Section 1.4. TASKBAR
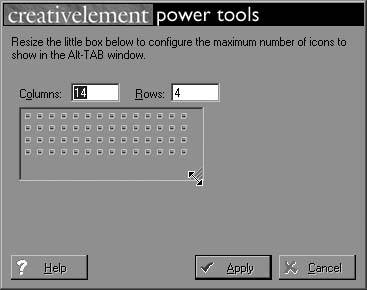
1.4.1. Customize the Alt-Tab WindowTHE ANNOYANCE: When I switch between programs using Alt-Tab, it's hard to tell which window is which. The icons alone don't provide enough information, and the Alt-Tab window is too small to show the entire title of each window. THE FIX: There are two ways to customize the Alt-Tab window. The first requires Creative Element Power Tools, available at http://www.creativelement.com/powertools/. Open the Creative Element Power Tools Control Panel, click the button next to "Change the size of the Alt-TAB window," and stretch the box to customize the size (Figure 1-14). Figure 1-14. You can change the size of the Alt-Tab window to make room for more icons and longer window captions.
If you want more than a larger Alt-Tab window, try Microsoft's free Alt-Tab Replacement PowerToy, available at http://www.microsoft.com/windowsxp/downloads/powertoys/xppowertoys.mspx. Once installed, it shows a preview of each window (Figure 1-15), rather than just the icon. Note: You can switch between multiple documents in the same application in a similar fashion, by pressing Ctrl-Tab or Ctrl-F6. Some applications (such as Word) show documents in separate windows, so they appear individually in the Alt-Tab sequence. Of course, this can be changed, too; in Word, for instance, select Tools  Options, and, on the View tab, uncheck the "Windows in Taskbar" box. Options, and, on the View tab, uncheck the "Windows in Taskbar" box.Figure 1-15. Replace the Alt-Tab window with this free PowerToy to see previews of open windows.
1.4.2. Ungroup Taskbar ButtonsTHE ANNOYANCE: At some point during the day, Windows starts adding little arrows to my Taskbar buttons and "grouping" my programs. Instead of being able to activate a window by clicking once, I now have to click two or three times to get the window I want (Figure 1-16). Make it stop! Figure 1-16. Windows consolidates task buttons to prevent the Taskbar from becoming crowded, but these groupings can be cumbersome to use.
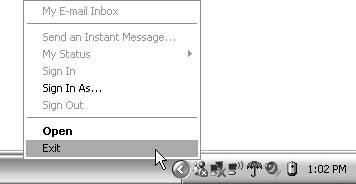
THE FIX: By default, Windows XP "groups" similar Taskbar buttons when the Taskbar gets full (when it's not full, the Taskbar behaves normally). To have the Taskbar work the same way all the time, right-click an empty area of the Taskbar and choose Properties. In the Taskbar tab, uncheck the "Group similar taskbar buttons" box. 1.4.3. Clean Out the TrayTHE ANNOYANCE: There's a bunch of junk in that little box to the right of my Taskbar, near the clock. I don't know what half the icons are for, and I think they're causing Windows to start more slowly. THE FIX: That little box is called the Tray (or sometimes the System Tray, Systray, or notification area). It's filled with icons representing currently running programs, most of which are probably unnecessary. And you're right: these programs slow down the Windows startup process, as each takes time to load and consumes precious memory. Note: To find out what a particular Tray icon is for, hover the mouse pointer over the icon for a few seconds until a little yellow "tooltip" appears. (Not all icons have these.) The problem is that removing a Tray icon varies from program to program. Most of the time, you can right-click an icon to exit the program (Figure 1-17), or even to change the setting that controls the icon so it won't load again. However, in some cases the program will reappear the next time you start Windows. To get rid of it permanently, you may have to hunt for the setting that controls whether or not the program starts with Windows. Look in the Startup folder in your Start menu, and if you find the Tray icon there, remove it. If you don't see it in the Startup folder, open the Registry Editor, navigate to HKEY_LOCAL_MACHINE\SOFTWARE\Microsoft\Windows\CurrentVersion\Run, and carefully remove the entry corresponding to the unwanted program. (For more tips on tidying your Tray, check out the sidebar "Hide Stubborn Systray Icons.")
Figure 1-17. You can right-click most notification icons to close or configure them.
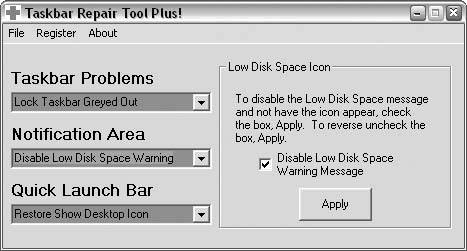
1.4.4. Customize the Start ButtonTHE ANNOYANCE: That big ugly green Start button is annoying. How can I make it look like an ordinary button, like in earlier versions of Windows? THE FIX: There's not much you can do about the Start button without changing the way the rest of Windows looks. If you prefer the no-frills Start button found in Windows 2000, Me, 98, and 95, open the Display control panel, click the Appearance tab, and choose "Windows Classic style" from the "Windows and buttons" drop-down. Of course, this will revert the rest of Windows to the older, simpler, non-XP style as well; unfortunately, you can't have the fancy new window style without the big ugly green button to go with it. 1.4.5. Move the TaskbarTHE ANNOYANCE: My Taskbar suddenly jumped to the side of my screen. How do I get it back on the bottom? THE FIX: To move it, just click an empty area of the Taskbar and drag the bar to a new location. The bar won't move with the mouse like windows do, but if you're patient and move the mouse far enough, the Taskbar will follow. (If it doesn't, right-click the Taskbar and turn off the "Lock the Taskbar" option.) To prevent it from moving again, once it's in place, right-click an empty area of the Taskbar and select "Lock the Taskbar." 1.4.6. Fix Taskbar BugsTHE ANNOYANCE: Certain elements of my Taskbarthings described elsewhere in this chapter, for instanceare either missing or grayed out. How come? THE FIX: This and related Taskbar glitches are caused by errant Registry entries and nasty bugs. Luckily, you can use the Taskbar Repair Tool Plus! (free, http://www.kellys-korner-xp.com/taskbarplus!.htm), shown in Figure 1-18, to fix these nagging problems. Among other things, the Taskbar Repair Tool Plus! can fix a grayed-out "Lock the Taskbar" command, recover missing minimized programs and a missing Start button, and squash more than a dozen other bugs relating to the System Tray and the Quick Launch toolbar. Figure 1-18. Use the Taskbar Repair Tool Plus! to fix a handful of Taskbar, Quick Launch toolbar, and Systray annoyances.
|


