Section 2.2. FILES
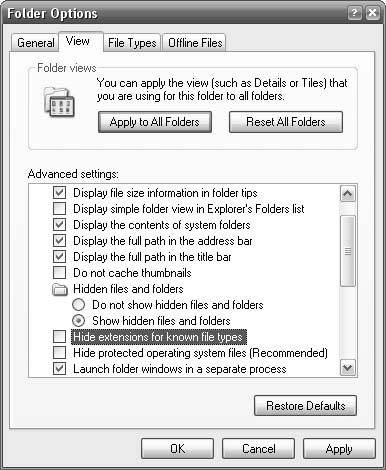
2.2.1. Show Filename ExtensionsTHE ANNOYANCE: I'm looking at a list of files, and I see several files with the same name. I can't tell my love letters from my hate mail! THE FIX: By default, Windows Explorer hides file extensions, the part of the filename after the last dot. For instance, a Microsoft Word file called Hi Grandma.doc will just appear as Hi Grandma in Windows Explorer. Naturally, this makes it indistinguishable from Hi Grandma.jpg (except, of course, for the tiny file icon). To make it easier to distinguish one file from another, open Windows Explorer, go to Tools Figure 2-12. Use Folder Options to show filename extensions so you can more easily work with your documents.
2.2.2. Choose Default ProgramsTHE ANNOYANCE: I like to double-click files to open them, as opposed to opening them from within an application. But sometimes when I double-click a file, the wrong program opens. How do I fix this? THE FIX: Right-click the file you'd like to open, select Properties, and click the Change button to choose a new default program for that type of file. If you don't see the program you want in the list, click the Browse button to locate the application's executable (.exe) file on your hard disk. Click OK in both boxes to confirm your choice. Note: The Windows Picture and Fax Viewer, the program that appears when you open image files, is a special case and usually won't release its hold on its file types, even when you choose a new default program. See "Down with the Picture and Fax Viewer!" in Chapter 3 for the fix. This doesn't mean you're stuck with a single program to open all files of a certain type, though; you can use the File Types window to assign several programs to each file type, and choose between them on the fly. In Explorer, go to Tools Figure 2-13. Use the Edit File Type window to associate several programs with a single type of file.
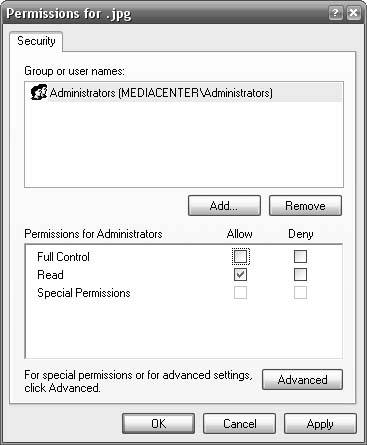
The Actions list shows the applications already associated with the selected file type. To add a new program to the list, click the New button. Type the name of the program in the Action field (e.g., Photoshop or Open with Photoshop), and then click Browse to select the application. Most of your installed applications will be located in the c:\Program Files folder, although most Windows components (such as Notepad) are located in c:\Windows\System32. Select the application's main .exe file, click the Open button, and then click OK. When you're done adding new actions, click OK in the Edit File Type dialog box and then the Close button in the Folder Options window. Now, right-click any file of the type you just customized (e.g., any JPG file). Your newly added actions will appear near the top of the context menu, and you'll be able to select "Open with Photoshop," for instance, to open the file with Adobe Photoshop, without having to make Photoshop the default application for JPG files. 2.2.3. Protect Your File TypesTHE ANNOYANCE: One of my programs keep selfishly reasserting itself as the default application for opening certain file types. Short of tossing the program, is there any way to prevent this from happening? THE FIX: Once you've gone to the trouble of customizing your file type associations, as described in "Choose Default Programs," the last thing you want is for some application to indiscriminately replace your settings. Although Windows doesn't provide any easy way to prevent this from happening, there are a few steps you can take if you're sufficiently motivated. First, open the misbehaving application (let's call it OmniPave) and disable any settings that look like "Check to see if OmniPave is the default" or "Check OmniPave file associations at startup." Consult the documentation that came with your software for further help. No luck? Here's one approach that only works in Windows XP Professional and Media Center Editions, and only if Service Pack 2 is installed. (Sorry, XP Home users.) While it may be overkill, it's effectively fool-proof. Open the Registry Editor (go to Start Right-click the .jpg key, select Permissions, and click the Advanced button. Uncheck the "Inherit from parent the permission entries that apply to child objects" box, click the Copy button when prompted, and then click OK. Back in the "Permissions for .jpg" window, shown in Figure 2-14, highlight the first entry in the "Group or user names" list, and uncheck the Full Control box in the Permissions list below. Repeat this for all the entries in the "Group or user names" list, and click OK when you're done. This effectively locks out all changes to this key, until you return to the Permissions window and reenable the Full Control option. Figure 2-14. Set restrictive permissions for Registry keys to prevent your file type associations from being overwritten.
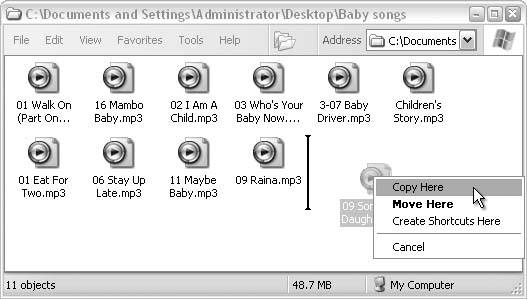
Now, with the .jpg key still highlighted, look at the (Default) value in the right pane. This value contains the name of another key in your Registry, which contains more settings that you'll need to lock down. For instance, if the (Default) value is set to jpegfile, you'll have to navigate to HKEY_CLASSES_ROOT\jpegfile and set the permissions for this key as described above. Repeat the process for any other file types you'd like to protect, and close the Registry Editor when you're done. From now on, Windows will not permit any application to modify these keys, thus protecting your file types. Of course, it remains to be seen how your applications react; a program may crash after being denied access to the Registry, but most will likely ignore the error and load normally. Note: If you have Windows XP Home Edition, you can't set any permissions on your Registry keys. But you can still create manual backups of your favorite file types by selecting them in the Registry Editor, going to File  Export, and saving each key in its own file. If your file types are ever overwritten, just double-click the .reg files you created to restore your backups. If you don't feel comfortable messing with the Registry, the QuickAssociation utility (free, http://www.pcmag.com/article2/0,1895,1654639,00.asp) can back upand lock downfile types you've spent time customizing. Export, and saving each key in its own file. If your file types are ever overwritten, just double-click the .reg files you created to restore your backups. If you don't feel comfortable messing with the Registry, the QuickAssociation utility (free, http://www.pcmag.com/article2/0,1895,1654639,00.asp) can back upand lock downfile types you've spent time customizing.2.2.4. Predict Moves and CopiesTHE ANNOYANCE: Sometimes when I drag a file, it gets copied. Other times, it gets moved. It doesn't really make sense. How can I predict what will happen, and more importantly, how can I choose? THE FIX: The problem is that drag and drop works differently in different situations. If you drag a file or folder from one place to another on the same physical drive (e.g., from c:\docs to c:\files), the object is moved. If you drag an object from one physical drive to another physical drive (e.g., from c:\docs to d:\files), the object is copied, resulting in two identical files on your system. (There are other specific exceptions, most too obscure to mention here.) Note: If you press Ctrl or Shift before you click, Windows may assume you're using these keys to select multiple files. If Explorer isn't behaving as you expect, make sure to press these keys only after you've started dragging, but before you let go of the mouse button. Fortunately, you can control what happensregardless of the drives in questionby using a combination of keystrokes. To copy an object in any situation, hold the Ctrl key while dragging. To move an object in any situation, hold the Shift key while dragging. To help you out when you're dragging files, Explorer provides some visual feedback. If there's a tiny plus sign (+) next to the mouse pointer, the files will be copied; if there's a curved arrow, Explorer will create shortcuts to the files. A standard, unadorned arrow means the files will be moved. To choose what happens to dragged files each time without pressing any keys, drag your files with the right mouse button. When you release the button at the destination, a special menu will appear (see Figure 2-15). Select the action you want (Copy Here, Move Here, or Create Shortcuts Here), or click Cancel to abort. Figure 2-15. Drag files with the right mouse button to choose whether they get moved or copied.
2.2.5. Copy Files to a Hidden DestinationTHE ANNOYANCE: Dragging and dropping has become a real drag. Every time I want to move a file, I have to open the destination folder first, and then fuss with the windows until the file and the destination are both visible simultaneously. Is there an easier way to do this? THE FIX: Actually, there are several! The first requires a little patience. Drag the file over to Explorer's folder tree, and hover the pointer near the top or bottom of the tree; with a steady hand, you can make Windows Explorer scroll the tree. Once the desired folder comes into view, hover the file over the folder until it expands (this usually takes a second or two). Keep doing this to dig down to the appropriate subfolder if necessary, and release the button when the destination is finally visible to drop the file into place. Another method uses good ol' copy and paste. Right-click the file (or files) you want to copy, and select Copy (or Cut, if you want to move the file). Open the destination folder, right-click an empty area, and select Paste. Note: The keyboard shortcuts for the cut, copy, and paste operations are Ctrl-X, Ctrl-C, and Ctrl-V, respectively. If you prefer to use the mouse, use the Copy To, Paste, and Move To buttons on the Explorer toolbar (if it's visible). Better yet, use a program like Creative Element Power Tools (http://www.creativelement.com/powertools/), which comes with a Move To/Copy To tool you can use by right-clicking, and even lets you create new folders on the fly. |


