Section 3.2. SOUND AND MUSIC
3.2.1. Choose an Input SourceTHE ANNOYANCE: I installed some dictation software and connected a microphone, but I'm not capturing any sound. I know my family is sick of my incessant griping, but I thought my computer liked me! THE FIX: Open the Windows Volume Control (double-click the speaker icon in the Windows System Tray or go to Start When you return to the main window, now titled Recording Control, place a checkmark in the Select box in the Microphone column (Figure 3-11), and then move the Volume slider so that it's somewhere in the middle. Figure 3-11. If your microphone doesn't appear to be working, make sure it's the active recording input.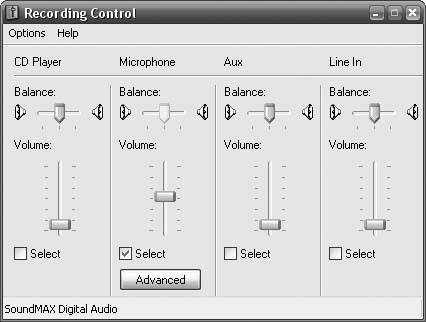
Note: For best results with voice-dictation software, use a USB microphone/headset instead of the conventional setup that plugs directly into your sound card. Not only will the quality and clarity improve, but you'll bypass troublesome sound card drivers. If your dictation software lets you choose the recording source, make sure you select the same device you picked in the Windows Volume Control. Still no sound? Run the calibration utility that came with your dictation software to ensure that the recording volume is set correctly. If all else fails, replace the microphone. 3.2.2. Let There Be SoundTHE ANNOYANCE: I can't hear any sound coming from my speakers. All I can hear now are the voices in my head. THE FIX: Some might consider this a blessing; the incessant sounds that come from computers can drive anyone completely crazy… But if you absolutely must have sound, check the most obvious (and most overlooked) factor firstcabling. Make sure the cable that connects your speakers to your sound card is properly connected. Likewise, make sure your speakers are plugged into the AC and turned on, with the volume up. If this doesn't solve your problem, try the following tips. Open the Sounds and Audio Devices control panel. In the "Device volume" section, make sure the Mute box is not checked, and drag the Device volume slider so that it's somewhere in the middle. Next, click the Advanced button to open the Windows Volume Control. Select Options Back in the Play Control window (see Figure 3-12), make sure that none of the controls are muted and all of the volume control sliders are turned up. If you still don't hear sound at this point, click the Advanced button, center both the Bass and Treble controls, and make sure the Digital Output Only box is not checked. Figure 3-12. Most sound problems are caused by incorrect settings in the Windows Volume Control.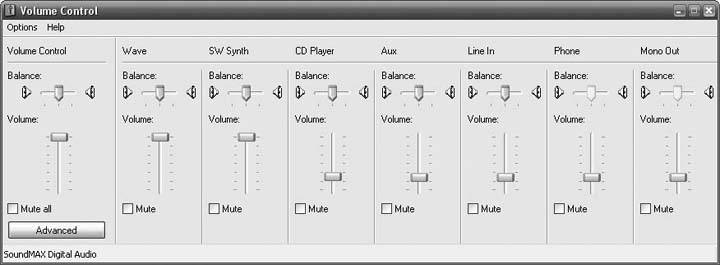
Back in the Sounds and Audio Devices Properties window, click the Audio tab, and in the drop-down menu in the "Sound playback" section, choose your sound card; there may be more than one device listed here, but only one is likely connected to your speakers. Click Apply and try again. If you don't hear anything, click the Advanced button (still in the "Sound playback" section), choose the Performance tab, and drag the Hardware acceleration slider to the left to increase compatibility. Click OK and then Apply when you're done. Still no decibels? Check your sound card driver; visit the card manufacturer's web site and download and the latest driver. (If you're not sure what sound hardware you have, choose the Hardware tab in the Sounds and Audio Devices Properties window for a list.) Also, run Windows Update to make sure you have the latest sound-related updates and DirectX drivers (also available at http://www.microsoft.com/directx/). 3.2.3. Fix Silent CDsTHE ANNOYANCE: I can hear sounds in games and web pages, but I hear nothing when playing music CDs. THE FIX: First, check the Windows Volume Control to make sure that your CD drive isn't muted and that the volume is cranked up high enough (see "Let There Be Sound" for details). If audio CDs remain silent, check your audio cables. Unlike sounds generated by your PC, the audio from music CDs is routed from your CD drive directly to your sound card by a special cable, like the one shown in Figure 3-13. (You'll find the cable only in desktop PCs; don't go looking for one in your laptop.) Make sure the cable is securely connected to both your CD-ROM drive and your sound card or motherboard; try replacing the cable if all else fails. Figure 3-13. If you can't hear audio CDs, this cable may be missing or improperly connected.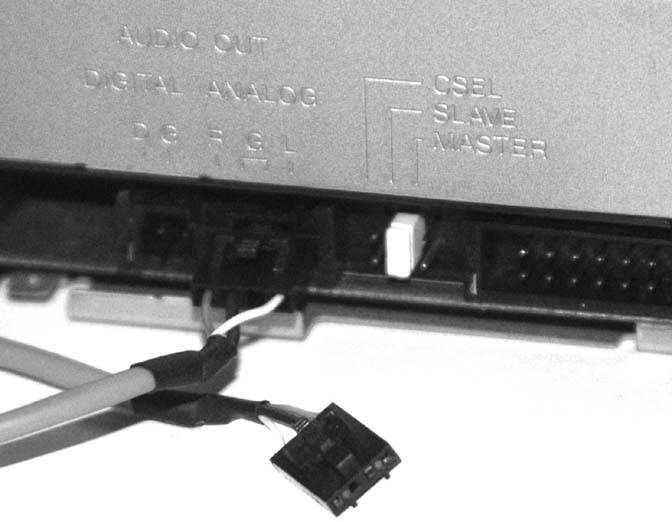
3.2.4. Play Music at the Correct SpeedTHE ANNOYANCE: No matter what sound I play, it sounds like Alvin and the Chipmunks. Only audio CDs play normally, including, ironically, my Alvin and the Chipmunks Greatest Hits: Still Squeaky After All These Years CD. THE FIX: This behavior is probably caused by a timing problem (big surprise) with your sound card's clock. This can usually be fixed by adjusting your sound card's hardware acceleration. Open the Sounds and Audio Devices Properties window in the Control Panel, and on the Volume tab, click the Advanced button in the "Speaker settings" section. Click the Performance tab, and drag the Hardware acceleration slider to the left one notch (see Figure 3-14). Click OK, and then click Apply. Play the sound again, and if it's still too fast, lower the Hardware acceleration setting further. Figure 3-14. Adjust the Hardware acceleration slider to solve sound corruption problems.
Other sound corruption problems can be fixed by turning off the equalizer settings in your music player. In Windows Media Player, for example, go to View Whether or not these adjustments fix the problem, this is not the behavior of a properly functioning sound card. Make sure you have the latest drivers, and consider replacing the card (or sending in your PC for repair) if nothing else works. 3.2.5. Get Crossfades WorkingTHE ANNOYANCE: I use Windows Media Player, and I can't seem to get my music to crossfade. I can't tolerate dead air. THE FIX: Crossfading eliminates the silent gaps between two songs by fading in the next song while the current song is ending. To enable crossfading in WMP, go to View Figure 3-15. Crossfading, which overlaps songs to reduce dead air, only works in certain circumstances.
Note: It's also possible that crossfading is actually working, but you can't tell because your music files have more than a few seconds of silence at the beginning or end. To see if this is what's happening, play a few songs that don't begin or end in a fade. You can also help compensate for this by moving the crossfade slider to the right to increase the amount of overlap. Crossfading works only on data files (such as MP3 or WMA files), and then only with songs encoded with the same sampling rate (e.g., 192 kbps or 256 kbps). Crossfades won't work if you are playing a standard audio CD, or a data CD that was originally burned with Windows Media Player. For more competent crossfading, try a different music player, such as WinAmp (free, http://www.winamp.com) or even Apple's iTunes (free, http://www.itunes.com). 3.2.6. Extract Sound from a VideoTHE ANNOYANCE: I downloaded a music video that plays fine in Windows Media Player, but my portable MP3 player won't touch it; it only plays strict music files. THE FIX: Use the Windows Media Stream Editor, a component of the Windows Media Encoder (free, http://www.microsoft.com/windows/windowsmedia/9series/encoder/), to extract the audio from a .wmv video file and save it into a standalone Windows Media Audio (.wma) file. First, open the Windows Media Stream Editor, shown in Figure 3-16, and click Add Source. Open the .wmv file, and expand the branches by highlighting the file in the list and pressing the asterisk (*) key. Check the box next to the Audio entry and click the Add button. Then, click Create File, supply an output filename, and click Save. When you're ready, click Start to begin the extraction. When the process is complete, you'll have a standard .wma file; see the next annoyance for ways to convert it to MP3 or any other format, if necessary. Figure 3-16. Use the Windows Media Stream Editor to extract audio tracks from video clips.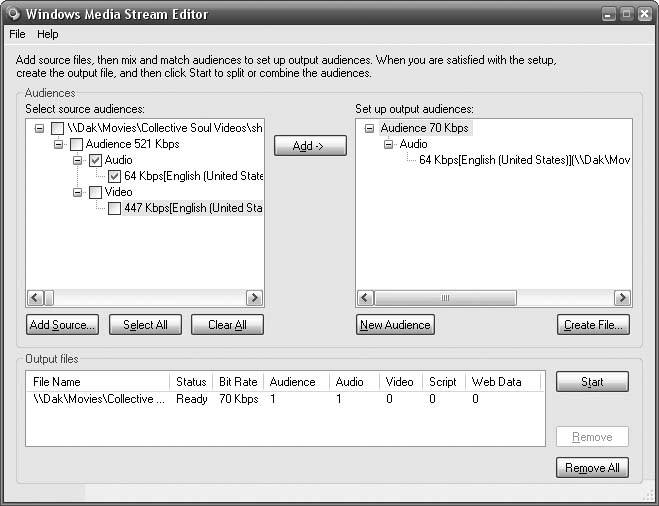
Note: Converting from one format to another involves recompressing the audio, which reduces sound quality. So, when you first rip your music from CD or purchase it online, choose a format you won't have to convert later. Many people choose the MP3 format because almost every music player supports it, even though some other formats offer slightly better quality and/or smaller file sizes. 3.2.7. Convert Audio FilesTHE ANNOYANCE: I have a bunch of music in one audio format, but my music player won't play them. THE FIX: Unless there's a specific patch or upgrade for the player that adds support for your file type, you'll probably have to convert your files to a format your player recognizes. For instance, the iTunes Music Store only distributes music in the copy-protected AAC (.m4p) format, which only works on Apple's iPod music player. And the iPod itself can't play files in Microsoft's .wma format. To convert an audio file from one format to another, you could open the file in a full-blown sound-editing application such as Sound Forge ($319.96, http://www.sonymediasoftware.com/download/step2.asp?DID=559), but there's a cheaper and easier solution if all you're doing is format conversions. You can download Apple's iTunes software (http://www.apple.com/itunes/) for free, even if you don't have an iPod or plan to buy music from the iTunes Music Store, and it can convert songs easily and quickly (Figure 3-17). iTunes supports MP3 (all bitrates), AAC (.m4p, .m4a, and .m4b), AIFF, Apple Lossless, and WAV formats. Figure 3-17. Use Apple's free iTunes software to quickly convert audio files from one format to another.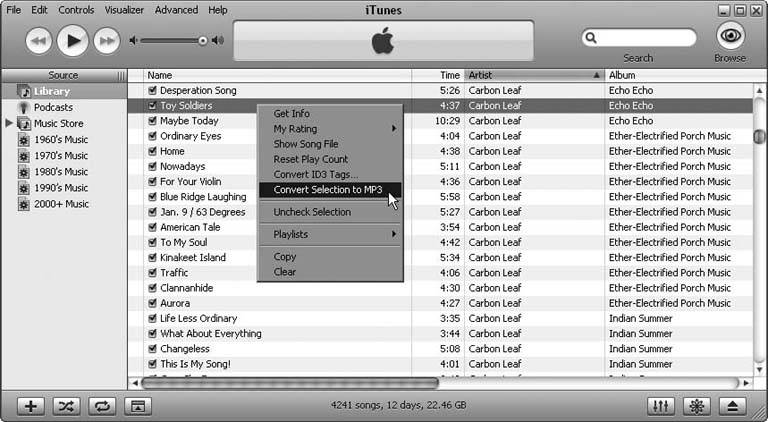
To convert your files, first start iTunes, and select Library on the left. Then drag and drop your music files onto the iTunes window. (If you move the files into your iTunes music folder before dragging them into the iTunes application, iTunes will, by default, organize them into folders based on their embedded tag information.) Next, select Edit 3.2.8. Fix MP3 TagsTHE ANNOYANCE: I've gone to a lot of trouble to name my song files, but Windows Media Player ignores the song titles and artist names when I play my music. What gives? THE FIX: Windows Media Player and other music players usually don't pay any attention to filenames, but rather look for information in ID3 tags that are embedded in the music files. The vast majority of music players support ID3 tags, which store information about the artist, track, album, year, genre, and about a hundred other things. In fact, most ripping programs will identify the CD you're ripping by its serial number, go online and fetch the relevant ID3 information, and embed that information in the MP3 files the program generates. To get your music player to display and organize your music properly, you'll have to properly tag your music files. Most music players allow you edit ID3 tags, and even Windows Explorer lets you edit a file's tag information by right-clicking, selecting Properties, choosing the Summary tab, and clicking Advanced. Windows Media Player (via the Advanced Tag Editor feature) and iTunes let you modify the tags of several files at once, but with a big stack of files you'll need more power. At this point, you should turn to Ultra Tag Editor ($19.95, http://www.atelio.com), which can scoop up the information in your filenames and plug it into the files' ID3 tags; it can also clean up existing tag information and even use the tags to create new names for your music files. To fix your tags, open Ultra Tag Editor, use the tree to navigate to the folder containing your files, and place checkmarks next to the specific files you want to fix. Choose the Ultra Tagger tab below, and then select "Generate Tag from Filename" from the Action listbox (Figure 3-18). Figure 3-18. Use Ultra Tag Editor to generate MP3 tags from filenames.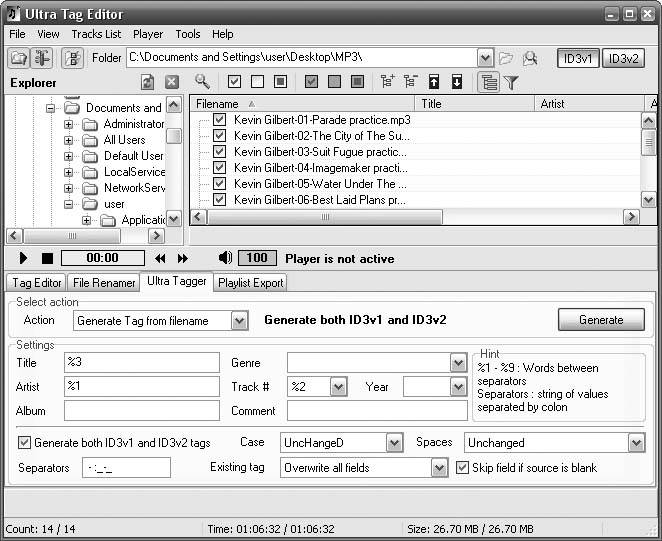
Now, Ultra Tag Editor needs you to tell it where in your songs' filenames to find the artist name, track title, track number, album name, and so on, so you'll need to examine the filename of a typical music file on your hard disk, which might look something like Artist-Album-Title.mp3. First, determine the delimiter used to separate the information in your filenamesa hyphen (-), in this caseand type it into the Delimiters field. Next, type %1 into the field containing the first piece of information (e.g., Artist), %2 into the field containing the second (e.g., Album), %3 into the third (e.g., Title), and so on. (Imagine that your filenames look like %1-%2-%3-%4….mp3.) When you're done, click the Generate button to preview the new tags, and click Write Tags to commit. Note: Although programs such as Ultra Tag Editor are flexible, they assume that your filenames all follow the same naming convention (e.g., ArtistAlbumTitle.mp3). If you use a mish-mash of different filenaming conventions, you can use a program such as Power Rename (part of Creative Element Power Tools, available at http://www.creativelement.com/powertools/) to homogenize your filenames rather than hand-renaming hundreds of individual files. 3.2.9. Connect to Your MP3 PlayerTHE ANNOYANCE: Windows Media Player won't recognize my portable MP3 player. THE FIX: Your music player should've come with its own drivers and software, which you can use to add or sync music and otherwise configure the player. The iPod, for instance, uses the iTunes software (available at http://www.apple.com/itunes/), while the Phatbox uses the Phatnoise Media Manager (available at http://www.phatnoise.com/downloads/). Visit the web site of the manufacturer of your music player for the latest version of the required software. Now, if you're not terribly fond of the software you have, or if you don't want to abandon your meticulously organized Windows Media Player library, you can visit http://www.playsforsure.com to see if Windows Media Player supports syncing directly with your device, either as-is or with a firmware upgrade. If your player isn't on the list (many aren't), you're stuck with the software you've got. Your last hope: the manufacturer may have included drivers that make your player act like a removable hard disk, allowing you to add music simply by dragging files in Windows Explorer. 3.2.10. Iron Out License IssuesTHE ANNOYANCE: I'm trying to play some music, but Windows Media Player keeps complaining about licenses. I'm tired and I just want to hear the Bee Gees! THE FIX: Music that you purchase online is usually copy-protected, which means you can only play the tunes on the computer where you originally bought them. If you change computers, or even upgrade certain hardware components (like your hard drive), Windows may think you're trying to get around the copy protection and will refuse to play the music. If you're prompted to "migrate" a license, you'll be able to play the file on another computer. Beware, though, that you can only migrate a license for a given file 10 times; thereafter, the file can't be played. For this reason, you should frequently back up your licenses by selecting Tools Note: If you get a licensing error for songs you ripped yourself with WMP, you likely ripped them with the "Copy protect music" option enabled. Although there's no officially sanctioned way to remove copy protection from your songs, you can prevent newly ripped songs from being protected. Select Tools  Options, choose the Rip Music tab (Copy Music in WMP 9.0), and uncheck the "Copy protect music" box. Options, choose the Rip Music tab (Copy Music in WMP 9.0), and uncheck the "Copy protect music" box.Figure 3-19. Back up your Digital Rights Management licenses to prevent licensing problems later on.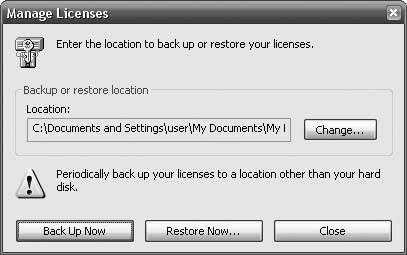
If you purchased the music online, Windows Media Player can attempt to acquire a new license for you. Select Tools If you get an error stating that your licenses are corrupted, you may be able to fix the problem by deleting your license database. First, back up your licenses. Then open Windows Explorer, navigate to \Documents and Settings\All Users\DRM, and rename the DRM folder to DRM.backup. (Note that this is a hidden folder; see Chapter 2 for instructions on displaying hidden files and folders.) Return to Windows Media Player and use the Restore Now button to restore your licenses, which recreates the database. |


