Hack 77 Top Screenshot Tips
![]()
![]()
Capture any XP screen or portion of a screen and control the file format and output using these screen-capture tips.
Capturing good screenshots in XP takes a bit of work. If all you want to do is capture a screen for later reference, and don't care about the file format of the capture, and don't need to capture the cursor or only part of the screen, you can use XP's built-in capture capabilities. But if you need to create documentation, are a professional writer, an artist, or are a student preparing a term paper and need to get great-looking screenshots, you'll have to use a third-party program.
These screen-capture tips will help you capture just about anything you want, using built-in or third-party tools.
8.6.1 Built-In Screen Capture
XP comes with a built-in capability for capturing screenshots, though it's about as basic as screenshot capture gets. To capture an entire screen, press the Print Scrn button. To capture only the active screen, press Alt-Print Scrn.
Pressing
those keys captures the screen to the
Clipboard [Hack #73], but
you'll have to paste the screen into a
graphics program in order
to save it. Use your favorite graphics program, such as Paint Shop
Pro [Hack #86], or use
XP's built-in Paint program by
choosing Start 


If you have
Microsoft Office, a
better bet than Paint is pasting the screen into Microsoft Photo
Editor (Start 


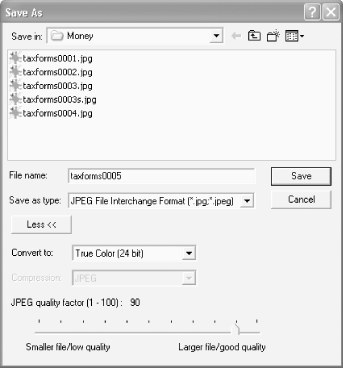
Figure 8-12. Saving screen captures with Microsoft Photo Editor

8.6.2 SnagIt
XP's built-in capture tool, while effective, has several drawbacks. It won't capture the cursor or portions of the screen, for example. To do that and more, get the ultimate screen capture tool, SnagIt from TechSmith (http://www.snagit.com). It's shareware and free to try, but it costs $39.95 if you decide to keep it. In addition to letting you capture the cursor and any portion of a screen, it will capture an entire scrollable area?such as a scrolling web page?gives you a wide variety of options for customizing file formats, and it will capture a screen and send it to the printer or a web page.
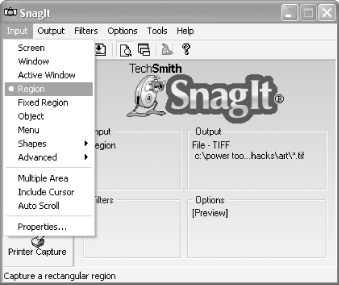
First, choose what you want to capture?the entire screen, the active window, a portion of the window and so on. Also, configure whether to capture the cursor. Figure 8-13 shows you the SnagIt menu options for capturing a screen.
Figure 8-13. SnagIt screen-capture options

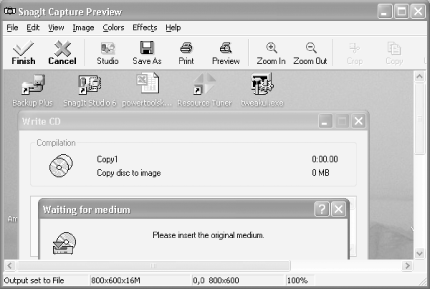
Next, set up the screen you want to capture and press SnagIt's hot key for screen capture. (The default is Ctrl-Shift-P, but you can change it.) If you've chosen to capture an area of the screen, you'll be able to define it using SnagIt's capture tools. If you've chosen the option of capturing a screen that scrolls, click on the scroll bar of the screen. Once you have the area you want, you get a preview of the screen, as shown in Figure 8-14. You can zoom in and out on any area of the screen to make sure it's what you want. When you decide the screen is what you want, click Finish, select a file format, name, and location, and you're done. To customize your graphics format?for example, to choose JPEG compression or change the color depth?click on the Options button that appears when you save a file, and make your choice.
Figure 8-14. Previewing your screenshot with SnagIt

8.6.3 See Also
If you want to capture onscreen actions such as mouse movements, menu choices, and anything else you do on your PC, use the free CamStudio (http://www.atomixbuttons.com/vsc/), which will record all your actions and save it as a video file in either Windows .avi video format or Flash .swf format.


