Mastering Permissions and Accounts
Mastering Permissions and Accounts
By now you should have a pretty good handle on the way Mac OS X organizes files, accounts, and permissions. While much of the book from here on out is oriented towards showing you how to do things, doing most of those things will be easier, and understanding why and how you're doing them will be easier, now that you understand the underlying structure. The rest of this chapter will provide some hands-on opportunities, as I discuss everything from creating and editing user accounts to creating groups and using group permissions, from working with the root account to dealing with permissions problems.
Creating, Editing, and Deleting User Accounts
When you first installed Mac OS X or first booted your Mac, you were asked for a name and password; whether you realized it or not, you were actually creating your first user account. That account was automatically given administrative access and, if your first Mac OS X installation was 10.2 (Jaguar) or later, was set to auto-login (meaning you're not prompted for your name and password at startup). Since that time, you may have continued to use your Mac as the sole user, in which case you're in the market for some additional user accounts like those mentioned in "Other Uses for User Accounts." Or you may have already set up other accounts for family or coworkers, in which case you want to know more about the options available to you (especially since OS X 10.2 and later have provided a number of additional account options over 10.1.x). In this section I'm going to explain how to create new accounts, edit existing accounts, and delete unwanted accounts. Even if you've already created accounts in OS X, you may find some of the details and tips interesting.
Creating User Accounts
|
User Level: |
admin |
|
Affects: |
individual users |
|
Terminal: |
no |
In order to create a new user account in Mac OS X, your own account must have admin access. You create new user accounts using Accounts panel of System Preferences; in the Accounts panel, you select the Users tab. (In versions of OS X prior to 10.2, Users was a separate preference panel.) To add a user, simply click the New User… button (you may be asked to authenticate before you can make any changes; if so, enter your username and password). A new user account info window will drop down (Figure 1.5) and you will be asked to complete the fields presented:
-
Name The user's full name.
-
Short Name A short version of the user's name; this will also be the name of their user folder in /Users.
-
New Password The password you give the new account. If the account is for another person, they will be able to change it.
-
Verify Enter the password a second time to verify it; if this field and the Password field do not match, you will be asked to type both over again until they match.
-
Password Hint (optional) You can supply a hint for the given password in case the user forgets it. This hint will be shown only if you've selected the Show password hint… option in the Login Options tab.
-
Picture You can choose a login picture for the account. If you have selected to display the Login window as a list of users (via the Login Options tab), each user's account will be represented by their full name and the picture selected here. You can choose a picture from the list, or you can choose your own custom picture by browsing your hard drive or dragging the picture to the window.
-
Allow user to administer this computer If checked, the new user will have full admin access. Use this option sparingly and only with people you trust to do the right thing (and not to do the wrong things) with such access.
-
Allow user to log in from Windows If you have Windows Sharing set up (for more details see Chapter 10), checking this box will allow the new user to connect to your computer from a Windows computer.
 Figure 1.5: Creating a new user account
| Note |
In versions of OS X prior to 10.2, the short username was limited to eight characters or less in length, and those characters were limited to a relatively small character set. However, in OS X 10.2 and later the short username can actually be up to 255 Unicode characters, greatly expanding both the length and the variety of possible characters that can be used (and making the term "short username" a bit of a misnomer). That said, since you're going to be typing your short name quite often (dialog boxes, file paths, etc.), I recommend keeping it a short name, and using characters that are easy to type. I also recommend avoiding punctuation, especially spaces, in short usernames, as they can cause problems. |
When you've finished, click the Save button to create the new user account. You'll notice that a new user account is visible in the Accounts window, and, if you check, you'll find that a new folder has been created in /Users, with the new user's short username as its title . If you log out, the new user (or you) can then log in under the new account.
There is one other thing left to do before the new account setup is complete. If the new user is not an admin user, you can also choose to restrict the user's abilities. To do so, click on the Capabilities… button. A new window is presented with a number of options (Figure 1.6). While most are self-explanatory, a few deserve a bit more attention.
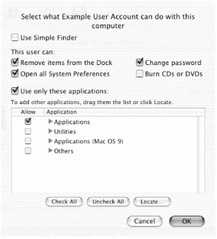
Figure 1.6: Limiting the capabilities of a new user
-
Use only these applications If this option is selected, you can control which applications in /Applications the user can access; which utilities in /Applications/Utilities the user can access; which OS 9 applications in /Applications (OS 9) the user can launch (if that folder is present on your Mac); and any other applications located elsewhere (Others). You can choose to allow or disallow each category, or you can click the disclosure triangle next to a category to select particular applications. In addition, you may find that some applications aren't listed; to add them to the list, click the Locate… button at the bottom of the window and browse your hard drive to find them. (This is also a good way to add applications stored on other partitions or volumes.)
-
Simple Finder This option lets you provide extremely limited access along with a very simple interface (for children or users who are not very comfortable with computers). The Desktop will be completely empty (it will not even show the hard drive). The Apple menu will be limited to just two commands: Sleep and Log Out… The Dock will include only the Trash, the Finder, and three folders: My Applications, Documents (for saving documents), and Shared (the Shared user folder, for saving or opening shared documents). Clicking one of these folders in the Dock brings up a window in "button" mode—documents and applications are represented by large icons, and a single click opens or launches them. The contents of My Applications is defined by you, the administrator; when you select the Simple Finder option, the Use only these applications option in the Capabilities window changes to Show these applications in My Applications folder. Just as you could limit the applications available to a user in standard Finder mode, selecting applications here lets you choose whether or not the user even sees them. Finally, if you've allowed the user to open System Preferences, only a few of the panels will actually be accessible: the Personal panels, as well as Sound and Universal Access.
| Note |
The applications displayed in Simple Finder mode's My Applications window are actually aliases inside the folder ~/Library/Managed Items/My Applications (inside the home folder of the affected user, not the administrator). When an admin enables an application for the user, OS X automatically places an alias to that application in this folder; likewise, disabling an application will result in the alias being removed. |
Editing User Accounts
|
User Level: |
admin |
|
Affects: |
individual users |
|
Terminal: |
no |
Editing user accounts is also done using the Accounts panel of System Preferences. You simply select a user account, and then click either the Edit User... button or the Capabilities... button, depending on whether you want to edit the account itself or the user capabilities for that account. However, while this System Preferences panel is available to all users, how much of an account's settings can be modified depends on user level:
-
Normal users Assuming an administrator has not limited their capabilities (as previously described), normal users can edit their password, their password hint, and their login picture. They cannot change their own capabilities, nor can they change their Name or Short Name.
-
Admin users Users with admin status can edit all capabilities of other users, as well as every field in the Edit User… window except for Short Name.
| Note |
Once you've created an account, its short name cannot be changed easily. Since the short name is not only a login name but also a directory name (the name of the user's home folder), the OS makes it difficult to change. If you'd like to edit the short name of a user account, see "Why Did I Ever Pick That Name?" later in this chapter. |
Deleting User Accounts
|
User Level: |
admin |
|
Affects: |
individual users |
|
Terminal: |
no |
At some point you may want to delete a user account. Perhaps the user is no longer employed at your company, maybe your friend or relative doesn't use your computer anymore, or maybe you've just been creating new accounts as an exercise as you've been reading this chapter. For whatever the reason, the need sometimes arises to wipe an account off of your computer.
Like creating and editing user accounts, deleting a user account starts in the Accounts pane of System Preferences. However, it doesn't end there. Since each account has its own home folder replete with settings, documents, and any other files or applications the user placed or saved there, deleting a user account runs the risk of losing anything inside that user's home folder. Luckily, as you'll see in a moment, OS X has a mechanism for avoiding this potentially problematic situation.
To delete a user account, first select the user you wish to delete and click the Delete User… button. As soon as you do so, a window will pop up asking if you're sure this is what you want to do. It also tells you that if you do delete the account, the contents of that user's home folder will "be put in a file in the Deleted Users folder" (Figure 1.7).

Figure 1.7: Deleting a user account
When you click OK, the account will be removed from the list of accounts. But what about that new file the warning box told you about? In the Finder, navigate to the /Users directory; in addition to the home folders of the user accounts that still exist on your computer, there is now a new folder, Deleted Users. Inside, you'll find a disk image called deletedusername.dmg (it's not actually called that, of course; deletedusername is the name of the user you just deleted). If you double click the file, Disk Copy will launch and mount the image in the Finder. The mounted disk contains the contents of the deleted user's home folder, so you, as the administrator, can copy any documents or files you or the previous user wish to preserve, burn to CD, or drop in another user's Public folder. Once you've done this, you can unmount the image, then trash the image file itself. At that point, the entire user account is gone forever.
Unfortunately, even though you can delete the image file, you can't delete the Deleted Users folder from the Finder, as it is technically owned by the root account. If you're a neat freak like me, and you really want to get rid of that folder, launch Terminal and type the following command (make sure you've checked the folder and you don't want anything inside, as this command will permanently delete it and any contents): sudo rm -rf '/Users/Deleted Users' <RETURN>. You'll be asked for your password; enter it and hit return. The folder is gone for good!
| Note |
In OS X 10.1.x, deleting a user account doesn't provide the same nice, neat "disk image" solution; instead, OS X renames the user's home folder username Deleted, leaves it in the /Users directory, and transfers ownership of the folder to an administrator (you choose which one). The administrator who gains ownership should then go through the Deleted user folder and save or delete the contents as needed. However, just as you can't delete the Deleted Users folder from the Finder in OS X 10.2 or later, you cannot delete the username Deleted folder in 10.1.x. The Terminal command to do this is: sudo rm -rf '/Users/username Deleted' <RETURN>, where username Deleted is the name of the folder you wish to delete. |
Getting to the Root of It: The Root Account
I mentioned in "User Levels" that in addition to normal user accounts and admin user accounts, there is a third user level, root. (The root account is also often called the superuser; while there is technically a difference between the two, for most intents and purposes they are one in the same.) While you can have as many normal and admin accounts as you like, you can only have one root account and it's called just that: root. You can't edit it or delete it; the most you can do is turn it on or off—and only if you have admin access. While it's possible to log in as the root user, you definitely don't want to do so unless you have a specific reason to.
Why all the limitations? Quite simply, the root account is too powerful. It is unhindered by permissions; it can move, edit, delete, copy, trash, view, and open at will. (More accurately, the root account in OS X honors permissions, but can change them without restriction, meaning the root account can do as it pleases quite easily.) While this is helpful at times when you need to do something you don't normally have the ability to do, it's also extremely dangerous. The root user can view the contents of all user folders. It can add to, edit, or remove contents of /System . In fact, it can even (accidentally or on purpose) move the entire /System directory to the trash. Do you really want to have that much power? I sure don't, and I don't recommend you do, either, at least not on a regular basis.
In addition, if you do decide to enable the root account, for all the reasons I mentioned previously, you really don't want to make it easy to log into. First, anyone who walks up to your computer could log in as root if they found out your password. Second, even if your Mac is physically secure from unsavory characters, if it's connected to the Internet and you have any sort of remote access or sharing enabled, anyone in the world with Internet access who discovers your password will have full access to your computer. Needless to say, neither of these situations is good. Have I impressed on you enough why root access is a bad idea? If so, then you're ready to learn how to use it.
There are actually three ways to gain root access. You can temporarily gain root access in Terminal from an admin account in order to issue commands as the root user. You can temporarily launch applications as the root user from any admin account. Finally, you can enable the root user account and actually log into your Mac as root.
Temporary Root Access in Terminal: sudo
|
User Level: |
admin |
|
Affects: |
NA |
|
Terminal: |
yes |
If you need to do something in Terminal that requires root access, there is a command called sudo (short for switch user and do or superuser do), only available to admin-level users, that provides temporary root access in the Terminal. Any commands you issue via the sudo command will be free of the restrictions that your user account usually has. There are actually a couple of ways to use the sudo command.
Run a Single Command Using sudo
By preceding a Terminal command with sudo, you actually run that command with root access. Before the command executes, you will be asked for your password (enter your personal account password) to authenticate. This is a useful procedure for moving or deleting a file that is owned by root. If this sounds familiar, it should—we used it earlier when we deleted the Deleted Users folder (Figure 1.8). The sudo command actually has a built-in "authentication timer"; once you've entered your password to authenticate the sudo command, you can continue to issue commands using sudo without being required to provide your password. However, once you've stopped using the sudo command for about five minutes, your authentication period expires, at which point you'll be back to your old, boring self.
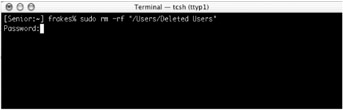
Figure 1.8: Using sudo to execute the rm (remove) command on a protected file
Run an Entire Terminal Session as sudo
If you know you're going to be using a lot of commands that might need root access, you can tell Terminal to maintain your temporary root access until you exit the session. To do this, type: sudo -s <RETURN>. You will be asked for your password (enter your personal account password). Once you have authenticated your account, you will have root access until you end your session (by typing exit <RETURN>). What you will notice is that after issuing the sudo s command, instead of your Terminal prompt using your username, it will now say root# (Figure 1.9).
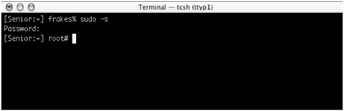
Figure 1.9: Running a Terminal session as root using sudo -s
Because you have so much power when using sudo, make sure you type what you mean to type. Word processors can correct typos; Terminal can't. Terminal interprets commands literally; if you accidentally mistype something, and the mistyped command still works, it will be executed. Take, for example, the Terminal command we used earlier:
sudo rm -rf '/Users/Deleted Users' <RETURN>
This command can also be written as:
sudo rm -rf /Users/Deleted\ Users <RETURN>
I'll talk more about this in Chapter 15, "Utilizing UNIX", but for now, you'll have to trust me that the two are the same. Now, suppose that you accidentally type:
sudo rm -rf / Users/Deleted\ Users <RETURN>
Notice the space between / and Users? Terminal notices, and the resulting command will erase your hard drive. I'm not kidding.
The moral of the story is: when using root access in Terminal, don't mistype. Or use rm -ri instead of rm -rf; the former will ask you to confirm each file it attempts to delete.
Temporarily Running Applications as Root
|
User Level: |
admin |
|
Affects: |
NA |
|
Terminal: |
yes/no |
There are times when you'll want to do something using an application—edit a configuration file in a text editor, move a file or folder using a file utility—that you don't have the privileges to do from your own account. Because the only way, or the easiest way, to do these tasks is from within an application, you can't (or don't want to) use Terminal. You might think that the only way to do this is to enable the root account and then log in as root. But fortunately, OS X provides a way to temporarily run individual applications as root. You will still be logged in under your personal account, but the application itself will behave as if it is being run by the root account.
While it's possible to do this from Terminal, I much prefer using two of my "essential" OS X utilities: Snard (shareware, http://www.gideonsoftworks.com/) or Pseudo (shareware, http://personalpages.tds.net/~brian_hill/). Snard provides a menu (either in the menu bar or in the Dock) that does a number of useful things, one of which is opening an application as root (Figure 1.10). You choose Open App As Root… from the menu, navigate to the application you want to use, and then provide your username and password to authenticate as root.
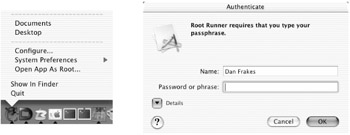
Figure 1.10: Using Snard to launch (left) and authenticate (right) an application as root
Pseudo is a one-trick pony, but it does that trick very well. You can drag an application onto the Pseudo icon in the Finder or the Dock. You can also launch Pseudo, which provides you with a convenient launch window (Figure 1.11), or you can choose File ➣ Launch… from within Pseudo. Finally Pseudo lets you create Launch Documents that open a particular application as root when double-clicked. I have several of these documents for various applications I use frequently as root.
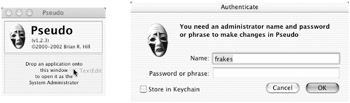
Figure 1.11: Using Pseudo to launch (left) and authenticate (right) an application as root
As an example of when this type of functionality might be useful, some advanced users customize the configuration of the built-in Apache web server in Mac OS X. One of the files used to do this is /private/etc/httpd/httpd.conf. This text file is owned by root, so even an admin user cannot edit it. Yet by launching a text editor, such as OS X's TechEdit or the commercial BBEdit Lite (http://www.barebones.com/products/bbedit_lite.html), as root, the file can be edited and saved.
As another example, many software installers ask for your admin-level username and password when you launch them. What is happening is that you are actually authenticating the installer to allow it to run as root so that it can install files where it needs to.
| Tip |
Although you need the username and password of an administrator to launch an application as root, you can do so from any account, normal or admin. For example, if a normal user wants to run a software installer that requires authentication, you can actually type your username and password to authenticate it, even though you aren't logged into your account. |
Enabling/Using the Root Account
|
User Level: |
admin |
|
Affects: |
NA |
|
Terminal: |
yes/no |
If you can't do the things you need to do using the methods I've already covered, and you've read all my dire warnings, and you still want to enable the root account, here's how. (To be fair, there are a few tips in the book where it's either necessary or just easier to use the root account. I just want the seriousness of doing so to sink in.) Like many things in OS X, there are several ways to do it.
Using NetInfo Manager
This is the most common method of enabling the root account, and the one you'll see most often in tutorials. It is also the most straightforward.
-
Backup your NetInfo database (of course!).
-
Launch NetInfo Manager.
-
Click the padlock button (or choose Security ➣ Authenticate) to authenticate; enter your admin username and password.
-
Select Security ➣ Enable Root User; if this is the first time you've enabled the root user, you'll be presented with an alert warning you that there is currently no root password.
-
In the new root password dialog, type a new root password, then retype it.
-
The root account is now enabled, but you'll see a dialog that you must re-authenticate to make additional NetInfo changes.
Using Terminal
You can also enable the root user account via Terminal. While it's probably the quickest way, you're still working in terminal rather than the GUI of NetInfo Manager.
-
Launch Terminal (or open a new session window if Terminal is already running).
-
Type sudo passwd root <RETURN>. This command actually tells Mac OS X to change the password for the root account.
-
You may see the following prompt:
Password:You should enter your personal (admin-level) user account password here; this is simply authenticating the sudo command.
-
You'll then see another set of prompts:
     Changing password for root.
     New password:
     Retype new password:
Here you should type your new root account password, then type it again to verify it.
-
The root account is now enabled; you could actually go into NetInfo Manager to verify this.
Using the Mac OS X Install CD
You can actually use the OS X Install CD's reset password feature to enable the root user. You would most likely use this method if your computer is having severe problems that you can only fix by logging in as root.
-
Insert the OS X CD and start up/restart your Mac while holding down the C key (this forces your computer to boot from the CD).
-
Once the OS X Installer appears, select Installer ➣ Reset Password.
-
Select the hard drive or volume that hosts the copy of Mac OS X under which you wish to enable the root account.
-
Select System Administrator (root) from the pop-up menu.
-
Enter a new root password, then enter it again to verify.
-
Click the Save button, quit out of Password Reset and Installer, and restart your computer.
-
The root account is now enabled.
Logging In as Root
After you've enabled the root account, you'll probably want to do something really silly like… oh, logging in as root (just kidding about the "silly" part). To log in as root, first log out of your current account (or start up the machine if it's not already booted). At the login screen, depending on your settings in the Login Options tab of Accounts preferences, you'll see either a list of users, or a name and password field. If you see the name and password field, type in root as the username and the new root password you just created in the password field. If your computer is set up to show a list of users, the last user should now say Others… Clicking that button will give you a name/password window that you can use to log in.
| Warning |
If you plan on logging in as the root user, I highly recommend that you set up your desktop and other appearance settings in the root account so that they look very different from your personal user account (such as using a bright red Desktop). This way you will have an obvious indicator of when you are logged in as root (and hopefully a reminder of the unfettered power you have and how much trouble you could cause yourself). |
Switching to Root for an Entire Terminal Session
If you've enabled the root account, you can actually log into a Terminal session as the root user. To do so, type: su <RETURN>. You will be asked for a password; instead of your adminlevel account password, this is the root account's password. Once you've provided it, you will be logged into Terminal as the root user until you end that session (type exit to return to your normal account in Terminal). For most users this method is identical to using sudo -s as described earlier except that the root user account itself must be enabled to use su. The main difference between in terms of what you can do is a small subset of advanced Terminal commands that can only be executed from the root account. If you have enabled the root account, logging into Terminal as the root user makes these commands available to you.
| Tip |
If you ever get confused as to what account you're logged into inside Terminal, type whoami<RETURN>. Terminal will respond with your current account name (generally username or root). |
It is important to point out that when you use this method, although your home folder in the Finder is still /Users/yourusername, your home folder in the current Terminal session is instead the root account's home folder, located at /private/var/root.
I Forgot My Root Password!
So you've enabled the root account, but you seem to have forgotten the password. Fortunately (or unfortunately, if you're security-conscious), Apple has made it relatively easy for an admin-level user to reset the root account's password. Here are the two easiest ways to do so:
-
In Terminal, type sudo passwd root <RETURN>. If you haven't used sudo in the last few minutes, you'll be asked for your password to authenticate. Once the command runs, you'll see the following text:
     Changing password for root.
     New password:
     Retype new password:
Type your new root password, then retype it to verify (if you don't type exactly the same thing, you'll have to do it over).
-
Boot from the Mac OS X Install CD. Once the OS X Installer appears, select Installer ➣ Reset Password.
What Do You Mean I Don't Have Permission? Working with Permissions
Now that you thoroughly understand permissions, it's time to actually work with them. In this section I'll talk a bit about default permissions, changing and setting permissions, and, finally, how to deal with permissions problems.
Default Permissions
At this point you know what permissions are, but you may be wondering how a file or folder gets its privileges in the first place. Files and folders created by the OS are given various permissions based on where they are installed and the purpose of the enclosing folder (see "Why Are There So Many Copies of So Many Folders?" earlier in this chapter). However, for files created by users, the answer is much simpler. Files are owned by the user who created them (with Read & Write access), inherit the group of the enclosing folder, and provide Read-only access to other users.
Creating a file means saving it to disk, whether that's by saving a new document from within an application or by downloading a file from the Web. This act of creating is the key—moving a file from one folder to another retains its original permissions, but copying the same file changes its permissions, as illustrated by Figure 1.12.

Figure 1.12: A file's permissions change when it is copied
The original file was created by jennifer in /Users/jennifer/Documents, then moved by jennifer to /Users/jennifer/Public. Since I (as an "Other") had access to read the file, I copied it from jennifer's Public folder to my own Desktop. As you can see, the file's owner changed when I copied it. This change is important because it illustrates that if you don't want other users to be able to access your files, you need to put those files in a folder others cannot view (Read), or you need to change permissions to give other users No Access.
| Note |
Non-boot volumes (additional hard drives, separate drive partitions, removable disks, etc.) act, by default, as "shared" volumes. This means that they are visible and editable by all users, just like the Shared user folder (Read & Write access for everyone). If you want to restrict access to the volume, or to files/folders on the volume, you'll need to manually change the appropriate permissions. |
Changing Permissions
|
User Level: |
admin or normal |
|
Affects: |
certain users |
|
Terminal: |
no |
There are a number of reasons why you might want to change the permissions on a file, a folder, or even on a volume. Most users will at some point want to open up access to a file or folder so that others can use it, or restrict access to it so that no one else can view or open it. In addition, if you're an admin user, you'll inevitably be faced with a situation where you need to open, edit, move, copy, or delete a file or folder, but you can't because you "don't have permission." Admin users often find themselves in this position when they want to delete a file or folder, or when trying to work with files or folders in a location where they are generally not allowed (in the /System/Library folder, for example).
Thanks to improvements in the Finder under OS X 10.2 and later, there's no longer a need to use Terminal or third-party utilities to change permissions—you can do it all right from the Finder. Simply click the file or folder and then choose File ➣ Get Info (or press command+I). In the resulting Info window, click the disclosure triangle next to Ownership & Permissions to expose the permissions pane. You'll see the privilege information we talked about earlier in the chapter. What you can do here depends on your user level.
-
Normal users Normal users can change the access level of all three privilege categories (Owner, Group, Others). However, they cannot change the owner or group a file belongs to. To change an access level, simply click the Access pop-up menu and choose the desired level of access (Figure 1.13). The new permissions apply immediately.

Figure 1.13: Changing the level of access Others have for a file -
Admin users Admin users can change everything a normal user can change; in addition, they can change the owner and group to which a file, folder, or volume belongs. In order to modify these additional fields, you first need to click the closed padlock icon; the first time you do this you'll be asked to enter your username and password in order to authenticate your account. Then simply click the Owner or Group field and choose the desired owner or group from the pop-up menu. As a security precaution, if too much time has passed since the last time you authenticated, after making the change you'll be asked for your name and password again. (This extra security exists to prevent an ill-intentioned passerby from giving themselves access to your entire system if you step away from your computer.)
If you select a folder in the Finder and use the Get Info command, you'll see one additional option in the Owners & Permissions pane: a button that says "Apply to enclosed items…" Clicking this button will apply the permissions you've set for the folder to all items within that folder. I emphasized the word permissions because it does not propagate any changes you made to the owner or group settings. If you'd like to make such changes to the entire contents of a folder, you'll need to use Terminal.
Throughout the book, you'll find lots of places where I mention changing permissions. For example, file sharing, remote access, system security, and Finder troubleshooting are all topics that are privilege-related, and all may require you to use the Get Info window to change permissions. In fact, in just a few pages I'll be talking about groups and group permissions. Suffice it to say that being familiar with permissions and how to change them will serve you well, not just for the rest of this book, but in everyday use.
| Note |
You can use Terminal to change permissions, via the chown, chgrp, and chmod commands. In addition, although it's no longer necessary to use third-party utilities to change permissions, there are still a number of other file properties that can be easily changed only by using such utilities—I'll talk more about those topics in Chapter 5, "Finagle Files and Foil Finder Frustration." |
When Privileges Go Bad: Permissions Problems
|
User Level: |
admin |
|
Affects: |
all users |
|
Terminal: |
no |
There are a number of situations where you'll find that a file, a folder, or multiple files or folders have obtained incorrect permissions. Symptoms of such faulty privileges can include printing problems; problems launching applications (even if they've been installed in /Applications); problems connecting to the Internet; an inability to work with a file that you should be able to access; or slow system performance. A couple of specific examples are "type -192" errors when using Disk copy, and "type -108" errors when printing. Some of the causes for these types of problems are software installers that incorrectly change permissions; files' being moved, created, or installed while booted into Mac OS 9; disk problems or file corruption; or something as simple as user error (i.e., "oops, I didn't mean to change that"). Regardless of the cause, you'll want to change the permissions to the correct ones in order to set things right.
For individual files for which you know the correct privileges, the solution is as simple as opening a Get Info window and choosing the correct values (as described in "Changing Permissions" section). However, at times you'll find more serious permissions problems: multiple files with incorrect permissions, or system-level files for which you have no idea what the "correct" permissions should be. In these situations, more drastic action is needed. Luckily, Apple has provided the solution for these problems and, unlike in of OS X 10.2 and later, has included the tools both on your Mac OS X Install CD and right on your computer in the form of a new and improved Disk Utility application.
To repair permissions while booted into OS X, launch Disk Utility from the Finder (/Applications/Utilities/Disk Utility) and click on the First Aid tab in the main Disk Utility window (Figure 1.14). Select your Mac OS X volume in the disk/volume panel on the left, and then click the Repair Disk Permissions button in the First Aid panel on the right. You may be asked for your admin username and password for the process to proceed. This process will reset all system files and Apple-installed software to their original and correct permissions (which will probably take a while, especially on large volumes with lots of files). The only caveat to such a repair is that some third-party software installers purposely modify the file privileges of system-level files. If these altered permissions are necessary for the third-party software to work, you may experience problems with that particular third-party software.
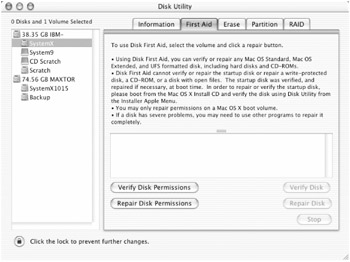
Figure 1.14: Using Disk Utility to repair permissions
Although Apple recommends repairing permissions when booted into OS X, if a permissions problem is preventing your Mac from booting at all, you can also repair permissions from the OS X Install CD. To do so, reboot your computer from the CD (hold down the C key during startup). When the Installer screen appears, choose Installer ➣ Disk Utility. Run Repair Disk Permissions normally, and when it is finished, quit Disk Utility and then quit the Installer; this will restart your Mac.
| Note |
In versions of OS X prior to 10.2, Disk Utility did not include the repair permissions option. For these versions of the OS, this functionality is provided via Apple's Repair Privileges Utility, which must be downloaded. You can find more information about this utility, and download it, from http://docs.info.apple.com/article.html?.artnum=106900. |
How to Give Permission to More Than One Person (but Not Everyone): Groups
Imagine the following scenario: you have a document that you want both you and your spouse to be able to access and edit. However, you don't want your kids to be able to open or edit it. How would you do this? Obviously you'd want to place the file in a location where your spouse could get to it, such as your own Public folder or the Shared user folder. However, here's where the dilemma begins. If you don't provide access to the file to Others, your spouse can't access the file. If you open access to Others, your spouse can access it, but so can your kids. Hmm…you could change ownership of the file to your spouse, but then you would no longer be able to access it. If only there was a way to provide Read & Write access to you and your spouse, but restrict everyone else to No Access. The good news is that there is a way—groups. The bad news is that Mac OS X doesn't make groups easy to use. Lucky for you, you bought this book, because I'm going to show you how.
In the discussion of permissions, I explained that every file or folder has three sets of permissions: Owner, Group, and Others. I also mentioned that groups—called such because they are simply groups of user accounts—are a way to create a subset of users, and to give them access that is different from the access given to Others. If you provide a certain level of file access to a group, each member of that group inherits the group's permissions. Anyone not in the group (and who is not the owner of the file) will maintain the level of access given to Others. Each user can belong to any number of groups, and groups can both overlap or be completely independent.
For example, in a large company, you could have groups for the finance department, the IT office, and the marketing group. Another group (employees) could contain all the people in all of these groups, while a group called executives might contain only the heads of each department. In fact, this concept of groups is exactly how most file servers and large corporate networks keep track of users and user access.
Thus, if we return to the family example I gave, you can create a new group called "Parents" and include your own user account and that of your spouse. You would then give the group Parents Read & Write access to the file in question, and restrict Others to No Access. Finally, you would place the document in a location where your spouse could access it, such as your Public folder.
| Tip |
Although you can give a group of users access to a file, remember that they must be able to view that file to use it. Thus if you give a group of users Read & Write access to a spreadsheet, but that spreadsheet is located inside your home folder (and is not in your Public folder), no one in the group will be able to access because your home folder is off-limits. Thus you must place the file in a "public" location such as your Public folder or the Shared user folder. (For more information on the Public and Shared folders, see Chapter 10) |
Unfortunately, as I mentioned, OS X doesn't make creating groups very easy. In the sections that follow, I'll explain how to create new groups of users, then I'll talk about editing group permissions.
Creating a Group
|
User Level: |
admin |
|
Affects: |
several users |
|
Terminal: |
no |
Apple's solution for creating and editing groups in OS X is NetInfo Manager. While this method isn't the most intuitive process, it works. You can also create and edit groups using the excellent donationware, SharePoints. I'll explain both methods here.
Creating a Group Using NetInfo Manager
To create a group using the "official" method, we come back to NetInfo Manager. Use the following steps to create a new group called Parents (no, the actual users in this example are not parents yet, but let's pretend for a moment that they are).
-
Open NetInfo Manager, then authenticate (click the padlock and enter your admin account password). You did backup your NetInfo database, didn't you?
-
In the second column of the browser pane of NetInfo Manager (the / level), click groups.
-
Although you could create a new group from scratch, it's much easier to simply copy another group and modify it. In the groups column to the right, select guest, and then click the Duplicate icon in the toolbar (the icon that looks like two folders). You will get an alert box asking you if you really want to duplicate the directory. Yes, you really do.
-
A new group is created called guest copy. Select this new group.
-
In the bottom (Property and Value) pane, double-click guest copy in the Value(s) column to edit the name of the group. For this example, we'll name it Parents (Figure 1.15).
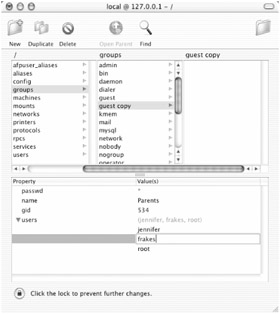
Figure 1.15: Creating a new group, Parents, in NetInfo Manager -
Double-click the number for gid (gid, also seen as GID, stands for group ID)—since every group must have a unique group ID number, and our group currently has the same gid as the "guest" group, we need to change the gid to something different from all other gids. You could go through each group, write down each gid, and then choose one that isn't in use, but since user-created gid numbers are expected to be in the range of 100 to 199, it's easier just to just start with 151 and work up from there. (You could start with 101, but if you or another user has already created a group or groups, you might stumble over an existing GID).
-
Next you want to add users to the group. Select the Property users, then choose Directory


