Sharing Remotely: iDisk
Sharing Remotely: iDisk
|
User Level: |
any |
|
Affects: |
individual user/.Mac account |
|
Terminal: |
no |
If you're a subscriber to Apple's .Mac Internet services, one of the benefits is your own personal iDisk. I've talked about iDisks a couple times already in the book, but I want to discuss it here as a way to share files. Although an iDisk technically isn't part of OS X, I include it here for two reasons. First, many Mac users are .Mac subscribers. Second, and more importantly, since iDisks are hosted on Apple's servers rather than on your own computer, placing files that you want to share on your iDisk means that you don't have to enable any sharing services—which in turn means that you don't have to worry as much about the potential for security issues that enabling such services brings.
What Does It Share?
Your iDisk shares any files that you place in its Public folder. (The Public folder on your iDisk is independent of your ~/Public directory; however, the two are similar in that they are the only personal folders to which other users have access.)
| Tip |
If you give someone your .Mac username and password, they can view all files in all folders of your iDisk. If you want to securely share files with a group of people in different locations, buying a .Mac account and sharing the username and password is quite convenient. |
Who Can Access Files?
Any user with an Internet connection, including both Mac and Windows users, can access your iDisk.
How Do I Configure It?
If you have only a single .Mac account, enter your .Mac username and password in the .Mac tab of Internet preferences. Then select Go ➣ iDisk (or press shift+command+I, or click on the iDisk toolbar item if you've added it to Finder window toolbars) to mount your iDisk in the Finder. Place any files you want to share in the Public folder at the root level.
If you have multiple .Mac accounts, an easier way to mount them is to use the iDisk Utility mentioned in Chapter 7, available from Apple's .Mac website (http://www.mac.com/). In the Open iDisk pane, enter a member name and password and click the Open button.
| Tip |
If you have multiple .Mac accounts, or if you frequently access multiple iDisks, a much more convenient way to access them is using Location files. I discuss these Location files in the next chapter when I talk about how to connect to shares. |
Finally, using either the iDisk tab of Internet preferences, or the Public Folder Access pane of iDisk Utility (Figure 10.2), you can control access to your iDisk's Public folder. You can decide whether other users have Read-Only access (which prevents them from editing or placing files on your iDisk) or Read-Write access (which lets them both access files on and copy files to your iDisk). You can also decide whether users will have to provide a password to access your iDisk's Public folder.
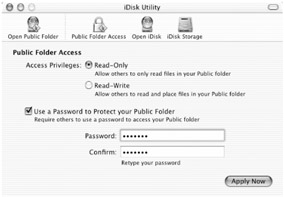 Figure 10.2: Using iDisk Utility to control access to your Public folder
How Do Others Access Files?
Users of Mac OS X can access your iDisk in two ways. Using the Open Public Folder pane of iDisk Utility, they can simply enter your member name and click the Open button (if you've set your iDisk to require a password, they'll be asked to enter it; they should use "public" as the username).
OS X users can also access your iDisk by selecting Go ➣ Connect to Server… (or pressing command+K) in the Finder, and then entering http://idisk.mac.com/membername/Public in the Address field. If your iDisk is password-protected, a dialog will appear; they should enter "public" as the username and your iDisk's Public folder password in the password field.
Users of other operating systems can access your iDisk's Public folder using the following techniques:
-
Mac OS 9 Choose Apple Menu ➣ Chooser, and then click the AppleShare icon on the left. Click the Server IP Address… button on the right, enter idisk.mac.com in the Server Address field, and then click Connect. In the resulting dialog, enter your .Mac member name (and, if applicable, your Public folder password) and then click Connect. Unfortunately, according to Apple, users connecting from OS 9's Chooser, which connects via AFP (Apple File Protocol, discussed later in the chapter) rather than WebDAV (an extension of the HTTP protocol used for web pages), will not be able to copy files to your iDisk Public folder or save changes to documents that reside in your iDisk Public folder.
-
Windows XP Open My Computer and then choose Tools ➣ Map Network Drive. Enter http://idisk.mac.com/membername (where membername is your .Mac member name). For authentication, use your .Mac member name and, if necessary, your Public folder password.
-
Windows 2000 Open My Computer and then choose Tools ➣ Map Network Drive. Click "Web folder or FTP site," and then enter the address provided above.
-
Windows 98 Open My Computer, open the Web Folders icon, and then double-click on Add Web Folder. Enter the address provided above.
Sharing iDisk Files Using a Web Page
In addition to providing direct access to your Public folder, you can also set up a web page that allows other users to view or download files located in that folder. Go to the main .Mac web page (http://www.mac.com/) and click on the Home Page graphic. Log in to your .Mac account, and on the main Home Page page, click the File Sharing tab. Click a color for your File Sharing web page, and you'll be presented with the configuration screen. You can edit the text on the page by clicking the Edit button, and update the web page (if you've recently added files) by pressing the Update button. Once your File Sharing page is ready, press the Publish button to make your Public folder files available via the Web. (Once you do this, you'll be presented with the URL of your File Sharing page—make sure you keep a record of it.)
When sharing files, especially over a network or Internet connection, there are a couple of things to keep in mind. The first is that even though most Internet connections today are much faster than those of a few years ago, many people are still using dial-up connections, and even broadband connections have their limits. If you're sharing files over the Internet, or over a slower local connection such as Bluetooth, I highly recommend using a file compression utility to make your shared files as small a possible. This will shorten the time it takes others to download or access files, and it will save bandwidth for you.
Luckily, OS X ships with a good compression utility. Aladdin's DropStuff (inside the StuffIt Lite folder in /Applications/Utilities) is a shareware version of the commercial StuffIt package. If you drop individual files or entire folders of files onto its icon, they will be compressed using the StuffIt compression format; the end result is a single file that is significantly smaller than the original. If you'll be sharing your files with Windows users, a better choice would be Aladdin's DropZip utility (located in the same folder), which instead compresses your files using the .zip format, more common on the Windows side of things. (Another option, if you're sharing files with only Mac users, is to create compressed disk images; I discuss how to do this in Chapter 7.)
Compression won't be convenient for files that will be used often, such as documents that are in progress or project files that multiple users will be accessing frequently, but for files that you are simply making available for a single download (or for download by a number of people), compression is a very good idea.
The second thing to be aware of when sharing files is that the file structures of some files on the Mac platform can present problems for Internet transfers. As discussed in Chapter 5, many Mac files—especially those from Mac OS 9 and earlier, but also many created in Mac OS X—are comprised of two parts: a data fork and a resource fork. Simply put, the data fork contains the file's data, and the resource fork contains information about the file. Unfortunately, although Apple's Personal File Sharing protocol keeps both forks intact, some other Internet protocols, such as FTP (discussed shortly), can strip the resource forks in transit. In addition, copying a file to a Windows or Unix computer and then back to the Mac may also strip the resource fork. (This generally isn't a problem for common document formats such as HTML, text, Word, and Excel files; it becomes an issue with more complex files such as applications.)
For this reason I also recommend using a program such as DropZip to compress files for sharing over FTP or with Windows or UNIX computers—such compression will preserve the resource fork.
| Warning |
If you've given your iDisk's Public folder a password, be aware that iDisk's File Sharing web page does not honor that password. Thus, if you make files available using .Mac's Home Page feature, any user who knows your .Mac member name will have access to the files in your iDisk's Public folder. To prevent this, Home Page provides a way to protect your site with its own password—just click the "Protect this site" button on the main Home Page web page. Also, if you take advantage of the Home Page password protection option, be aware that both your username and password are case sensitive, so when you provide another user with the URL to your website, be sure the username portion of it is capitalized correctly. |


