Internet and Networking Setup Subtleties
Internet and Networking Setup Subtleties
Even though I said at the beginning of the chapter that I was going to assume you've already got your Mac on the Internet, and maybe even set up your own home network, I'm going to quickly talk about the settings used for these connections, as there are some neat features with which many users aren't entirely familiar. These features and settings are contained in a few different System Preferences panes, and in the Internet Connect Application.
The Network System Preferences
|
User Level: |
admin |
|
Affects: |
computer |
|
Terminal: |
no |
As I mentioned at the beginning of the chapter, I'm assuming that you've already entered your network/ISP settings and are connected to the Internet (and possibly even to other computers or networked printers on a local network). So let's skip to two of OS X's very cool network-related features: port priority and Locations.
OS X has the ability to mix and match network types and network ports, making it extremely flexible. However, it also has the ability to automatically adapt to various network situations, and to quickly switch between sets of network port configurations that you've defined, making it the most adaptable OS on the market.
Enabling/Disabling Network Port Configurations
When you open the Network pane of System Preferences, the Show pop-up menu lists the currently active network port configurations. (In OS X 10.1.x, these were called Active Network Ports, which is an easier name to say and remember, but I'm going to stick with "network port configurations" or "active network interfaces" since these are the hip terms now, it appears.) By selecting a network interface from the Show pop-up, you're presented with various tabs that allow you to input various settings that are specific to that particular network port configuration. I stress the phrase specific to because this is where all that flexibility I talked about comes in. The TCP/IP settings for Ethernet can differ from the TCP/IP settings for AirPort, which can differ from the TCP/IP settings for modem connections.
In addition, which tabs show up differs for each type of port configuration. If you have an AirPort card, the AirPort configuration shows TCP/IP, AppleTalk, Proxies, and AirPort. The tabs for a modem are TCP/IP, PPP, Proxies, and Modem. Ethernet gets TCP/IP, PPPoE, AppleTalk, and Proxies. So each type of network port configuration has its own group of settings.
| Note |
Although Mac OS X allows you to enable TCP/IP on multiple network ports simultaneously, it does not allow you to enable AppleTalk on multiple ports at the same time. Well, it will let you, but it won't work, and you'll probably get an error message telling you that AppleTalk can only be active on a single port. |
In addition to providing the ability to select each network port configuration, the Show pop-up menu also includes an item called, curiously enough, Network Port Configurations. Selecting this item provides a list of all the active network interfaces that you could select from the Show menu. What's more, you can actually turn particular configurations on and off. For example, if you only connect to the Internet using an AirPort card, you can disable all the other port configurations (Figure 9.1). Disabling a network interface not only prevents it from being active; it also removes it from the Show pop-up menu. You can also create a new port configuration, or duplicate or delete an existing one, using the buttons on the right. Finally, you can rename a port configuration by double-clicking on its name.
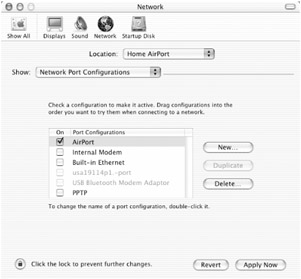 Figure 9.1: Using the Network Port Configurations dialog to disable unused network interfaces
Although you can probably think of a situation where you might need to create a new network interface (you installed new networking hardware would be a good example), you may be wondering why you'd ever want to disable, delete, or duplicate a port. The reason relates to the feature I mentioned at the beginning of this section, port priorities.
| Tip |
If you have multiple ISP accounts, you can create a new Modem configuration for each one. For example, I have two modem configurations on my iBook, one called Mindspring Modem and another called PacBell Modem. I can quickly connect to either of these accounts using the modem status menu or the Internet Connect application. |
Understanding and Using Network Port Priorities
As should be clear by now from the discussion, you can create multiple network port configurations and have them all active at the same time; in network geek-speak this is called multihoming. However, in addition to being able to use multiple network configurations simultaneously, Mac OS X also has the impressive (and impressively useful) ability to prioritize them. In other words, not only can you enable TCP/IP on your Ethernet port, internal modem, and AirPort card at the same time, you can also tell Mac OS X which one you want to use as your primary connection, your secondary, etc. In fact, you can have as many network port configurations active as you have available network ports. When you do something that requires a TCP/IP connection (check your e-mail, access a web page, connect to a remote server), OS X will try your first TCP/IP-enabled network interface. If that fails, it will try the second, and so on, until it either makes a successful TCP/IP connection or gives up after trying them all.
The way you prioritize network port configurations is so obvious and simple that it's…well, not really obvious. In Network preferences, you go to the Network Port Configurations dialog (from the Show pop-up). Then you just drag each port configuration up or down. The port you move to the top of the configurations listing is the first to be used, and so on down the list. Yes, it's really that simple.
As an example, my desktop Mac normally uses DSL (via Ethernet) to connect to the Internet. However, sometimes my DSL provider is, shall we say, less than reliable. So my backup is a dial-up connection. I have two network port configurations active, Ethernet and Internal Modem, and Ethernet is first in the priority listing. Whenever I try to access the Internet, my Mac first checks the DSL connection; if it's working, it uses it. If not, it then automatically dials up my ISP via the phone line.
| Note |
Although the idea behind port priorities is very cool, and most of the time it works great, sometimes it doesn't. Sometimes OS X will try your first port configuration, and if it doesn't work, it just sits there—it doesn't even bother to try the next configuration. In situations like this, you can try to rearrange port configuration order, or enable/disable various configurations. However, an easier solution is to use Locations, discussed in the next section. |
Using Network Locations
If your Mac never leaves home, you may never need to change your network settings. However, for many users (especially iBook and PowerBook users) this isn't the case. You may use different network settings at home than you do at work; or you may travel between a number of places— work, home, friend's homes, relative's—each of which has its own network setup. You could manually enable/disable network port configurations, or change settings, whenever you move, but that would be a hassle (and the more places you use your Mac with different network settings, the bigger the hassle it would be). A better solution is built into Mac OS X: network Locations.
A network Location is a group of network port configurations and their settings. You can have as many Locations as you want, and easily switch between them as you need. In fact, you already have at least one network Location, as OS X created the very first one when you first set up you Mac for Internet access. It was called Automatic, and you can see it at the top of the Network pane of System Preferences, in the Location pop-up menu.
Setting up Locations is fairly easy, and switching between Locations is even easier. To create a new Location:
-
In the Location pop-up menu, choose New Location…
-
Name your new Location and click OK.
-
Make sure the new Location is selected from the Location pop-up menu, and then configure your network preferences for the new Location. Add/remove/enable/disable network interfaces, enter the settings for each interface, and prioritize them as needed.
Repeat the above process for each new Location you want to create.
If you want to create a new Location that is based on or similar to an existing Location, select "Edit Location…" from the Location pop-up menu, select the Location you want to use as a model, then click the Duplicate button and give the copy a new name. You can then select the new Location from the pop-up menu and edit it as needed. The Edit menu item can also be used to delete or rename existing Locations.
To switch to a different Location, you simply select it from the Location pop-up menu, and then click the Apply Now button at the bottom of the Network preferences window. But there's an even easier way. Instead of opening System Preferences every time you want to change Locations, Mac OS X's Apple Menu has a convenient Location sub-menu. Choose Location ➣ Location Name and OS X will make the change for you. Your new settings take effect immediately.
| Tip |
If your iBook or PowerBook has an AirPort card, having the card active uses a good amount of battery power when you aren't plugged into an AC outlet. In fact, even the modem card uses some juice when you're not using it. So it follows that disabling the AirPort card and/or the modem when you don't need them will extend your battery life. An easy way to do this is to create a new network Location that has the AirPort and/or Internal Modem network interface(s) disabled (or even deleted). When you're about to unplug, switch to this Location. Another alternative is to enable/disable the AirPort card using the Internet Connect application or the AirPort menu item. However, I personally have a Location called No Network that has no active ports; I use this whenever I'm in transit or don't need any network access. This method also prevents your modem from trying to dial up when OS X doesn't find a network. |
To give you an idea of the flexibility that the combination of port priorities and network Locations provide, I have the following Locations defined on our iBook:
-
All Off All network port configurations are disabled.
-
Home AirPort AirPort is the only active connection, and AppleTalk is enabled. I get both Internet and local network access via AirPort. I use this when I'm not near my desk.
-
Home AirPort/Modem AirPort and the Internal Modem are active. I use this when I use the iBook at my desk. If the DSL is acting flaky, the iBook dials up my ISP for Internet access, but uses the AirPort card for local network access.
-
Travel AirPort The only active port is the AirPort card and AppleTalk is disabled. I use this Location when I'm accessing the Internet via a wireless access point—in a coffee shop, at a conference, etc.
-
Travel Ethernet DHCP The only active port is Ethernet, AppleTalk is disabled, and the Ethernet port is set to use DHCP for Internet access. This is the Location I use when connecting to broadband networks in hotels or other locations when I travel or do consulting work.
-
Travel Modem I've enabled a separate modem configuration for each of my ISPs. I've also edited the phone number list in Internet Connect (explained later in the chapter when I talk about the Internet Connect application) with phone numbers for the place(s) I'll be visiting for each ISP. I use this Location most often when I'm traveling and my only Internet access is via dial-up.
Granted, my setup isn't typical, as most people don't have the need for so many varied network setups. But isn't it great to know you could do it if you wanted to?
Using Mac OS 9-like Locations in Mac OS X
|
User Level: |
admin |
|
Affects: |
computer |
|
Terminal: |
no |
If you used Mac OS 9 or earlier, especially on a PowerBook, you're probably thinking that OS X's Locations are similar to "locations" using OS 9's Location Manager. However, OS X's Locations only apply to network settings, whereas OS 9's Location Manager also controlled things like default printers, time zones, startup files, and more.
If you miss OS 9's ability to control these other settings when you change locations, you'll appreciate the shareware Location X (http://homepage.mac.com/locationmanager/). Location X works with OS X's Locations functionality, but adds the ability to also change settings for QuickTime, the time zone, the default printer, and sound volume. It also lets you run AppleScripts and shell scripts when you change Locations, and you can use it to change your preferences for Apple's Mail or Microsoft's Entourage e-mail clients, as well.
Location X runs as an application; the first time you launch it, it creates its own locations based on the Locations you've set up in Network preferences. By selecting a location and then clicking the Edit button (or choosing Location ➣ Edit…), you'll see a dialog with all of the possible settings Location X can change for you (Figure 9.2). First choose which settings you want it to change when switching to that location (Network is selected by default), then configure those settings.

Figure 9.2: Location X changes various settings when you switch "locations"
You can configure each setting two different ways. (Before you make any changes, you should click the padlock icon to authenticate, since some of the changes you'll be making will require admin access; provide your admin password when prompted.) The first method is to select a setting and then click the Configure… button. For those settings set in System Preferences (QuickTime and Time Zone), Location X will open System Preferences for you; make the appropriate changes and then switch back to Location X—the current settings will be restored when you're through. For those settings that require changing your preferences in an application (Apple Mail and Entourage), Location X will launch the application; make the changes to the application's preferences and then switch back to Location X (again, your original settings will be preserved). For those settings that require a simple menu selection or slider (Network, Default Printer, and Sound Level), Location X will present a pop-up menu. Finally, for AppleScript or Shell Script, Location X will present you with a dialog window; you can either drag the scripts to the window, or use the Add… button to navigate to them.
The second way to configure settings—for all but the AppleScript and Shell Script options—is to manually change them using Network preferences, Sound preferences, QuickTime preferences, etc., and then to click the Capture All Current Settings button. All the current settings will be saved to this location.
You can also add new locations in Location X by clicking the Add button or choosing Location ➣ Add. However, whereas the first time you run Location X it creates its own location for every Network Location, on subsequent launches simply uses its own group of locations. In other words, if you create a new network Location in Network preferences, Location X will not automatically create a corresponding location of its own; you'll have to create one yourself.
You can switch between Location X's locations by selecting a location and then clicking the Make Active button (or choosing Location ➣ Make Active). If you've enabled the Location X Menu in the preferences dialog, you can also switch locations even when Location X isn't running. If any changes require admin access, you'll be asked for your admin password; after that all your settings will change to reflect the new location (including the network Location, if applicable). This is a great way to quickly change your Mac's settings.
I mentioned earlier that at the time of this writing, networking over FireWire was quite rare. However, by the time you read this, it will probably be more common, so I'm going to talk about it a bit. IP (Internet Protocol) networking over FireWire is exciting and cool because FireWire is much faster than most of the other connection methods used for networking. In fact, FireWire's theoretical data transfer speed is about 40 times faster than standard 10BaseT Ethernet and AirPort, and about 4 times faster than 100BaseT Ethernet. So if you network your Macs together using FireWire, your network will scream.
Using FireWire networking is actually quite easy. First, you need to make sure your Macs have IP over FireWire support—chances are that a recent OS X update added it, but if not you may need to go to the Apple Software Update web page to download the drivers: http://www.info.apple.com/support/downloads.html. Once you've installed the drivers (or you go right to this step if you didn't need to install them), open Network preferences on both computers and make sure FireWire is listed as a Network Port Configuration. If not, add a new interface using the instructions I provide in the main text ("The Network System Preferences"); choose FireWire as the port. Then in the Network Port Configurations window, drag the FireWire configuration to the top of the list. (As explained in the main text, this ensures that your Mac will try to use FireWire networking first, and if it can't use it for a particular task, it will use the second configuration, and so on.)
Next, connect two Macs together using a FireWire cable (you can also use two FireWire cables and a FireWire hub, if that's your setup). You can now connect from one computer to the other for File Sharing or any other type of networking. (If you're not sure how to use File Sharing, I'll talk about it in the next chapter.) In fact, if you have just a small home network, this is probably the ideal network setup, because the data transfer speeds are so much faster than Ethernet or AirPort.
(You can even share your Internet connection with another Mac over FireWire; however, at the time of this writing the procedure is fairly complicated, as it's still in the testing process. I hope that by the time you read this, Apple will have instructions on their website, or even in your Mac's Help.)
Copying And/or Backing Up Network Preferences
If you want to make a backup copy of your network preferences (a good idea, although you should be backing up much more than just your network preferences—see Chapter 14), the preferences file is located in the hidden directory /var/db/SystemConfiguration. The easiest way to access this directory is to open a new Finder window, choose Go ➣ Go to Folder…, type the path I just showed you, and click the Go button. The file that contains your network preferences is called preferences.xml. Copy it to a safe location.
In addition, if you're setting up a new Mac that will use many of the same network settings, you can copy this file to the same location on the new Mac (you'll need root access, or a utility such as File Buddy that you can open as root using Pseudo or Snard, as discussed in Chapter 1). The new Mac will then have the same network preferences as the original Mac.
The Internet System Preferences
|
User Level: |
any |
|
Affects: |
individual user |
|
Terminal: |
no |
The Internet pane of System Preferences is where each user sets up their default settings for Internet-related services. If you have a .Mac account, it's also where you can enter your account information and configure and monitor your iDisk. The preference pane is divided into four tabs: .Mac, iDisk, Email, and Web.
.Mac
If you have a .Mac account (http://www.mac.com/), the .Mac tab is where you enter your member name and password. Your Mac uses these settings in a few different ways. First, if your main e-mail account is your .Mac account, the Email tab of Internet preferences (discussed in a moment) can use this information to configure your e-mail account settings. Second, the iDisk tab of Internet preferences (also discussed in a moment) uses these settings to access your iDisk. Finally, if you use the Finder's Go ➣ iDisk command to access your iDisk, these settings are used to indicate the name of the iDisk and its password.
| Note |
You can access other iDisks (other members' iDisks, or your own if you have multiple .Mac accounts) using Apple's iDisk Utility. In the next chapter, I'll also show you how to keep "bookmarks" for multiple iDisks. |
iDisk
In Chapter 7, I covered the iDisk Utility. The iDisk tab of Internet preferences contains two groups of options (iDisk Storage and Public Folder Access) that are identical to those in the similarly named tools of iDisk Utility. iDisk Storage shows you the current usage and capacity of your iDisk, using the member name and password entered in the .Mac tab, and allows you to "Buy More" if you need it (connecting you to Apple's .Mac website to do so). The Public Folder Access section lets you change the permissions for the Public folder on your iDisk—these permissions (Read-Only or Read-Write) apply to other users, not you (you always have full read/write access to your iDisk). In addition, if you want to further secure your Public folder, you can enable a password; when enabled, other users will be required to enter this password to access your iDisk's Public directory. If you've made any changes in the Public Folder Access section, click the Apply Now button to enable them.
The Email tab of Internet preferences has two sections, one for choosing your e-mail client, the other for providing a default e-mail account. If you've never done so before, choose your preferred e-mail client; Apple's Mail is the default choice, but you can choose the Select… option and navigate to any other e-mail client (Entourage, Eudora, Netscape, etc.). You can even choose a Classic e-mail client if you still haven't imported your OS 9 e-mail to OS X. Keep in mind that this setting is used only when Mac OS X receives a request to send an e-mail. For example, if you click on an e-mail address on a web page, OS X will open the e-mail application selected here, and open a new message to that e-mail address.
The e-mail account information in the lower part of the window is used by Mail (and most other e-mail clients) to automatically configure an e-mail account. When you first started up in OS X, you were prompted to enter this information by the Setup Assistant. You can also change it manually if you change e-mail accounts. However, note that although Apple's Mail will automatically update its e-mail account information to reflect these changes, not all third-party e-mail clients will—if you're using another client, double-check its settings. In addition, if you have multiple e-mail accounts, you'll need to set them up separately in your e-mail client, including Mail.
| Note |
If your e-mail account is a .Mac account, and you check the "Use .Mac Email account" box, the information entered in the .Mac tab of Internet preferences is automatically used for the Email Address, User Account ID, and Password fields, and OS X also fills in the remaining fields with the correct info. |
Web
The Web tab lets you select your default web browser behavior. The Default Web Browser is the browser Mac OS X will launch (or open a new page in, if it's already running) when you click on a URL in an e-mail message, text document, or any other application. It's also the application that will be used if you double-click on a Web Location file. (I talk more about Web Location files later in this chapter.)
The other two settings in this tab, Home Page and Download Files To, are only used if your browser supports Apple's Internet preferences system. Most do; however, a few don't, and use their own preferences instead. Home Page tells your browser what page to go to when you click the browser's Home button or choose Home from its menus. The Download Files To setting tells your browser where files should go when you click a link on a web page to download a file.
| Tip |
In addition to your home page, there is also a preference for the default search engine; unfortunately, as of OS X 10.2 you can't access this setting from the Internet pane of System Preferences. However, if you launch Classic, and then open the Classic Internet control panel (located in Classic System Folder/Control Panels/Internet, or Classic System Folder/Control Panels (Disabled)/Internet if you've disabled it using Extensions Manager), you can actually change the setting from there. |
Adding Other Browsers Using Browser Wars
You may have noticed that by default, the Default Web Browser includes only a single web browser to, um, "choose" from. If you want to use another browser as your default, you have to manually navigate and select it. This isn't a big deal if you only make this change once. But if you're like me and you like to try out different browsers, it gets to be a pain. Enter the freeware Browser Wars (http://www.tepidcola.com/), which does a very simple thing: it edits the settings file that Internet preferences uses for this menu. Double-click the Browser Wars "install" package and Terminal launches. Enter your admin password, confirm the installation, and the script backs up the original settings file and installs a new one that includes pretty much every web browser on the market. The next time you open the Internet pane of System Preferences, the Default Web Browser pop-up will contain a veritable cornucopia of browsers to choose from.
Using a Local File (or Your Bookmarks/Favorites) as Your Home Page
Since my laptop isn't always connected to the Internet, I prefer not to use the URL of a remote website as my home page—mainly because it isn't always accessible, but also because if I have "Connect automatically when needed" selected in the Modem configuration of Network preferences, every time I open my browser, my laptop tries to dial up my ISP. To solve this, I've created my own "home page" that is simply an HTML file of my favorite links, as well as some text info that I tend to forget (such as my home computer's IP address). I then enter the local address of this file in the Home Page field of Internet preferences. (Another solution is to simply leave the Home Page field blank, which doesn't load any page until you specifically enter a URL it the browser's address field, or click a URL in another application. This can be helpful if you want to use your browser without being connected to the Internet.)
If you'd like to use a local file as your home page, the easiest way to get its address is to use your favorite browser. Select File ➣ Open… (or File ➣ Open File…, depending on the browser), and navigate to the local file. When you click the Open button, the file will open in your browser. More importantly, the file's address will appear in the browser's address bar. Simply copy it and then paste it into the Home Page field in Internet preferences. As an example, the location of my personal home page document is file://localhost/Users/frakes/Documents/homepage.html.
If you like this tip, but don't want to (or don't know how to) create your own "home page," you might consider using your browser's bookmarks/favorites file. Your bookmarks/favorites are actually contained in a single file, created by your browser. You use the procedure I just described for getting the address of a local file to get the address of your bookmarks file, and then paste it into Internet preferences. This is actually a nice option for many people, since they tend to access many of their bookmarks frequently. If you don't know where your browser's bookmarks file is at, here are some hints:
-
iCab ~/Library/Preferences/iCab Preferences/Hotlist.html
-
Internet Explorer ~/Library/Preferences/Explorer/Favorites.html
-
Mozilla ~/Library/Mozilla/Profiles/default/bookmarks.html
-
OmniWeb ~/Library/Application Support/OmniWeb/Bookmarks.html
If you use the Camino or Opera browsers, or Apple's own Safari, their bookmark files can't be used as your home page because they aren't in HTML format. However, you can export your bookmarks to HTML format from within Camino and Opera, and then use the resulting file as your home page. For Safari, until Apple adds an Export command, you'll have to use a third-party bookmark utility (like those I discuss later in the chapter) to convert your bookmarks to a standard HTML file.
Accessing Hidden Internet Preferences
Most web browsers have a section in their preferences dialog for "helper" applications— applications used to deal with files and protocols that the browser doesn't handle. For example, Internet Explorer has a setting that tells it what to do with downloaded files that end in .sit (StuffIt archive files) and what to do when the user clicks on an FTP link on a web page. Users of Mac OS 9 will remember that the Internet control panel actually allowed you to customize the settings for helper applications, and those settings were used not only by many web browsers, but also by the OS itself—when you opened an Internet location file, or when you clicked on an Internet address in a text document or e-mail message.
It turns out that Mac OS X has the same settings, but they've been hidden. It's a safe bet that Apple will allow you to access them via the Internet preferences pane at some point in the future, but at the time of this writing the only way to get to them is to edit a fairly obscure XML file using a text editor... or install a neat freeware preference pane called More Internet (http://www.monkeyfood.com/software/).
Once you install More Internet, you can access it via System Preferences. In the More Internet window, you'll see a list of protocols/file types on the left, and the application that will be used for the selected protocol or file type on the right (Figure 9.3). To change the chosen application, just drag your preferred application to the window; it will be assigned to the selected protocol or file type. You can also add new protocols or file types to the list, or remove existing items, using the Add… and Remove buttons.
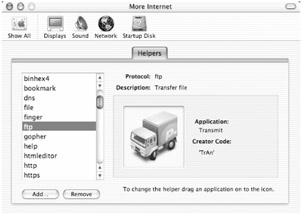
Figure 9.3: Using More Internet to assign applications to Internet protocols and file types
More Internet is also available as a standalone application called Vince; however, its interface isn't as nice, and I personally prefer the preference pane approach since that's where such settings belong (in my opinion).
The Bluetooth System Preferences
Bluetooth is a relatively new wireless networking protocol that allows Bluetooth-enabled devices within range of each other (up to 30 feet, or 100 feet, depending on the device) to communicate. Bluetooth is similar to the 802.11 (AirPort) wireless networking standards, but with two significant exceptions. The first is that Bluetooth is a low-bandwidth protocol; it can't transfer nearly as much data as AirPort can. (In terms of data throughput, you can think of it this way: if AirPort is the wireless equivalent to Ethernet, Bluetooth is the wireless equivalent to a USB or serial cable.) The second difference is that whereas AirPort is multi-device network protocol— you can connect your AirPort-enabled Mac to a large network of computers, printers, etc., and even to the Internet—Bluetooth is a paired or direct technology. Rather than connecting a computer to a network, with Bluetooth you create a private network of two devices by connecting those devices directly with each other—you pair them. Apple introduced support for Bluetooth in Mac OS X 10.1, but you had to install the software drivers separately. Beginning with 10.2, Bluetooth support was integrated into the OS.
Some examples of Bluetooth pairings are a mobile phone and a hands-free headset; a mobile phone and a computer; two computers; a computer and a printer; a computer and a keyboard; and a mobile phone and a PDA. Using these pairings, you can send data back and forth. For example, you can use your wireless phone as a modem, or, using Apple's iSync utility, you can synchronize your Mac's Address Book with your contacts on your Bluetooth-enabled wireless phone or PDA. The only requirement is that both devices be Bluetooth enabled. In the case of phones, printers, and PDAs, Bluetooth capability will generally be built in. In the case of your computer, at the time of this writing Apple has made Bluetooth either built-in or available on every new Mac model, portable or desktop. If you're using an older Mac without built-in Bluetooth, you can buy a relatively inexpensive USB adapter that's about the size of a piece of candy.
The Bluetooth pane of System Preferences is where you control how your Mac uses Bluetooth. It only shows up in System Preferences when your Mac has Bluetooth support built-in, or a Bluetooth adapter attached.
The Settings tab is where you turn Bluetooth on and off, and control the access level, security, and compatibility of Bluetooth connections. The Discoverable option, when checked, broadcasts your Mac's presence over the Bluetooth frequencies so that other Bluetooth-enabled devices within range can see it. If you uncheck this box, devices that have previously been paired with your Mac will still be able to connect to it, but others will not "see" it unless you specifically connect to them. The Require Authentication setting forces other Bluetooth devices to authenticate (using a password) before they can connect to your computer. The Encryption option encrypts all data sent over the Bluetooth connection so that anyone else in the area who might intercept it (using their own Bluetooth device) cannot use that data without your password. The Support Non-Conforming Phones option uses a less efficient connection that is more compatible with older Bluetooth-enabled phones. Finally, the "Show Bluetooth status in the menu bar" option provides a new Bluetooth menu that lets you monitor Bluetooth connections as well as enable/disable discoverable mode and Bluetooth itself.
The File Exchange tab (called Receiving Files under some versions of OS X) lets you decide on the default behavior when another Bluetooth device attempts to send a file or data to your Mac, and the location where accepted items will be placed. Under OS X 10.2.4 and later, it also includes a Bluetooth File Transfer section that lets you allow other Bluetooth-enabled devices to browse a particular folder on your computer.
In OS X 10.2.4 and later, the Devices tab lets you view paired and connected Bluetooth devices, as well as disconnect devices or pair with a new device (by choosing Paired Devices from the Show pop-up menu and then clicking Pair New Device). In addition, by clicking the Setup New Device button, the Bluetooth Setup Assistant launches and walks you through the procedure of configuring a Bluetooth phone or PDA for use with your Mac.
Under OS X 10.2.3 and earlier, setting up Bluetooth devices is a bit more complicated. The Bluetooth preference pane doesn't include the Devices tab, but instead includes Serial Ports and Paired Devices tabs. The Serial Ports tab allows you to create emulated serial ports to which you can "connect" Bluetooth devices. This is necessary for some software to be able to connect to these devices. For example, the Palm synchronization software requires you to choose a port in the HotSync preferences. To create a new port, click the New… button, provide a name for the new port, choose whether it's an incoming or outgoing port (for printers, choose outgoing, for PDAs, choose incoming), and then click the Select Device… button to scan for the Bluetooth device this port will be associated with. You can also choose to require authentication and/or encryption.
The Paired Devices tab lets you pair your computer with another device. Click the New… button, and a window will pop up that allows you to select "discoverable" devices; wait for a few seconds as your Mac scans for nearby Bluetooth devices. Once the scan has competed, select the desired device and then click the Pair button. Once a device is paired with your Mac, you no longer need to keep it or your Mac discoverable, as they will always be able to communicate. (You can also delete a pairing to prevent the device from communicating with your Mac; you can always re-pair them again later.)
Using Bluetooth Devices
Once you've paired your Mac and another Bluetooth device, you can send data between them using various methods. If you're using a Bluetooth printer, simply setting up the printer in Print Center lets you use it whenever needed. In the case of a Palm PDA, the HotSync software takes care of most data exchanges.
If the device supports file transfers, you can also use Apple's Bluetooth File Exchange (located in /Applications/Utilities/) to send files—just drag a file onto the Bluetooth File Exchange icon, and you'll get a list of Bluetooth devices in range (if the desired device isn't listed, click the Search button to force your Mac to re-scan for devices). Select the desired device and then click the Send button to send the file.
If your Mac or PowerBook has Bluetooth capability (either built-in, or using a USB Bluetooth adapter), and you have a Bluetooth-enabled cellular/wireless phone, you can actually use your phone as a modem. This is a very cool thing, since it means you can connect to the Internet and download mail or surf the Web even if you're far away from your home network or a telephone line. (Note that some cellular phones and service plans have both "voice" and "data" rates. You may even be able to set your Mac up to use your standard voice connection and airtime.) Although I don't have space here to show you how, if you're using OS X 10.2.4 or later, the Bluetooth Setup Assistant makes it fairly easy to set up.
| Note |
If you have a Bluetooth-enabled Sony/Ericsson mobile phone, you really have to try out the preference pane Sony Ericsson Clicker (http://www.salling.com/). It turns your phone into a remote control that you can use to control iTunes, iDVD, PowerPoint, or Keynote whenever you're in range—fun at home and quite useful when giving presentations. In addition, it includes a "proximity sensor" that detects when your phone is in range of your Mac; it can run any AppleScript when your phone leaves the proximity of your computer, and another when it returns. For example, you can have a password-protected screen saver launch when you leave your office and then disappear when you come back! |
The Internet Connect Application
The Internet Connect application serves four purposes: to initiate dial-up ISP connections, to initiate "Point-to-Point Protocol over Ethernet" (PPPoE) ISP connections, to connect to AirPort networks, and to initiate Virtual Private Network (VPN) connections. If your connection to the Internet is via DSL, cable modem, or another type of Ethernet connection, and your ISP doesn't use PPPoE you may have never even opened the Internet Connect application (unless you use its VPN feature to connect to an office network over your broadband connection). In fact, even if you use a dial-up or AirPort connection, you may have never used Internet Connect if you have the AirPort and/or Modem menus enabled in Network preferences—since you can initiate your connections using those menus. Nonetheless, Internet Connect has a few useful features you may want to know about.
Internet Connect assumes that you've already entered all of your settings and configured all of your network ports in Network preferences; if not, you can click the Edit… button near the bottom of the Internet Connect window to open Network preferences.
Using Internet Connect
If you only have a single network port configuration that requires a connection (modem, PPPoE, AirPort, etc.), the Internet Connect window will simply provide you with the appropriate settings and controls for that type of connection. However, if you have multiple port configurations that require connections, you'll see a Configuration pop-up that lets you choose which network configuration you'd like to use to connect. The window's options will change to reflect the type of port configuration you choose.
For example, if you choose any type of modem configuration, you'll see the information you previously entered in the PPP tab of the modem settings in Network preferences. However, one nice bonus is that the Telephone Number pop-up provides a list of all numbers you've used with that port configuration. This can be very handy if you tend to travel a lot and use different dial-up numbers with the same ISP, as you can select any number you've ever dialed for that ISP quickly. You can also add (or remove) numbers from the list by selecting Edit… from the pop-up menu (Figure 9.4). (In Mac OS X 10.1 and earlier, the only way to do this was to edit a preference file!) If you chose not to save your dial-up password in the modem settings of Network preferences, you can enter it manually here. Clicking the Connect button will dial your ISP and connect you to the Internet. Once you're connected, the Status area of the window provides your IP address, connection speed, time connected, and visible indicators of data being sent and received.
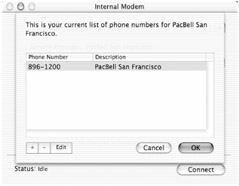
Figure 9.4: Editing the dial-up numbers used by Internet Connect
The PPPoE window looks almost identical to the modem version except for the fact that there's no phone number pop-up menu. The AirPort configuration, on the other hand, looks significantly different. You can turn your AirPort card on or off using the AirPort Power setting—turning it off is a good practice when you're traveling with a laptop, as the AirPort card uses battery power—and the Signal Level meter lets you see how strong a signal your AirPort card is receiving. You can choose between multiple AirPort networks using the Network pop-up; if you choose a network that requires a password, you'll be presented with a dialog asking for that password. Finally, by choosing Create Network… from the Network pop-up, you can create your own AirPort network, using your own computer as the base. You give your network a name and password, as well as a default channel, and other users will be able to connect to it. (If your network is getting a lot of interference, you can change to another channel to see if the signal improves.)
Finally, each of the various configuration screens of Internet Connect allows you to turn its respective menu item on and off; these menu items allow you to quickly connect and disconnect, and also provide a visible status indicator of your connection.
Internet Connect has two other useful features most users don't know about: the ability to connect to Virtual Private Networks (which I'll talk about in Chapter 11), and the connection log. The connection log, accessible by choosing Window ➣ Connection Log, shows a complete record of all modem and PPPoE connection activity. By enabling "verbose logging" in Network preferences (from the modem or PPPoE Options dialog), you can get even more detailed logging. If you're having trouble connecting, or sustaining a connection, the connection log should be your first place to look for clues as to the cause.
In Mac OS X 10.2, Apple introduced a new technology called Rendezvous. Based on the Zero Configuration Networking (zeroconf) standard (http://www.zeroconf.org/), Rendezvous provides a way for you, the user, to set up a local network of devices—computers, printers, servers—without having to deal with IP addresses, complicated network setups, or obscure networking protocols. In effect, you connect two computers and they'll immediately be able to take advantage of each other's services.
The beauty of Rendezvous is that it works over your existing network. Once you've got your network set up, you go to the Sharing pane of System Preferences and enter your preferred Rendezvous name in the Rendezvous Name field—this is the name other users will see when they connect to your computer via Rendezvous. Plug your Mac into a local area network, and without any further ado, you can see other Rendezvous-enabled devices and they can see you. In fact, even if you don't set up any other networking preferences, Rendezvous works great; you can simply connect two Macs using an Ethernet cable and they will communicate perfectly, allowing you to chat, share files, share printers, etc.
Although most of the services that you'll take advantage of using Rendezvous are sharing services—file sharing, Windows sharing, printer sharing—that I'll be talking about in the next few chapters, I mention Rendezvous here because it also works for things like iChat (which has its own Rendezvous buddy list) and iTunes (a version that allows you to share/access iTunes music libraries should be available by the time you read this).
How Does Rendezvous Work?
If you're curious, what's really happening behind the scenes is the following. When you connect to a local network, you computer picks an IP address for itself, chosen from a subnet that has been allocated for zeroconf networking by the Internet Assigned Numbers Authority (IANA). This IP address is in addition to any IP address your computer may already have been assigned for Internet access, and is an internal address (meaning that it is only used on the local network, and cannot be accessed by computers not on that local network). Your computer then sends out a query using the Address Resolution Protocol (ARP) standard to see if any other device on the subnet is already using that address. If so, your Mac chooses another address and sends another query; once it's found an unused IP address, it grabs that address as its own.
After staking a claim on a local IP address, your computer then assigns its Rendezvous name (the one in Sharing preferences) to that local IP address. It does this using the Domain Name System (DNS) protocol that is used to assign domain names to IP addresses (e.g., why you can type cnn.com instead of the cnn.com server's IP address). In fact, you'll notice in the Sharing pane of System Preferences that Rendezvous Name field is followed by the text .local. The .local domain has been assigned to Rendezvous, so any Rendezvous-enabled devices are given domain names based on the .local domain—your computer is simply Rendezvous-Name.local. You'll see in Chapter 12 ("Printing Practicalities") that when you share a printer, it's Rendezvous name will be an extension of your computer's name: PrinterName@Rendezvous-Name.local. The main difference between Rendezvous names and "true" Domain Name System names are that, again, Rendezvous names are only used on your local network, so your Mac doesn't have to query one of the Internet's DNS servers to resolve the name into an IP address.
Rendezvous Connection Caveats
A couple of caveats about Rendezvous: First, as I mentioned, Rendezvous is only used for devices located on a local network; for another user to see your computer using Rendezvous, they have to be connected to the same local network as you. In fact, they have to be connected to the same subnet of your local network. (A subnet is a subsection of a local area network, designated/delineated by a network administrator; if you're using a network in your home or small office, this restriction won't affect you at all. If you're connected to a large LAN with multiple subnets, it just means that Rendezvous will only work for other devices connected to the same subnet.)
Second, Rendezvous has some built-in security measures that are intended to prevent network security breaches; these measures may prevent certain Rendezvous devices from working (specifically, those devices that don't follow the Rendezvous guidelines precisely). If you find that certain Rendezvous-enabled devices don't appear when they should, open Terminal and type sudo sysctl -w net.inet.ip.linklocal.in.allowbadttl = 1 <RETURN>; provide your admin password when prompted. If this fixes the problem, the cause is a not-fully-Rendezvous-compliant device. (You should contact the manufacturer to see if they have a more permanent fix; if they don't, you'll have to type this command each time you restart, since it only "fixes" the problem until shutdown.)
Sharing Your Surfing Signal
I talk about most of the features in the Sharing pane of System Preferences in Chapters 10 (sharing files), 12 (sharing printing), and 13 (using OS X's built-in firewall). However, one of these features, Internet Sharing, belongs here. Internet Sharing lets you share a single Internet connection (dial-up, broadband, etc.) between multiple local computers. It does this using network address translation.
Network Address Translation Translated
When you connect to the Internet via your ISP or your business or organization's network, your computer is usually assigned an IP address that uniquely identifies it to the rest of the Internet. This IP address is very much like a street address for postal mail—anything you send out has your return address so that the recipient knows exactly where to send replies. When you connect to a web server, for example, and request a web page, your IP address tells the server exactly where to send that page for viewing. Since most ISPs only provide you with a single IP address, you can't connect multiple computers to the Internet at the same time, since whenever one of them requested data from the Internet, all of them would receive that data (since they'd all have the same IP address).
The solution to this problem is to employ an Internet router that provides network address translation (NAT). The router takes on the actual IP address assigned by your ISP, and then provides internal IP addresses to each connected computer. (Internal addresses are a specific range of IP addresses that uniquely identify computers on a local network; they don't really mean anything on the Internet and can't communicate via the Internet without an Internet router in between.) The router then translates traffic from your computer to the Internet (so that the data appears to come from your ISP-assigned IP address), and from the Internet to your computer (so that requested data finds its way back to your computer, instead of one of the other computers being managed by the router).
To further the "street address" analogy, an Internet router is like the mailroom at a large company. To the post office, all mail is going to and coming from a single address; but the mailroom makes sure that outgoing mail gets out, and that incoming mail gets forwarded to the correct recipient. By using an Internet router, multiple computers can access the Internet over a single connection, but to your ISP and anyone else outside your network, it appears as though only a single computer is online.
OS X's Own Internet Router
|
User Level: |
admin |
|
Affects: |
computer |
|
Terminal: |
no |
Most Internet routers are hardware devices that provide routing services for broadband connections such DSL and cable; a few, such as Apple's AirPort Base Station, also work with dial-up connections. Mac OS X actually includes a software router—based on the Unix program natd—that works with both broadband and dial-up connections. Called Internet Sharing in OS X, this router is set up from the Internet tab of System Preferences' Sharing pane. Just like with a hardware Internet router, other computers on your network can take advantage of your Mac's Internet Sharing via Ethernet or wireless (AirPort) connections, so a small hom


