Recipe 9.9 Use an ActiveX Control
9.9.1 Problem
Access ships with the ActiveX Calendar control. How can you incorporate this and other custom controls into your Access applications?
9.9.2 Solution
ActiveX controls are not as commonly used in Access as they are in development environments such as Visual Basic, and some controls that work in other environments don't work well in Access. However, a number of controls have been created to work well in Access, and Microsoft ships one such control with the product: a very useful Calendar control. This solution shows you how to use the Calendar control in both bound and unbound modes. You'll also learn how to create a general-purpose reusable pop-up calendar form.
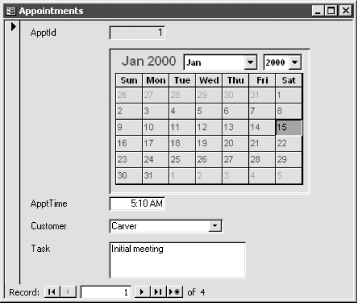
Load the 09-09.MDB database and open frmAppointment1 in form view (see Figure 9-27). Create a new record, selecting a date by using the Calendar control's Month and Year combo box controls to navigate to the desired month and then clicking on the date on the calendar. Complete the rest of the record and close the form. Now open the tblAppointment table to verify that the date you selected was stored in the ApptDate field of that record.
Figure 9-27. The frmAppointment1 form
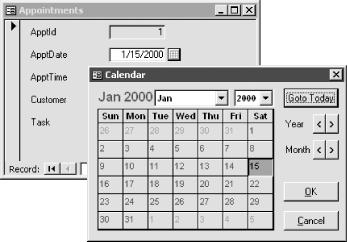
Open frmAppointment2 in form view and select a date by clicking on the calendar button to the right of the ApptDate text box. A pop-up form will be displayed, where you can select a date again using the Calendar control (see Figure 9-28). Double-click on a date to select it and close the calendar pop-up form, or click once on a date and use the OK button. You may also wish to experiment with the Go to Today button, the Month and Year navigation buttons, and the Cancel button.
Figure 9-28. Selecting a date using the frmPopupCal form
9.9.2.1 Add a bound Calendar control to your form
Follow these steps to add the Calendar control to an existing form to replace a text box for selecting dates:
Create a form (or edit an existing one) bound to a table that has a date/time field formatted as a date without time.
Select Insert
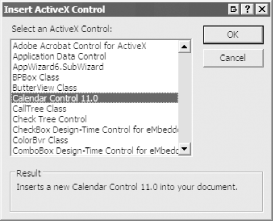
ActiveX Control. The Insert ActiveX Control dialog will appear, as shown in Figure 9-29. (The list of available controls that appear on your screen will likely differ from the list displayed here.)
Select the Calendar control and click OK to close the dialog. Move and resize the control as needed. On the frmAppointment1 form, we resized the control to a width of 2.375" and a height of 1.8333".
Figure 9-29. The Insert ActiveX Control dialog
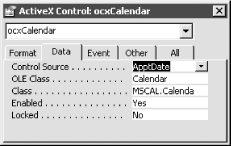
Set the control's ControlSource property to point to the date field in the underlying record source for the form (see Figure 9-30).
Figure 9-30. The calendar control can be directly bound to a field
Right-click anywhere on the embedded custom control to display its shortcut menu. Select Calendar Control Object
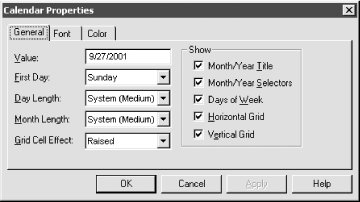
Properties from the shortcut menu, and the Calendar control properties sheet will appear (see Figure 9-31).
Use this to customize the various properties of the control. For example, we changed the properties shown in Table 9-7 to non-default values to make the calendar look better at a smaller size. Use the Apply button to preview the settings while keeping the properties sheet open. You may also wish to use the Help button to view the custom control's help file at this time. (Not all custom controls support the Apply and Help buttons.) When you're done, click on the OK button to close the custom properties sheet. These special custom control properties are also available from the Other tab of the control's regular properties sheet.
Figure 9-31. The custom properties sheet for the Calendar control
|
Tab |
Property |
Value |
|
General |
DayLength |
Short |
|
MonthLength |
Short | |
|
Fonts |
TitleFont |
Font: MS Sans Serif; Font Style: Bold; Size: 9.65 points |
Save the form and switch to form view to see it in action.
9.9.2.2 Create a generic unbound pop-up calendar form
Follow these steps to create a generic unbound pop-up calendar form:
Create a new form called frmPopupCal with the properties shown in Table 9-8.
|
Property |
Value |
|---|---|
|
DefaultView |
Single Form |
|
ScrollBars |
Neither |
|
RecordSelectors |
No |
|
NavigationButtons |
No |
|
AutoResize |
Yes |
|
PopUp |
Yes |
|
Modal |
Yes |
|
BorderStyle |
Thin |
|
MinMaxButtons |
None |
Select Insert
ActiveX Control. The Insert ActiveX Control dialog will appear, as shown in Figure 9-29. Select the Calendar control and click OK to close the dialog. Move and resize the control as needed. On the frmPopupCal form, we resized the control to a width of 2.4167" and a height of 1.9167". Name the control ocxCal.
Adjust the custom properties of the control as discussed in Step 4 of the previous section.
Add seven command button controls to the right of the control, as shown in Table 9-9.
|
Control name |
Caption |
|---|---|
|
cmdToday |
Goto Today |
|
cmdPrevYear |
< |
|
cmdNextYear |
> |
|
cmdPrevMonth |
< |
|
cmdNextMonth |
> |
|
cmdOK |
&OK |
|
cmdCancel |
&Cancel |
Create an event procedure attached to the Click event of each button. (If you're unsure of how to do this, see How Do I Create an Event Procedure? in the the preface of this book.) Add the following event procedures to the appropriate buttons:
Private Sub cmdCancel_Click( )
    DoCmd.Close acForm, Me.Name
End Sub

Private Sub cmdNextMonth_Click( )
    Me.ocxCal.NextMonth
End Sub

Private Sub cmdNextYear_Click( )
    Me.ocxCal.NextYear
End Sub

Private Sub cmdOK_Click( )
    Me.Visible = False
End Sub

Private Sub cmdPrevMonth_Click( )
    Me.ocxCal.PreviousMonth
End Sub

Private Sub cmdPrevYear_Click( )
    Me.ocxCal.PreviousYear
End Sub

Private Sub cmdToday_Click( )
    Me.ocxCal.Today
End Sub
Add the following code to the event procedure attached to the form's Load event:
Private Sub Form_Load( )
    If Not IsNull(Me.OpenArgs) Then
        Me.CalDate = Me.OpenArgs
    End If
End Sub
Add the following code to the event procedure attached to the Calendar control's DblClick event:
Private Sub ocxCal_DblClick( )
    Call cmdOK_Click
End Sub
Note that this event will be found under the Other tab of the control's properties sheet, not under the Event tab.
Add the following two property procedures to the form's module:
Public Property Let CalDate(datDate As Date)
    Me.ocxCal = datDate
End Property

Public Property Get CalDate( ) As Date
    CalDate = Me.ocxCal
End Property
Save and close frmPopupCal.
Import the basCalendar module from 09-09.MDB into your database.
Create a new form with a bound date text box control. This form will be used to test the pop-up calendar form created in Steps 1 through 10. Add a command button to the right of the text box control. Name it cmdPopupCal and add the following code to the event procedure attached to the command button's Click event:
Private Sub cmdPopupCal_Click( )

    Dim ctlDate As TextBox
    Dim varReturn As Variant

    Set ctlDate = Me.txtApptDate

    ' Request the date.
    varReturn = acbGetDate(ctlDate.Value)

    ' Change the value only if Null is not returned; otherwise
    ' the user cancelled, so preserve the existing value.
    If Not IsNull(varReturn) Then
        ctlDate = varReturn
    End If
End Sub
Change txtApptDate to the name of the text box created in this step.
Save the form, switch to form view, and test out the new pop-up form by clicking on the cmdPopupCal button.
9.9.3 Discussion
You insert a custom control into an
Access form using the Insert 

Access and Custom Control Data BindingAccess supports simple custom control data binding. This means you can use controls (such as the Calendar control) that are bound to a single field, but you can't use certain types of bound controls (such as Visual Basic's Data-Bound Grid control) that are bound to tables or queries. You can, however, use controls such as Data-Bound Grid control in Access if they are used in unbound mode. |
In Step 3 of adding a bound Calendar control, you bound the Calendar control directly to a field in the form's underlying record source.
In the steps for creating a generic unbound pop-up calendar form, you created code that manipulated five different methods of the Calendar control: PreviousYear, NextYear, PreviousMonth, NextMonth, and Today. For example, in the event procedure attached to cmdPreviousMonth, you added the following line of code:
Me.ocxCal.PreviousMonth
|
The frmPopupCal form contains two special procedures, called property procedures, that you may not have seen before. Using property procedures, you can create custom properties for a form that can be called from outside the form. This allows you to expose certain elements of the form to the outer world while keeping all of the form's controls and procedures?the form's inner workings?encapsulated within the form.
The Let property procedure creates a user-defined property for the form, controlling what happens when a calling routine sets the value of the form's property. The Get property procedure controls what happens when a calling routine requests the value of the property. The property procedure for frmPopupCal is simple, consisting of only an assignment statement, but you can do anything in a property procedure that you could do in a normal event procedure. For example, you can count the number of text box controls on a form in a Get property procedure, or you can set all the labels on a form to a certain color in a Let property procedure. The Solution in Recipe 9.10 contains examples of more complex property procedures.
|
The basCalendar module contains a wrapper function for the frmPopupCal pop-up calendar form. The acbGetDate wrapper function is shown here:
Function acbGetDate(varDate As Variant) As Variant

    Const acbcCalForm = "frmPopupCal"

    ' Open calendar form in dialog mode, passing it the current
    ' date using OpenArgs.
    DoCmd.OpenForm acbcCalForm, WindowMode:=acDialog, OpenArgs:=Nz(varDate)

    ' Check if the form is open; if so, return the date selected
    ' in the Calendar control, close the pop-up calendar form,
    ' and pass the new date back to the control. Otherwise,
    ' just return Null.
    If IsOpen(acbcCalForm) Then
        acbGetDate = Forms(acbcCalForm).CalDate
        DoCmd.Close acForm, acbcCalForm
    Else
        acbGetDate = Null
    End If

End Function
acbGetDate sends the calendar a date by using the OpenArgs property of the form (discussed in the Solution in Recipe 9.6) and requests a date from the form by using the CalDate user-defined property created using the Get property procedure. The Load event procedure of frmPopupCal sets the CalDate property to the OpenArgs property. In this case, it's necessary to use the OpenArgs property because you are opening the form in dialog mode, which makes it impossible to manipulate its properties directly.
Calling the acbGetDate wrapper function whenever you wish to use the pop-up calendar form to provide a date to your application ensures that you are always going through a single, consistent entry point. Thus, you never need to bother with opening or closing the form or worry about the names of the controls on frmPopupCal. Just use the following syntax to get a date using the pop-up form:
variable = acbGetDate(current value)
The pop-up calendar's AutoCenter property has been set to Yes so it will always appear in the center of the screen. You may wish to extend acbGetDate with optional left and top parameters so you can precisely position the pop-up calendar form on the screen when it is first opened.
The techniques presented in this solution can be applied to other Microsoft and third-party vendor custom controls, including controls that ship as part of the Visual Basic development environment.


