Installing Microsoft SQL Server 2000
Installing Microsoft SQL Server 2000
The installation instructions for MS SQL Server 2000 follow.
Prerequisites for the MS SQL Server 2000 Evaluation Edition
SQL Server is native to Windows and, as such, it is highly optimized to work with it. Before you embark on installing MS SQL Server 2000 check your system for software and hardware requirements.
Minimum system requirements
Table D-7 lists the minimum system requirements for the MS SQL Server 2000 Evaluation Edition.
|
Processor (CPU) |
Intel Pentium 166MHz or higher |
|
Operating system |
Windows XP
ProfessionalWindows XP Home Edition |
|
Memory (RAM) |
64 MB (128 MB recommended) |
|
Hard disk |
250 MB for typical installation |
|
Web browser |
Internet Explorer 5.0 or higher (usually included with any Windows edition) |
| Note |
If you are using Windows 95, you only can install client connectivity software (that is, a client to connect to a server installed somewhere on the network). |
Installing on Windows NT/2000/Me/XP
The installation instructions for these flavors of Windows are essentially the same, assuming your choice is Evaluation Edition of Microsoft SQL Server 2000.
Installation instructions
Perform the following steps to install MS SQL Server 2000 on your machine:
-
Insert the Microsoft SQL Server 2000 Evaluation Edition CD into your CD-ROM drive. (These instructions assume that you obtained an evaluation CD from Microsoft.) The installation will start automatically if your computer supports the autorun feature; if it does not, find your CD-ROM from Windows Explorer and double-click on autorun.exe. Alternatively, use the Add/Remove Program utility from your Control Panel. Select SQL Server 2000 Components menu option
-
The next screen gives you three options:
-
Install Database Server
-
Install Analysis Services
-
Install English Query
Select the Install Database Server option.
-
-
The Installation Wizard will guide you through the process. You can go back and forth to amend your choices — until you click the Finish button. SQL Server 2000 can be installed either locally or on a remote machine, as shown in Figure D-20. For the purposes of this book we recommend that you use the Local Computer installation.
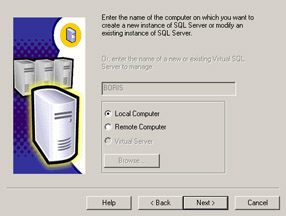
Figure D-20: This MS SQL 2000 installation window allows you to choose the destination computer name.The installation program detects any previous instances of SQL Server running on your machine and gives you appropriate install and/or upgrade options.
We assume that you're creating a new instance of SQL Server; if so, select the default option shown in Figure D-21. Click Next to continue.
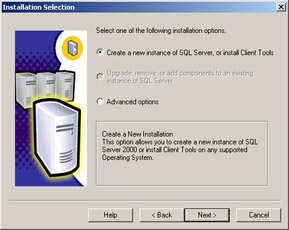
Figure D-21: MS SQL 2000 Installation Selection window -
The next screen prompts you for your name and the name of your company; fill in the appropriate information (or leave it blank). Click Next to continue to the License Agreement screen.
-
Before you can proceed, you need to agree to the terms of the license agreement that comes with your copy of SQL Server 2000.
-
Select installation options as shown in Figure D-22. Click Next.
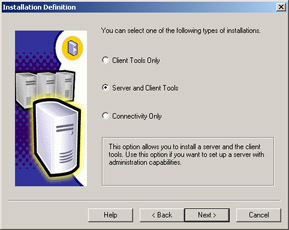
Figure D-22: MS SQL 2000 Installation Definition screen -
Leave Default checked as you are performing a default installation. We recommend that you do not install Named installation as it could complicate configuration and startup tasks. Click Next to proceed.
-
For the purposes of this book we recommend sticking with the Typical setup type. You also may wish to change the physical location of the program and database files by clicking the Browse button. Click Next. See Figure D-23.
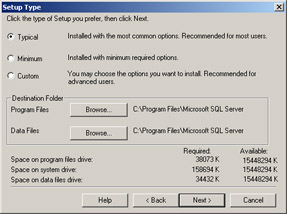
Figure D-23: MS SQL 2000 Setup Type screen -
You need to specify Services Accounts (see Figure D-24). You can start each service on a different account (for fine-tuning access privileges). We recommend selecting the same account for each service as well as auto-start for the SQL Server. By doing so, you will have SQL Server and SQL Server Agent started each time you start up your computer. Uncheck it if you wish to start SQL Server manually. Choose the Use a Domain User account radio button and use your OS login name and password (Windows 98 would not have this requirement). Click Next.
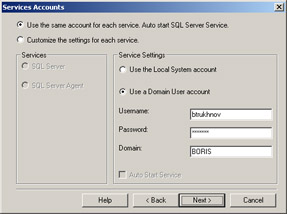
Figure D-24: MS SQL 2000 Services Accounts screen -
Specify the authentication mode for SQL Server as shown in Figure D-25. Choosing Windows Authentication Mode makes your on-line SQL Server databases accessible as soon as you log on to your account with your Windows NT/XP/2000 login; Mixed Mode requires you to supply a user ID and password to connect to SQL Server after you log on. Select Mixed Mode (for the purposes of this book as we intend on using userID/Password), specify a password, and click Next.
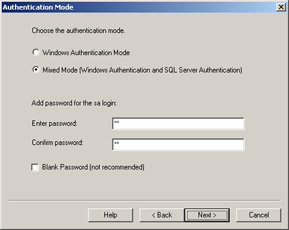
Figure D-25: MS SQL 2000 Authentication Mode screenNote The password you specify on this screen is for user sa; you will need it when installing the ACME database (see Appendix F).
-
The setup process has collected enough information to start the installation. Click Next to finish the installation.
Note You might see additional screens prompting you to choose licensing mode, collation order, network protocols, and so on. We recommend accepting defaults unless you have valid reasons for doing otherwise.
Assuming that all the steps of the installation routine have completed successfully, after reboot and logging on you should see a small icon (a computer tower and a small encircled green triangle) in your system tray (usually found in the lower right-hand corner of the Windows desktop). This means that MS SQL Server has been installed and started successfully. Now you can connect to it and run the SQL scripts provided with this book to install the ACME database and populate it with data; please refer to Appendix E.
Postinstallation tasks
Usually you do not need to do anything additional to run MS SQL Server on your machine after the install. However, if you selected the option not to start SQL Server services at system startup, you need to know how to do it manually. Microsoft provides an SQL Server Service Manager utility through which you can start, stop, or pause any SQL Server-related service (see Figure D-26).

Figure D-26: MS SQL 2000 Server Service Manager
You could access the Service Manager from StartàProgramsàMicrosoft SQL Server menu, or from the system tray icon (usually found at the lower right corner of the Windows taskbar). Make sure that the SQL Server Service Manager is running before attempting to execute any of the SQL examples from the book — either through the command line or through the Query Analyzer interface; otherwise you will get the "SQL Server does not exist or access denied" error.
MS SQL Server Administration is beyond the scope of this book, but for the most common scenarios, you do not need to know much about the RDBMS administration.
Uninstalling MS SQL Server 2000
You have two options for uninstalling MS SQL Server:
-
Re-run the initial setup program and choose the Uninstall option.
-
Add/Remove Programs utility from your computer's Control Panel.
To uninstall MS SQL Server 2000 using the setup program perform the following steps:
-
Start SQL Server Installation.
-
On the first screen, select the option SQL Server Components.
-
On the second screen, select the option Install Database Server.
-
Click Next on the Welcome screen.
-
The Computer Name screen prompts you to select installation on Local or Remote computer; if you followed our installation instructions, then your choice will be Local.
-
Select the option "Upgrade, remove, or add components to an existing instance of SQL Server."
-
Select the option "Uninstall your existing installation."
-
Click the Finish button on the final dialog box to complete the process.
The second option does not differ from any other program removal. If you installed several named instances of MS SQL Server, you must remove each instance separately.
| Note |
Some directories and files created during operation of the SQL Server on your computer may remain, and will require manual removal; these are found under the folder you've installed your SQL Server into: \Microsoft SQL Server\80 or \Microsoft SQL Server\MSSQL. |
| Caution |
In January 2003, the "Slammer" worm attacked a vulnerability in MS SQL Server 2000. If you have a copy of MS SQL Server 2000 Evaluation Edition, you should verify that it is a recent version that is not vulnerable to "Slammer." Additionally, Microsoft recommends that you should not run the trial version in a production environment and it should be kept separate from your production network. The SQL Server 2000 Evaluation Edition installation coverage in this appendix was written based on a version prior to the "Slammer" worm and it is possible that future evaluation edition versions will have installation procedures that vary from the steps described here. For non-evaluation MS SQL Server 2000 installations, you should verify that you have updated your servers with SQL Server 2000 Service Pack 2 and update MS02-061 or with SQL Server 2000 Service Pack 3. |


