Creating a Discussion Forum
In the following sections, you'll learn the design process behind a simple discussion forum. This includes developing the database tables, user input forms, and display of the results. When broken into pieces like this, such a task seems quite simple?and it is!
Designing the Database Tables
Think of the basic components of a forum: topics and posts. A forum?if properly used by its patrons?should have several topics, and each of those topics will have one or more posts by users. Knowing that, you should realize that the posts are tied to the topics through a key field. This key forms the relationship between the two tables.
Think about the requirements for the topics themselves. You definitely need a field for the title, and subsequently you may want fields to hold the creation time and the identification of the user who created the topic. Similarly, think of the requirements for the posts: You want the text of the post, the time it was created, and the person creating it. Most importantly, you need that key to tie the post to the topic.
The following two table creation statements create these tables, called forum_topics and forum_posts:
mysql> create table forum_topics (
    -> topic_id int not null primary key auto_increment,
    -> topic_title varchar (150),
    -> topic_create_time datetime,
    -> topic_owner varchar (150)
    -> );
Query OK, 0 rows affected (0.03 sec)

mysql> create table forum_posts (
    -> post_id int not null primary key auto_increment,
    -> topic_id int not null,
    -> post_text text,
    -> post_create_time datetime,
    -> post_owner varchar (150)
    -> );
Query OK, 0 rows affected (0.00 sec)

|
In this forum example, we will identify users by their e-mail addresses and not require any sort of login sequence. In the activity at the end of this hour, you'll be given some hints on extending this forum example to fit within an environment of registered users. |
You should now have two empty tables, waiting for some input. In the next section, you'll create the input forms for adding a topic and a post.
Creating the Input Forms and Scripts
Before you can add any posts, you must add a topic to the forum. It is common practice in forum creation to add the topic and the first post in that topic at the same time. From a user's point of view, it doesn't make much sense to add a topic and then go back, select the topic, and add a reply. You want the process to be as smooth as possible.
Listing 14.1 shows the form for a new topic creation, which includes a space for the first post in the topic.
Listing 14.1 Form for Adding a Topic
  1: <html>
  2: <head>
  3: <title>Add a Topic</title>
  4: </head>
  5: <body>
  6: <h1>Add a Topic</h1>
  7: <form method=post action="do_addtopic.php">
  8: <p><strong>Your E-Mail Address:</strong><br>
  9: <input type="text" name="topic_owner" size=40 maxlength=150>
 10: <p><strong>Topic Title:</strong><br>
 11: <input type="text" name="topic_title" size=40 maxlength=150>
 12: <P><strong>Post Text:</strong><br>
 13: <textarea name="post_text" rows=8 cols=40 wrap=virtual></textarea>
 14: <P><input type="submit" name="submit" value="Add Topic"></p>
 15: </form>
 16: </body>
 17: </html>
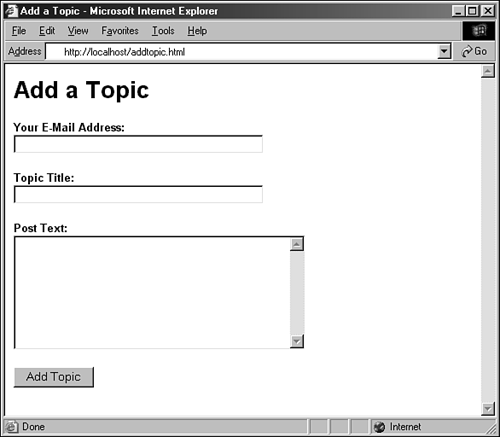
Seems simple enough?the three fields shown in the form, which you can see in Figure 14.12, are all you need to complete both tables; your script and database can fill in the rest. Save Listing 14.1 as something like addtopic.html and put it in your Web server document root so that you can follow along.
Figure 14.12. The topic creation form.
To create the entry in the forum_topics table, you use the topic_title and topic_owner fields from the input form. The topic_id and topic_create_time fields will be filled in automatically. Similarly, in the forum_posts table, you use the post_text and topic_owner fields from the input form, and the post_id, post_create_time, and the topic_id fields will be filled in automatically. Because you need a value for the topic_id field to be able to complete the entry in the forum_posts table, you know that query must happen after the query to insert the record in the forum_topics table.
Listing 14.2 creates the script to add these records to the table.
Listing 14.2 Script for Adding a Topic
  1: <?php
  2: //check for required fields from the form
  3: if ((!$_POST[topic_owner]) || (!$_POST[topic_title])
  4:     || (!$_POST[post_text])) {
  5:     header("Location: addtopic.html");
  6:     exit;
  7: }
  8:
  9: //connect to server and select database
 10: $conn = mysql_connect("localhost", "joeuser", "somepass")
 11:     or die(mysql_error());
 12: mysql_select_db("testDB",$conn) or die(mysql_error());
 13:
 14: //create and issue the first query
 15: $add_topic = "insert into forum_topics values ('', '$_POST[topic_title]',
 16:     now(), '$_POST[topic_owner]')";
 17: mysql_query($add_topic,$conn) or die(mysql_error());
 18:
 19: //get the id of the last query
 20: $topic_id = mysql_insert_id();
 21:
 22: //create and issue the second query
 23: $add_post = "insert into forum_posts values ('', '$topic_id',
 24:     '$_POST[post_text]', now(), '$_POST[topic_owner]')";
 25: mysql_query($add_post,$conn) or die(mysql_error());
 26:
 27: //create nice message for user
 28: $msg = "<P>The <strong>$topic_title</strong> topic has been created.</p>";
 29: ?>
 30: <html>
 31: <head>
 32: <title>New Topic Added</title>
 33: </head>
 34: <body>
 35: <h1>New Topic Added</h1>
 36: <?php print $msg; ?>
 37: </body>
 38: </html>
Lines 3?7 check for the three required fields we need to complete both tables. If either one of these fields is not present, the user is redirected to the original form.
Lines 10?12 form the database connection, which should be familiar to you by now. Lines 15?17 create and insert the first query, which adds the topic to the forum_topics table. Note that the first field is left blank, so the automatically incrementing number is added by the system. Similarly, the now() function is used to time stamp the record with the current time. The other fields in the record are completed using values from the form.
Line 20 shows the use of a very handy function: mysql_insert_id(). This function retrieves the primary key ID of the last record inserted into the database by this script. In this case, mysql_insert_id() gets the id value from the forum_topics table, which will become the entry for the topic_id field in the forum_posts table.
Lines 23?25 create and insert the second query, again using a mixture of information known and supplied by the system. Line 28 simply creates a message for the user, and the rest of the script rounds out the display.
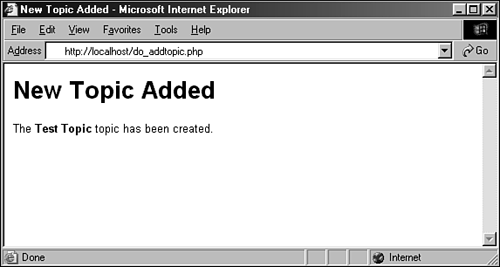
Save this listing as do_addtopic.php?the name of the action in the previous script?and place it in the document root of your Web server. Complete the form and then submit it, and you should see the "New Topic Added" message. Figures 14.13 and 14.14 show the sequence of events.
Figure 14.13. Adding a topic and first post.
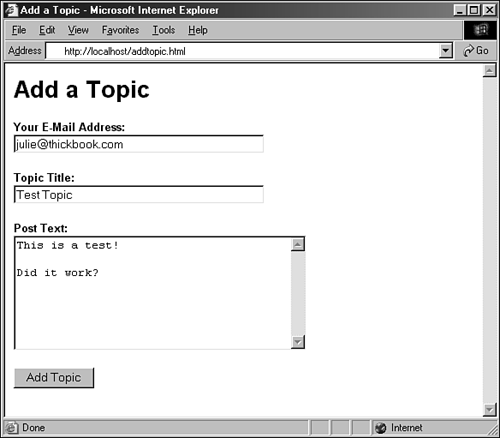
Figure 14.14. Successful addition of a topic and first post.
In the next section, you'll put together two more pieces of the puzzle: displaying the topics and posts, and replying to a topic.
Displaying the Topic List
Now that you have a topic and at least one post in your database, you can display this information and let people add new topics or reply to existing ones. In Listing 14.3, we take a step back and create a topic listing page. This page will show the basic information of each topic and provide the user with a link to add a new topic; you already have the form and script for that. This script would actually be an entry page for your forum.
Listing 14.3 Topic Listing Script
  1: <?php
  2: //connect to server and select database
  3: $conn = mysql_connect("localhost", "joeuser", "somepass")
  4:     or die(mysql_error());
  5: mysql_select_db("testDB",$conn) or die(mysql_error());
  6:
  7: //gather the topics
  8: $get_topics = "select topic_id, topic_title,
  9: date_format(topic_create_time, '%b %e %Y at %r') as fmt_topic_create_time,
 10: topic_owner from forum_topics order by topic_create_time desc";
 11: $get_topics_res = mysql_query($get_topics,$conn) or die(mysql_error());
 12: if (mysql_num_rows($get_topics_res) < 1) {
 13:    //there are no topics, so say so
 14:    $display_block = "<P><em>No topics exist.</em></p>";
 15: } else {
 16:    //create the display string
 17:    $display_block = "
 18:    <table cellpadding=3 cellspacing=1 border=1>
 19:    <tr>
 20:    <th>TOPIC TITLE</th>
 21:    <th># of POSTS</th>
 22:    </tr>";
 23:
 24:     while ($topic_info = mysql_fetch_array($get_topics_res)) {
 25:        $topic_id = $topic_info['topic_id'];
 26:        $topic_title = stripslashes($topic_info['topic_title']);
 27:        $topic_create_time = $topic_info['fmt_topic_create_time'];
 28:        $topic_owner = stripslashes($topic_info['topic_owner']);
 29:
 30:        //get number of posts
 31:        $get_num_posts = "select count(post_id) from forum_posts
 32:             where topic_id = $topic_id";
 33:        $get_num_posts_res = mysql_query($get_num_posts,$conn)
 34:             or die(mysql_error());
 35:        $num_posts = mysql_result($get_num_posts_res,0,'count(post_id)');
 36:
 37:        //add to display
 38:        $display_block .= "
 39:        <tr>
 40:        <td><a href=\"showtopic.php?topic_id=$topic_id\">
 41:        <strong>$topic_title</strong></a><br>
 42:        Created on $topic_create_time by $topic_owner</td>
 43:        <td align=center>$num_posts</td>
 44:        </tr>";
 45:    }
 46:
 47:    //close up the table
 48:    $display_block .= "</table>";
 49: }
 50: ?>
 51: <html>
 52: <head>
 53: <title>Topics in My Forum</title>
 54: </head>
 55: <body>
 56: <h1>Topics in My Forum</h1>
 57: <?php print $display_block; ?>
 58: <P>Would you like to <a href="addtopic.html">add a topic</a>?</p>
 59: </body>
 60: </html>
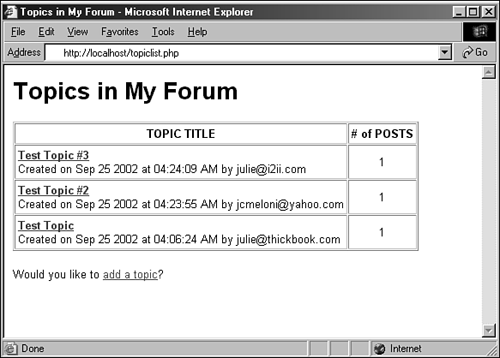
Although Listing 14.3 looks like a lot of code, it's actually many small, simple concepts you've already encountered. Lines 3?5 make the connection to the database, in preparation for issuing queries. Lines 8?10 show the first of these queries, and this particular one selects all the topic information, in order by descending date. In other words, display the topic that was created last (the newest topic) at the top of the list. In the query, notice the use of the date_format() function to create a much nicer date display than the one stored in the database.
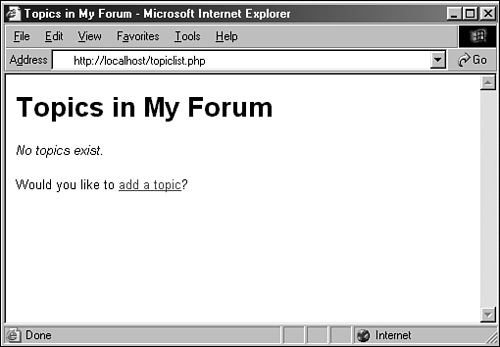
Line 12 checks for the presence of any records returned by the query. If no records are returned, and therefore no topics are in the table, you'll want to tell the user. Line 14 creates this message. At this point, if no topics existed, the script would break out of the if...else construct and be over with, the next action occurring at line 51, which is the start of the static HTML. If the script ended here, the message created in line 14 would be printed in line 57, and you would see something like Figure 14.15.
Figure 14.15. No topics found.
If, however, you have topics in your forum_topics table, the script continues at line 15. At line 17 a block of text is started, containing the beginnings of an HTML table. Lines 18?22 set up a table with two columns: one for the title and one for the number of posts. The text block is stopped momentarily, and at line 24 we begin to loop through the results of the original query.
The while loop in line 24 says that while there are elements to be extracted from the result set, extract each row as an array called $topic_info, and use the field names as the array element to assign the value to a new variable. So, the first element we try to extract is the topic_id field, on line 25. We set the value of $topic_id to $topic_info['topic_id'], meaning that we get a local value for $topic_id from an array called $topic_info, containing a slot called topic_id. Continue doing this for the $topic_title, $topic_create_time, and $topic_owner variables in lines 26?28. The stripslashes() function removes any escape characters that were input into the table at the time of record insertion.
In lines 31?35 we issue another query, in the context of the while loop, to get the number of posts for that particular topic. In line 38 we continue the creation of the $display_block string, using the concatenation operator (.=) to make sure this string is tacked on to the end of the string we have created so far. In line 40 we create the HTML table column to display the link to the file that will show the topic (showtopic.php), and also print the topic owner and creation time. The second HTML table column, on line 43, shows the number of posts. On line 45 we break out of the while loop and in line 48 add the last bit to the $display_block string, to close the table. The remaining lines print the HTML for the page, including the value of the $display_block string.
If you save this file as topiclist.php and place it in your Web server document root, and if you have topics in your database tables, you may see something like Figure 14.16.
Figure 14.16. Topics are available.
Displaying the Posts in a Topic
As you may have guessed, the next item on the task list is to build that showtopic.php file, to show the topic's postings. Listing 14.4 does just that.
Listing 14.4 Script to Show Topic Posts
  1: <?php
  2: //check for required info from the query string
  3: if (!$_GET[topic_id]) {
  4:    header("Location: topiclist.php");
  5:    exit;
  6: }
  7:
  8: //connect to server and select database
  9: $conn = mysql_connect("localhost", "joeuser", "somepass")
 10:     or die(mysql_error());
 11: mysql_select_db("testDB",$conn) or die(mysql_error());
 12:
 13: //verify the topic exists
 14: $verify_topic = "select topic_title from forum_topics where
 15:     topic_id = $_GET[topic_id]";
 16: $verify_topic_res = mysql_query($verify_topic, $conn)
 17:     or die(mysql_error());
 18:
 19: if (mysql_num_rows($verify_topic_res) < 1) {
 20:     //this topic does not exist
 21:    $display_block = "<P><em>You have selected an invalid topic.
 22:     Please <a href=\"topiclist.php\">try again</a>.</em></p>";
 23: } else {
 24:     //get the topic title
 25:    $topic_title = stripslashes(mysql_result($verify_topic_res,0,
 26:         'topic_title'));
 27:
 28:    //gather the posts
 29:    $get_posts = "select post_id, post_text, date_format(post_create_time,
 30:         '%b %e %Y at %r') as fmt_post_create_time, post_owner from
 31:         forum_posts where topic_id = $_GET[topic_id]
 32:         order by post_create_time asc";
 33:
 34:    $get_posts_res = mysql_query($get_posts,$conn) or die(mysql_error());
 35:
 36:    //create the display string
 37:    $display_block = "
 38:    <P>Showing posts for the <strong>$topic_title</strong> topic:</p>
 39:
 40:    <table width=100% cellpadding=3 cellspacing=1 border=1>
 41:    <tr>
 42:    <th>AUTHOR</th>
 43:    <th>POST</th>
 44:    </tr>";
 45:
 46:    while ($posts_info = mysql_fetch_array($get_posts_res)) {
 47:        $post_id = $posts_info['post_id'];
 48:        $post_text = nl2br(stripslashes($posts_info['post_text']));
 49:        $post_create_time = $posts_info['fmt_post_create_time'];
 50:        $post_owner = stripslashes($posts_info['post_owner']);
 51:
 52:        //add to display
 53:        $display_block .= "
 54:        <tr>
 55:        <td width=35% valign=top>$post_owner<br>[$post_create_time]</td>
 56:        <td width=65% valign=top>$post_text<br><br>
 57:         <a href=\"replytopost.php?post_id=$post_id\"><strong>REPLY TO
 58:         POST</strong></a></td>
 59:        </tr>";
 60:    }
 61:
 62:    //close up the table
 63:    $display_block .= "</table>";
 64: }
 65: ?>
 66: <html>
 67: <head>
 68: <title>Posts in Topic</title>
 69: </head>
 70: <body>
 71: <h1>Posts in Topic</h1>
 72: <?php print $display_block; ?>
 73: </body>
 74: </html>
In Listing 14.4, lines 3?6 check for the existence of a value for topic_id in the GET query string. Because we're showing all the posts in a selected topic, we need to know which topic, and this is the manner in which the information is given to us. If a value in $_GET[topic_id] does not exist, the user is redirected to the topic listing page.
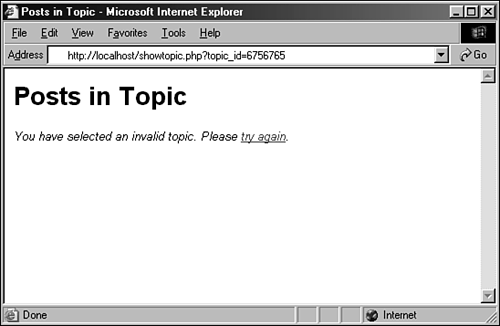
If you made it past the check for a topic_id, Lines 9?11 make the connection to the database, in preparation for issuing queries. Lines 14?17 show the first of these queries, and this one is used to validate that the topic_id sent in the query string is actually a valid entry, by selecting the associated topic_title for the topic in question. If the validation fails the test in line 19, a message is created in lines 21?22, and the script breaks out of the if...else statement and finishes up by printing HTML. This output looks like Figure 14.17.
Figure 14.17. Invalid topic selected.
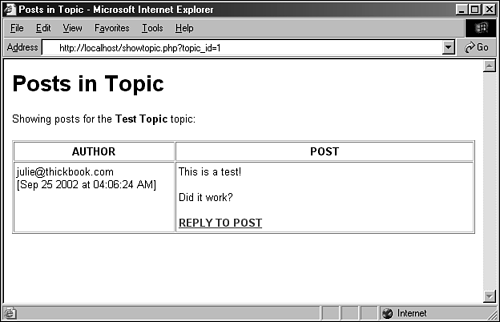
If, however, the topic is valid, we extract the value of topic_title in line 25, again using stripslashes() to remove any escape characters. Next, the query is issued in lines 29?32 to gather all the posts associated with that topic, in ascending order by time. In this case, newest posts are at the bottom of the list. At line 37 a block of text is started, containing the beginnings of an HTML table. Lines 40?44 set up a table with two columns: one for the author of the post and one for the post text itself. The text block is stopped momentarily and at line 46 we begin to loop through the results of the original query.
The while loop in line 46 says that while there are elements to be extracted from the result set, extract each row as an array called $posts_info, and use the field names as the array element to assign the value to a new variable. So, the first element we try to extract is the post_id field, on line 47. We set the value of $post_id to $posts_info['post_id'], meaning that we get a local value for $post_id from an array called $posts_info, containing a slot called post_id. Continue doing this for the $post_text, $post_create_time, and $post_owner variables in lines 48?50. The stripslashes() function is again used to remove any escape characters, and the nl2br() function is used on the value of $posts_info[post_text], to replace all newline characters with HTML <br> characters.
In line 53 we continue the creation of the $display_block string, using the concatenation operator (.=) to make sure this string is tacked on to the end of the string we have created so far. In line 54 we create the HTML table column to display the author and creation time of the post. The second HTML table row, on line 56, shows the text of the post as well as a link to reply to the post. On line 60 we break out of the while loop and on line 63 add the last bit to the $display_block string, to close the table. The remaining lines print the HTML for the page, including the value of the $display_block string.
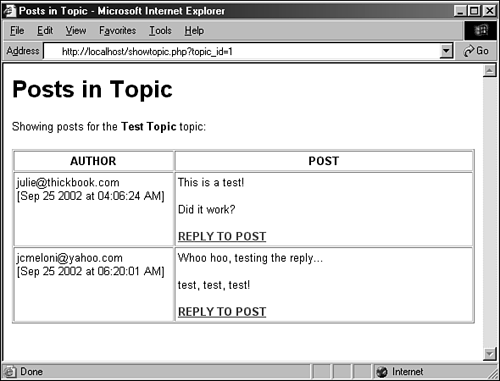
If you save this file as showtopic.php and place it in your Web server document root, and if you have posts in your database tables, you may see something like Figure 14.18.
Figure 14.18. Posts in a topic.
A one-post topic is boring, so let's finish up this hour by creating the script to add a post to a topic.
Adding Posts to a Topic
In this final step, you will create replytopost.php, which will look remarkably similar to the form and script used to add a topic. Listing 14.5 shows the code for this all-in-one form and script.
Listing 14.5 Script to Add Replies to a Topic
  1: <?php
  2: //connect to server and select database; we'll need it soon
  3: $conn = mysql_connect("localhost", "joeuser", "somepass")
  4:     or die(mysql_error());
  5: mysql_select_db("testDB",$conn) or die(mysql_error());
  6:
  7: //check to see if we're showing the form or adding the post
  8: if ($_POST[op] != "addpost") {
  9:    // showing the form; check for required item in query string
 10:    if (!$_GET[post_id]) {
 11:        header("Location: topiclist.php");
 12:        exit;
 13:    }
 14:
 15:      //still have to verify topic and post
 16:    $verify = "select ft.topic_id, ft.topic_title from
 17:     forum_posts as fp left join forum_topics as ft on
 18:     fp.topic_id = ft.topic_id where fp.post_id = $_GET[post_id]";
 19:
 20:    $verify_res = mysql_query($verify, $conn) or die(mysql_error());
 21:     if (mysql_num_rows($verify_res) < 1) {
 22:        //this post or topic does not exist
 23:        header("Location: topiclist.php");
 24:        exit;
 25:    } else {
 26:        //get the topic id and title
 27:        $topic_id = mysql_result($verify_res,0,'topic_id');
 28:        $topic_title = stripslashes(mysql_result($verify_res,
 29:         0,'topic_title'));
 30:
 31:        print "
 32:        <html>
 33:        <head>
 34:        <title>Post Your Reply in $topic_title</title>
 35:        </head>
 36:        <body>
 37:        <h1>Post Your Reply in $topic_title</h1>
 38:        <form method=post action=\"$_SERVER[PHP_SELF]\">
 39:
 40:        <p><strong>Your E-Mail Address:</strong><br>
 41:        <input type=\"text\" name=\"post_owner\" size=40 maxlength=150>
 42:
 43:        <P><strong>Post Text:</strong><br>
 44:        <textarea name=\"post_text\" rows=8 cols=40 wrap=virtual></textarea>
 45:
 46:        <input type=\"hidden\" name=\"op\" value=\"addpost\">
 47:        <input type=\"hidden\" name=\"topic_id\" value=\"$topic_id\">
 48:
 49:        <P><input type=\"submit\" name=\"submit\" value=\"Add Post\"></p>
 50:
 51:        </form>
 52:        </body>
 53:        </html>";
 54:    }
 55: } else if ($_POST[op] == "addpost") {
 56:    //check for required items from form
 57:    if ((!$_POST[topic_id]) || (!$_POST[post_text]) ||
 58:     (!$_POST[post_owner])) {
 59:        header("Location: topiclist.php");
 60:        exit;
 61:    }
 62:
 63:    //add the post
 64:    $add_post = "insert into forum_posts values ('', '$_POST[topic_id]',
 65:     '$_POST[post_text]', now(), '$_POST[post_owner]')";
 66:    mysql_query($add_post,$conn) or die(mysql_error());
 67:
 68:    //redirect user to topic
 69:    header("Location: showtopic.php?topic_id=$topic_id");
 70:    exit;
 71: }
 72: ?>
Lines 3?5 make the database connection at the outset of the script. Although you're performing multiple tasks depending on the status of the form (whether it's being shown or submitted), both conditions require database interaction at some point.
Line 8 checks to see whether the form is being submitted. If the value of $_POST[op] is not "addpost", the form has not yet been submitted. Therefore, it must be shown. Before showing the form, however, you must check for that one required item; lines 10?13 check for the existence of a value for post_id in the GET query string. If a value in $_GET[post_id] does not exist, the user is redirected to the topic listing page.
If you made it past the check for a topic_id, lines 17?20 issue a complicated-looking query that gets the topic_id and topic_title from the forum_topics table, based on the only value that you know: the value of the post_id. This query both validates the existence of the post and gets information you will need later in the script. Lines 21?24 act on the results of this validity test, again redirecting the user back to the topiclist.php page.
If the post is valid, you extract the value of topic_id and topic_title in lines 27?29, again using stripslashes() to remove any escape characters. Next, the entirety of the form for adding a post is printed to the screen, and that's it for this script until the form submission button is pressed. In the form, you see that the action is $_SERVER[PHP_SELF] on line 38, indicating that this script will be recalled into action. Two hidden fields are present, in lines 46 and 47, which hold the information that needs to be passed along to the next iteration of the script.
Moving along to line 55, this block of code is executed when the script is reloaded and the value of $_POST[op] (one of the hidden fields in the form) is "addpost". This block checks for the presence of all required fields from the form (lines 57?61) and then, if they are all present, issues the query to add the post to the database (lines 64?66). After the post is added to the database, the showtopic.php page is reloaded (lines 69?70), showing the user's new post along in the line.
If you save this file as replytopost.php and place it in your Web server document root, try it out and you may see something like Figures 14.19 and 14.20
Figure 14.19. Preparing to add a post.
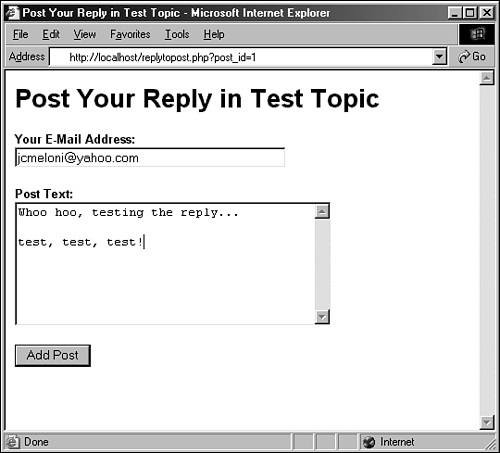
Figure 14.20. A post was added to the list.