SDP
The second half of this chapter deals with the features and functionality of SDP. Simply put, SDP includes the components that allow Compact Framework applications to be developed using VS .NET. The purpose of this section is to bring architects and developers quickly up to speed on how SDP leverages VS .NET by integrating with the development environment and languages, on the UI tools available, how the Compact Framework provides true emulation, how the debugging process works, and how other tools can assist in the development process.
Project System
In VS .NET 2003 to create an SDP, a developer simply needs to select the Smart Device Application icon in the New Project dialog. When selected, the Smart Device Application Wizard will be invoked, as shown in Figure 2-5.
Figure 2-5. Creating an SDP.
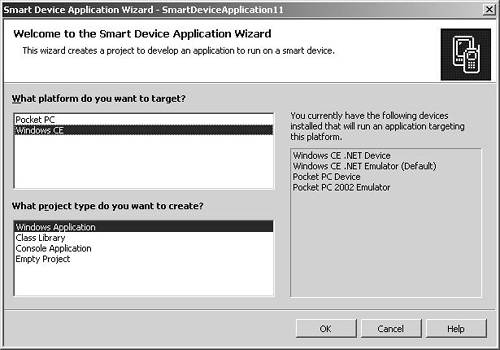
As you can see in Figure 2-5, SDP supports two platform types, Pocket PC and Windows CE .NET; and for each one, a set of project types follows:
Windows application: This creates a form-based application using the Windows.Forms assembly. In a Pocket PC project, the forms are defaulted to the landscape view and are 240 x 320; in Windows CE .NET projects, forms are 640 x 443.
Class library: This creates a code library assembly that can be referenced by other projects. It's useful for encapsulating reusable code.
Console application (nongraphical application): The former title appears when choosing Windows CE; the latter is for Pocket PC. In both cases, the application does contain windows, and its execution begins via a Main method. In the case of Windows CE, output can be directed to a console window (Console.WriteLine), whereas in Pocket PC the application does not support any UI.
Empty project: This is an empty project that can subsequently be populated with project items.
The wizard also shows the targets that are currently available for deploying and executing the Compact Framework application. By default, SDP installs both Windows CE .NET and Pocket PC 2002 emulators and, of course, lists actual devices that may be connected to the development machine. The emulators will be discussed in more detail later in this chapter. If Pocket PC is chosen as the platform, then only the Pocket PC emulator and device will be shown.
As with other VS .NET project types, the resulting project is placed in a solution and, by default, in the current user's Visual Studio Projects directory. Although the VS .NET solution uses the same format and .sln extension, the project file extensions differ. For example, projects using VB use the .vbdproj extension while C# projects use .csdproj. It is also important to note that the solution may contain only other projects that also target the same platform for each compiler. This means that the solution cannot contain a VB project for smart devices and a VB project for the desktop Framework or even a VB project for the Pocket PC and one for Windows CE .NET. However, a VB SDP can coexist with a C# desktop Framework project. This is the case because both the Compact Framework and the desktop Framework use the same compilers with different settings, and VS .NET can instantiate only one version.
.NET Language Support
As previously mentioned, SDP supports both the VB and C# compilers and, in fact, uses exactly the same compiler as the desktop Framework, although it is targeted to the different platforms. The specifics regarding what is supported by each compiler follow.
VB
Although the VB syntax supported in SDP is not a radical subset like the VB supported in eVB, when compiling a VB Compact Framework application, there are several similarities and differences to note.
First, although VB has traditionally supported its own set of file I/O functions, including ChDir, ChDrive, Print, PrintLine, Seek, FileOpen, FilePut, FileGet, and FileClose, among others, these functions are no longer supported in the Compact Framework. The reason is twofold: The Compact Framework already contains all the necessary I/O functionality in the System.IO namespace (File, Directory, TextReader, TextWriter, and so on), and omitting the older methods reduces the size of the Microsoft.VisualBasic.dll assembly that must be deployed with the project.
Second, the Compact Framework does not support late binding. In other words, code like the following snippet will not compile in an SDP because of the third line:
Dim mine As Object
mine = Activator.CreateInstance(GetType(String))
MsgBox(mine.Length)
In this case, the variable mine is declared as Object (System.Object) and created using the Activator class. Although the instantiation works, the call to the Length property will cause the compilation error, "The targeted version of the .NET Compact Framework does not support late binding."
NOTE
The features of the desktop Framework class libraries, such as asynchronous delegates and ActiveX controls, are, of course, not supported in VB or in C# in the Compact Framework.
Finally, because the same compiler is used (and the EE includes a Type Checker as mentioned previously), VB in the Compact Framework supports the same set of language constructs and strict type checking using the Option Strict On statement as it does in the desktop Framework.
OO Comes to DevicesAlthough VB 6.0 and eVB developers will feel fairly comfortable with the VB syntax used in SDP, it should be noted that the object-oriented nature of the Compact Framework means that developers need to have a firm grounding in object-oriented concepts in order to maximize their productivity. For example, the class libraries in the Compact Framework make extensive use of both implementation and interface inheritance. Developers familiar with these concepts can not only understand the framework more easily, but, using the framework, can write polymorphic code that is more maintainable and flexible than the component-based development typically done in eVB. In the long run, using object-orientation in their own designs allows developers to write less code and make the code that they do write more reusable. To take maximum advantage of OO, however, a development organization should also get up to speed on the use of design patterns. See the "Related Reading" section for two good books that can help you get started. |
C#
Unlike VB, the C# syntax used in the Compact Framework is 100% language compatible between the Compact Framework and the desktop Framework and, therefore, supports the ECMA-334 specification. This means that other than class library features that are unsupported, C# code will be easy to port from the desktop Framework to the Compact Framework and vice versa.
UI Support
Because of the obvious differences between the UI capabilities of devices targeted for the Compact Framework and desktop PCs, it is important to understand how those differences affect the design and development process for applications written for the Compact Framework and SDP.
Fortunately, although totally rewritten for the Compact Framework, the System.Windows.Forms namespace contains the same basic programming model (albeit a subset like the rest of the Compact Framework) as that found in the desktop Framework.[25] For example, it provides a Control class from which all other controls and the forms themselves are derived, just as in the desktop Framework. In addition, a forms designer is included in SDP to make development of the UI as simple as in eVB and yet more powerful. Finally, the Compact Framework and SDP also support the ability to create custom controls so that UI functionality can be easily reused across forms and projects.
|
NOTE
One of the features not supported by SDP is visual inheritance. It is possible to create, using this feature in VS .NET with a desktop Windows Forms application, a form complete with code and controls and then to inherit a new form from it using a menu option from within VS .NET. As changes are made to the base form, they are reflected on the derived form.
Supported Controls
To get a feel for the breadth of the supported controls, consider Table 2-3, which shows the controls included in SDP that are also in the desktop Framework.
Type | Controls |
|---|---|
Input | CheckBox, ComboBox, DomainUpDown, NumericUpDown, RadioButton, TextBox |
Non-visual | Timer, InputPanel, OpenFileDialog, SaveFileDialog |
Display | Label, TreeView, StatusBar, ListView, ListBox, DataGrid |
Images | ImageList, PictureBox |
Sliders | HScrollBar, VScrollBar, TrackBar, ProgressBar |
Place holders | Panel, TabControl |
Menus and Toolbars | MainMenu, ContextMenu, Toolbar |
Keep in mind as well that for each of the controls listed in Table 2-3, the look and feel of the control has been designed to preserve the look and feel of the device and that a subset of the properties, methods, and events is available. For example, the TextBox control supports just fewer than 50% of the members of the desktop Framework.[26]
[26] For example, none of the drag-and-drop or validation events and methods is supported.
While SDP supports the majority of controls that are frequently used, there are also several controls in the desktop Framework that are not included in SDP because of device constraints, the UI design guidelines for smart devices, or a lack of support in Windows CE. These include the GroupBox, RichTextBox, PrintDialog, PrintPreview, PrintPreviewControl, CheckedListBox, ColorDialog, FontDialog, ErrorProvider, HelpProvider, LinkLabel, NotifyIcon, Tooltip, and Splitter.
The process for using controls in an SDP is the same as that in the desktop Framework. The controls can be dragged and dropped on the design surface, which creates declarations in the code-behind file for the form. Unlike desktop projects, however, the controls cannot be anchored in place on a form because forms are not typically resized on a device (especially a Pocket PC) as they are on the desktop. Developers can then manipulate the controls in the code utilizing the IntelliSense feature of VS .NET. Events are handled by double-clicking on the control, which creates an event handler in the code-behind file using the Handles clause in VB or creating a delegate in C#. For example, to respond to the Click event of a button called btnShowStats, the following event handler would be created in VB:
Private Sub btnShowStats_Click(ByVal sender As System.Object, _
  ByVal e As System.EventArgs) Handles btnShowStats.Click
  ' Perform the logic here
End Sub
Note that the event handler uses the same event pattern as that in the desktop Framework, where the object that raised the event and event arguments are passed into the event.
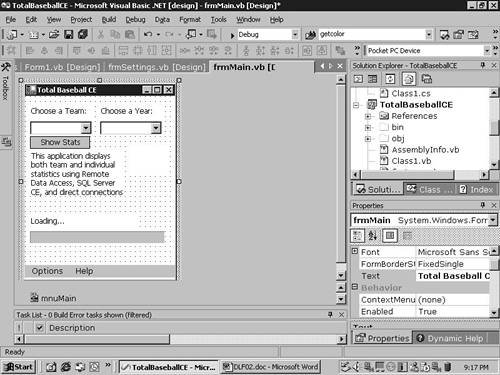
The Windows Forms designer in SDP also supports nongraphical controls through the inclusion of a panel in the designer, as shown in Figure 2-6. Nongraphical controls are placed in a panel beneath the form, in this case a MainMenu control called mnuMain.
Figure 2-6. Designing an SDP Form.
Custom Controls
Not only can developers use the controls provided by SDP in the toolbox, they can also create their own controls by deriving them from existing controls, by using a combination of existing controls (referred to as composite controls), or by creating brand new controls from scratch. An example of the former, a TextBox that allows only numeric entry written in C#, can be seen in Listing 2-1.
One UI or Two?As Figure 2-5 shows, SDP supports targeting both the Pocket PC and Windows CE platforms, and those platforms support various screen sizes with the Pocket PC at 240 x 320 and Windows CE defaulted to 640 x 443 (although the sizes will vary with the device). This difference will cause developers some difficulty when building solutions targeted at both platforms. Although it is possible to detect the platform at runtime using an operating system function and then to rearrange and resize controls programmatically, for most applications this won't be feasible. This is primarily because moving from a larger screen size to a smaller one also entails using different graphics and even splitting controls across multiple forms, which can result in code that is difficult to maintain and extend. As a result, a better technique is to partition the application fully using a layered architecture where the presentation code is separated from the business logic and data access. Then, create two entirely separate assemblies for the presentation code, one that targets each platform. A layer of code in each assembly (often referred to as user process components[*] ) then mediates the calls between the business and data-access logic and the presentation code by presenting a consistent interface or API to the rest of the application. The user process objects can then fully abstract the UI differences, for example, in the name and numbers of forms. The application can then be deployed as two separate packages (.cab files), one for each targeted device to minimize the install footprint on the device, or together in a single package. If the latter option is chosen, code in the application will need to check for the platform and to instantiate the appropriate user process components. |
[*] Documented as the Mediator design pattern in the Design Patterns book referenced at the end of the chapter.
Listing 2-1 Extending an Existing Control. This listing shows how to create a specialized version of the TextBox control that accepts only numeric input.
public class NumericTextBox : TextBox
{
 // Restricts the entry of characters to digits, the
 // negative sign, the decimal point, and editing keystrokes

 private NumberFormatInfo numberFormatInfo;
 private string groupSep;
 private string decSep;
 private string negativeSign;

 public NumericTextBox()
 {
   numberFormatInfo =
    System.Globalization.CultureInfo.CurrentCulture.NumberFormat;
   groupSep = numberFormatInfo.NumberGroupSeparator;
   decSep = numberFormatInfo.NumberDecimalSeparator;
   negativeSign = numberFormatInfo.NegativeSign;
  }

  protected override void OnKeyPress(KeyPressEventArgs e)
  {
    base.OnKeyPress(e);
    string keyInput = e.KeyChar.ToString();
    if (Char.IsDigit(e.KeyChar))
    {
      // Digits are OK
    }
    else if (keyInput.Equals(decSep) ||
      keyInput.Equals(groupSep) ||
        keyInput.Equals(negativeSign))
    {
        // Negative, decimal and group separator is OK
    }
    else if (e.KeyChar == '\b')
    {
      // Backspace key is OK
    }
    else
    {
      // Supress this invalid key
      e.Handled = true;
    }
  }
}
As you can see in Listing 2-1, to extend the functionality of an existing control, a developer must simply derive from the existing control and then override the appropriate methods or add additional members when appropriate. In this case the OnKeyPress method is overridden to accept only digits, decimal separators, the group separator, a negative sign, and the backspace. Note also how the control in its constructor reads the current culture information to ensure that the proper decimal, separator, and negative keystrokes are accepted.
In order to create either a composite or a completely custom control where the developer determines how the control paints, the developer must derive from the Control class. In the latter case the developer must also override the OnPaint method in order to draw the control using classes from the System.Drawing namespace. For more information and for sample code showing a custom control see the walkthrough "Authoring a Custom Control for Smart Device Applications" in the online documentation.
Whether creating a derived control as in Listing 2-1 or a custom or composite control, SDP does not currently support placing controls developed with the Compact Framework directly into the toolbox in VS .NET. In order to do so, developers must compile an alternate version of the control using the desktop Framework to be used at design time.[27] This design-time control can then be placed into the toolbox in VS .NET by right-clicking on the toolbox and selecting Add/Remove Items, as with other controls. The only caveat is that, of course, the Compact Framework must use the runtime version of the control for deployment to the device. This is accomplished by adding the RuntimeAssemblyAttribute to the control project and using it to specify the name, version, culture, and public key of the runtime control:
|
#if NETCFDESIGNTIME
  [assembly:
  System.CF.Design.RuntimeAssemblyAttribute("NumericTextBox,
  Version=1.0.0.0, Culture=neutral, PublicKeyToken=null")]
#endif
Note that the attribute is wrapped in a conditional directive that tests for the NETCFDESIGNTIME symbol. This symbol is specified when building the design-time control and is used by the SDP forms designer to link to the runtime version, whose assembly must be placed in the CompactFrameworkSDK\v1.0.5000\Windows CE directory.
In addition, developers can use the attributes of the System.ComponentModel namespace of the desktop Framework to affect the appearance of properties in the custom control. For example, if a custom control contains a property called MaxLength, the following attributes can be placed on the property declaration to affect the property grid.
#if NETCFDESIGNTIME
  [System.ComponentModel.Category("Appearance")]
  [System.ComponentModel.DefaultValueAttribute(20)]
  [System.ComponentModel.Description("The maximum length.")]
#endif
Here the property is assigned to the Appearance category, and it is given a default value of 20 and a short description shown in the Properties window.
Components
Just as in the desktop Framework, the Compact Framework also supports creating inherently nongraphical components that can be designed graphically in the forms designer and placed in the toolbox. These components show up in the panel at the bottom of the forms designer as shown in Figure 2-6. This is accomplished by deriving a class from System.ComponentModel.Component. Just as with custom controls, however, a design-time version of the component assembly must be compiled. Developers must also apply the ToolBoxItemFilterAttribute to the class to associate the component with the SDP forms designer and to specify that the component can be used for the smart device platform.
<ToolBoxItemFilterAttribute("NETCF", ToolBoxItemFilterType.Require), _
  ToolBoxItemFilterAttribute("System.CF.Windows.Forms", _
  ToolBoxItemFilterType.Custom)> _
Just as with custom controls, the properties of the component can be marked with attributes from the System.ComponentModel namespace to affect the appearance of the component in the property grid.
Drawing
As mentioned previously, the Compact Framework does support the System.Drawing namespace to allow developers to produce graphics directly on the screen. This can be especially useful when creating custom controls. Although System.Drawing does not support GDI+,[28] it does support the following core drawing primitives developers expect:
[28] GDI+ is the graphics subsystem shipped with Windows XP that supports two-dimensional vector graphics, imaging, and typography and improves upon the graphics device interface (GDI) shipped with earlier versions of Windows.
Drawing ellipses, icons, lines, images, strings, polygons, and rectangles by exposing a subset of the draw methods of the Graphics class
Filling ellipses, polygons, rectangles, and regions using the fill methods of the Graphics class
Providing image transparency through the inclusion of the ImageAttribute
As a result, although it is impossible to draw pie charts easily with the Compact Framework, it is fairly simple to draw rectangular shapes, for example, to create a bar chart, as shown in Listing 2-2, using VB.
Listing 2-2 Drawing a Bar Chart. This method draws a bar chart, given the PictureBox on which to draw it, the data for the X and Y axes, and the title.
Private Sub DrawBarChart(ByVal pb As PictureBox, _
  ByVal xAxis() As String, _
  ByVal yAxis() As Integer, ByVal title As String)

  Dim i As Integer
  Dim bm As New Bitmap(pb.Width, pb.Height)
  Dim g As Graphics
  Dim maxHeight As Integer = 180

  g = Graphics.FromImage(bm)

  ' Form color
  g.Clear(Color.Snow)

  ' Graph title
  g.DrawString(title, New Font("Tahoma", 8, FontStyle.Bold), _
    New SolidBrush(Color.Black), 5, 5)
  ' Graph legends
  Dim symbolLeg As Point = New Point(150, 10)
  Dim descLeg As Point = New Point(175, 6)
  For i = 0 To xAxis.Length - 1
    g.FillRectangle(New SolidBrush(GetColor(i)), symbolLeg.X, _
     symbolLeg.Y, 20, 10)
    g.DrawRectangle(New Pen(Color.Black), symbolLeg.X, _
     symbolLeg.Y, 20, 10)
    g.DrawString(xAxis(i).ToString, New Font("Tahoma", 8, _
     FontStyle.Regular), New SolidBrush(Color.Black), _
     descLeg.X, descLeg.Y)
    symbolLeg.Y += 15
    descLeg.Y += 15
  Next i

  ' Bars
  Dim padding As Integer = 15

  ' Find the tallest bar
  Dim max As Integer
  For Each i In yAxis
    If i > max Then
       max = i
    End If
  Next

  ' Scale the bars
  Dim yScale As Double = maxHeight / max

  For i = 0 To yAxis.Length - 1
    g.FillRectangle(New SolidBrush(GetColor(i)), _
     (i * padding) + 10, 200 - (yAxis(i) * yScale), 10, _
     (yAxis(i) * yScale) + 5)
    g.DrawRectangle(New Pen(Color.Black), (i * padding) + 10, _
      200 - (yAxis(i) * yScale), 10, (yAxis(i) * yScale) + 5)
  Next

  ' Border
  Dim p As New Pen(Color.Black)
  g.DrawRectangle(p, 1, 1, 220, 205)

  ' Set the picturebox
  pb.Image = bm

End Sub
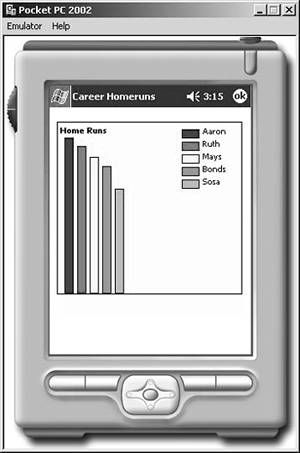
As you can see from Listing 2-2, the Compact Framework supports the Bitmap and Graphics classes necessary to draw a chart using the FillRectangle, DrawRectangle, and DrawString methods. In this case, the method creates the graph on a Bitmap, and then places the bitmap on the PictureBox control passed into the method. To call the method, a client would then simply need to populate the required arrays and pass them to the method as follows:
Dim yaxis() As Integer = {755, 714, 660, 611, 499}
Dim xaxis() As String = {"Aaron", "Ruth", "Mays", "Bonds", "Sosa"}
DrawBarChart(PictureBox1, xaxis, yaxis, "Home Runs")
The resulting bar chart can be seen in Figure 2-7.
Figure 2-7. Displaying a Bar Chart Produced in Listing 2-2 Running on the Pocket PC 2002 Emulator.
Design Guidelines
When building solutions for the Compact Framework, it is also extremely important to take into consideration the differences between PCs and smart devices. The following are some of the important points to consider when designing the UI for applications using the Compact Framework:
Be consistent: As much as is possible, follow the accepted Windows design guidelines published in documents such as the "Official Guide for User Interface Developers and Designers" published on the MSDN Web site.[29] This can ensure that your users leverage their existing knowledge. In addition, be consistent with other applications for smart devices and adopt commonly used conventions.
[29] See http://msdn.microsoft.com/library/default.asp?url=/library/en-us/dnwue/html/ch00a.asp?frame=true.
Design with user input in mind: Because smart devices typically accept stylus input, ensure that your applications use controls that do not require character input, such as the CheckBox, RadioButton, ComboBox, and NumericUpDown. Also, be aware that on the Pocket PC, the SIP is used and covers the bottom 25% of the screen when shown. Therefore, controls that require SIP input should be repositioned so they are not covered. Finally, make controls big enough to tap easily with the stylus (a minimum of 21 x 21 pixels), and leave enough space between controls so users don't accidentally tap them.
Take advantage of device characteristics: Where you can, take advantage of device-specific features, including the SIP, IrDA, and the notification API available in Pocket PC 2002.[30]
[30] For an example of using the notification API, see Chapter 11.
Promote readability: Although designers are often tempted to use small fonts to maximize the constrained real estate available on a smart device, you should use fonts that are easily readable to prevent eyestrain.
Short sessions are normative: Remember that users often use smart device in short stretches as time allows. Therefore, group required input on the initial form and allow users to come back later to add details by using menus.
Choose the device profile carefully: Remember that applications created with the Windows CE profile will run on Pocket PC but not vice versa. When targeting multiple profiles, add code to check for the device type, and load the appropriate forms accordingly.
Save defensively: Applications running on devices such as the Pocket PC may be moved to the background simply by tapping the "X" in the corner of the window, or they may be ended by the device at any time in order to conserve resources. Therefore, your applications should save data frequently.
Think about navigation: Although tempting, don't require users to do a lot of scrolling using scroll bars. Provide tabs and other more direct ways to navigate the application.
By following these guidelines, developers can create applications that perform the required functionality and that users will want to use.
Emulators
As mentioned at the beginning of this chapter, one of the goals of the Compact Framework and SDP was to provide true emulation. This goal was realized through the inclusion of two emulators, one for Windows CE .NET 4.1 and the other for Pocket PC 2002. The most interesting aspects of the emulators, however, are that they host exactly the same version of the operating system, EE, and class libraries as does managed code running on the device. This provides for a true emulation environment that allows developers to predict accurately how their applications will execute on the device.
It is important to note that the emulators are designed to run in complete isolation within the host operating system. As a result (and as you would expect), Compact Framework code running within the emulator does not have direct access to the machine on which the emulator is hosted. For example, when calling an XML Web Service hosted on the same machine as a Compact Framework application executing in the emulator, it must be called using the actual machine or Domain Name System (DNS) name, rather than localhost. In addition, the emulators have several unsurprising limitations in the following areas:
Networking: Emulate only the DEC 21040 Ethernet driver and do not support the hardware and drivers for USB devices.
Peripherals: Do not support any PC Card devices, Compact Flash (CF) cards, or other storage devices including CD and DVD file system drivers.
Display: Do not support screen rotation or the use of multiple screens.
NOTE
As a general rule, Compact Framework code executing within the emulators will run roughly 80% as fast as the same code executing on the device.
After an SDP is created, it can be tested using an emulator simply by compiling and deploying the application in VS .NET using the Build menu. Doing so will prompt the developer to choose one of the installed devices (and to set a default device) on which to deploy the application.[31] The emulators will be installed by VS .NET as devices and, so, will always be present. In addition, the dialog may also include an actual device if the machine has been configured to synchronize with a device such as a Compaq iPaq. By choosing the emulator, it will be launched, and the Compact Framework installed (if it is not present already), followed by the application. The developer can then manually execute the application by navigating to the installation directory on the device. At this point the application will run just as if it were running on the device connected to the developer's workstation. When the developer closes the emulator, he or she will be prompted to save its state. Doing so saves the developer from redeploying the Compact Framework to the emulator the next time the application is deployed.
[31] The default deployment device can also be set in the Device properties page in the Project Properties dialog.
NOTE
In order for the SDP to be deployed in the emulator, the developer's workstation must have a valid network connection. If the workstation is disconnected from the network (as in a laptop or notebook situation), the developer will need to install the Microsoft Loopback Adapter on his workstation. This can be done by using the Add Hardware Wizard in the Control Panel and selecting Add a New Hardware Device. Add a network adapter, and choose the Microsoft Loopback Adapter from the list of adapters when Microsoft is chosen as the manufacturer.
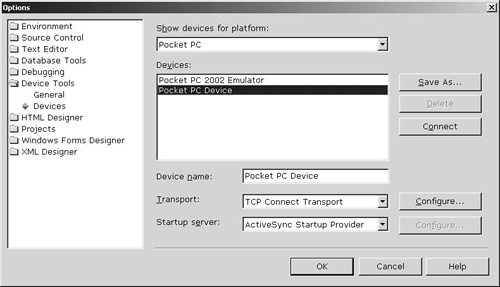
The emulators themselves can be configured using the Options dialog found on the Tools menu within VS .NET. The Device Tools option contains both General and Devices property pages, where the developer can elect to disable the prompt to choose the deployment device and configure the emulators respectively, as shown in Figure 2-8.
Figure 2-8. Configuring Devices Properties. This dialog is invoked from the Tools/Options menu in VS .NET and is used to configure the various devices available to the developer.
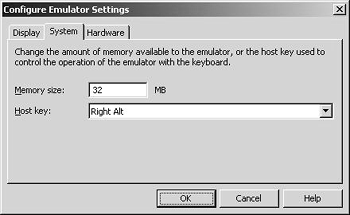
The interesting aspect of the Devices property page is that it can be used to change the display, memory, and hardware settings for the default emulator and used to add additional emulator devices with different settings. For example, after clicking the Configure button next to the Startup Server dropdown, the dialog box shown in Figure 2-9 is displayed. This dialog allows a developer to constrain the amount of memory available to the emulator in order to test an application under different configurations.
Figure 2-9. Configuring the Emulator.
In addition, the developer can map serial and parallel ports in the emulator to ports on the host machine, as well as change the display size and color depth. The developer can then click the Save As button to add a new device to the list of available deployment devices shown in the dialog.
Being able to change the emulator settings and create new devices in this way allows developers to test their applications effectively under a variety of conditions that emulate devices with varying displays and memory. |
Outside of VS .NET, the emulators themselves can be manipulated and configured in several ways. For example, the emulators provide both hot-key and menu options for performing a pause, hard reset, soft reset, and shutdown. In addition, the hot-key combinations, based on a host key configured in the Devices property page shown in Figure 2-7, allow for displaying the emulator, help, and shortcut menus.
The emulators can also be configured with different skins analogous to the configuration of Windows Media Player. This is accomplished by creating various .bmp files and an XML document that includes the skin schema.[32]
[32] To configure new emulator skins, see the emulator help file accessible from the Help menu within the emulator.
Finally, the emulators can be executed from the command line using the Emulator.exe executable located in the \Program Files\Visual Studio .NET\CompactFrameworkSDK\ConnectionManager\Bin directory. Using the command line, the developer can configure the video, skin, kernel image, and Ethernet support. As mentioned previously, the emulator can include Ethernet support by emulating a single DEC 21040 Ethernet card using IP. The only requirement is that the machine hosting the emulator has an Ethernet card through which the emulator can communicate. In the event that the host machine includes multiple Ethernet cards, the Media Access Control (MAC) address of the card to be used can be specified at the command line.
To start the emulator with custom options, the following command line can be used:
Emulator.exe /CEImage PPC2002.bin /Video 240x320x16 /Ethernet true
In this case, the emulator uses the default Pocket PC kernel image, a 240 x 320 pixel display with Ethernet networking turned on.
Debugging
One of the chief ways that SDP leverages VS .NET is in the use of the debugger and its tools. Because SDP can use existing tools, debugging a Compact Framework application is almost exactly like debugging a desktop Framework application and supports breakpoints, single-stepping through code, managed stack dumps that display the MSIL code, watch windows for variables, expression evaluation, and cross-language debugging (for example, stepping from an assembly written in C# into one written in VB). All of these features use the same key combinations and windows in VS .NET.
However, there are several differences:
There is no support for viewing native instructions, registers, and call stack. As a result, if an application contains both managed and unmanaged code, the debugger steps over any unmanaged calls.
There is no support for changing source code while the application is running (as is true of the desktop Framework).
There is no support for attaching to a running process or Application Domain.
Closing the device when the debugger is active causes the debugger to close with a connection failure.
Not only does SDP support debugging an application running in the emulator, it also is able to debug an application while it is executing on the device. By simply setting breakpoints and starting the debugger with the Start option on the Debug menu in VS .NET, the application is deployed to the target device, and the debugger is started. The Transport and Startup Server used to connect to the device can be configured in the Options dialog as shown in Figure 2-8 and set, for example, to use the TCP transport and the ActiveSync start-up server. For performance reasons, it is desirable to connect the device to the development machine using an Ethernet connection rather than USB. |
Readers familiar with a Pocket PC will be aware that when a form appears, the icon in the upper right-hand corner may be either an X or the OK symbol. Tapping the X does not close the form, but merely sends it to the background (where it can later be closed from the Memory tab in the Settings application), although tapping OK will close the form. Developers sometimes find this behavior irritating during development because they end up opening and closing the application many times. To avoid this, a developer can place the following code in the constructor of the form:
#If DEBUG Then
   Me.MinimizeBox = False
#Else
   Me.MinimizeBox = True
#End If
This code ensures that in the Debug build, the form will display the OK button, and in Release build, the default X button will display.
As mentioned previously, to ensure that error messages are available on the device during debugging (as well as executing outside the debugger), it is necessary to reference the System.SR.dll assembly in the project. This ensures that the appropriate .cab file, System_SR_language.cab, is deployed to the device.
Finally, the command-line runtime debugger (Cordbg.exe), which developers can use to debug a managed application outside of VS .NET, has been augmented to support the Compact Framework through the inclusion of mode and connect arguments that allow the debugger to target device projects and connect to remote devices using a machine name and port, respectively.
Additional Tools
Although SDP contains an impressive array of development tools, there are several additional tools that often come in handy when developing SDP. Several of these tools, including a remote registry viewer and remote file system viewer for use with the emulators, are available in the eMbedded Visual Tools SDK. Many developers will want to download and install these additional tools as well.


