Packaging Compact Framework Applications
Before an application can be deployed to a device or set of devices, it must be packaged. Fortunately, VS .NET and SDP provide plenty of help in targeting the application to a specific directory and building CAB files for deployment.
Setting Project and File Options
Perhaps the most fundamental aspect of deployment that developers need to be aware of before packaging the application is setting the project and file properties in VS .NET.
At the project level, VS .NET supports the Output File Folder property in the Properties window. This property specifies the deployment directory on the device that the project will be installed in. This property is consulted by the Deploy menu options in VS .NET, as well as the CAB file creation that will be discussed in the next section. It defaults to the \Program Files\projectname folder, but this setting can be changed easily.
The second property is the Build Action property shown in the Properties window for each file included in the project. This option can be set to one of four values shown in Table 10-1. One of the build actions shown therein can be associated with each file in an SDP.
Additionally, an icon can be associated with the application in the Project Properties dialog box accessed by right-clicking on the project name in VS .NET and selecting properties.
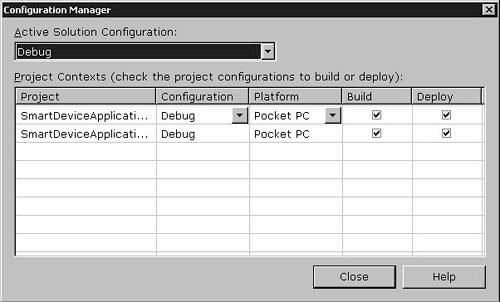
Finally, the build configuration can be set from within VS .NET by selecting the Build/Configuration Manager menu. The resulting dialog is shown in Figure 10-2. It is important to remember to change the solution or project configuration from Debug to Release before deploying the application because the Debug build slows performance and creates larger assemblies. The build mode for the current project can also be changed via the Solution Configuration option in the toolbar in VS .NET. |
Figure 10-2. Configuration Manager. This dialog shows the build and deployment settings for each project in the current solution. Changing from Debug to Release is recommended for performance and size reasons.
Build Action | Purpose |
|---|---|
None | Performs no action for the specified file. This can be used when the file is to be included in the project but not compiled or deployed to the device. This is useful for documentation, such as Visio diagrams. |
Compile | Compiles the file into the project. This is the setting used for all code files and forms. |
Content | Deploys the file along with the project. This is useful for deploying SQLCE databases, XML files, and other supplementary files that the application may use. |
Embedded resource | Includes the file in the assembly as a resource. This is useful for adding images and text files to the assembly and later retrieving them. For example, the following line of VB code loads a bitmap (the name is case sensitive) added to the project using this setting: [View full width] Dim a As [Assembly] = [Assembly] |
Creating a CAB File
Once the project options are set, a CAB file can be created to deploy the application. SDP in VS .NET makes this easy by including a Build Cab File menu, accessible by right-clicking the project. Note that this process is different from that in the desktop Framework, where a deployment project that uses the Windows Installer can be added to the solution to package the application.
When this option is invoked, VS .NET silently creates a .cab directory under the project directory on the developer's workstation. In this directory and within a directory identifying the build mode (Debug or Release) are placed a series of .cab files, each targeting a specific processor type, including ARM, ARM4, MIPS, SH3, and X86, and named accordingly, such as MyApplication_PPC_ARM.cab. To install the application on a device, the .cab file simply needs to be copied to the device (as discussed in the third and final section of this chapter) and executed.[4]
[4] WCELoad is the software that ships with Windows CE devices and performs the unpacking and installation of .cab files.
However, in order to customize the installation process, SDP also adds the files needed to customize and rebuild the .cab files in the obj\buildmode directory. In this directory are placed the BuildCab.bat, Dependencies_ platform.txt, and Projectname_platform.inf files,[5] along with a configuration file for each processor type. The batch file can be used to initiate the rebuild of the .cab files.[6] The dependencies file contains the list of .cab files that this file is dependent on and that always contains a reference to the Compact Framework .cab file for each processor type. At installation time, these dependencies will be checked to ensure that they have been applied to the device. The .inf file contains the installation settings to use when the .cab file is executed.
|
NOTE
The .cab file created for a project by SDP does not include the .cab file for the Compact Framework. Although future devices will include the Compact Framework in ROM, for the present the Compact Framework .cab file (installed on the developer's workstation) must be copied to the device and executed separately. This is done automatically when the application is deployed from VS .NET using the Deploy menu or when the application is debugged.
To customize the installation on the device, the .inf can be modified. Although a complete description of the .inf file format is beyond the scope of this book, a simple example would be to add a shortcut to the Programs group on a Pocket PC. This can be accomplished by modifying the following sections in the .inf file:
[DefaultInstall]
CEShortcuts=Shortcuts

[Shortcuts]
My Application,0,myapp.exe,%CE2%\Start Menu\Programs
In this example, the CEShortcuts section is redirected to the Shortcuts section of the file, and there a shortcut (actually a file with a particular format in Windows CE) is created by specifying (1) the text of the shortcut, (2) 0 to identify it as a file, (3) the file to create the shortcut to, and (4) the folder in which to place the shortcut. The identifier %CE2% specifies the \Windows directory on a Windows CE device. For more information about the various sections of the .inf file, see the "Related Reading" section at the end of this chapter.
Other examples of customizing the .inf file might include adding additional files (for example, SQLCE databases) to be distributed to the device to the .cab file by modifying the CopyFiles section.


