Developing ActiveSync Applications
Based on the functionality described thus far, several types of applications can be built based on ActiveSync services and used to synchronize device data with a desktop PC:
ActiveSync provider: As described in the ActiveSync provider section, the ActiveSync architecture is extensible and allows custom providers to be implemented. Although this approach is the most difficult of those described in this section for Compact Framework developers (because of the reliance on COM), this type of application represents the tightest integration with ActiveSync.
File synchronization: Although it is not typically discussed in most Windows CE resources, using the file-synchronization support included in ActiveSync allows a managed application to provide synchronization support with a modicum of effort; however, developers will likely want to add ActiveSync notification support, which will require a few calls to the Windows CE API. Applications that depend on file synchronization require an installed dummy file filter, which transfers files with a specific extension and stored in a special folder. This is discussed in more detail later in this section.
RAPI application: This type of application resides on the desktop and calls functions located in the Rapi.dll. The application would therefore not interact with ActiveSync at all, and so the developer would have full control over the GUI. The uses for this type of application are virtually unlimited due to the breadth of RAPI functions that allow remote activities, such as retrieving device system information, accessing the device registry, controlling processes, communicating with device windows using Windows messages, and doing directory and file manipulation, including the copying of files in either direction. A simple example of how to use RAPI is included in this chapter.
Pass-through application: When using ActiveSync 3.5 and higher coupled with Pocket PC 2002, the PC becomes the hub to the network for the device. To take advantage of this, no configuration is required. The developer simply builds the Compact Framework application to generate messages that access the network or Internet resources. These messages would "pass through" the PC and could be used with the types of communication that were covered in Chapter 4.
In the remaining parts of this section, we will discuss in more detail the latter three types of applications.
A Managed Application Using File Synchronization
Because this chapter emphasizes the most basic of synchronization options, we'll start by showing how the Compact Framework can be used to take advantage of the file-synchronization mechanism provided by ActiveSync. We'll illustrate this technique by synchronizing data for a list of book publishers between the desktop and device utilizing XML files generated from the database and an ADO.NET DataSet on the device. To do this, the following steps are required as discussed in the proceeding sections:
Enable file synchronization.
Create an ActiveSync dummy file filter.
Create a folder structure to support imported and exported files.
Build a PC application that generates files destined for transfer to the device and reads files transferred from the device.
Build a Compact Framework application registered to run upon a notification from ActiveSync.
Build a Compact Framework application that reads files transferred from the desktop and outputs files transferred to the desktop.
Enabling File Synchronization
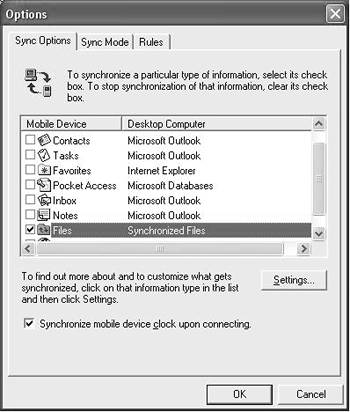
The first step is to enable file synchronization from the desktop machine. To turn this feature on, a developer would select Files from the Options dialog (the same dialog shown during the partnership creation process) shown in Figure 6-7, invoked from the Tools | Options menu in ActiveSync.
Figure 6-7. The Options Dialog. This dialog appears when creating a partnership. There are various Outlook features to choose from. File synchronization can be enabled by checking the Files checkbox.
Creating a Dummy File Filter
A dummy file filter is an ActiveSync configuration entry that tells the ActiveSync synchronization engine to transfer a file of a specific extension to the other side without conversion. By doing this, ActiveSync will copy data files not only from the desktop to the device, but also from the device to the desktop.
The filters for a machine are installed in the registry under the key HKEY_ LOCAL_MACHINE\Software\Microsoft\Windows CE Services\Filters. As seen in RegEdit (Figure 6-8), ActiveSync installs a variety of filters. Each subkey is a file extension of a registered file type. Under the subkey, there are string values for DefaultImport and DefaultExport. The entries hold the class identifier (CLSID) of a COM object responsible for the conversion and for transferring data between the desktop and device. Note that these entries can also have a value of Binary Copy to specify that the files should be transferred without conversion.
Figure 6-8. RegEditLlooking at the Registered ActiveSync Filters.
For our example, XML files will be synchronized without conversion for the application. To enable this, a developer would add a subkey to the registry key. The subkey should be of the form ".XXX." In this case, the extension would be .xml, as shown in Figure 6-8, in order to transfer XML files. Additionally, two string values are entered under the subkey for the DefaultImport and DefaultExport, which have the values Binary Copy assigned.
Although RegEdit can be used to make these entries, a second way to create these entries is to import a .reg file, the content of which is shown in the following snippet:
Windows Registry Editor Version 5.00
[HKEY_LOCAL_MACHINE\SOFTWARE\Microsoft\Windows CE Services\Filters\.xml]
"DefaultImport"="Binary Copy"
"DefaultExport"="Binary Copy"
Save this text file with a .reg extension, and then double-click to add the keys to the registry.
It is possible to view and edit the registry settings within the ActiveSync application by displaying the Options dialog, selecting Files, and selecting the Rules tab. From here a developer can disable the conversion of files at synchronization or edit the settings using the Device to Desktop and Desktop to Device tabs.
Creating a Folder Scheme
When a partnership is created, a synchronizing folder is created on the PC. The location of the folder is based on several factors, including where Windows user folders are stored, the Windows account name, and the name of the device. For example, if personal folders are stored in C:\Documents and Settings\, the user is jbox, and the device is named Pocket_PC, the resulting folder is C:\Documents and Settings\jbox\My Documents\Pocket_PC. Assuming that a filter is registered for a given file type, any file placed in this directory structure will be converted and transferred to the device's corresponding folder.
The device's synchronization folder will be \My Documents. Any file placed in this folder will be converted and transferred to the desktop machine (actually, the results will vary based on the registered filter).
In order to avoid conflict-resolution issues with using the same folder, we recommend creating an additional desktop folder with child folders for importing and exporting. So, in this example, we would have a folder called Publishers and two child folders called Inbox and Outbox. From the perspective of the device, Inbox is the container for files flowing to the device, whereas Outbox is for data flowing to the desktop. This structure should be placed under the file-synchronization folder as described in the previous paragraphs. This structure will then be automatically duplicated on the device during the next synchronization or immediately if the device is cradled.
This functionality can be tested by placing the files directly in the folders with Windows Explorer (as opposed to automating). For example, a developer could perform the following test to make sure everything is working:
Cradle a device with a partnership that has the synchronization setup, as we have discussed so far.
Find an XML file on the PC, and place it in one of the Publisher folders on the PC. In several seconds, the file will be on the device.
Delete the file from the PC. After several seconds, the file will disappear from the device.
On the PC, right click on one of the Publisher folders and create a text file. After several seconds, the file will show up on the device.
Click on the device file to load it in Pocket Word. Add some text like "From the Device," close the editor, and wait several seconds.
Open up the file on the PC to view the results.
Following the Data
Now that you have an understanding of the plumbing provided by ActiveSync, we'll discuss how both static and dynamic data will flow between the desktop and device.
The first flow is for static data. This is the type of data that rarely changes and usually comes in pairs (ID and description), for example, a list of states and their codes, customer types and their IDs, or other lookup and reference information that the device application will use to validate data. To move this type of data, the desktop application will need to query a database or other data store and write out the data at start-up and anytime the next flow occurs. By creating a Static.xml file in the Inbox folder, the file will be transferred to the device. The device application should notice this at some point, apply it intelligently, then delete the file from the device folder.
The second flow is for dynamic data, defined as any data that can be created, changed, or deleted on the device. This data must eventually be synchronized with the database or data store so that changes from any device will eventually find their way to the rest of the devices. This flow is initiated when the device is cradled. At this point, a notification application (using RAPI, for example) will send a message to the device application to initiate the task of writing all data to the Outbox (or launch the device application and write out the data), which will be synchronized to the desktop in a file called Dynamic.xml. This will be recognized by the desktop application, which will cause the data to be applied to the database, a full copy of the data to be generated from the database resulting in Dynamic.xml and Static.xml files in the Inbox folder (if needed), and the original Outbox/Dynamic.xml file to be deleted. The device will then notice the newly received files and start using them.
Building a Desktop Application
For this scheme to work, a process on the desktop has to push data from the data source and pull data from the device. Although it is a simple application to create, there are a few issues to consider.
The first is whether to build a Windows application or a Windows service. Fortunately, either type is easily built with VS .NET 2003.[2] Typically, a Windows service will be used if the situation requires a process that must run in the background, doesn't require user interaction, and should be running without someone initiating the process. Although a Windows service sounds like the right solution for this scenario, regrettably, ActiveSync requires a logged-in user; however, it still has the advantage of not requiring a user to initiate the process or worry about who is logged in. These will still be issues for ActiveSync itself.
[2] See the article referenced in the "Related Reading" section at the end of the chapter for the basics on creating Windows services.
A second issue entails dealing with the folder names and their hard coding. The preferred technique to avoid hard-coding paths in the application is to use the managed application's configuration file. By storing the path in the configuration file, the programmer can use the ConfigurationSettings.AppSettings class to retrieve the data easily.
The final issue centers on how to deal with the data. This program is responsible for interacting with the database and the synchronization folders. This responsibility requires two activities: (1) writing out a copy of static data to Publishers\Inbox, and (2) whenever a file shows up in the Outbox, reading the data and updating the database, making a new copy of the dynamic and static data in the Inbox, and then deleting the file in the Outbox. In order to be notified when a file reaches the Outbox, the desktop application can take advantage of the System.IO.FileSystemWatcher to avoid the polling logic using timers.[3]
[3] See Chapter 12 of Dan Fox's Building Distributed Applications in Visual Basic .NET referenced in the "Related Reading" section at the end of the chapter.
By letting the device react to the cradling event and then pushing the dynamic data to the desktop, the process ensures that all updates are applied to the database before a new copy is sent to the device. Another benefit is that when the application is brought up for the first time, the static data will be there for start-up.
Creating a Device Notification Application
The device application must be launched by the operating system when the device is cradled. There are several ways to accomplish this, but we'll describe the registration route (because the other is COM based). This task is accomplished by creating a stub application that calls the Windows CE API functions CeRunAppAtEvent or CeSetUserNotificationEx. Chapter 11 includes an example of CeRunAppAtEvent, and detailed instructions for building a full example with CeSetUserNotificationEx are provided in the lab at the Atomic Mobility site (http://atomic.quilogy.com/mobility). This lab was used at TechEd 2003 and is the basis of this notification application. This code takes advantage of PInvoke, although interaction with it is encapsulated in classes to make it easier to utilize.
When this program is launched by the act of cradling, the first step is to inform the device application. This is done using the following steps:
Check if the device application is running by checking for a mutex that the device program has created.
If the mutex exists, use the MessageWindow class to send a message, and then exit.
If the mutex does not exist, launch the application with command-line parameters to start a refresh, and exit the program.
Although you would think it would be possible to include this logic in the device application (described below) instead of having two applications on the device, the Compact Framework runtime will not allow a second instance of an application to run on the Pocket PC.
Using a Device Application
The device application is the Compact Framework application that the disconnected worker is to use. The application will likely utilize a DataSet as described in Chapter 3 for its local data storage. Other than providing the user with the UI for viewing and maintaining the data, the application will have several additional responsibilities related to the synchronization tasks.
For first time execution, the application should send an empty data set to the Outbox, which will launch the synchronization process at the desktop, resulting in a copy of the DataSet back at the device. If necessary, the desktop will create in the Inbox a Static.xml file that contains necessary lookup information for the application. During the time that the application is waiting for the data to return from the desktop, no changes to existing data should be allowed. When new files appear in the Inbox, the application should start immediately using the new data.
At this point, anytime a refresh message is received from the device notification application, the device application should create a Dynamic.xml file in the Outbox and wait for a Dynamic.xml file to return to the Inbox. Upon return, the dynamic file will act as the database for the device. This process is simply a subset of the initialization process, and so there is an opportunity here for code reuse.
When using this type of architecture, the Compact Framework will take advantage of the capability in ADO.NET to serialize and deserialize ADO.NET DataSet objects as XML files, as described in Chapter 3; however, be aware that the larger the XML files, the more time start up will require.
Conclusions on File-Synchronization Application
To summarize the process described in the preceding sections, consider the full process of using file synchronization as outlined in Figure 6-9 and described here.
Start the device notification application on the device. It does one of two things, depending on if the device application is running (determined by checking for an existing mutex): (a) If the device application is running, it does a broadcast using MessageWindow class, or (b) if the device application is not running, it does a CreateProcess on the device application passing command-line parameters to indicate an immediate refresh is needed.
Write out Dynamic.xml to Outbox.
ActiveSync replicates the file to the desktop Outbox.
The desktop application recognizes a new file arriving (for example, by using the FileSystemWatcher). The application reads the data and applies the data to the data source. The Inbox file should be deleted upon reading, which will delete the copy on the device.
The desktop application writes out Static.xml and a Dynamic.xml files to the Inbox folder. The Static.xml file includes a fresh copy of lookup data, and Dynamic.xml incorporates the changes from other users.
ActiveSync copies the files to the device Inbox folder.
The device application has been suspended since step 2. It now sees a file in the Inbox folder. It reads the files as DataSet objects, deletes the files from the Inbox (which deletes them from the desktop), and allows normal operation to continue.
Figure 6-9. The File-Synchronization Process.
File synchronization seems fairly simple at first glance; however, it does entail issues you and your team will need to consider. First, ActiveSync forces the device to be tied to a desktop machine. Second, scalability is limited due to working with a desktop process instead of a server process. Third, file synchronization copies entire sets of data, whereas a more robust synchronization process will allow for more granularity by allowing users to drill down to the record or field level. For these sorts of scenarios you'll want to explore the SQL Server CE synchronization discussed in the next chapter.
NOTE
The primary scenario for using file synchronization is when the master data source will be constrained to the desktop machine.
If the device does not have network connectivity, then cradling is still required; and although you might think that this automatically means that file synchronization must be used, you should also explore the ActiveSync pass-through capability described later in this chapter.
Utilizing RAPI in a Managed Application
As mentioned previously, RAPI is a core part of ActiveSync and allows a desktop application to control and query a device. Due to the need to access Rapi.dll, a .NET Framework application can use the PInvoke service described in Chapter 11. To give you a sense of how RAPI can be utilized, consider Listing 6-1, a simple example in C# that launches a game of Solitaire on the device from the desktop machine.
Listing 6-1 A RAPI Console. This C# snippet uses RAPI to start up Solitare on the device from the desktop.
using System.Runtime.InteropServices;

[DllImport("rapi.DLL", CharSet=CharSet.Unicode)]
public static extern int CeRapiInit();

[DllImport("rapi.DLL", CharSet=CharSet.Unicode)]
public static extern int CeRapiUninit();

[StructLayout(LayoutKind.Sequential,Pack=4)]
public struct ProcessInfo
{
  public IntPtr hProcess;
  public IntPtr hThread;
  public int dwProcessId;
  public int dwThreadId;
};

[DllImport("rapi.dll", CharSet=CharSet.Unicode)]
public static extern
int CeCreateProcess (string lpApplicationName,
  string lpCommandLine, int Res1, int Res2, int Res3,
  int dwCreationFlags, int Res4, int Res5, int Res6,
  ref ProcessInfo lpProcessInformation);

[DllImport("rapi.dll", CharSet=CharSet.Unicode)]
public static extern int CeCloseHandle(IntPtr Handle);

static void Main(string[] args)
{
  // Intialize RAPI
  int hr = CeRapiInit();

  //if safe to continue
  if (hr==0)
  {
    string strProg = @"\windows\solitare.exe";

    //build needed structure used in API call
    ProcessInfo pi = new ProcessInfo();

    //make important RAPI call to start Solitare
    CeCreateProcess(strProg,  "", 0, 0, 0, 0, 0, 0, 0, ref pi);

    //release handles created process and thread
    CeCloseHandle(pi.hProcess);
    CeCloseHandle(pi.hThread);
  }

  // Shutdown RAPI connection
  CeRapiUninit();

  return;
}
NOTE
As with any calls to PInvoke, the CeRapiInit, CeRapiUnit, and CeCreateProcess functions can be encapsulated in a managed class and exposed as static methods to make them easier to call and maintain.
For more detailed information on using RAPI in Compact Framework applications, we recommend Chapter 16 of Paul Yao and David Durant's Programming the .NET Compact Framework in C#, as noted in the "Related Reading" section at the end of the chapter. Not only does this chapter provide coverage of the 78 functions in RAPI, it also explores more advanced examples, including how to interoperate with COM.
Considerations for a Pass-Through Application
Even though the synchronization example looks interesting, it should be used only in specific scenarios. Although some will suggest that a solution should use file synchronization when over-the-air security is an issue or when there is no network connectivity built into the device, there is another option as well.
These issues are also good reasons for using the cradle, but for not using file synchronization. A more robust architecture is one that uses servers, rather than desktops; therefore, if the requirements include cradling, the solution can still utilize servers. One of the primary advantages, of course, is that scalability is more achievable, for example, when using SQL Server as opposed to Access or MSDE on a desktop.
Fortunately, ActiveSync can assist this type of application as well. With the combination of ActiveSync 3.5 (and higher) and Pocket PC 2002 (and higher), ActiveSync provides network connectivity to a device while cradled. This is known as ActiveSync pass-through and gives a device access to the network accessible from the desktop PC using TCP/IP. As a result, it is possible to have a cradled device that communicates directly with servers on a network.
There is, however, the issue of partnerships to resolve. In the default configuration of ActiveSync, the cradling of an unrecognized device always creates a prompt on the desktop asking users to choose to create a partnership or act as a guest, as described previously. In many basic scenarios the mobile application requires using PCs that have cradles, and those PCs are often located in field offices that may already be logged in under a different user's identity. As a result, either the logged on user will have to logoff and the roving user login, or the logged on user will have to create a partnership or choose guest with each of the devices that connect using its cradle.[4]
[4] Creating named partnerships is obviously problematic due to the existence of the PC user's Outlook information. You wouldn't want this information ending up on each device that synchronizes with the cradle on the PC.
To avoid forcing the desktop user to choose guest continually when synchronizing, there is a registry setting that will change the default behavior. By adding GuestOnly, a DWORD entry with a value of 1 that resides at HKLM\Software\Microsoft\Windows CE Services, the prompting will cease. Instead, sessions with unrecognized devices will automatically connect as guest. And, in these cases, the pass-through capability is all that is required.


