Setting Your Preferences
The System Preferences utility is an important tool you use to control how your Mac OS X system works and looks. If you have read through other parts of this book, you have already used some of the panes it contains to work with various parts of the system. Table 8.1 provides a summary of each pane and tells you where in this book you can learn more about it.
| Area | Pane | What It Does | Learn More About It |
|---|---|---|---|
| Personal | Desktop | Sets the background image of the desktop | "Customizing the Mac OS X Desktop," p. 99. |
| Personal | Dock | Controls how the Dock looks and works | "Customizing the Appearance and Behavior of the Dock," p. 115. (Chapter 5) |
| Personal | General | Sets interface colors and scrollbar behavior | "Setting General Preferences," p. 186. |
| Personal | International | Controls the language and formats used depending on the language you are working with | "Setting International Preferences," p. 187. |
| Personal | Login Items | Enables you to set the items that open when you log in | Chapter 2, "Getting Started with Mac OS X," p. 17. |
| Personal | My Account | Enables you to change your password, login picture, and Address Book card | "Configuring User Accounts," p. 26. |
| Personal | Screen Effects | Configures Mac OS X's built-in screensaver | "Saving Your Screen," p. 188. |
| Hardware | CDs & DVDs | Configures the actions that occur when you insert CDs or DVDs | Chapter 23, "Understanding and Using Data Storage Devices," p. 687. "Using Disks and Discs," p. 202. |
| Hardware | ColorSync | Synchronizes color among devices you use | "Synchronizing Color Among Devices," p. 682. |
| Hardware | Displays | Controls the display properties you use | "Finding, Installing, and Using a Monitor," p. 660. |
| Hardware | Energy Saver | Controls how your Mac sleeps | "Managing Your Mobile Mac's Power," p. 866. |
| Hardware | Keyboard | Sets keyboard preferences | "Configuring a Keyboard," p. 641. |
| Hardware | Mouse | Configures the behavior of your mouse or trackpad | "Configuring a Mouse," p. 644."Using and Configuring the Trackpad," p. 871. |
| Hardware | Sound | Manages your system sound and alert sounds | "Controlling Your System's Sound," p. 193. |
| Internet & Network | Internet | Sets preferences for your Internet configuration such as a default e-mail application and home page | "Configuring the Internet Pane of the System Preferences Utility," p. 251. |
| Internet & Network | Network | Configures your network settings for both Internet access and your LAN | Chapter 10, "Connecting Your Mac to the Internet," p. 233. Chapter 25, "Building and Using a Network," p. 721. |
| Internet & Network | QuickTime | Enables you to configure QuickTime for your Mac | "Configuring QuickTime," p. 506. |
| Internet & Network | Sharing | Controls access to your computer from the network and the Internet, and enables you to configure Mac OS X's built-in firewall, and to set up Internet account sharing | "Using Mac OS X to Serve Web Pages," p. 389. Chapter 25, "Building and Using a Network," p. 721. "Defending Your Mac Against Net Hackers," p. 803. "Using a Mac Running OS X to Share an Internet Account," p. 757. |
| System | Accounts | Creates and manages user accounts | "Creating User Accounts," p. 22. |
| System | Classic | Controls your Classic environment | "Installing, Configuring, and Running the Classic Environment," p. 166. |
| System | Date & Time | Manages the time and date information for your system | "Working with the Date and Time," p. 197. |
| System | Software Update | Maintains your system software | "Using Software Update to Maintain Your Software," p. 774. |
| System | Speech | Manages speech recognition and Text-to-Speech | "Controlling Your Mac's Speech," p. 198. |
| System | Startup Disk | Selects the startup volume that will be used the next time you start your Mac | "Choosing a Startup Volume with System Preferences," p. 203. |
| System | Universal Access | Controls options to improve access for physically or mentally challenged users | "Improving Access to the System," p. 192. |
TIP
Remember that you can customize the System Preferences utility's toolbar by dragging icons from the lower pane of the window to the toolbar. You can remove icons from the toolbar by dragging them off the toolbar.
Setting General Preferences
Use the General pane of the System Preferences utility to control several basic settings for your system.
Use the Appearance pop-up menu to choose Blue if you want color in the buttons, menus, and windows. Choose Graphite if you want to mute the color so that the color elements are gray instead. Use the Highlight pop-up menu to choose the highlight color.
Use the radio buttons to set scrolling behavior. You can place the scroll arrows together or at each end of the scrollbars or choose to have a scroll arrow placed at each end of the scrollbar. You can choose "Scroll to here" to cause a window to jump to the relative position on which you click or "Jump to next page" to scroll a page at a time when you click above or below the scroll box.
Set the number of recent items tracked on the Apple menu for applications and documents using the Number of Recent Items pop-up menus. You can track as few as five or as many as 50 recent items.
The lower part of the pane provides the controls you use to configure how font smoothing is enabled on your Mac. Font smoothing (known as anti-aliasing for graphics) reduces the "jaggies" that occur when you view certain fonts on the screen; this is most noticeable when you use larger sizes or thick fonts or when you apply bold or other formatting. Font smoothing is always turned on, but you can configure it specifically for your system. |
-
Open the General pane of the System Preferences utility.
-
At the bottom of the pane, select the smoothing style you want to use on the Font smoothing style pop-up menu. Your options are Standard ? Best for CRT, Light, Medium ? best for Flat Panel, or Strong. You will probably be satisfied with the option appropriate for the display type you use, but you can experiment with the other options to see whether one of them matches your needs better.
-
Choose the text size at or below which text smoothing is disabled on the Turn off text smoothing for font sizes pop-up menu. Because the effect of smoothing is less noticeable at small font sizes, your system can save some wasted processing power by not smoothing fonts displayed at smooth sizes. The default value is 8 pts, but you might not even notice if you increase this value slightly.
Setting International Preferences
Mac OS X includes support for a large number of languages, language behaviors, and date, time, and number formats. You control these properties through the International pane of the System Preferences utility (see Figure 8.1).
Figure 8.1. You can use the International pane of the System Preferences utility to control various language and format properties based on a language and the conventions of particular nations.
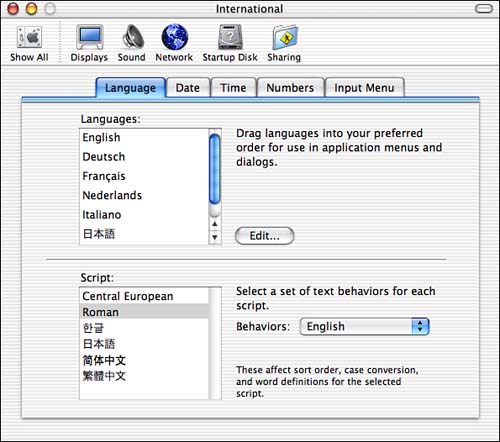
Use the Language tab to configure the languages you want to use. In the Languages list, you see the languages that are currently active. You can drag these languages up and down in the list to set the preferred order in which you want to use them on menus and in dialog boxes. If you click the Edit button, you can choose the languages that appear in the Languages list. In the bottom part of the pane, you can choose the set of behaviors for each script. For example, to configure the Roman script for English, select it on the list of scripts and choose the behavior to match the language you use (for example, because I use "U.S." English, I choose English on the pop-up menu).
Use the Date tab to set the date formats displayed in Finder windows and other locations. There are two general date formats: Long Date and Short Date. Choose the region whose format conventions you want to follow from the Region pop-up menu. Then, use the pop-up menus, check boxes, and text fields to set the format for each type of date. At the bottom of the window, you will see an example of dates in the format in which you have configured them.
Use the Time tab to set the time format; this tab works similarly to the Date tab. Choose a region from the Region pop-up menu and then use the radio buttons, text fields, and check box to format the time. For example, you can choose to use a 12- or 24-hour clock. Examples of the time format you choose are shown at the bottom of the pane.
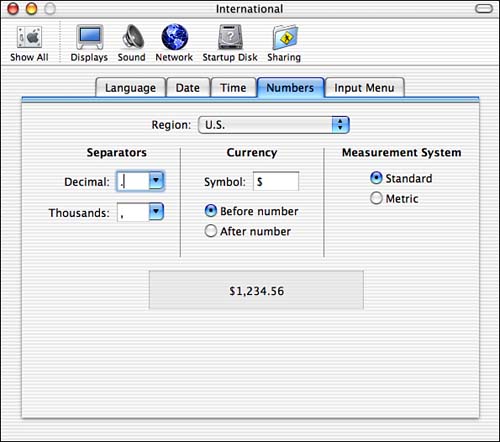
Using the Numbers tab, you can set the format for numbers displayed on your Mac (see Figure 8.2). You can use the pop-up menus to choose the separators in numbers (for the decimal and thousands), and you can choose a currency symbol and where that currency symbol is located (before or after the amount). You can also choose the default measurement system that is used (Standard [aka English] or Metric).
Figure 8.2. These settings would cause the OS to use U.S. number conventions.
Use the Input Menu tab to control and configure your keyboard layout and to enable and configure the Character Palette menu on the menu bar.
 To learn how to configure a keyboard for different languages, see "Configuring a Keyboard," p. 641.
To learn how to configure the Character Palette, see "Working with the Character Palette," p. 135.
Saving Your Screen
Mac OS X is the first version of the Mac OS that includes a built-in screensaver (which is ironic because the real need for screensavers has long since passed). At any rate, many Mac users enjoy having a screensaver, and Mac OS X's version provides the features you would expect. However, the quality and style with which the screensaver displays images are quite nice, especially when you use your own images.
Display Sleep TimeIf you really want to protect your screen, use the Energy Saver pane to set a display sleep time. Display sleep actually turns off the display mechanism, which "saves" the screen. Of course, a blank screen isn't nearly as interesting as the screensaver. Using a screensaver with modern CRT displays isn't really necessary because they will not suffer the screen burn-in that earlier generations of displays did. Although flat panel monitors haven't been around long enough to be sure, some theorize that using display sleep is important to maximize the working life of such displays. |
You use the Screen Effects pane of the System Preferences utility to configure a screensaver for your machine (see Figure 8.3).
Figure 8.3. You can use one of Mac OS X's built-in screensaver modules, create your own screensaver, or add a screensaver that someone else created (such as by using one that has been posted to a user's .Mac account).
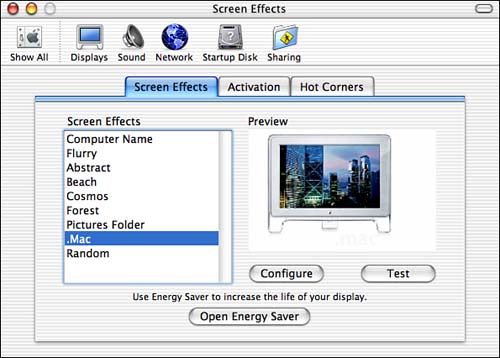
You have three general choices: Use one of Mac OS X's default modules, use a module from images you have created or downloaded, or use a module that someone else has created.
Using one of Mac OS X's built-in modules is rather straightforward. The general steps are the following:
-
Open the Screen Effects pane.
-
Choose the screensaver module you want to use from the Screen Effects list; you will see a preview in the Preview window.
-
Use the Configure button to set various parameters for the module you select, such as whether a cross-fade is used between slides and whether slides are kept centered on the screen (not all modules have configuration options). The available display options are the following:
Cross-fade between slides. When enabled, one image fades into the next. If disabled, one image will disappear before the next image appears.
Zoom back and forth. When enabled, the screensaver zooms in and out of each image.
Crop slides to fit screen. When enabled, images are sized so that they fit onto the display by having the parts that don't fit cropped off.
Keep slides centered. When enabled, images are always centered on the screen.
Present slides in random order. When enabled, images appear in a random order rather than the order in which they are listed in the folder that contains them.
-
Test the screensaver by clicking the Test button. The images that are part of the screensaver will be rendered and displayed with the configuration options you selected.
NOTE
If you use multiple displays, a different image from the module will be shown on each display.
-
Click the Activation tab.
-
Set the idle time that must pass before the screensaver is activated using the slider.
-
If you want your machine to be password-protected, click the "Use my user account password" radio button. With this option active, you will have to enter your password to exit the screensaver.
-
Click the Hot Corners tab.
-
Select a corner to which you can move the mouse to manually start the screensaver by clicking the box in that corner of the desktop image. Click a box twice to set a corner to which you can move the mouse to disable the screensaver.
-
Quit System Preferences.
NOTE
To encourage you to use the screen-dimming option to protect flat-panel displays, the "Open Energy Saver" button is included on the Screen Savers tab. Click this to open the Energy Saver pane of the System Preferences utility.
Some of the "built-in" modules are pretty cool (I especially like Cosmos), but you can have even more fun by creating or using a custom module. There are three ways to do this:
Create a module from a collection of your own images, such as those you have captured with a digital camera.
Use a module that someone has made available through .Mac.
Use a module that you download from the Internet.
To create a module from your own images, use the following steps:
-
Create a folder containing the images you want to use. The images can be in the standard image formats, such as JPG or TIFF.
To learn about creating images, see Chapter 15, "Creating and Editing Digital Images," p. 403. -
Open the Screen Effects pane and select the Pictures folder.
-
Click the Configure button. The Configure sheet will appear.
-
Drag the folder of images you created in Step 1 onto the folder well, or click the Set Slide Folder button, move to that folder, and choose the folder of images.
-
Use the Display Options check boxes to configure the screensaver. You have the same display options as for the "built-in" modules.
-
Click OK.
-
Configure and test the module just like one of Mac OS X's built-in modules.
TIP
You can create a screensaver module from images in your iPhoto image library from within that application. |
To learn how to use iPhoto to create a screensaver module, see "Creating an iPhoto Screensaver," p. 449.
Using the .Mac service, people can make their screensaver modules available to you and you can make your modules available to other people. |
To learn how to use .Mac services, see "Using .Mac to Create and Serve Your Web Pages," p. 371.
To use a module that is available via .Mac, perform the following steps:
-
Open the Screen Effects pane and select the .Mac module. (A default .Mac module is available and will be selected automatically.)
-
Click Configure. The Configuration sheet will appear. You will see that you are already subscribed to the .Mac public slide show.
-
Enter the .Mac member name of someone whose slide show you would like to use as your screensaver in the .Mac Membership name field and press Return. The sheet will close.
-
Click Configure. The Configuration sheet will appear again. Now, the person whose .Mac name you entered in Step 3 will appear on the list of slide shows you are subscribed to.
-
Repeat Steps 3 and 4 to add more public slide shows to the list.
-
Check the "Selected" check box for each slide show you want to be used in your screensaver. If the check box is unchecked, the slide show is still available to you, but it won't be displayed.
TIP
To unsubscribe from a public slide show, select the slide show and press Delete.
-
Use the Display Options check boxes to configure the screensaver. You have the same display options as for the "built-in" modules.
-
Click OK.
-
Configure and test the module just like one of Mac OS X's built-in modules.
TIP
If you have people who are interested in you (such as relatives), you can create a .Mac public slide show and inform those people who are interested that it is available. As you update your slide show, people who subscribe to and use it will see the images you add to the collection.
You can also download and use other screensaver modules. You can make the additional modules you add available to everyone who uses your Mac or just to specific users. Screensaver modules have the .saver filename extension. To use downloaded modules, do the following:
-
Download the modules you want to use and prepare them for use.
-
To enable modules for a specific user, log into that user account and drag the .saver files you want to add to the screensaver into the directory shortusername/Library/Screen Savers, where shortusername is the short username for that user account. To enable the modules for all users, instead place the .saver file in the directory Mac OS X/Library/ Screen Savers, where Mac OS X is the name of the startup volume.
-
Use the Screen Savers pane of the System Preferences utility to choose and configure the modules you add.
For help with downloading and preparing files, see "Downloading and Preparing Files," p. 345.
Improving Access to the System
You can use the Universal Access pane to make your Mac more accessible to those with various physical or mental challenges.
You configure special access to the system by using the Universal Access pane of the System Preferences utility. This pane includes the following four tabs: |
Seeing. Using the Seeing tab, you can configure the visual aspects of the system. You can use zoom to increase the size of items on the screen. You can also change the display to be white on a black background or to grayscale.
Hearing. The Hearing tab enables you to configure sound feedback for the system, and you can set the screen to flash when the alert sound plays.
Keyboard. Using the Keyboard tab, you can configure Sticky Keys that make it possible to choose key combinations by typing only one key at a time. Click the Keyboard tab, and then use the radio button and check boxes to configure Sticky Keys. When Sticky Keys is on, each modifier keystroke will be shown on the screen. For example, if you press the
 key, the key symbol will appear on the screen. You can turn off this feature by unchecking the "Show pressed keys on screen" check box. You can also turn off the audible feedback by unchecking the "Beep when a modifier key is set" check box. You can also control the key repeat rate using the Set Key Repeat button. You can configure the rate at which keystrokes are registered by using the "Slow Keys" radio button and the Acceptance Delay slider.
Mouse. The Mouse tab enables you to control the mouse by using the numeric pad on the keyboard. Click the Mouse tab of the Universal Access pane, and then click the "On" radio button to turn Mouse Keys on. Use the Initial Delay and Maximum Speed sliders to control how the pointer moves in relation to keystrokes.
The three check boxes at the bottom of the Universal Access pane enable you to configure general aspects of the universal access functionality. If you check the "Allow Universal Access Shortcuts" check box, you can turn Sticky Keys on or off by pressing the Shift key five times, and you can turn Mouse Keys on or off by pressing the Option key five times. If you check the "Enable access for assistive devices" check box, you can control the system with specific assisting devices. If the "Enable text-to-speech for Universal Access preferences" check box is selected, the Mac will speak various commands as you move the pointer over them.
Controlling Your System's Sound
You use the Sound pane of the System Preferences utility to control the volume, sound effects, and input sources for your system (see Figure 8.4). The Sound pane has three tabs: Sound Effects, Output, and Input. You use the Sound Effects tab to configure your system alert sounds and various audio feedback. You use the Output tab to control the sound output of your Mac. You use the Input tab to configure sound input devices attached to your Mac, such as USB microphones.
Figure 8.4. You use the sliders, list, pop-up menus, and check boxes on the Sound pane of the System Preferences utility to control various sound properties of your system.
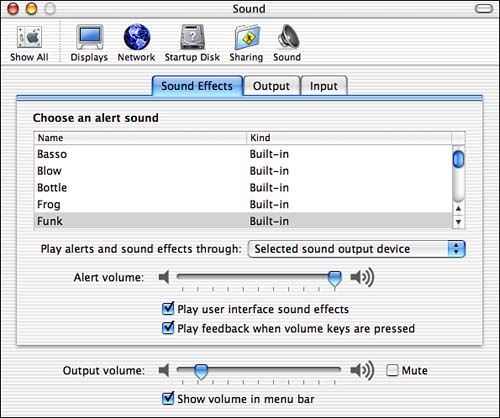
You can control your system's volume by using the Output volume slider at the bottom of the pane. Use the "Mute" check box to mute all system sound. Check the "Show volume in menu bar" check box to show the speaker icon in the menu bar. You can control your main system volume by clicking this icon and using the pop-up slider to set the volume level.
TIP
If you use an Apple Pro keyboard, you can also control the volume level using the mute and volume keys located just above the numeric keypad. When you press one of these keys, a sound level indicator appears onscreen so that you can visually tell what the relative volume level is. You will also hear the alert sound each time you press one of the volume keys. You can disable this audio feedback by unchecking the "Play feedback when volume keys are pressed" check box.
To configure your system alert sound, carry out the following steps:
-
Open the Sound pane of the System Preferences utility.
-
Click the Sound Effects tab.
-
Choose the alert sound you want to use on the list?you will hear a preview of the sound you select.
-
Choose the output device through which you want the alert sound to be played on the "Play alerts and sound effects through" pop-up menu. If you have USB speakers installed, such as SoundSticks, you can choose to play alerts through them, or if you want to use your Mac's internal speaker, select Built-in audio controller.
-
Use the Alert volume slider to control the relative volume level of the alert sound.
TIP
If you have external USB speakers, it is usually a good idea to play the alert sound through the Mac's built-in speakers, especially if you like to listen to music or watch movies with high sound volume. This prevents the alert sound from knocking you out of your chair (if this has ever happened to you, you know exactly what I mean). If you set things this way, you will probably need to set the alert volume high as the Mac's built-in speaker will be overwhelmed by your external speakers.
If you have analog speakers plugged into the Mac's Speaker jack, you won't be able to do this because the Mac's built-in audio controller controls the output to those speakers. You must be using USB speakers or an additional sound PCI card to be able to separate the output.
Mac OS X can play various sound effects when you perform specific actions or when something specific happens (such as when you send an item to the Trash). This feature is enabled by default. To disable it, uncheck the "Play user interface sound effects" check box. |
To configure the sound output for your system, use the following steps:
-
Open the Sound pane and click the Output tab. You will see a list of all sound output devices attached to your machine; at the least, you will see the Built-in audio controller which is your Mac built-in speaker or speakers, depending on what kind of Mac you use.
-
Select the output device you want to configure.
-
Use the Balance slider to set the balance level.
To configure sound input devices that are attached to your Mac, perform the following steps: |
-
Attach the sound device you want to use. For example, to use a USB headset microphone, attach it to an available USB port.
-
Open the Sound pane of the System Preferences utility and click the Input tab. You will see a list of all input devices that your Mac recognizes.
-
Select the device you want to configure.
-
Use the Input volume slider to configure the device's sensitivity. Dragging the slider to the right increases the level of sound through the device.
-
Test the device by speaking into it. You will see the relative sound level on the Input level indicator.
-
Continue adjusting the device until you achieve the proper level of input.
Although these sound options will satisfy most Mac users, there are more sound options you can choose to implement.
Controlling Volumes from the Dock
Some people prefer to control sound from the Dock rather than from the Sound pane or from the Sound menu bar icon. You can add such capability by adding a dockling to your Dock.
One example of this is DVolume, written by Stas Pietrucha. (DVolume requires a $2 shareware fee.) After you install this module on your Dock, you can open it to select a system and alert volume level (see Figure 8.5).
Figure 8.5. Using the DVolume module, you can control your system and alert volume from the Dock.
NOTE
You can download a copy of DVolume from the Version Tracker site at www.versiontracker.com. |
To learn how to install modules on your Dock, see Chapter 5, "Using and Customizing the Dock," p. 105.
Installing Additional Alert Sounds
Under Mac OS X, system alert sounds are in the Audio Interchange File Format (AIFF). This is a good thing because you can use many sounds as your alert sound, and using QuickTime Pro, you can convert almost any sound into the AIFF format.
To learn how to convert sounds into the AIFF format using QuickTime Pro, see "Using QuickTime Pro to Convert Files into Other Formats," p. 529.
NOTE
Under Mac OS X, AIFF files have the .aiff filename extension. By default, QuickTime Player Pro appends the .aif filename extension to files when you export them in the AIFF format. Make sure that you add the second "f" to the filename extension for the sound you want to add as an alert sound. If you don't, the file will not be recognized as a valid alert sound.
There are two basic ways in which you can add alert sounds. You can add them to specific user accounts or you can add them to the system so that they are accessible to everyone who uses your Mac.
To add an alert sound to a specific user account, perform the following steps:
-
Create or download the AIFF files you want to add to your available alert sounds.
-
Log in the user account under which you want to make the alert sounds available.
-
Drag the new alert sounds to the following directory: /shortusername/Library/Sounds. The new alert sound will be available to that user account on the Alert Sounds list in the Sound pane of the System Preferences utility.
NOTE
If the System Preferences utility is open when you install a new alert sound, you must quit and restart it to see the new sound on the list.
When you install your own system alert sounds in the alert sound list, the kind for the sounds you add will be "Custom" instead of "Built-in." Built-in sounds are stored in the Sound folder in the System Library folder instead of the user's Library folder.
You can also add alert sounds to the system so that they will be available to all the user accounts on your machine. However, to do this, you must log in under the root account.
CAUTION
You can't modify files or directories that are within the Mac OS X system directory without being logged in under the root account. Be careful when you are logged in under the root account because when you are logged into the root account, you can change anything on your system, including changing vital system files in such a way that your Mac will fail to work. You can also delete any files on the machine while you are logged in as root.
To learn how to enable and log in under the root account, see "Logging In As Root," p. 206.
To add additional alert sounds to your system, follow these steps:
-
Create or download the AIFF files you want to add to your alert sounds.
-
Log in under the root account.
-
Drag the AIFF file into the directory Mac OS X/System/Library/Sounds, where Mac OS X is the name of your Mac OS X startup volume.
-
Log out of the root account and then log back in under another account. The new sounds will be available on the Alert Sounds list on the Sound pane of the System Preferences utility.
NOTE
The kind of alert sounds you add to the system will be Built-in, just as the alert sounds that are preinstalled.
Working with the Date and Time
The Date & Time pane of the System Preferences utility enables you to set and maintain your system's time and date (see Figure 8.6). You can set the time and date manually, or you can use a network timeserver to set and maintain your system's time and date for you.
Figure 8.6. Mac OS X's time and date features are similar to those in previous versions of the OS.
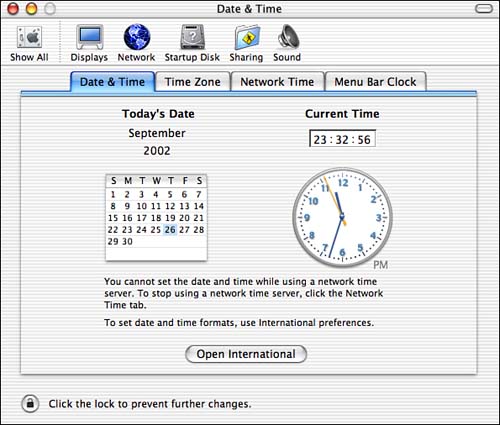
To set your system's date and time, do the following:
-
Open the Date & Time pane of the System Preferences utility.
-
Click the Time Zone tab and use the map to set your time zone. Drag the highlight bar over your location to choose the correct time zone. Then, use the Closest City pop-up menu to choose the specific time for the area in which you are located.
-
If you are going to use a network timeserver to maintain the time and date for your machines, click the Network Time tab. Generally, you should use a timeserver to keep the time on your Mac correct. You can use a timeserver on your local network or one on the Internet.
-
Check the "Use a network time server" check box.
-
Choose one of the timeservers available on the NTP Server pop-up menu or select the entry in the NTP Server file, delete it, and enter the address of the timeserver you want to use. One of the preconfigured timeservers is Apple's timeserver at time.apple.com.
-
Click the Menu Bar Clock tab. Use the check boxes and pop-up menu to set the properties of the clock at the right end of the menu bar.
-
If you want to set the time and date manually, click the Date & Time tab (you must turn off Network Time Synchronization on the Network Time tab to do this). Use the straightforward controls to set the date and time.
-
Quit the System Preferences utility.
NOTE
You can find the official time for any time zone in the United States at www.time.gov. |
TIP
To change network timeservers, you must first stop time synchronization and then restart it after you have entered the address of the new timeserver you want to use.
Controlling Your Mac's Speech
You can use the Speech pane of the System Preferences utility to control two aspects of how your Mac uses speech (see Figure 8.7). Speech recognition enables you to speak commands to your Mac; Spoken User Interface controls how your Mac reads the text in windows and dialog boxes or in documents from applications that speak text.
Figure 8.7. The Speech pane of the System Preferences utility enables you to communicate with your Mac by speaking and listening.
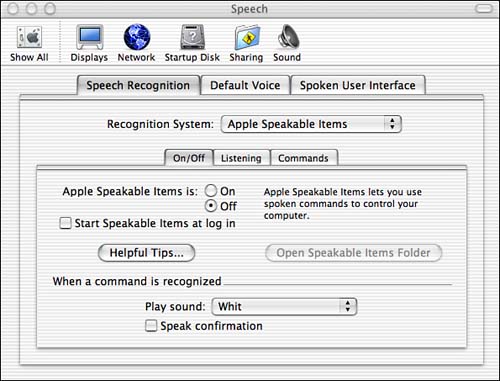
To configure speech recognition on your Mac, click the Speech Recognition tab and use the controls to configure how speech recognition works. On the On/Off tab, turn on speech recognition and then use the Listening tab to configure how your Mac listens to commands. Use the Commands tab to select the commands that are available when Speakable Items is turned on. Additional information about this feature is beyond the scope of this chapter. However, you might want to explore it to see whether it is useful to you.
TIP
To see what commands you can speak, turn Speech Recognition on. The feedback window will appear after speech recognition is on. Click the arrow at the bottom of that window and choose Open Speech Commands window. In the Speech Commands window, you will see the list of commands you can speak. When you open an application that supports speech recognition, that application will appear in the Speech Commands window and you can see the list of spoken commands that it supports.
If you double-click the feedback window, it will move to the Dock.
If you use applications that support Text-to-Speech, those applications can read text to you. To configure the voice that they use, open the Default Voice tab of the Speech pane of the System Preferences utility. Choose the voice from the Voice list and then set the rate at which the voice speaks using the slider. You can click the Play button to hear a sample.
Use the Spoken User Interface tab to configure spoken feedback from the system. You can use the Talking Alerts controls to configure specific phrases that are spoken to you and the voice that is used to speak those phrases. You can also choose to have a voice speak to you when any of the following events occurs:
An application requires your attention. With this feature enabled, when an application needs your attention, you will hear an audible warning.
There is text under the mouse. You must be using an assistive device configured on the Universal Access pane to use this feature. When it's enabled, you will hear the text under your pointer.
Text is selected and the key is pressed. When you enable this feature and press the key combination you select, your Mac will read to you any text you have selected.


