Setting Up and Using an Address Book
Mac OS X includes the Address Book application, in which you can store all your contact information. The most obvious use for this information is within Mail, but other applications can access the Address Book as well. This is useful because it enables you to use a single contact database for other applications that use information about your contacts, such as iChat.
Address Book has been totally reworked for Mac OS X version 10.2. It now provides its services to a wider range of applications, and it offers more functionality itself. You can store as much information as you want, and you can customize each entry in the Address Book as much as you like. |
Address Book is based on virtual cards, or vcards. A vcard is an electronic information card that you can drag and drop between applications to transfer the information contained on that card. You can also share vcards with other users to exchange information. For example, you can drag someone else's vcard onto your Address Book to quickly add that person's information to your list of contacts.
TIP
Address Book is not the only application that can work with vcards. Many other applications can use vcards. For example, Microsoft Entourage can read vcards, so you can provide your vcard to someone who uses that application and that person can easily add your contact information to her contact database.
Using the Address Book
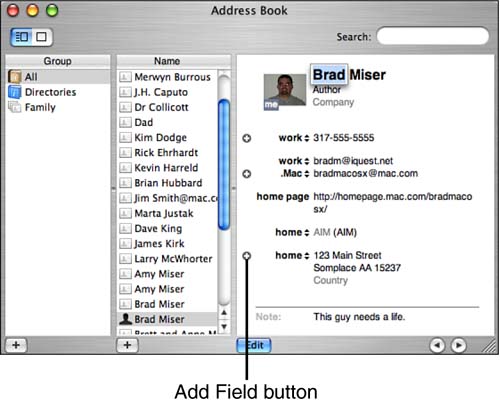
When you open the Address Book, you will see that its window consists of two columns and a card by default. The columns are Group and Name. The Group pane shows the groups you have created. The Name pane lists each contact individually. The Card pane shows the card that is selected in the Name pane (see Figure 12.1).
Figure 12.1. The Address Book is a powerful tool you can use to manage all of your contact information.
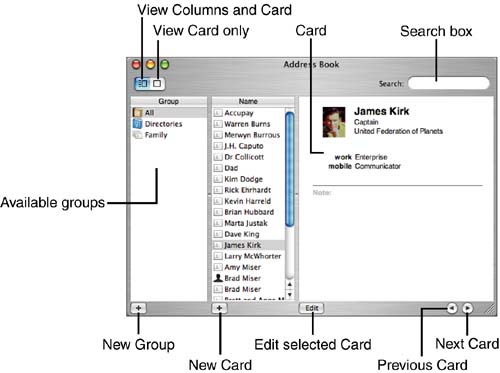
In the upper-left corner of each card, you will see an image well you can use to place an image for your contact, such as a photo of the person for whom you created the card. You can add a photo to a card by dragging a photo onto this well. The photo you use can be a JPEG, GIF, TIFF, or PDF file and should be 64x64 pixels.
Working with Address Book Contact Information
Although Address Book provides the standard functions you expect, such as e-mail addresses and phone numbers, the information in Address Book is dynamic. For example, when a contact's card includes an e-mail address, you can click on the address to send the contact an e-mail. When you include a Home page for a contact, you can click on it to visit that Home page. When the contact has a .Mac account, you can open the contact's iDisk. You can also use the contact's card to chat with the person using iChat.
To locate information in Address Book, you can browse your contacts or search for specific contacts.
To browse your contacts, perform the following steps:
-
Open the Address Book by clicking the Address Book icon on the Dock or by opening the Applications folder and double-clicking the Address Book icon.
-
Scroll in the Name column to find the contact you are interested in.
-
Select the contact whose information you want to view. The contact's card will be displayed and you can see the person's information.
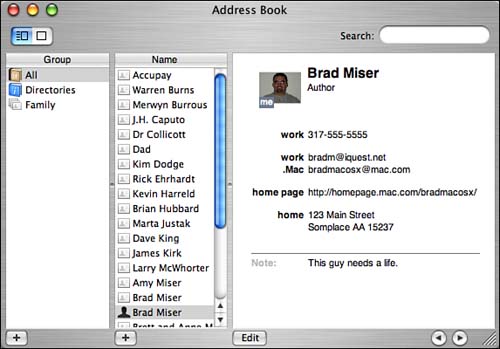
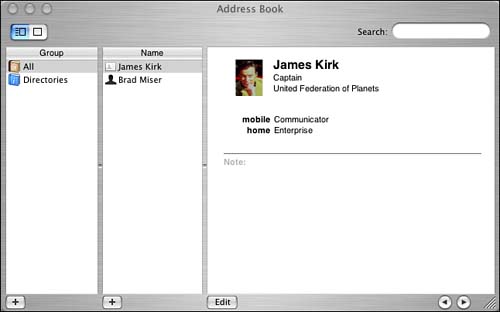
The information in Address Book is extremely flexible. The fields that are displayed for each contact can be configured individually. When you display a card, only the fields that contain information are displayed. For example, compare Figure 12.1 and Figure 12.2 to see how Address Book has reconfigured the card display for cards with different amounts of information.
Figure 12.2. This card contains information for someone at least a little bit more real than that shown in the preceding figure.
You can also search to locate a contact's information.
-
Open the Address Book by clicking the Address Book icon on the Dock or by opening the Applications folder and double-clicking the Address Book icon.
-
Enter a portion of the contact's name in the Search field. You can enter text found in any of the contact's information, including name, address, home page, and so on. As you type, the list of names shown in the Name column will be narrowed so that it includes only those contacts whose data contains the text you enter.
-
Select the contact whose information you want to view. The contact's card will be displayed and you can see the person's information.
To view all of your contacts again, click the X button that appears in the Search field when you perform a search.
When working with the Address Book, you can do the following tasks:
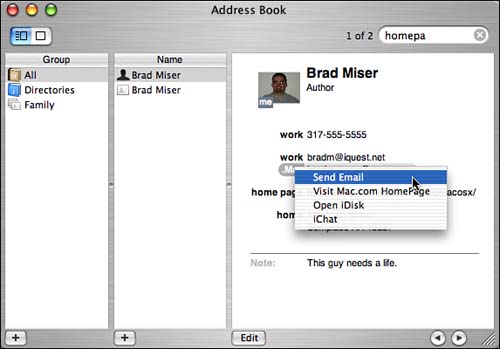
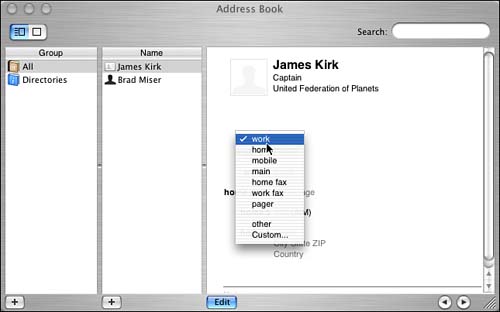
Send an e-mail. To send an e-mail to one of your contacts, view the contact you want to send an e-mail to. Click the label next to the e-mail address you want to send an e-mail to. A pop-up menu will appear. Choose Send Email (see Figure 12.3). Your default e-mail application will open and a new message addressed to the contact will be created.
Figure 12.3. Sending an e-mail from Address Book can be done with the Send Email command.
Visit the contact's home page. Click the home page label next to the Web site you want to visit. From the resulting pop-up menu, choose Go to Web Site. Your default Web browser will open and you will move to the contact's Web site.
View a map to an address. Click the label next to an address. Choose Map Of from the resulting pop-up menu. Your default Web browser will open and will move to the Map Quest Web site. A map to the selected address will be displayed.
Open an iDisk. If the contact has a .Mac account and you have configured their .Mac e-mail address, you can open the person's iDisk by clicking the label next to the .Mac e-mail address and choosing Open iDisk. The contact's iDisk will open in a new Finder window.
Scroll through your contacts. Click the Next and Previous Card buttons to browse through your contacts.
Edit your contacts. Click the Edit button to move into the Edit mode (more on this later).
You can change the view of the Address Book to show only cards by clicking the View Card Only button, by choosing View, Card Only, or by pressing ![]() +2. The window will collapse down to the card only. You can add cards, edit cards, or browse cards from the collapsed window.
+2. The window will collapse down to the card only. You can add cards, edit cards, or browse cards from the collapsed window.
Adding Addresses to Your Address Book
Obviously, before an address book is of any value, it has to have some information in it. There are several ways to get information into your Address Book:
Create your own address card.
Add information manually.
Add information from an e-mail message you have received.
Add a contact's vcard.
Import address information from an e-mail application.
Creating Your Own Address Card
You should create an address card for yourself, mostly so that you can easily send your contact information to other people simply by sending them your vcard. The first time you open Address Book, a card is created for you from your information in Mac OS X. For example, if you entered an e-mail address when you installed Mac OS X, that address is included in your address card automatically. Your registration information is used to add an address, phone number, and other information.
Your card's icon will have a silhouette next to your name. When you select the card, the image well will be marked with the text "me."
TIP
You can export a vcard, by viewing it and choosing File, Export vCard.
You can export your own card, or any other card for that matter, as a vcard by viewing the card, holding down the Control key, clicking the mouse button, and choosing Export vCard. Choose a location, name the vcard, and click Save.
If you want to create another card for yourself for some reason, you can create a new card and enter your contact information in it. After you have created your address card, select it and choose Card, This Is My Card.
Adding Addresses Manually
As you might expect, you can add people to your Address Book by inputting their information manually.
To manually add an address, do the following:
-
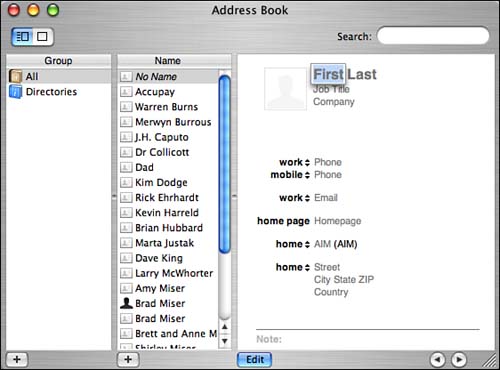
Click the Add new Person button in the Name column, choose File, New Card, or press
 +N to see a new, empty address card. The fist name will be highlighted by default so that you can edit it immediately (see Figure 12.4).
Figure 12.4. This is a new card, ready for the contact's information.
-
Input the first name.
-
Press Tab to move to and select the Last field, and then enter the contact's last name.
-
Press Tab to move to and select the Job Title field, and then enter the contact's job title if applicable.
-
Press Tab to move to and select the Company field, and then enter the person's company information if applicable.
-
Press Tab to move to and select the first contact information, which is work by default.
-
Click the menu icon to reveal the label pop-up menu (see Figure 12.5).
Figure 12.5. You use this pop-up menu to label contact information.
-
Select the label for the contact information, such as home.
NOTE
Two entries on the Label pop-up menu require some explanation. The selection called other inserts the label "other." If you choose Custom, you can create a custom label for a field.
-
Enter the contact information.
-
Continue tabbing to each field on the card, selecting the label for that field, and editing the information to fill in the rest of the card.
-
If the contact has a Home page, select the home page field and enter the URL of the Home page you want to associate the contact with.
-
If you want to add additional fields to the card, click the Add Field button (+) next to one of the existing fields. After you have added a field, you can edit it in the same way as the default fields.
-
If you have an image you want to associate with the contact, drag the image onto the contact's image well. You can add images in the usual formats, such as .jpg or .tiff.
-
Click the Edit button to move out of the Edit mode. Your new card will be ready to use (see Figure 12.6).
Figure 12.6. You can create an address card for anyone you know (or even for those you don't know!).
Adding an Address from an E-Mail Message
You can create a contact in your Address Book by adding the sender's information from an e-mail message to it. To add a contact from an e-mail that you receive in the Mail application, do the following:
-
Use Mail to open an e-mail message from the person whom you want to add to your Address Book.
-
Choose Message, Add Sender to Address Book (or press
+Y). The person's name and e-mail address will be entered on a new address card.
NOTE
If you forget that you have already added a sender to your Address Book and add her again, another address card will be created. Address Book does not check to see whether the person exists already, which can lead to having multiple address cards for the same person.
Using Vcards to Add Information to Your Address Book
The benefit to using a vcard is that you can add lots of information about a contact with very little work on your part. When you receive a vcard from someone, use the following steps to add that person's address card to your Address Book.
-
Drag the vcard onto the Name column in Address Book. The vcard will be added to your contacts.
-
Select the card and click the Edit button.
-
Edit the information as needed (you'll learn how to edit cards later in this chapter).
NOTE
Vcard files have the filename extension .vcf (Virtual Card File).
Importing Addresses from Another Application
If you have used another e-mail application in the past, you probably have an Address Book or Contact database in that application. If that application supports vcards, it is simple to export vcards from the application and then add them to Address Book.
As an example of how this works, the following steps show you how to export contacts from Microsoft's Entourage e-mail application and then add those contacts to the Address Book. Because Entourage supports vcards, you can create vcards for your Entourage contacts and then import those contacts into Address Book.
-
Create a folder to temporarily store the vcards you export from Entourage.
-
Open Entourage.
-
Click the Address Book button to move into the Address Book mode.
-
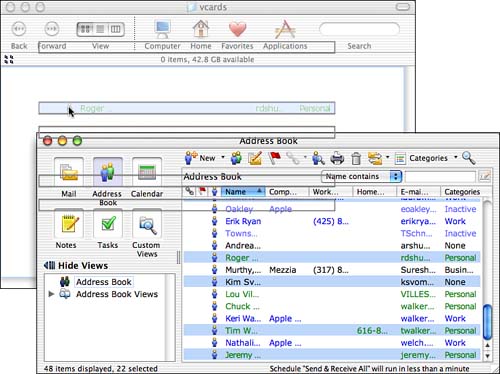
Drag the contacts for whom you want to create vcards from the Entourage window onto the folder you created in step 1, and drop them in that folder (see Figure 12.7). A vcard will be created for each of your Entourage contacts.
Figure 12.7. Here, I am dragging my contacts from Entourage onto a folder to create a vcard for each of the contacts in my Entourage Address Book.
NOTE
If you drag an Entourage group to create a vcard, a text clipping file is created instead. You will need to re-create your groups within Address Book.
-
Open Address Book.
-
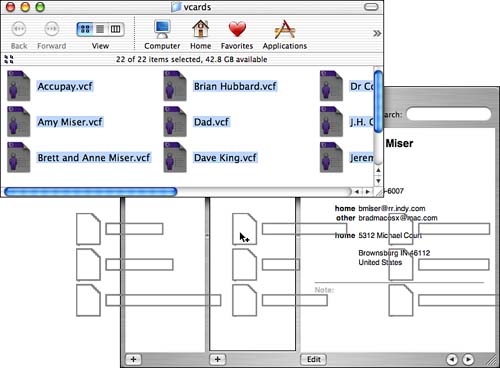
Drag the vcards from the folder you stored them in onto the Name column (see Figure 12.8). The contacts you added will be available for you to use and edit.
Figure 12.8. Dragging vcards onto the Name column in Address Book adds the contacts to your Address Book.
NOTE
Unfortunately, if the application you have used for your contact information does not support vcards, there isn't a way to import its information into Address Book.
It is likely that not all the information in your current address book or contact list will make it into the Address Book application. For example, if you have added Category information for your Entourage contact list, that information will not be imported into the Address Book. After you have imported contacts into Address Book, you should check them over so that you know exactly what information made it in, and what didn't. If you lost any important information, you might have to spend some time re-creating it within Address Book.
Editing Addresses in Your Address Book
To edit an address in your Address Book, use the following steps:
-
In Address Book, view the card containing the information you want to edit.
-
Click the Edit button. Address Book will move into the Edit mode (see Figure 12.9). The first name will be selected and ready to edit.
Figure 12.9. You can use the Edit mode to change an existing card's information.
-
Use the same steps to change the information on the card that you do to create a card (see the earlier section on creating cards for the details).
TIP
You can use the Add Field button to add fields to the card. You can also add fields by using the Card, Add Field command. On the Add Field menu, you can choose the type of field you want to add.
Many of the data fields have pop-up menus containing the data field's label. You can open these menus and select a new label for that field. The changes you make by doing this affect only the current address card; this means that you can configure the information for a specific card independent of other cards. For example, if you know someone who has three mobile phones, you can select Mobile Phone as the label for three of the fields on that person's address card. You can also choose Custom to create custom field labels for existing or new fields.
You can quickly swap the last name with the first name for the card by viewing the card and choosing Card, Swap First/Last Name.
You can view cards by company instead of by name. View the card you want to change and choose Card, Show as Company. To view a card by name again, choose Card, Show as Person.
To remove an image from a card, view the card and choose Card, Clear Custom Image.
If you don't want a field's data to appear on a card, select the data and delete it. The data will be replaced with the type of data it is, such as Email for an e-mail address. The data will not appear on the card when it is viewed.
NOTE
After you add a field, you can't remove it. You can only delete its data so that it doesn't appear on the card any more.
To delete a card from the Address Book, select it and press Delete. Click Yes in the resulting prompt and the card will be deleted.
Working with Address Groups
Address groups enable you to e-mail multiple people using a single address. Working with an address group is just like working with any other address card in your Address Book. Creating an address group is simple, as you can see in the following steps:
-
Click the New Group button; choose File, New Group; or press Shift+
+N. You will see a new group in the Group column. The name of the group will be selected and ready to edit. -
Change the group's name to something meaningful and press Return.
-
Click All in the Group column to view all the cards in the Address Book.
-
Drag the cards you want to be included in the group onto the group's icon in the Group column. Those cards will become part of the group.
TIP
You can create a new group and add selected address cards to it by first selecting the cards you want to place in the new group and choosing File, New Group From Selection. A new group will be created and will include the cards you selected.
You can view a group by selecting it on the Group column. The Name column will show only those cards that are included in the group. You work with the cards in a group just as you do individual cards. For example, you can edit the card, use it to send e-mail to that individual, and so on.
To remove a card from a group, view the group, select the card you want to remove, and press Delete. After you confirm the action, the card will be removed from the group. However, the card will still exist in the Address Book.
You can also export a group as a vcard. Select the group, hold down the Control key, click the mouse button, and choose Export Group vCard. Choose a location, name the card, and click Save. You can use the group's vcard just like vcards for individuals.
If any of the cards you add to a group includes more than one e-mail address, you can edit the mailing list for the group to set the specific addresses that are used.
-
Select the group for which you want to configure the mailing list.
-
Choose Edit, Edit Mailing List. The Edit Mailing List sheet will appear.
-
Select the e-mail address you want to use for an individual by clicking on it. The address that will be used appears in bold; other addresses are grayed out to show that they won't be used.
-
Click OK. When you send a message to the group, the addresses you selected will be used.
TIP
You can back up your Address Book by choosing File, Backup Database. If you want to return to the version of the database you have backed up, choose File, Revert to Database Backup.
Addressing E-Mail
There are several ways in which you can address e-mail to people in your Address Book.
-
View the contact to whom you want to send a message and click the label for the e-mail address you want to use.
-
Drag the contact's vcard to the To, Cc, or Bcc boxes of a Mail e-mail message.
-
Drag a group's vcard to the To, Cc, or Bcc boxes of a Mail e-mail message.
NOTE
When you send e-mail from the Address Book, the e-mail application used is the default e-mail application that is selected in the Internet pane of the System Preferences utility.


