Sequence Diagrams
Sequence Diagrams
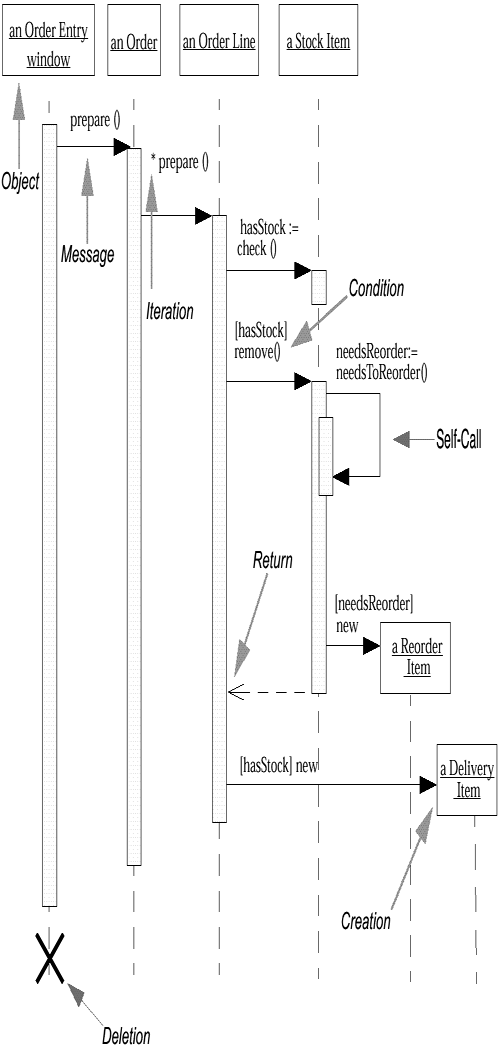
Within a sequence diagram, an object is shown as a box at the top of a dashed vertical line (see Figure 5-1).
Figure 5-1. Sequence Diagram

This vertical line is called the object's lifeline. The lifeline represents the object's life during the interaction. This form was first popularized by Jacobson.
Each message is represented by an arrow between the lifelines of two objects. The order in which these messages occur is shown top to bottom on the page. Each message is labeled at minimum with the message name; you can also include the arguments and some control information. You can show a self-call, a message that an object sends to itself, by sending the message arrow back to the same lifeline.
To show when an object is active (for a procedural interaction, this would indicate that a procedure is on the stack), you include an activation box. You can omit activation boxes; this makes the diagrams easier to draw, but harder to understand.
Two bits of control information are valuable.
First, there is a condition, which indicates when a message is sent (for example, [needsReorder]). The message is sent only if the condition is true. Conditions are useful in simple cases like this, but for more complicated cases, I prefer to draw separate sequence diagrams for each case.
The second useful control marker is the iteration marker, which shows that a message is sent many times to multiple receiver objects, as would happen when you are iterating over a collection. You can show the basis of the iteration within brackets, such as *[for all order lines].
Figure 5-1 includes a return, which indicates a return from a message, not a new message. Returns differ from the regular messages in that the line is dashed. Some people draw a return for every message, but I find that clutters the diagram, so I draw them only when I feel they add clarity. The only reason I used a return in Figure 5-1 is to demonstrate the notation; if you remove the return, I think the diagram remains just as clear. That's a good test.
As you can see, Figure 5-1 is very simple and has immediate visual appeal. This is its great strength.
One of the hardest things to understand in an object-oriented program is the overall flow of control. A good design has lots of small methods in different classes, and at times it can be tricky to figure out the over-all sequence of behavior. You can end up looking at the code trying to find the program. This is particularly true for those new to objects. Sequence diagrams help you to see that sequence.
Sequence diagrams are also valuable for concurrent processes.
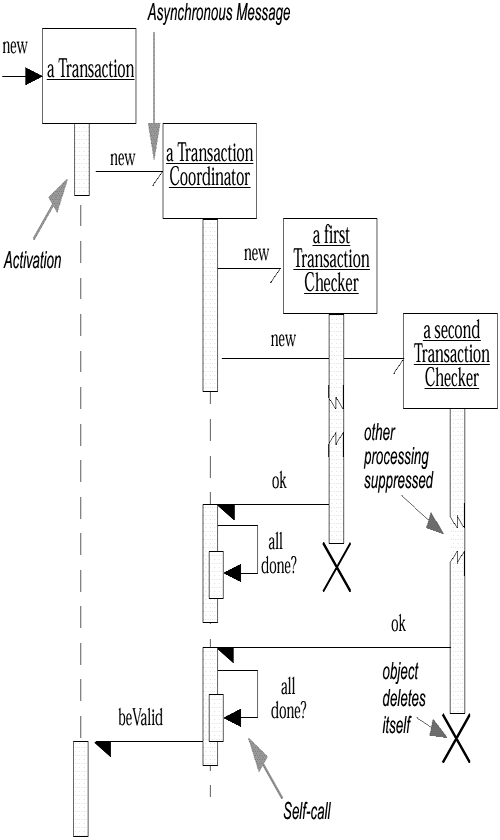
In Figure 5-2, we see some objects that are checking a bank transaction.
Figure 5-2. Concurrent Processes and Activations

When a Transaction is created, it creates a Transaction Coordinator to coordinate the checking of the Transaction. This coordinator creates a number (in this case, two) of Transaction Checker objects, each of which is responsible for a particular check. This process would make it easy to add different checking processes, because each checker is called asynchronously and proceeds in parallel.
When a Transaction Checker completes, it notifies the Transaction Coordinator. The coordinator looks to see whether all the checkers called back. If they haven't, the coordinator does nothing. If they have, and if all of them are successful, as in this case, the coordinator notifies the Transaction that all is well.
The half-arrowheads indicate an asynchronous message. An asynchronous message does not block the caller, so it can carry on with its own processing. An asynchronous message can do one of three things:
Create a new thread, in which case it links to the top of an activation
Create a new object
Communicate with a thread that is already running
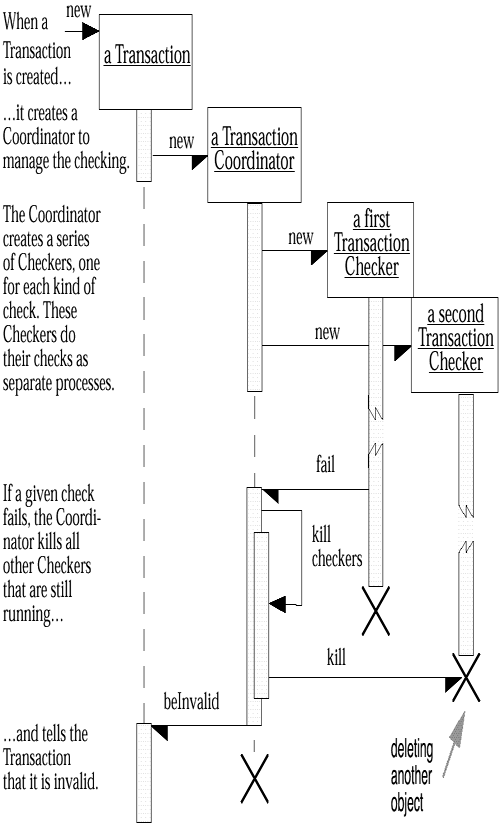
Object deletion is shown with a large X. Objects can self-destruct (shown in Figure 5-2), or they can be destroyed by another message (see Figure 5-3).
Figure 5-3. Sequence Diagram: Check Failure

Figure 5-2 and Figure 5-3 show two of the scenarios in the "transaction checking" use case. I have drawn each scenario separately. There are techniques for combining the conditional logic onto a single diagram, but I prefer not to use them, because it makes the diagram too complicated.
In Figure 5-3, I've employed a very useful technique: I've inserted textual descriptions of what's happening along the left side of the sequence diagram. This involves lining up each text block with the appropriate message within the diagram. This helps in understanding the diagram, albeit at the cost of some extra work. I do this for documents I'm going to keep but not for whiteboard sketches.


