Section 9.3. A Simple Form Example
In a moment, we'll examine each of the many form controls in detail. Let's first take a quick look at a simple example, to see how forms are put together. This HTML form (shown in Figure 9-1) gathers basic demographic information about a user:
<form method=POST action="http://www.kumquat.com/demo">

  Name:

    <input type=text name=name size=32 maxlength=80>

  <p>

  Sex:

    <input type=radio name=sex value="M"> Male

    <input type=radio name=sex value="F"> Female

  <p>

  Annual Income:

    <select name=income size=1>

      <option>Under $25,000

      <option>$25,001 to $50,000

      <option>$50,001 and higher

    </select>

  <p>

  <input type=submit>

</form>
Figure 9-1. A simple form
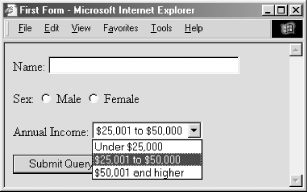
The first line of the example starts the form and indicates we'll be using the POST method for data transmission to the forms-processing server. The form's user-input controls follow, each defined by an <input> tag and type attribute. There are three controls in the simple example, each contained within its own paragraph.
The first control is a conventional text-entry field, letting the user type up to 80 characters but displaying only 32 of them at a time. The next one is a multiple-choice option, which lets the user select only one of two radio buttons. This is followed by a pull-down menu for choosing one of three options. The final control is a simple submission button, which, when clicked by the user, sets the form's processing in motion.


