Working with Directory Information
Working with Directory Information
When you are working with file systems, you often also need to work with the directory structure that contains the files. PHP contains several commands that assist in the manipulation of directories.
Introducing the imageIndex.php Program
The imageIndex.php program featured in Figure 6.8 is a simple utility that generates an index of all jpg and gif image files in a particular directory.
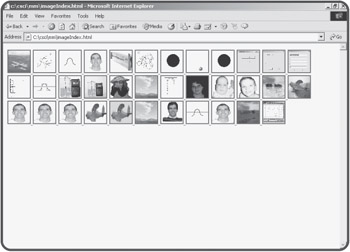
Figure 6.8: This HTML file was automatically created by imageIndex.php.
When the user clicks on any thumbnail image, a full version of the image will be displayed. The techniques used to display the image files can be used to get selected sets of files from any directory.
<html>
<head>
<title>imageIndex</title>
</head>
<body>

<?
// image index
// generates an index file containing all images in a particular directory

//point to whatever directory you wish to index.
//index will be written to this directory as imageIndex.html
$dirName = "C:\csci\mm";
$dp = opendir($dirName);
chdir($dirName);

//add all files in directory to $theFiles array
while ($currentFile !== false){
  $currentFile = readDir($dp);
  $theFiles[] = $currentFile;
} // end while

//extract gif and jpg images
$imageFiles = preg_grep("/jpg$|gif$/", $theFiles);

$output = "";
foreach ($imageFiles as $currentFile){
  $output .= <<<HERE
<a href = $currentFile>
  <img src = "$currentFile"
       height = 50
       width = 50>
</a>

HERE;

} // end foreach

//save the index to the local file system
$fp = fopen("imageIndex.html", "w");
fputs ($fp, $output);
fclose($fp);
//readFile("imageIndex.html");
print "<a href = $dirName/imageIndex.html>image index</a>\n";

 ?>

</body>
</html>
Creating a Directory Handle with openDir()
Of course directory operations focus on a particular directory. It's often smart to store a directory name in a variable so it can be easily changed, as directory conventions change when you migrate your programs to different systems. In the imageIndex program, I stored the target directory in a variable called $dirName. The directory can be stored as a relative reference (in which case it will be located in reference to the current program's directory) or absolute (in the current file system).
Getting a List of Files with readdir()
The readdir() function is used to read a file from a valid directory pointer. Each time you call the readdir() function, it returns the name of the next file it finds, until there are no files left. If the function cannot find another file, it will return the value FALSE. I find it very useful to store all the files of a directory into an array, so I'll usually use a loop like this:
while ($currentFile !== false){
  $currentFile = readDir($dp);
  $theFiles[] = $currentFile;
} // end while
This loop keeps going until the $currentFile variable is false, which will happen when there are no files left in the directory. Each time through the loop, it uses the readdir() function to load a new value into $currentFile, then adds the value of $currentFile to the $theFiles array. Note that when I assign a value to an array without specifying the index, the item is simply placed at the next available index value. This is an easy way to load up an array in PHP.
| TRICK? |
The special !== operator is a little bit different than the comparison operators you have seen before. It is used here to prevent a very specific type of error. It's possible that the user might have a file actually called "false" in the directory. If that's the case, the more normal condition $currentFile != false would give a strange result, because PHP could confuse a file named "false" with the actual literal value false. The !== operator specifies a comparison between actual objects rather than values, and it will work correctly in this particular odd circumstance. |
Selecting Particular Files with preg_grep()
Once all the files from a particular directory are stored in an array, you'll often want to select a subset of those files to work with. In this particular case, I'm interested in graphic files, which end with the characters "gif" or "jpg." The oddly-named preg_grep() function is perfect for this type of situation. It borrows some clever ideas from UNIX shells and the perl programming language. Grep is the name of a UNIX command that allows you to filter files according to a pattern. The "preg" part indicates that this form of grep uses perl-style regular expressions. Regardless of the funny name, the function is very handy. If you look back at the code in imageIndex.php, you'll see the line
$imageFiles = preg_grep("/jpg$|gif$/", $theFiles);
This code selects all the files that end with "jpg" or "gif" and copies them to another array called $imageFiles.
Using Basic Regular Expressions
While it would be possible to use string manipulation functions to determine which files to copy to the new array, there are many situations where you might want the ability to work with string data in a more detailed way. In this particular situation, I wanted all the files with "gif" or "jpg" in them. There isn't an easy way to compare for two possible values with normal string manipulations. Also, I didn't want any filename containing these two values, but only those filenames that end with "gif" or "jpg." Regular expressions are a special convention often used to handle exactly this kind of situation, and much more. To illustrate, I'll explain how the "/jpg$|gif$/" expression works. Regular expressions are usually marked by slashes at the beginning and the end. The first and last characters of the expression are these slashes. The pipe (|) character indicates or, so I'm looking for "jpg" or "gif." The dollar sign ($) indicates the end of a string in the context of regular expressions, so "jpg$" will only match on the value "jpg" if it's at the end of a string. So, the expression "/jpg$|gif$/" will match on any string that ends with "jpg" or "gif."
Regular expressions are extremely powerful if a bit cryptic. PHP supports a number of special functions that use regular expressions in addition to preg_grep . Look in the online help under "Regular Expression Functions - Perl compatible" for a list of these functions as well as more details on how regular expressions work in PHP. If you find regular expressions baffling, you can usually find a string manipulation function or two that will do the same general job. (See Table 6.2 for a list of basic regular expressions.)
|
operator |
description |
sample pattern |
matches |
doesn't match |
|---|---|---|---|---|
|
. |
any character but newline |
. |
e |
\n |
|
^ |
beginning of string |
^a |
apple |
banana |
|
$ |
end of string |
a$ |
banana |
apple |
|
[characters] |
any characters in braces |
[abcABC] |
a |
d |
|
[char range] |
describe range of characters |
[a-zA-z] |
r |
9 |
|
\d |
any digit |
\d\d\d-\d\d\d\d |
123–4567 |
the-thing |
|
\b |
word boundary |
\bthe\b |
the |
theater |
|
+ |
one or more occurrences of preceding character |
\d+ |
1234 |
text |
|
* |
zero or more occurrences of preceding character |
[a-zA-z]\d* | ? | ? |
|
{digit} |
repeat preceding character that many times |
\d{3}-\d{4} |
123–4567 |
999-99-9999 |
|
| |
or operator |
apple|banana |
apple, banana |
peach |
|
(pattern segment) |
store results in pattern memory returned with numeric code |
(^.).*/1 |
gig, blab (any word that starts and ends w/ same letter) |
any other word |
Storing the Output
Once the $imageFiles array is completed, the program uses the data to build an HTML index of all images, and stores that data to a file. Since it's been a few pages since you've seen that code, I'll reproduce a piece of it here.
foreach ($imageFiles as $currentFile){
  $output .= <<<HERE
<a href = $currentFile>
  <img src = "$currentFile"
       height = 50
       width = 50>
</a>

HERE;

} // end foreach

//save the index to the local file system
$fp = fopen("imageIndex.html", "w");
fputs ($fp, $output);
fclose($fp);

print "<a href = $dirName/imageIndex.html>image index</a>\n";
I used a foreach loop to step through each element of the $imageFiles array. I added the HTML to generate a thumbnail version of each image to a variable called $output. Finally, I opened a file called imageIndex.html in the current directory for writing, put the value of $output to the file, and closed the file handle. Finally, I added a link to the file.
| TRAP? |
You might be tempted to use a readFile() command to immediately view the contents of the file. (I was.) This may not work correctly, because the Web browser is assuming the imageList.php directory is the current directory. Inside the program, I changed to another directory within the local file system, but the Web browser has no way of knowing that. When I did a readFile(), the HTML was full of broken links, because all of the relative links in the HTML page were pointing towards files in another directory. When I add a link to the page instead, the Web browser itself can find all the images, because it's being sent to the correct directory. |


