13.3 The Flash ActionScript Debugger
Debuggers have been around in other
programming environments for years, but it is a necessary tool and a
welcome addition to the Flash environment. We cover the Flash
debugger only briefly, as it has been covered in depth elsewhere. The
Flash debugger allows you to set up interactive debugging within the
Flash movie. This allows you to interact with the code as it is
executing?examining variables and stepping through the lines of
code one by one to help you determine where a problem might exist.
The debugger can also be used with a remote movie located on a web
server. The movie will be retrieved and debugged locally in the Flash
Player. More information on remote debugging can be found in the
Flash online Help system under Help  Using Flash
Testing a Movie Using the Debugger.
Using Flash
Testing a Movie Using the Debugger.
13.3.1 Using the Debugger
The Debugger panel becomes active when you choose Control
Debug Movie (Ctrl-Shift-Enter on Windows or Cmd-Shift-Enter on
Macintosh). This effectively starts the movie in debug mode, allowing
you to view the execution of code. The movie starts with the Debugger
panel open at the first line of your script to await instructions, as
shown in Figure 13-1.
Figure 13-1. The interactive debugger of Flash MX
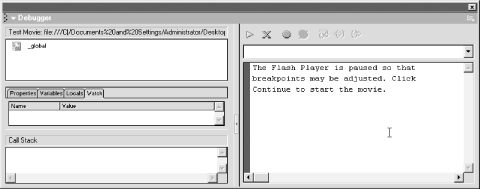
Having chosen the Debug Movie option, the first thing you'll need to do is to set up a breakpoint. Breakpoints make the code execution "stop here."
|

At that point in the code, you can examine any variables that are in use. It gives you a snapshot of your code, with live values for variables in that code. You are also able to step through your code line by line, examining the code execution and variable contents as you go.
You can set a breakpoint anywhere in your ActionScript code. You can navigate through the different sections of code in the debugger by using the code navigator drop-down box above the code window. You'll find that even simple movies have many areas of code that are superfluous to the debugging operation?built-in areas of Flash MX that you have no control over. You'll want to put your breakpoints into scripts that you have coded or areas that you want to track with the debugger. A good place to start for a Flash Remoting application is the main initialization script on the main timeline. In the examples for this book, the code can usually be found in the code navigator of the debugger as "Actions for Scene 1 Frame 1 for Layer named actions."
To set a breakpoint, click the Toggle Breakpoint button on the debugger control bar, or use the contextual menu in Code View on the debugger and choose Set Breakpoint. After setting the breakpoint, you can click the Continue button on the debugger to allow the movie to execute up to the breakpoint. That's where the fun begins. Once at the breakpoint, the movie stops again and allows you to interact with your code.
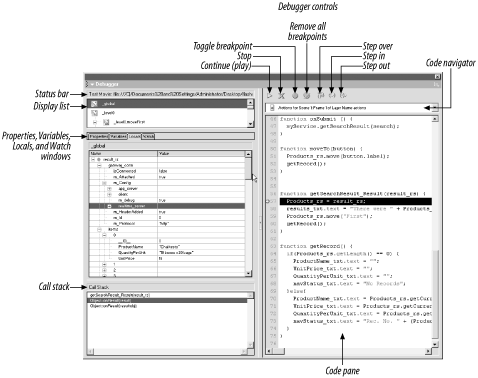
The Properties and Variables windows (accessed via tabs in the center pane on the left side as shown in Figure 13-2) give you editable lists of all properties and variables in a selected movie clip. The Watch and Locals windows (accessed via tabs in same pane) are more useful from a Flash Remoting perspective.
13.3.1.1 The Watch window
The Watch window allows you to examine certain variables of your own choosing. For example, if I want to determine the contents of my results_rs variable inside the getSearchResult_Result( ) function, I add the result_rs variable to the Watch window. The variable shows as undefined until it comes into scope, at which point the variable's value is displayed in the Watch window.
13.3.1.2 The Locals window
The Locals window displays all local variables as they come into scope. It provides immediate feedback about relevant local variables, without requiring manual setup, as the Watch window does. For example, Figure 13-2 shows the Locals window when the debugger is paused at the getSearchResult_Result( ) function. The nice thing about the debugger is that you have access to all properties of your ActionScript objects. The result_rs variable is a complex RecordSet object, and you can easily see the different properties of the object in the display, allowing you to determine if your script is retrieving the correct results or if your RecordSet object has the correct structure.
Figure 13-2. The Flash interactive debugger
Variables can also be modified from the debugger in any of these windows. Using this feature allows you to set different values to test different situations that might not be possible if you were relying only on values coming from a database, for example. What exactly would happen to your movie if a certain field contained a negative number? Using the debugger, you can test different situations such as these easily.
13.3.1.3 The Call Stack
The Call Stack gives you information about all functions that were called up to the current function. If you are debugging at the main timeline, the Call Stack will be empty. As you call functions, the Call Stack displays the function names in the stack. Functions called from within functions will appear in the Call Stack. Note that only user-defined functions show up in the Call Stack.
13.3.2 A Debugging Session
To fully appreciate the Flash interactive debugger, you need to use it. If you haven't tried it before, you can get your feet wet with it now. This section goes through a typical interactive debugging session using the searchProducts.fla file from Example 3-8. This section assumes that you have the sample file working and results successfully coming from the server. This exercise also allows you to see the order of execution of a typical Flash Remoting application.
|
Open the searchProducts.fla file and choose Ctrl
Debug Movie to begin a debugging session. Refer to Figure 13-2 for the location of the various controls
within the Debugger panel. We'll set one breakpoint
and then step through the code line by line:
Expand the Debugger panel so that it is large enough to examine the code easily. Move the vertical splitter in the center of the Debugger panel to the right to enlarge the left pane somewhat, but leave room for the Code pane on the right side.
Select the Locals tab in the center pane on the left. Expand the center pane by dragging the horizontal splitter downward.
Use the Code Navigator drop-down list to access "Actions for Scene 1:Frame 1 of Layer named actions."
Insert a breakpoint by clicking the Toggle Breakpoint button while the first executable line of code is highlighted:
if (connected == null) {Hit the Continue/Play button (green arrow) to begin debugging. The code should stop at your breakpoint.
Notice that the Locals window has a single entry, this, which represents the current timeline object. Expand the tree under it to show all associated properties.
Click the Step Over button once (it is the leftmost of the three stepping buttons), which takes you to the next line of code. The Locals window hasn't changed yet, because the code in the current line has not executed yet.
Click the Step Over button again, and the Locals window should change at this point. Now, the variable connected should have a value of true, as shown in Figure 13-3.
Figure 13-3. Stepping through code and examining variables
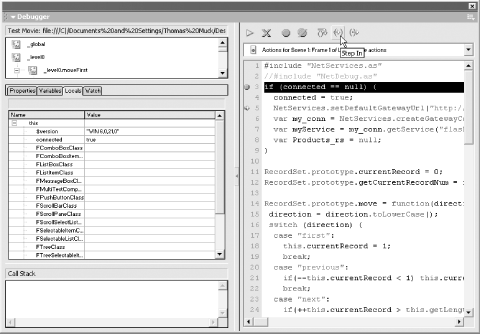
Click the Step In button (instead of the Step Over button), and the Code pane should show the NetServices.as file; this is where the setDefaultGatewayUrl( ) method is being called. The Step In button "dives down" into any subroutine called on the current line (keep your eye on the Call Stack pane to see where you are in the code). The Locals window once again changes, but now the local variable this points to the NetServices object.
Keep clicking the Step In button slowly and keep track of where you are in the Code pane using the Call Stack pane for guidance. You should be stepping through the createGatewayConnection( ) method, eventually ending up at this line:
var nc = new NetConnection( );
This is where the NetConnection object is created. You can see that at this point the URL is set up for the connection, but no connection has been made to the server yet. In fact, as you complete the createGatewayConnection( ) method, the debugger will automatically step back (out) into the main timeline. There you will see that the my_conn variable is now populated with an isConnected property with the value false.
Step through the getService( ) method next. You'll see from this section that you are creating a proxy to the service but still not connecting. As you step back to the main timeline, you now have the myService object created. The my_conn object still has the isConnected property set to false.
The rest of the inline code can now be stepped through quickly until the step buttons become grayed out.
Flash is event-driven; the movie is waiting for user interaction and your script is awaiting an event. Click the Submit button in the movie to continue the debugging.
If you've been single-stepping through the code, when you click the Submit button the debugger takes you inside the onSubmit( ) function. If you look at the Call Stack window, you'll see that the onSubmit( ) function was executed after MovieClip::onRelease( ) and MovieClip::executeCallBack( ). This gives you some insight into the inner workings of Flash; the click handler function is actually executed in the onRelease event of the button.
If you are stepping through the code line by line, it might take a while to get through all the lines of code. Navigate to the getSearchResult_Result( ) function using the Code pane and set a breakpoint there.
|
Click the Go button, and the debugger should stop at the breakpoint set in getSearchResult_Result( ). (If not, there may have been an error, and you should set a breakpoint in getSearchResult_Status( ) to examine that code.) Once inside getSearchResult_Result( ), the Locals window should contain the RecordSet object named result_rs, and you can examine its properties. You may recall that in Chapter 3 we enhanced the RecordSet object to include a currentRecord property, which should appear in the debugger, along with the fields and built-in properties of the recordset.
To demonstrate the usefulness of the Locals window, modify the currentRecord property by changing its value to 20 (simply edit the number in the Value column of the Locals window). As you step through your code, the movie should display the 20th record instead of the first record.
Unfortunately, the Flash MX Interactive Debugger doesn't remember your breakpoints between sessions. The next time you start the debugger, you will have to set any breakpoints again.
The Flash interactive debugger is useful for checking the client-side ActionScript code, including Flash Remoting code, as well as examining return objects and values from a remote service. The NetConnection debugger, on the other hand, gives you solid feedback on the Remoting process itself.


