Appendix D: Installing RDBMS Software
Appendix D: Installing RDBMS Software
Please keep in mind that no matter which RDBMS you have chosen to install, it is for educational/evaluation purposes only. Oracle, IBM DB2 UDB, and the MS SQL Server can be installed in many different ways, but for the scope of this book we recommend that you follow the proposed instructions and naming conventions. That will simplify the creation and population of the ACME database (regardless of the RDBMS you have chosen) used in the examples and exercises given throughout this book.
Installing Oracle 9i
Undoubtedly, Oracle 9i is the most resource-demanding (and one of the most powerful) RDBMS engine out of the three discussed in this book. From our personal experience we know that installing just for the "minimal hardware requirements" combined with the installation defaults does not result in acceptable performance. Oracle is a really great system, but to work well it needs to be tuned, and database tuning is a very serious undertaking usually performed by experienced DBAs; as such, it is definitely beyond the scope of this book.
| Caution |
To install Oracle in a production environment, you need the help of an experienced professional. |
Our general recommendation is that if you want to install Oracle 9i on your machine, don't rely on the minimum hardware requirements, but rather try to exceed what is recommended. If you don't have enough resources for Oracle, try DB2 or MS SQL Server.
If you've decided to try out Oracle 9i RDBMS, you may download it from the vendor's site (otn.oracle.com).We recommend that you install the Personal Edition of Oracle 9i, which is only available for Windows. You would need one set of three disks (per platform) to install Personal, Standard, or Enterprise, so it's actually up to you which version to choose; but in order to try out our SQL examples, the Personal Edition is more than sufficient.
We also include instructions on how to install Oracle 9i on Sun/Solaris and Linux, but be advised that you have to be familiar with those operating systems to be able to proceed with the installation. For more detailed installation instructions (for any platform) visit technet.oracle.com.
| Note |
Oracle 9i installation disks are not included with your book; you can download the disk images from Oracle Technology Network site (otn.oracle.com) after completing a registration form. |
Installing Oracle 9i software on Windows NT/2000/XP
Oracle 9i requires quite a bit of resources. Table D-1 contains Oracle's own principal guidelines; from our own experience, we recommend at least a Pentium 400-MHz machine with 192 MB of RAM.
System requirements
Table D-1 lists the minimal and recommended requirements to install Oracle 9i on Windows.
|
Processor (CPU) |
Minimal: Pentium 200 Recommended: Pentium 266 |
|
Operating system |
Windows NT Workstation
4.0 |
|
Service packs |
Windows NT: Service pack 5
or higher
|
|
Memory |
RAM:
|
|
Hard disk FAT |
System drive: 140MB |
|
Hard disk NTFS (recommended) |
System drive: 140MB |
|
Web browser |
Netscape Navigator 4.76 or
higher
|
|
Other |
Video Adapter: 256
color |
| Tip |
Though Oracle 9i is not certified for the Windows XP Home Edition, it is possible to install and run it on this operating system version. |
| Tip |
You need a special Oracle 9i installation disk for Windows 98; the set of three disks mentioned previously is good for any other approved version of Windows. |
Installation instructions
Follow these instructions to install Oracle 9i on your computer:
-
Insert the first Oracle 9i component CD into your CD-ROM drive. The installation will start automatically (see Figure D-1.) If the Autorun window does not appear, find your CD-ROM from Windows Explorer, open the autorun directory, and double-click on autorun.exe.
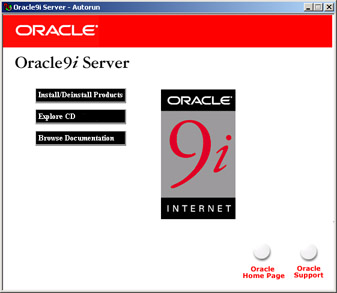
Figure D-1: Oracle 9i Autorun window -
Choose Install/Deinstall Products from the Autorun window. The Welcome window appears. See Figure D-2.

Figure D-2: Oracle Welcome window -
Choose Next. The Inventory Location window appears (assuming that this is your first Oracle installation on this computer). Accept default location and click OK.
-
The File Locations window appears. Do not change the directory path in the Source field. We also recommend that you accept defaults for the Oracle Home and Directory path in the Destination fields as shown in Figure D-3.
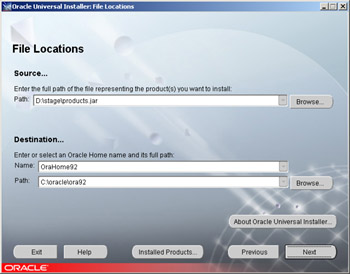
Figure D-3: Oracle File Locations window -
Choose Next. You will see the Available Products window. Select Oracle 9i Database.
-
Choose Next. Select Personal Edition on the Installation Types window.
-
From the Database Configuration window, select General Purpose.
-
If the Microsoft Transaction Server is detected, then the Oracle Services for Microsoft Transaction Server window will appear. Accept the default port number for this service (2030).
-
Choose Next. Enter ACME in both the Global Database Name and SID fields on the Database Identification window. This information is used by the Database Configuration Assistant to create your database during the installation process. See Figure D-4.
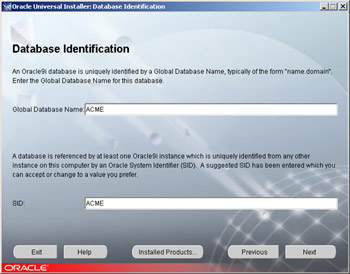
Figure D-4: Oracle Database Identification window -
Choose Next. The Database File Location window appears. Enter the directory location where you wish to place the database files. We recommend that you accept the defaults.
-
Choose Next. Select the database character set. We recommend that you accept the defaults (which are based on your operating system's local settings) as shown in Figure D-5.
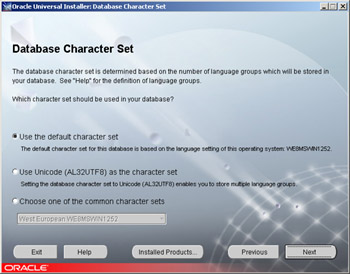
Figure D-5: Oracle Database Character Set window -
Choose Next. You will see the Summary window (Figure D-6.) Review the space requirements to ensure you have enough space on your hard disk. Click the Install button.
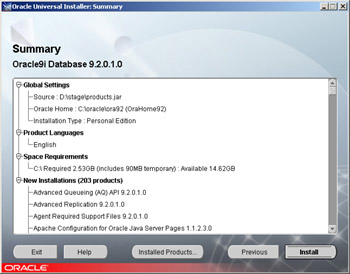
Figure D-6: Oracle Summary window -
Wait for the installation process to complete. During the installation you will be prompted to insert the second and the third CDs (Figure D-7.)
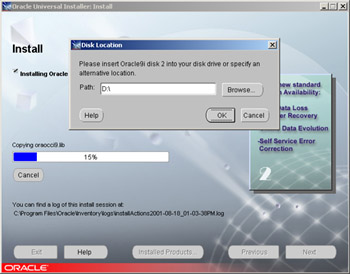
Figure D-7: Oracle Install window / Disk Location pop-up screen -
When the software installation process is complete, the Configuration Tools window appears (Figure D-8). The default installation configures Oracle Net Services and Agent, creates the sample database, and starts the Oracle HTTP server. The End of Installation window appears when all tasks are complete.
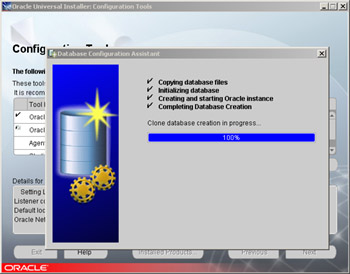
Figure D-8: Oracle Configuration Tools and Database Configuration assistant windowsNote For the purposes of this book you don't really need to configure the aforementioned services except for the sample database. Regrettably, there is no way to create the default database alone unless you do it manually after the install. For simplicity's sake, we suggest that you let the installation program configure all the default options, and then disable them as described later in this chapter.
-
The Database Configuration Assistant window prompts you for new super user (SYS and SYSTEM) passwords as shown in Figure D-9. Type in your passwords, write them down, and click OK.
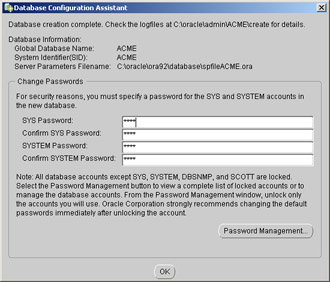
Figure D-9: Oracle Change passwords for system users on the Database Configuration assistant window -
The End of Installation window appears. Choose Exit and click Yes on the Exit confirmation pop-up window. The Oracle Enterprise Manager Console window may open. Unless you intend to administer the Oracle database, you should simply close this window.
Tip You can review your installation session logs in the <SYSTEM_DRIVE>:\Program Files\Oracle\Inventory\logs directory.
Note These installation instructions assume you don't have a previous version of Oracle software installed on your computer. Go to technet.oracle.com for upgrade instructions.
Postinstallation tasks
Usually there are no special tasks to be performed after Oracle 9i installation on the Windows platform. See the Starting and stopping Oracle 9i section later in this chapter for basic recommendations.
Uninstalling Oracle 9i
At some point you might want to uninstall Oracle. To do so, follow the instructions below. If after the uninstall process is complete some elements were left behind, go to technet.oracle.com for instructions on how to completely remove Oracle from your system.
-
Go to the Windows Services control panel (Figure D-10) and stop all Oracle Services (anything that starts with Oracle or Ora).
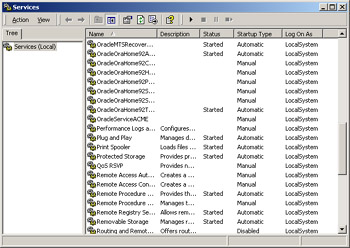
Figure D-10: Oracle Windows Services windowTip To go to the Services panel, on Windows NT, select StartàSettingsàControl PanelàServices; on Windows 2000, choose StartàSettingsàControl PanelàAdministrative ToolsàServices; on Windows XP, go to StartàControl PanelàAdministrative ToolsàServices. To stop a service, right-click on it and select Stop.
-
Start the Oracle Universal Installer from StartàProgramsàOracle Installation Products.
-
Choose Deinstall Products from the Welcome window. The Inventory window appears.
-
Expand the tree of installed components and check the Oracle 9i Database 9.x.x.x box.
-
Choose Remove. Click the Yes button on the Confirmation window. See Figure D-11 for details.
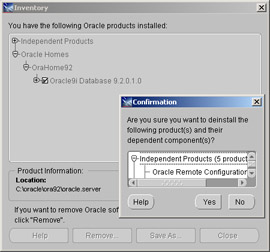
Figure D-11: Removing Oracle software with the Inventory window -
Close the Inventory window and exit the Universal Installer.
Starting and stopping Oracle 9i
Oracle 9i takes a lot of your computer's resources, so it's good to know how to start and stop it, especially since it is configured to start automatically after default installation. That might not be bad for a production server, but if you installed if for educational purposes only, you probably don't want it to start automatically every time you boot your PC because of resources drain. The following procedure disables the automatic startup:
-
Go to StartàProgramsàOracle — OracleHome92àConfiguration and Migration Tools and choose Administration Assistant for Windows NT.
-
Expand the tree all the way to your ACME database, right-click on ACME database, and choose Startup/Shutdown Options.
-
Go to the Oracle NT Service tab, select Manual under Oracle NT Service Startup Type, and click OK (Figure D-12.) Next time you boot your computer, Oracle will not start automatically.
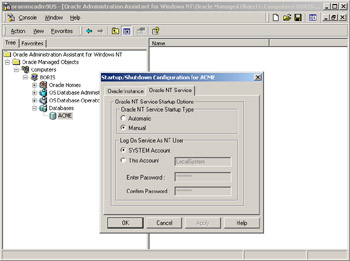
Figure D-12: Oracle Administration Assistant for Windows NT -
To start Oracle manually, repeat the procedure described in Step 1, expand the tree, right-click on the ACME icon, and select the Start Service option. To stop Oracle, select the Stop Service icon from the same right-click menu.
Tip When you choose to start database service, the message window pops up almost immediately saying, "Service started successfully." In fact, the startup procedures are still in progress, so give it a little time before you try to log in.
Another service that takes your computer's resources is the Oracle HTTP Server. This is powered by the Apache Web Server and also starts automatically by default. To change its default behavior, go to the Windows Services panel, find OracleOraHome92HTTPServer, double-click on it, and change Startup type to manual on the General tab.
| Tip |
You will need the Oracle HTTP Server running if you are planning to configure iSQL*Plus (more about iSQL*Plus in Appendix E). |
Installing Oracle software on SUN Solaris
Oracle installation on Unix platforms requires solid knowledge of the operating system and root privileges. Also, the Oracle 9i Personal Edition is not available for Unix, so minimal DBA skills are also desirable. We assume you don't have any previous version of Oracle installed on your server.
System requirements
Table D-2 lists the minimal and recommended requirements to install Oracle 9i on Sun Solaris.
|
Operating System |
Solaris 32-bit: 2.6(5.6), 7
(5.7), 8 (5.8) |
|
Memory |
RAM: 512 MB
|
|
Hard Disk |
4.5 GB for database software
and seed database |
|
Web Browser |
Netscape Navigator 4.76 or higher |
|
Other |
CD-ROM Drive capable of
reading ISO 9660 format CDs with RockRidge extensions |
Preinstallation tasks to perform as root
You must perform the following tasks as root before you can start the Oracle installation.
-
Configure Kernel parameters. Edit the /etc/system file, and make sure the Kernel parameters are at least at the levels defined below:
semsys:seminfo_semmni=100
				  semsys:seminfo_semmns=1024 semsys:seminfo_semmsl=256
				  shmsys:shminfo_shmmax=4294967295 shmsys:shminfo_shmmin=1
				  shmsys:shminfo_shmmni=100 shmsys:shminfo_shmseg=10
If any of the above values is not large enough, change it appropriately; save the file, and restart the server.
-
Create mount points. Oracle requires a minimum of two mount points: one for the software, and one for the database files. The conventions are /u01 and /u02.
Note Oracle recommends that you create at least four mount points to follow the rules of the Oracle Flexible Architecture (OFA).
-
Create a Unix group called dba. Everybody who belongs to this group will have all database privileges, so use it carefully.
-
Create user oracle as a member of the dba group with a home directory consistent with other user home directories (not the same as Oracle Home directory). The default shell can be Bourne, Korn, or C.
Tip You can create Solaris groups and users with the admintool utility.
-
Set file creation permissions for user oracle by adding this line to .profile or .login file:
umask
				  022
Preinstallation tasks to perform as user oracle
You must perform the following tasks as user oracle (created in the previous set of steps) before you can start the Oracle installation.
-
Set environment variables in .profile or .login file of the oracle account as described in Table D-3. We assume you used the /u02 mount point for the Oracle software installation.
Table D-3: Unix Environment Variables Necessary for Oracle 9i Installation on Sun Solaris Platform Variable
Explanation
Recommended value
ORACLE_BASE
Top of the Oracle software structure
/u01/app/oracle.
ORACLE_HOME
Directory that contains software for a particular release
/u01/app/oracle/product/9.?.?.?.?, where ?.?.?.? corresponds to the current release.
ORACLE_SID
System identifier to be used by Oracle server instance during the installation
ACME (for purposes of this book).
PATH
Shell's search path for executables (The order is important.)
$ORACLE_HOME/bin:/usr/ ccs/bin:/usr/bin:/ etc:/usr/openwin/bin:/ usr/local/bin (if exists).
LD_LIBRARY_PATH
Add $ORACLE_HOME/lib at the beginning of your LD_LIBRARY_PATH variable.
Note We assume that you installed the Oracle 9i software from the server X Window console. Otherwise, the DISPLAY environment variable must be set appropriately.
-
Update the environment for current oracle session (the one that will perform the installation).
Installation instructions
You have several options on how to install Oracle 9i. We assume you've chosen the installation that uses the CD-ROMs.
| Tip |
Oracle uses a platform-independent, Java-based graphical user interface (GUI) called Universal Installer for software installations. That means the screenshots from the Windows installation section are identical (or very similar) to what you will see during installation on Sun Solaris, Linux, or any other OS. |
-
Insert the first Oracle 9i CD (Disk1) into your CD-ROM drive. Mount your CD-ROM. The CD-ROM is mounted automatically if you have Volume Management software installed (Solaris default).
-
Log in as user oracle. Start the Oracle Universal Installer by running the runInstaller command from the CD-ROM root directory. The Welcome window appears.
-
Click Next. The Unix Group Name window appears. Specify the dba group created during preinstallation steps in the appropriate field.
-
Click Next. The Installer window will pop up asking you to run /tmp/OraInstall/orainstRoot.sh as root, which creates the /var/opt/oracle directory on your machine and gives user oracle the appropriate permissions on it. When done, click Retry. The installation will continue.
-
The File Location window will appear. Do not change the Source field; we also recommend that you do not change the Destination field that defaults to the directory path specified in your $ORACLE_HOME environment variables.
Tip If you did not complete all preinstallation requirements, another Installer window might appear asking you to run the orainstRoot.sh script as root. Run it and click Retry.
-
Click Next. The Available Products window will appear. Choose Oracle 9i Database.
-
Click Next. The Installation Types window appears. Select Standard Edition.
-
Click Next. The Database Configuration Types window appears. Select General Purpose.
-
Click Next. Enter ACME for both Global Database Name and SID.
-
Click Next. The Database File Location window appears. Enter the directory for the database files in the appropriate field, for instance, /u02 if you've created it during the preinstallation steps.
-
Click Next. The Database Character Set window appears. We recommend that you accept defaults.
-
Click Next. The Summary window appears. Review the information and click Install. The Install window appears showing a progress bar.
-
You will be prompted to insert Disk2 and Disk3 during the installation. You will also be prompted to run the root.sh script as root. The script sets appropriate permissions and configures Oracle software. When done, click OK in the Alert pop-up window.
-
The Configuration Tools window appears. This window helps you to configure your network, database, HTTP Server, and Oracle Intelligent Agent. We recommend that you accept all defaults.
-
The End of Installation window appears. Click Exit.
Tip You can review your installation session logs. The location of the logs is defined in file /var/opt/oracle/oraInst.loc.
Tip Noninteractive installation of Oracle 9i on Unix platforms is also available.
Postinstallation tasks
Postinstallation tasks can vary. You might want to create additional Unix accounts, check file permissions, change group membership of the Apache user (for security reasons), and automate database startup and shutdown procedures. If you've installed Oracle only to run examples in this book, there is no need for any of these tasks.
Uninstalling Oracle 9i
Please follow instructions below to uninstall Oracle.
-
Start the Oracle Universal Installer.
-
Choose Deinstall Products from the Welcome window. The Inventory window appears.
-
Expand the tree of installed components and check the boxes of components to uninstall.
-
Choose Remove. Choose Yes on the Confirmation window.
-
Close the Inventory window and exit the Universal Installer.
Starting and stopping Oracle 9i
Oracle 9i does not automatically start on Unix. To start and stop Oracle you have to be logged in as user oracle or as another member of the dba group. Also, make sure your session's environment variables are properly set as shown in Table D-3.
-
At the Unix prompt, type sqlplus /nolog.
-
At SQL prompt type connect / as sysdba.
-
Either type startup (to the start Oracle 9i instance) or shutdown immediate (to stop it).
-
Type quit to exit to the Unix prompt.
Tip You can also use Oracle's GUI to perform database startup and shutdown.
Installing Oracle software on Linux
For all the practical purposes, Linux is a Unix dialect, just as Sun Solaris is, so the installation procedures are similar for these two operating systems. These installation instructions assume familiarity with the Linux operating system.
System requirements
Even though Oracle 9i is only currently certified for the SuSE Linux Enterprise Server 7 (SLES-7), we know from experience that it is also installable on Red Hat 7.0 and Mandrake 8.0. If you are a Linux expert, you are more than welcome to try to install Oracle 9i on other Linux flavors. Please refer to Oracle documentation for detailed instructions.
Table D-4 lists the recommended requirements for Oracle 9i installation on Linux.
|
Operating system |
SuSE 7 with kernel 2.4.7 and
glibc 2.2.2 |
|
Memory |
RAM: 512 MB
|
|
Hard disk |
4.5 GB for database software
and seed database |
|
Web browser |
Netscape Navigator 4.76 or higher |
|
Other |
CD-ROM Drive capable of
reading ISO 9660 format CDs with RockRidge extensions |
| Tip |
Binutils for Red Hat 7.2 seems to be incompatible with Oracle 9i. You can use binutils-2.10.0.18 (Red Hat 7.0) or binutils-2.10.1.0.2 (Mandrake 8.0) |
Preinstallation tasks to perform as root
You must perform the following tasks as root before you can start the Oracle RDBMS installation.
-
Configure kernel parameters. The minimum recommended values are listed below:
semmsl 100 semmns 256
				  semomp 100 semmni 100 shmmax 2147483648 shmmni 100 shmall 2097152 shmmin 1
				  shmseg 4096 shmvmx 32767
The 2.4.x default kernel parameters are usually sufficient for an Oracle 9i installation. If not, modify these values; write a script to initialize them, and include the script in your system initialization files, for example:
# cd /proc/sys/kernel #
				  echo 100 256 100 100 > sem # echo 2147483648 > shmmax # echo 100 >
				  shmmni # echo 2097152 > shmall # echo 1 > shmmin # echo 4096 > shmseg
				  # echo 32767 > shmvmx # echo 65536 > /proc/sys/fs/file-max # ulimit –n
				  65536 # echo 1024 65000 > /proc/sys/net/ipv4/ip_local_port_change # ulimit
				  –u 16384
-
Create mount points. Oracle requires a minimum of two mount points; one for the software, and one for the database files. The conventions are /u01 and /u02.
-
Create a Linux group called dba. Everyone who belongs to this group has all database privileges, so use it carefully.
-
Create user oracle as a member of the dba group with the home directory consistent with other user home directories (but not the same as the Oracle Home directory). The default shell can be Bourne, Korn, or C.
-
Set file creation permissions for user oracle by adding this line to .bash_profile or /etc/profile:
umask
				  022
Preinstallation tasks to perform as user oracle
You must perform the following tasks as user oracle (created in the previous set of steps) before you can start the Oracle RDBMS installation.
-
Set environment variables in .bash_profile of the oracle account as described in Table D-5. We assume you used the /u02 mount point for Oracle software installation.
Table D-5: Environment Variables Necessary for Oracle 9i Installation on Linux Variable
Explanation
Recommended value
ORACLE_BASE
Top of the Oracle software structure
/u01/app/oracle.
ORACLE_HOME
Directory that contains software for a particular release
/u01/app/oracle/ product/9.?.?.?.?, where ?.?.?.? corresponds to the current release.
ORACLE_SID
System identifier to be used by Oracle server instance during the installation
ACME (for purposes of this book)
PATH
Shell's search path for executables (The order IS important.)
$ORACLE_HOME/bin:/usr/ bin:/bin:/usr/bin/X11:/ usr/local/bin (if exists).
LD_LIBRARY_PATH
Add $ORACLE_HOME/lib at the beginning of your LD_LIBRARY_PATH variable.
-
Update the environment for the current oracle session (the one that will perform the installation).
Installation instructions
You have several options on how to install Oracle 9i. We assume you've chosen the installation that uses the CD ROMs.
-
Insert the first Oracle 9i CD (Disk1) into your CD-ROM drive. Mount your CD-ROM. The CD-ROM is mounted automatically to the directory specified in your auto mount configuration if you are using mounting software.
-
Log in as user oracle. Start the Oracle Universal Installer by running the runInstaller command from the CD-ROM root directory. The Welcome window appears.
-
Click Next. The Unix Group Name window appears. Specify the dba group created during preinstallation steps in the appropriate field.
Tip If the /etc directory does not exist on your system or user oracle does not have appropriate permissions on it, the Installer window will pop up asking you to run /tmp/OraInstall/orainstRoot.sh as root. When done, click Retry. The installation will continue.
-
Click Next. The File Location window will appear. Do not change the Source field; we also recommend that you do not change the Destination field that defaults to directory path specified in your $ORACLE_HOME environment variables.
Tip If you did not complete all the preinstallation requirements, another Installer window might appear asking you to run the orainstRoot.sh script as root. Run it and click Retry.
-
Click Next. The Available Products window will appear. Choose Oracle 9i Database.
-
Click Next. The Installation Types window appears. Select Standard Edition.
-
Click Next. The Database Configuration Types window appears. Select General Purpose.
-
Click Next. Enter ACME for both Global Database Name and SID.
-
Click Next. The Database File Location window appears. Enter the directory for the database files in the appropriate field, for example, /u02 if you've created it during the preinstallation steps.
-
Click Next. The Database Character Set window appears. We recommend that you accept the defaults.
-
Click Next. The Summary window appears. Review the information and click the Install button. The Install window appears showing a progress bar.
-
You will be prompted to insert Disk2 and Disk3 during the installation. You will also be prompted to run the root.sh script as root. The script sets appropriate permissions and configures Oracle software. When done, click OK in the Alert pop-up window.
-
The Configuration Tools window appears. This window helps you to configure your network, database, HTTP Server, and Oracle Intelligent Agent. We recommend that you accept all the defaults.
-
The End of Installation window appears. Click Exit.
Tip You can review your installation session logs. The location of the logs is defined in the file /var/opt/oracle/oraInst.loc.
Postinstallation tasks
Postinstallation tasks may vary. You might want to create additional Linux accounts, check file permissions, change group membership of the Apache user (for security reasons), and automate database startup and shutdown procedures. If you've installed Oracle only to run examples in this book, there is no need for any of these tasks.
| Tip |
If you create any additional OS users to work with Oracle, then you have to make sure all environment variables discussed above are added to their .bash_profile (unless /etc/profile is used for everybody). |
Uninstalling Oracle 9i
The following are used to uninstall Oracle:
-
Start the Oracle Universal Installer.
-
Choose Deinstall Products from the Welcome window. The Inventory window appears.
-
Expand the tree of installed components and check the boxes of components to uninstall.
-
Choose Remove. Choose Yes on the Confirmation window.
-
Close the Inventory window and exit the Universal Installer.
Starting and stopping Oracle 9i
Oracle 9i does not automatically start on Linux. To start and stop Oracle you have to be logged in as user oracle or as another member of the dba group and start it manually. Also, make sure your session's environment variables are properly set as shown in Table D-5.
-
At the Linux prompt, type sqlplus /nolog.
-
At SQL prompt type connect / as sysdba.
-
Either type startup (to start the Oracle 9i instance) or shutdown immediate (to stop it), and hit the Return key.
-
Type quit to exit to the Linux prompt.


