Installing IBM DB2 UDB 8.1 Personal Edition
Installing IBM DB2 UDB 8.1 Personal Edition
Unlike Oracle, DB2 requires fewer system resources. It also has a reputation for being fast and reliable, but its user friendliness still lags behind its rivals' (even though it became much better in version 8.1). In this book, however, we use command-line interface.
Installing DB2 UDB 8.1 software on Windows NT/2000/Me/XP
DB2 installation on Windows is fast and simple and does not require much user interaction and is very straightforward.
System requirements
Table D-6 lists the requirements for DB2 UDB 8.1 installation on Windows.
|
Processor (CPU) |
Minimal: Pentium 200Recommended: Pentium 266 |
|
Operating System |
Windows NT 4.0 |
|
Service Packs |
Windows NT: Service pack 6a or higher |
|
Memory |
RAM:128 MB (Personal Edition) |
|
Hard Disk |
350 M |
|
Web Browser |
Netscape Navigator 4.76 or
higher |
|
Other |
Java Runtime Environment
(JRE) v. 1.3.1 |
Preinstallation tasks
You have to have a locally defined user account that is a member of the local Administration group. By default, any user who is a member of the local OS Administration group also belongs to the DB2 System Administrative (SYSADM) group. The user needs the following rights:
-
Act as part of the operating system
-
Create a token object
-
Increase quotas
-
Replace a process level token
If the user is missing any of these rights, you will see the Information window during the installation (after Step 6) saying that user does not have the necessary rights. You can ignore this message and click OK. While it is important for a properly configured production installation, it is irrelevant for the purposes of this book.
| Tip |
It is recommended to shut down any other programs before you start installation. |
Installation instructions
Follow these steps:
-
Insert DB2 UDB installation CD-ROM into the CD-ROM drive. The installation will start automatically. If the installation window does not appear, find your CD-ROM from Windows Explorer, and double-click on setup.exe.
-
The DB2 Setup screen opens as shown in Figure D-13. Click Install Products.
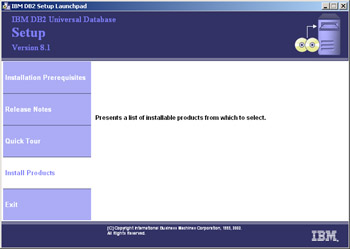
Figure D-13: DB2 UDB 8.1 Installation window -
The Select the product you would like to install screen appears (Figure D-14.) Select DB2 UDB Universal Database Personal Edition and click Next.
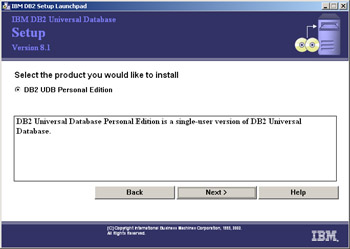
Figure D-14: DB2 UDB 8.1 Products selection screen -
The Preparing to Install window appears; DB2 Setup wizard starts automatically then (Figure D-15.) Click Next.

Figure D-15: DB2 UDB 8.1 Setup wizard screenTip The Next button on the DB2 Setup wizard screen will be grayed out for a short period of time. Wait until it becomes enabled.
-
The License Agreement screen appears. You may read the agreement (or skip it); you have to select "I accept the terms in the license agreement" option, and click Next.
-
The Select the installation type screen appears. Select Typical and click Next.
Note The Warning window about APPC remote server connections may pop up; ignore it by clicking OK. It is not relevant to the goals of your installation.
-
Accept the default installation drive and directory from the Select installation folder screen. Make sure you have enough space on your hard disk (partition). See Figure D-16.
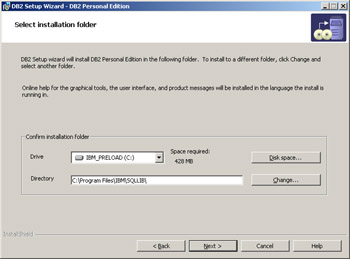
Figure D-16: DB2 UDB 8.1 Select installation folder screen -
The next screen prompts you for domain, username, and password for the DB2 Administration Server. The default username is db2admin. Overtype it with your own OS username and supply the password. Leave the Domain field blank, leave "Use the same user name and password for the remaining DB2 services" checkbox checked, and click Next.
Tip If you accept the default username db2admin, the installation program will ask you if you want to create the user. You can answer Yes and use the db2admin account to access your DB2 database later on.
-
The Set up the administration contact list screen appears. Leave all the defaults intact and click Next. You may see a warning about SMTP server not being specified. Ignore it by clicking OK, it is irrelevant for the purposes of the current installation.
-
Click Next on the Configure DB2 instances screen.
Tip We recommend that you accept the default options of the Configure DB2 instances screen. Otherwise, if you don't want to start DB2 automatically, click Startup button on the abovementioned screen, select "Do not autostart the instance..." option, click OK, and continue. You will have to start the DB2 instance manually every time you reboot your machine. The instructions are given later in this appendix.
-
Accept default settings on the Prepare the DB2 tools catalog screen by clicking Next.
-
The Specify a contact for health monitor notification screen appears. Select "Defer the task until after installation is complete" option and click Next.
-
Click Install on the Start copying files screen (Figure D-17). Installation will start.
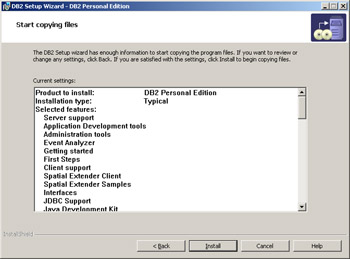
Figure D-17: DB2 UDB 8.1 Start copying files screen -
When installation and setup of DB2 are complete, the Setup is complete screen appears, asking you to shut down all programs running on your computer now. Do so and click Finish.
-
The First Steps window appears, displaying the Congratulations message. Click Exit First Steps unless you feel like browsing tutorials or taking the DB2 UDB Quick Tour.
Postinstallation tasks
To create an empty ACME database now:
-
Open the DB2 Control Center (StartàProgramsàIBM DB2àGeneral Administration ToolsàControl Center).
-
Expand the tree view all the way to the databases.
-
Right-click on the Databases folder and select CreateàDatabase Using Wizard (Figure D-18.) The Create Database Wizard window appears.
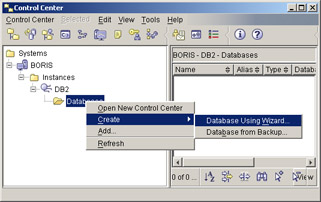
Figure D-18: DB2 UDB 8.1 Creating database using Control Center window -
Type ACME in Database name field and click Finish (Figure D-19.) The Progress window pops up, showing elapsed time.
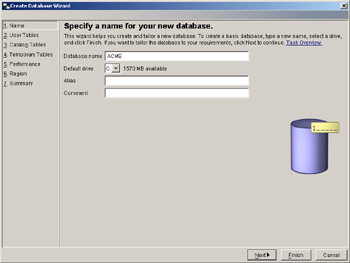
Figure D-19: DB2 UDB 8.1 Creating ACME database in using Database WizardTip If your screen resolution is 800 × 600, the Database Wizard window may appear too large and out of the screen bounds. Resize it manually and continue.
-
When done, the DB2 Message window pops up saying the database was created successfully and asking if you want to run the Configuration Advisor to tune your database. Click No to decline.
-
You will see the ACME icon under the Databases folder. The postinstallation tasks are now complete.
Note You don't have an option to create a database user who is not also an operating system user. All OS users who have Administrator privileges are also DB2 users with administrative privileges by default.
Uninstalling DB2 UDB
The following instructions are used to uninstall DB2 UDB:
-
Drop database ACME (and any additional databases you've created). Open the Control Center (StartàProgramsàIBM DB2àGeneral Administration ToolsàControl Center), expand the tree view all the way to the Databases folder (InstancesàDB2àDatabases), select ACME, and choose Remove from the right-click menu (or from the Selected menu). The Confirmation window appears. Leave the Remove checkbox checked and click OK. Repeat for any other databases you might have.
-
Close the Control Center window and any other DB2-related programs you might have opened.
-
Go to My ComputeràControl PanelàAdd/Remove Programs.
-
Find DB2 Personal Edition and click the Remove button. Click Yes on the Confirmation window.
-
The INFORMATION window might appear asking if you want to terminate running the DB2 processes. Answer Yes to continue.
-
You might still need to remove some directories manually (C:\Program Files\IBM\SQLLIB; C:\DB2; C:\DB2LOG, assuming default locations).
Starting and stopping DB2 UDB
DB2 will automatically start on startup if you accepted the Configure DB2 instances screen defaults during the installation process. Otherwise, open the Control Center (StartàProgramsàIBM DB2àGeneral Administration ToolsàControl Center); expand the tree view all the way to the DB2 folder, right-click on the DB2, and select Start. To stop the instance, repeat the same procedure but select Stop option instead.
| Cross-References |
You can also stop the database manager instance using the db2start and db2stop commands from the command line. |
| Note |
For DB2 UDB 8.1 installation instructions on different platforms (Linux, Solaris, etc.) go to www-3.ibm.com/software/data/db2/udb. The trial DB2 downloads are also available from that Web site. |


