Task 5 How to Silhouette an Image
Silhouetting an image refers to isolating part of an image against a white background, cutting it out from the rest of the frame. This task uses the Extract command to silhouette an image cleanly and easily. The Extract command asks you to define the edge of the object and then cuts it away from the background. Then you can smooth and modify the silhouette edges endlessly before you accept the final result.
Open the File
Choose File, Open and open the desired image file. Then choose Filter, Extract to open the Extract dialog box.

Select the Edge Highlighter Tool
In the Extract dialog box, select the Edge Highlighter tool from the mini-toolbox on the left. In the Tool Options area, drag the Brush Size slider to set an appropriate brush size. (Use a smaller brush size to define sharper edges more accurately; use a larger brush to highlight wispy, intricate edges, such as hair or trees.) Then select highlight and fill colors from the pop-up menus, choosing colors that give a clear view of both the mask and the underlying image.

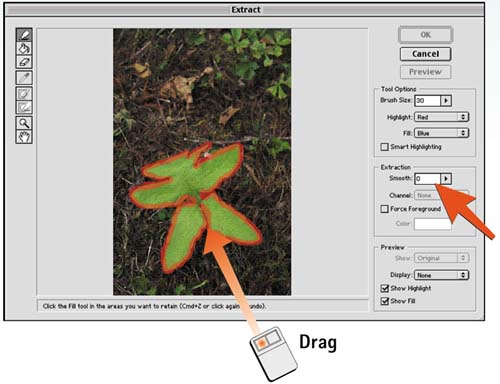
Define a Silhouette Edge
Leave the Smooth setting at 0 and drag along the edge between the object and the part of the image to be erased. Be sure that the line overlaps both the object and the background. Don't be concerned with other object areas that touch the edge of the image you're tracing around.
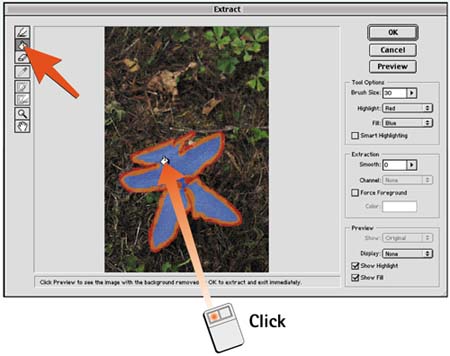
Fill the Object
Select the Paint Bucket tool and click in the outlined image area to fill the object.
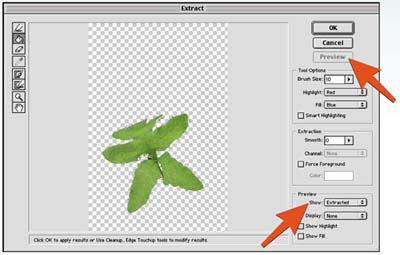
Preview the Result
Click the Preview button to process a preview of the silhouette. Use the Show drop-down list to switch between previews of the Original and Extracted images.
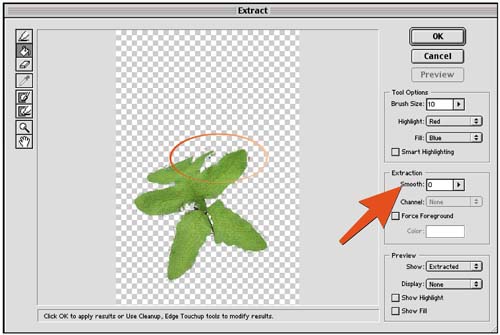
Modify the Preview
If artifacts appear in the background, increase the Smooth slider to remove them. (In this example, notice that the dark bit of grass at the upper-right edge of the leaf is minimized as the Smooth slider is adjusted.) You also can use the Eraser and Paint Bucket tools in the Extract dialog box to adjust the outline and fill as necessary. When the preview is accurate, click OK to extract the image. If necessary, you can now use the Background Eraser and Magic Eraser tools from the main toolbox to clean up any stray pixels and remaining artifacts.
How-To HintsForcing the Foreground If a single, flat color dominates the object, sample it with the Eyedropper tool from the Extract dialog box and enable the Force Foreground check box in the Extraction section of the Extract dialog box. This action selects all pixels matching the selected foreground color. Other Methods Although the Background Eraser and Magic Eraser tools do similar things as the Extract command (see Part 8, Task 3, "How to Erase a Background"), the Extract command is especially suited for problem areas, such as smoke and fine-hair details. |


