Section 8.1. Using OpenOffice
|
By now, OpenOffice has become the leading full-function free and open source office suite program for GNU/Linux and is included by default on most distributions, including SUSE, Red Hat, Debian, and others. This should not take credit away from the other free and open source office suite development projectsKOffice and AbiWord come quickest to mindbut OpenOffice gains the stage here due to the relative maturity of its code base and the elegance of its native open XML file format (which even KOffice has) as well as the suite's ability to run on Windows and its compatibility with the popular proprietary file formats. 8.1.1. "OpenOffice" Versus "OpenOffice.org"Certain conventions of language used in this chapter would be confusing if they are not highlighted. The term "OpenOffice," or its abbreviated form "OOo," typically refers to the software, the code, the product, the office suite itself. In referring to the development project, the terms "OpenOffice.org" or "OOo project" or "OpenOffice.org development project" apply exclusively. To make things even more confusing, there is also StarOffice, which is based on the same code base, but sold by Sun Microsystems as a commercial product. 8.1.2. The Modules of OpenOfficeOne among several hallmarks of OOo is the tight integration of its word processor, spreadsheet, and all other modules , which leads to a strong consistency in features, menu placement, and ease of use. The OpenOffice modules are listed in Table 8-1.
We cover OOoWriter, OOoCalc, and OOoImpress in this chapter, omitting the remaining modules because they are less frequently used and their features and functions are well supported in the leading reference texts and online documentation for the users who still depend upon them. 8.1.3. OpenDocument and OpenOffice 2This section of the book was written for OpenOffice 1.1 and therefore will be most helpful to users of Versions 1.1.1 through 1.1.5. By the time of publication, however, the OpenOffice.org development project will have released OpenOffice Version 2 worldwide. Generally, OpenOffice 2 looks and feels more like the modern versions of Microsoft Office. This should help smooth transitions to the open source office suite, on both Linux and other platforms. The most significant development in Version 2 is the new native file format, called "OASIS OpenDocument." This has already been widely embraced by technologists and government IT organizations (a web search for "Massachusetts" and "OpenDocument" offers a revealing start). OpenDocument is an open XML file format, represented in OpenOffice 2 by the new filename extensions .odt for a text file, .ods for a spreadsheet, and .odp for a presentation file, among others. (Version 1 uses the filename extensions .sxw, .sxc, and .sxi, respectively.) OpenDocument is an upgrade of the same OASIS-based open XML file format used in Version 1; however, OpenDocument has some additional capabilities that make it incompatible with the earlier iteration of the format. Accordingly, OpenOffice software prior to 1.1.5 cannot open or create files in the OpenDocument file format, and therefore cannot handle files created by users of OpenOffice 2. However, OpenOffice.org put the OpenDocument filters into Version 1.1.5 so that users of the 1.1 version can easily upgrade to a version that works the way they are familiar with and still open the new OpenDocument files. Users of Version 1.1 or earlier will need to upgrade to OpenOffice 2 in order to gain all the latest functionality and be able to create OpenDocument files themselves. 8.1.4. OpenOffice WriterOpenOffice Writer (also known as OOoWriter ) is the word processor module included as one of six key components of OpenOffice. By now, OOoWriter is designed to be familiar to users of Microsoft Word. 8.1.4.1. Launching OOoWriterConfiguration of the Launch or Start menu may vary across the Linux distributions. On the Java Desktop System, for example, starting OOoWriter from the Launch menu brings up the Templates and Documents New Document window, where you can select the New Document icon in the left-hand index, then Text Document from the list in the central pane. You can launch OOoWriter directly if you have created a dedicated Launcher icon on the desktop, taskbar panel, or both. Create a Launcher icon for any module of OpenOffice that you use frequently. Keep in mind, you may launch any alternative module from within any open module of OpenOffice: on the main menu, select File 8.1.4.2. Opening filesTo open an OOoWriter or MS Word file, either open the directory where the file is located and double-click on the file's icon or select File Note that MS Office filesthose in the .doc formatopen in OpenOffice in the same way a native OpenOffice document opens. You can edit the MS Office document and save it either in its own format or in OpenOffice's native format. See Table 8-2 for a complete list of file formats available for saving. 8.1.4.3. Saving filesAfter editing a document, select File For information about the function bar, see "Identifying the toolbars" later in this chapter and Figure 8-2. If you need to select a different target directory or change the filename or file type, select File Saving as different file types. If you open an existing document, it is saved by default in its original format. To save as a different file format, select File
Note that you can save a native OOo text document file (with the .sxw extension) as several different versions of the legacy MS Office file types as well as in other standard formats, including the web page format of HTML. You will be warned about a possible loss of formatting when saving to a format other than the native file format. That is, of course, because OOoWriter may support features that other word processors (and therefore their file formats) do not support. So if you want to be absolutely sure that you do not lose any formatting, macros, or other aspects of your documents at all, always save in the native file format, or at least keep a copy in the native file format. Saving or exporting to common file formats. OpenOffice facilitates saving files in several different file types, including some very useful document standards such as PDF. By choosing the format in which you save a document, you can ensure that your work is viewable and editable in different software environments, such as Windows, Mac, Solaris, and others. Saving in the MS Word
file formats. Chose File
8.1.4.4. Exporting and sending filesThere are occasions when it's convenient to quickly send a document in its current form to a colleague. OOo offers a few menu items to help you attach the current document to an email message in a choice of formats. Export as Adobe PDF . In your current document, click the small, red Export to PDF icon on the menu, and the Export window will open with File Type preselected to Adobe PDF. Notice in Figure 8-1 that the Export window is similar to the Save As window. Enter the filename, choose a folder in which to save the new PDF file, and press the Save button. You can achieve the same result by selecting File PDF is a great format for GNU/Linux users to get into the habit of using often. In a world of mixed computer systems, PDF is one of the most universally accepted file formats, and the security of locking down the content of your files as they get passed around your organization and supply chain can reduce the chances of unhappy, confusing or surprising content alterations. Figure 8-1. The Export window Sending a document as an email file attachment. OOoWriter offers a host of facilities for exporting or sending the current document to others through one or two mouse-clicks. To send the current document as an attachment to an email, select File This feature automatically sends the attached file in the native or default OpenOffice open XML (.sxw) file format. Sending a document as a PDF attachment to an email. To send the current document as an Adobe PDF attachment to an email, select File 8.1.4.5. Identifying the toolbarsThe default toolbars of OOoWriterto which we refer oftenare the main menu, the function bar, the object bar, and the main toolbar (see Figure 8-2). Figure 8-2. The toolbars of OOoWriter These are merely the default toolbars available out of the box. Other toolbars can be invoked with customization. We cover toolbar customization in the section entitled "OOoWriter Customization," later in this chapter. 8.1.4.6. Basic formattingThis section covers basic formatting techniques for short and simple documents. One-click character formatting. The text formatting buttons located on the object bar for bold, italic, and underline hardly need to be covered, because even beginning users know their purpose instinctively. In addition to these one-click font-change object bar buttons, many people enjoy using the shortcut keystroke combinations Ctrl-B, Ctrl-I, or Ctrl-U to effect the same changes on any selected text. These changes affect any word in which the cursor sits, so text selection (using the Shift key and moving the cursor, or selecting text with the mouse) is not necessary unless you are changing multiple words of text. Character, paragraph, and page formatting. For more customized or fine-grained formatting of textual characters, whole paragraphs, or entire pages, select Format on the main menu. The sequences Format Inserting headers and footers. To insert a header, go to the main menu, select Insert Inserting a footer is similar to inserting a header, but select Insert To change headers or footers in the middle of a document, see "Changing styles in mid-document," later in this chapter. Page numbering
. For most documents it's appropriate to place page numbers in a header or footer. To generate page numbers automatically, insert a header or footer (depending on where you intend the page number to go, at either the top or bottom of each page) and place the cursor inside the live header or footer frame by clicking once there. Then go to the main menu and select Insert Selecting the Page Number choice inserts the page number automatically at the location of the cursor. If you wish the page number to be located flush right, simply click the Align Right justification icon on the object bar after inserting the page number. To change or restart page numbering at a certain point in a document, see the section "Changing styles in mid-document." Generating a table of contents. For a longer written work that is structured with chapters or headings, it is convenient to exploit OOoWriter's ability to autogenerate a table of contents. This feature is often used because manually generating tables and indexes is extremely time-consuming and repetitiveespecially for larger documents. To generate a table of contents that picks up the headings you've inserted into your document, choose Insert You can generate a number of different kinds of indexes and tables; the choices include Table of Contents, Alphabetical Index, Illustration Index, Index of Tables, User-Defined, Table of Objects, and Bibliography. Format these indexes and tables from the Insert Index/Table dialog, where you can designate the type of index or table, its layout, the number of heading levels, and other design characteristics. 8.1.4.7. Printing a documentPrint the current document in one stroke by simply clicking the printer icon on the function bar. Figure 8-3. The Insert Index/Table window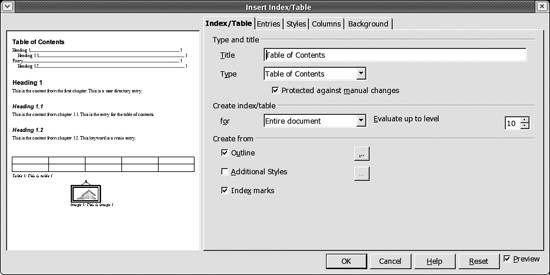 More precise control is gained via the Print window: select File 8.1.4.8. Advanced formattingAlthough the following sections introduce the strong formatting features of templates and styles below, other advanced formatting features are outside the scope of this chapter. It may help just the same to mention some of the useful features we're unable to cover. Long-form documents benefit from frames, borders, and sections. These facilities help you format sidebars, set apart quotations, or highlight elements you wish to distinguish from the running text. They provide opportunities for adding colored or shaded backgrounds, changing fonts, and using multiple columns. Text contained in frames can even be set to flow through multiple frames inserted throughout a document. This is especially useful in formatting newsletters, for example, and making them more visually engaging. 8.1.4.9. TemplatesA variety of stock templates and a facility for creating, editing, importing, and managing templates are included with OOoWriter. You can access templates by clicking File Figure 8-4. Templates and DocumentsTemplates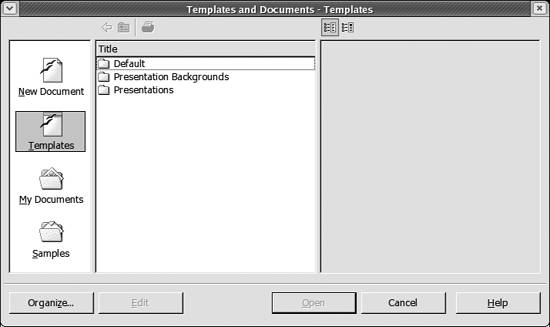 Here you can open one of the various stock templates and work away: edit and save it just as you would a normal document. Documents created this way, however, will not be linked to the template file from which they were derived. See "Template linkages," later in this chapter, for further detail. Saving your own document as a template. Any of the documents you've created in your filesystem can perform as a template. Quite often users repurpose old files such as office memoranda, fax cover sheets, or business letters and use them to create new documents by simply replacing a few key words. This practice is fine and works well for many people; however, users could be more productive if they took full advantage of OOoWriter's template management facilities and particularly its linkage abilities. Creating a new template. To create a new template, open a new text document (or use an existing document from your file store) and make the necessary formatting adjustments that you'd like to have in your template. Now, select File Files saved as templates this way will automatically have the .stw file extension appended. Editing templates . You can edit or generally treat a template file just like any other; however, we recommend editing a template with special care, because it can be easy to open a template file and then save it by mistake as a normal OOoWriter .sxw file, which would interfere with the template's linkages and storage location. One direct way to edit a template is to select File Managing templates. You can also save any of your own documents as a template or, later, move them into one of the Templates folders/categories using the Template Manager (Figure 8-5). Access the Template Manager from the main menu by selecting File Figure 8-5. The Template Management window You can browse documents in the right-hand pane of the Template Manager and drop them into folders in the templates pane on the left-hand side. Template Manager also offers facilities for importing, updating, and adjusting the printer settings associated with templates. Importing templates . The template files you encounter in the Template Management window's Default folder are actually stored in the /home/swhiser/OpenOffice. org/user/template directory on the system. The templates you encounter in all the other Template Management folders are actually stored in the /home/swhiser/OpenOffice.org/share/template/english directory. (This allows individual users in a multiuser installation of OpenOffice to change their own default master templates without affecting other users on the network.) To import template files from MS Word or from any trusted outside sources (including useful ones you find on the Web), you can manually copy the templates into the directories just discussed, and they will show up in the folders you expect in the Template Management window. Templates copied in this way will also be available when you use the AutoPilot to create documents from templates. You can also use the Import Templates feature in the Templates Management window to get external templates into the correct place and into the proper file format (.stw). This ensures that templates and the files derived from them maintain their linkages (see the following section). A third way to import a template is to select File Template linkages. Template files are linked to the documents that are derived from those templates. It helps to imagine the template file, or the source file, as the "parent," and the derived document as the "child." Parent-to-child linkage is one of the principal benefits of using templates. When you have a large number of child documents in your Documents folder, for example, you have the ability to update the formatting of all those files in one stroke by altering the formatting of the parent template file. Each time you open a child document, you are prompted to accept or reject the formatting alterations that were previously made to the source template, as illustrated in Figure 8-6. Figure 8-6. Accept the formatting changes to a subdocument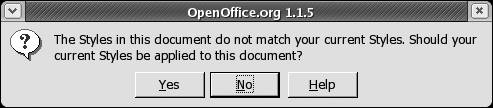 Linkage is broken, however, if you later save the source template file via File Change the default
template for all new text documents. As mentioned earlier, the standard blank document that opens up when you select File Figure 8-7. Templates and DocumentsNew Document window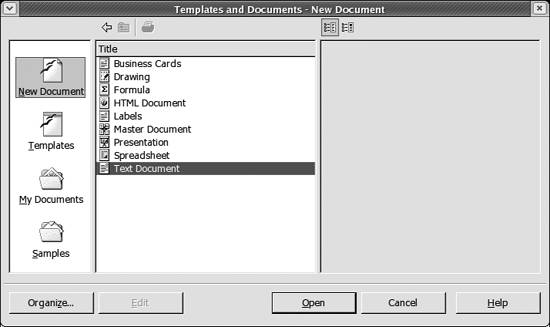 To change the default template for all new text documents, first create a new template with the desired formatting (and add custom styles if desired) as described earlier in "Creating a new template." Save it by selecting File Then, go into the Template Management window by selecting File To restore the original text document default template, simply click the Command button once again and select Reset Default Template AutoPilot : quick document creation. AutoPilot is like templates on steroids. It offers a way of creating customized documents that are much like templates, but it is a wizard that takes you through a few steps to customize the new document rapidly before launching it. AutoPilot is therefore a useful tool for first-time users who wish to get up and running in OOoWriter quickly. Access AutoPilot via File Figure 8-8. The AutoPilot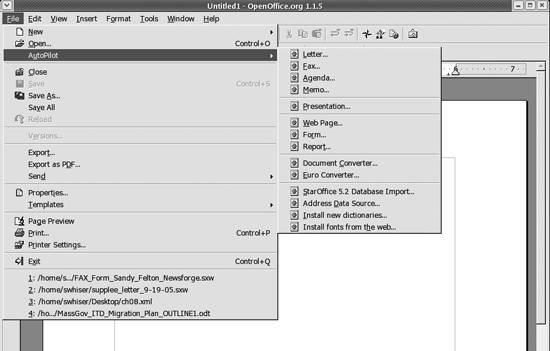 AutoPilot is a wizard that takes you through various steps to create an individual document from a generous list of different document types, including letters, faxes, agendas, memos, presentations, web pages, forms, and reports. AutoPilot also contains several different utilities to manage document or content conversion: Document Converter, Euro Converter, StarOffice5.2 Database Import, and Address Data Source. 8.1.4.10. StylesIf you work with many people and want them all to make documents that look the same, you definitely need styles . Put another way, any formatting you can apply to text can be turned almost as quickly into a style, which you can then apply over and over through a couple of clicks. Figure 8-9 shows the button on the function bar (third from right, highlighted) with which you can quickly open the Stylist in order to begin manipulating styles. Alternatively, open the Stylist by pressing the function key, F11. Once open, the Stylist lets you toggle among the five different style types or style categories: paragraph styles, character styles, frame styles, page styles, and numbering styles. To switch from one style category to another, simply click the corresponding icon at the top left of the Stylist's toolbar. Figure 8-9. The Stylist On/Off button The Stylist. The interface to OOoWriter's Styles is a floating palette called the Stylist. It is invoked by pressing the function key F11 or the Stylist On/Off button on the function bar. The Stylist On/Off button looks like a page with a tiny hand on the lower-left corner. The default state of Stylist is to open in Paragraph Styles with the Automatic mode, as shown in Figure 8-10. Figure 8-10. The Stylist opens to Paragraph Styles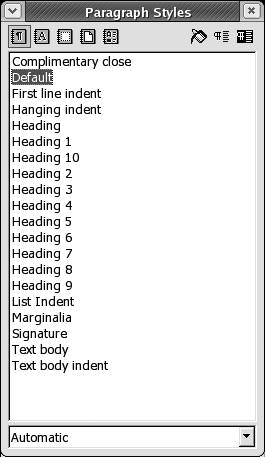 Clicking through the icons on the Stylist's toolbar, you begin to get a feel for the different styles that come with OOoWriter out of the box. Applying a character style. To apply character styles in the Stylist, click on the Character Styles icon (second from left, showing an A) at the top of the Stylist. This reveals all the default character styles available (the window is in All mode by default). To apply an italics style, for example, highlight the "Emphasis" character style (fifth from the top of the list by default) with a single click and then click once on the paint can icon, which is third from right at the top of the Stylist (Figure 8-11). Figure 8-11. The Stylist, ready to paint italics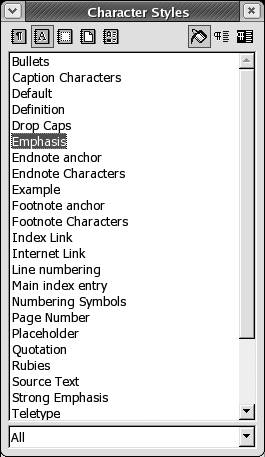 When you invoke the paint can, your cursor turns into a little paint can tool that makes it easy to apply your chosen style with precision. Click on a word you wish to italicize, or draw the paint can cursor across some text. The paint can now gives you a Midas touch that italicizes everything on which you click. You can turn off the style by pressing F11, clicking on the X icon at the top right of the Stylist box, or choosing a different style. Modifying styles. To modify a style, press CtrlF11 to bring up the Style Catalog. The resulting window is shown in Figure 8-12. You can also invoke the Style Catalog from the main menu by selecting Format Figure 8-12. The Style Catalog We've already shown you how to change a particular paragraph or set of characters. You can make similar changes to styles. For instance, if you want list items indented differently from the default indentation used in a list style, you can edit the list style and make it indent each list the way you want. When you modify a style, it immediately takes effect on all existing items in the document, as well as items you create afterward. This section shows you how to modify a style; a later section shows you how to create an entirely new style so you can do things the inventors of OOoWriter didn't anticipate. Quick-flowing styles modification is one of the key productivity benefits for using styles rather than manual or direct formatting. It permits efficient formatting of large documents for work that is likely to be used by many different people or reused repeatedly. The Style Catalog displays different styles depending on the style existing at the cursor's current location. This can be very convenient; if you wish to modify a certain style throughout an entire document, just place the cursor on one example of that style and proceed to modify it. With the Style Catalog open, highlight the style you wish to alter and click the Modify button at the right of the Style Catalog window. This opens the Style Settings window for the highlighted style (in Figure 8-12 this is Default). The Style Settings window is shown in Figure 8-13: here you can change any characteristic that is available for modification. An alternate way to modify a style is to right-click on the style in the Stylist and choose from New, Modify, or Delete. When you click Modify, the Style Settings window opens and you can make the desired changes. Figure 8-13. The Style Settings window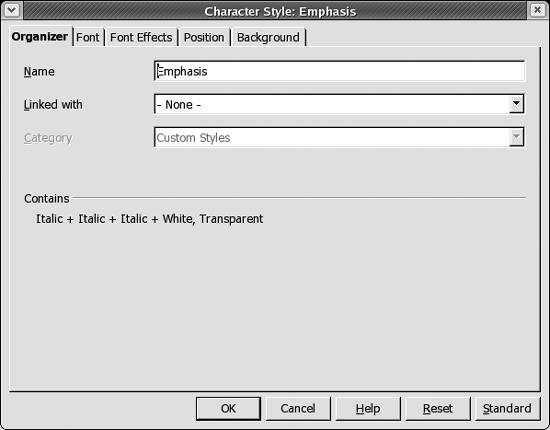 Updating styles . Short of creating a whole new style from scratch, you can quickly change an existing style by applying the format of a selected character, paragraph, or page. To update a particular style, press the function key F11 to open the Stylist. Next, click the icon of the style type you want to update: paragraph, character, or page. Then, click once in the document in the place where you want to copy or update the style. For example, you may be "borrowing" paragraph formatting that you had previously applied manually. Next, in the Stylist, click on the style name you wish to update. Finally, click the Update Style icon at the far right of the Stylist toolbar. Adding new styles (or creating styles). Although OOoWriter comes with many predefined styles, advanced situations will inevitably need new styles to be added. These styles are also known as custom styles, and they travel with the document with which they were created when it is saved. To add a new style to the Stylist, first open the Stylist by pressing F11. Next, pick a style type and highlight an existing style in the Stylist that's similar to the new one you wish to create (if such a style exists). Right-click that style and select New. This opens the Style Settings window (shown in Figure 8-13). Here you can set all the characteristics you want for the new style, including its category. There are two alternative ways to add a new style. One is by clicking the "New Style from Selection" button, which is the second button from the right at the top of the Stylist. This opens the Create Style window, where you can choose a new style from the given list and enter a name for the new style, as shown in Figure 8-14. Figure 8-14. The Create Style window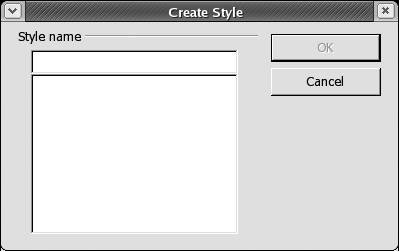 Perhaps the best way to create a style that doesn't closely resemble any existing style is to press Ctrl-F11 to open the Style Catalog. Then click the New button on the right side. This opens the Style Settings window, where you can make all the desired selections to create your new style. Changing styles
in mid-document. To change page styles, headers, and footers, or to restart page numbering in mid-document, generally insert a manual break where the cursor sits by selecting Insert Load (transfer) styles. You can transfer styles into the current document from another document or template by selecting Format Figure 8-15. The Styles Load window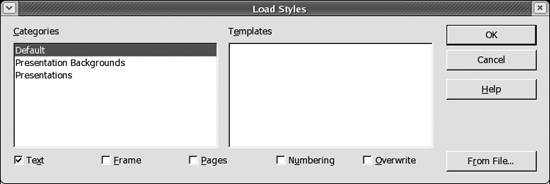 8.1.4.11. Collaboration with documentsWhen several people create and edit a document together by passing the draft around, it becomes useful to turn on changes tracking. This allows each person's changes and deletions to appear in a different color while the document circulates for drafting. Changes tracking. To turn on Changes Tracking, select Edit Comparing documents. To compare two different documents, open the first document and select Edit Version control. OOoWriter's version control features allow you to keep track of numerous versions of a document from within a single file. This both saves disk storage space and provides ready and quick access to older versions of a document. Thus, if you make edits that you later regret, you can back them out. If somebody asks when a change was made, you can review earlier versions of the document. Version control is accessed via the main menu under File To save a new version of a document on which you're working, choose File Figure 8-16. Differences are displayed as redlined content If you use File To open a specific version of a document listed in the Versions window, choose File Figure 8-17. The Versions window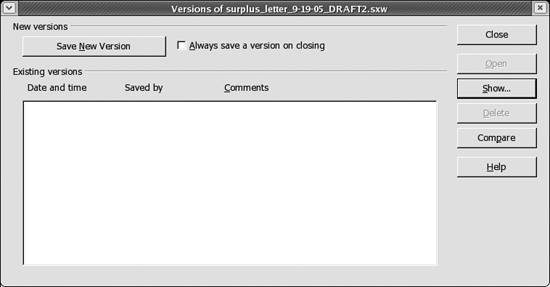 Figure 8-18. The Insert Version Comment window To track and show changes from one version to another, click the Compare button in the Versions window. This highlights all version differences (just as when using the Edit 8.1.4.12. NavigatorThe Navigator is a floating panel, like the Stylist, that adds horsepower to your ability to rapidly move throughout a document. The Navigator is turned on or invoked by clicking the Navigator button on the main menu, just to the left of the Stylist button, or by pressing the function key F5 at any time. The Navigator panel displays an expandable outline of all the elements in your document to aid a rapid jump to any one of them. Such elements include headings, tables and text frames, graphics, OLE objects, bookmarks, sections, hyperlinks, references, indexes, notes, and draw objects. If you click on the plus sign in front of any of those object types in the Navigator, you can click on any of the elements listed to immediately scroll the document to that location. 8.1.4.13. Keyboard shortcutsThis section lists the most common keyboard shortcuts that users find valuable for speeding up document composition. The shortcuts are faster than using the mouse and drop-down menus because the keystrokes allow you to keep both hands on the keyboard. Some people in danger of developing repetitive stress syndrome through excessive use of the mouse can find these shortcuts of particular value. Custom keyboard mappings. The key mappings reflected in Table 8-3 are merely default settings. Users and system administrators are free to change them to reflect their personal or organizational taste or habit by selecting Tools
Adjustments to the Function Key defaults can be helpful, too, in the desktop migration process. OpenOffice offers four modesF[1-12], Shift-F[1-12], Ctrl-F[1-12], and Shift-Ctrl-F[1-12]--which creates many openings for custom function key mappings that can aid speed and productivity. 8.1.4.14. Searching a document with Find & ReplaceTo find and replace characters in a document, press Ctrl-F to open the Find & Replace dialog. Alternatively, you can access the Find & Replace dialog from the main menu by selecting Edit Enter the term you're searching for in the "Search for" field (top left), and, if you want to change it, the term you'd like to replace it with in the "Replace with" field. Proceed by pressing the Find button at the top right of the window, and the search will locate the term you're searching for in the nearest location in the document after the placement of the cursor. Continue by pressing the Replace button whenever appropriate. If you come to a term that you don't wish to replace, just press the Find button again to advance to the next example of the search term. 8.1.4.15. Inserting hyperlinksInserting hyperlinkstextual references to URLs on the Webinto documents has become essential. To insert a link, choose Insert Figure 8-19. Inserting a hyperlink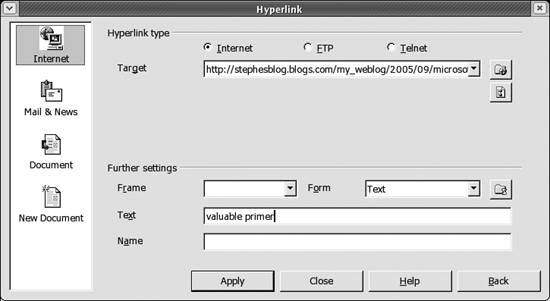 Click the Apply button at the left of the series of buttons across the bottom of the window, and your text will appear highlighted and clickable in your document. Close the dialog by clicking the Close button. Test the link to see that it was spelled, punctuated, and typed correctly. If it is correct, clicking on the link in your document will wake up your browser with the target web page in it, and produce a little surge of joy in your heart. Naming your hyperlinks is a good idea because that will enable you to move quickly among them with the Navigator, where the link names will be listed in outline form and clickable. To enter a name in the Hyperlink window, type a short but descriptive sequence in the Name field at the bottom of the dialog before you click the Apply button. One may also make a hyperlink from existing text by highlighting the text sequence with the cursor, selecting Insert 8.1.4.16. Word countJournalists, authors, and editors depend on this feature for their daily bread, so they can be forgiven anxiety at missing the word count feature. In fact, word count is present in OpenOffice, but it's in a surprising location. The feature is located in MS Word under Tools 8.1.4.17. Password-protecting documentsYou can secure OOoWriter documents
from unwanted access by saving files with password protection turned on. When saving with File To turn off whole document password protection at any time, simply choose File OOoWriter offers a variety of ways to protect your documents against alterations to revision markings, sections, frames, graphics, objects, indexes, and tables. Consult the system Help under "passwords : protecting content." 8.1.5. OOoWriter CustomizationOpenOffice offers many ways to customize its settings. A quick browse of the five tabs under OOoWriter's Tools 8.1.5.1. OOoWriter toolbar customizationThe workflow habits and nature of the business of each organization dictate the shape of its desktop toolset. So wide latitude in toolbar customization can help system administrators or power users bring the most frequently used toolbars or object elements to the top to increase productivity for themselves or all users in the workgroup. In addition to the default toolbars available out of the box (main menu, function bar, object bar and main toolbar) the following additional toolbars are available through customization: table object bar, numbering object bar, frame object bar, draw object bar, control bar, text object bar/graphics, Bezier object bar, graphics object bar, objects, text object bar/Web, frame object bar/Web, graphics object bar/Web, object/Web, and user-defined no.1. You can hide any of the toolbars (except main menu) by unchecking their names in the top half of the context menu that opens when you right-click in the empty space within any of the toolbars (Figure 8-20). Figure 8-20. The context menu for configuring toolbars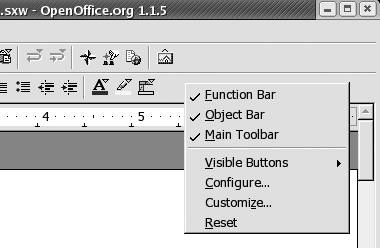 You can further rearrange elements and redesign toolbars to your personal or workgroup preference by choosing any of the other four choices in the bottom half of the contextual menu: Visible Buttons, Configure, Customize, and Reset. Changes made using these commands apply to the specific toolbar on which you right-clicked to call the context menu. 8.1.5.2. Adding an OOoWriter icon on the desktop or taskbar panelLaunching OOoWriter with a quick double-click of an icon is usually faster and preferable to wading through a series of cascading menus. You can add separate Launchers to open each of the OpenOffice modules directly. Here's the easiest way to set up a launcher specifically for OOoWriter on both your desktop workspace or the edge panel across the top or bottom of your desktop. The example is given from the GNOME environment; KDE will be different. Right-click on an open space on the edge panel and select Add to Panel To add the same Launcher icon to the desktop space, simply drag and drop the OOoWriter icon you've just created on your taskbar panel onto your desktop workspace. This places a duplicate Launcher icon on the desktop, if that location is useful to you, and you can remove the taskbar panel icon if you wish by right-clicking it and selecting Remove From Panel on the context menu. To remove a desktop icon, right-click it and select Move to Trash in the context menu. 8.1.5.3. Adjusting unpopular default settingsOpenOffice is set by default to automatically complete words, replace certain characters, and capitalize initial letters in a new sentence. If you feel autocorrection to be intrusive while you are typing, the autocorrect settings are easy to adjust to be less intrusive or to turn off completely. Word Completion (turning off). OOoWriter's Word Completion feature comes turned on by default. Some users find it distracting or annoying to have the word processor program appending the ends of words before they finish typing them. Others are content to ignore the completion action and leave the default alone. If you like OOoWriter to complete your words, simply press the Enter key when its recommendations are felicitous; otherwise, press the spacebar to reject the program's offering. To turn Word Completion off, select Tools Auto-Replace (turning off). If you find Auto-Replace to be invasivesuch as when you attempt to type (c) and it keeps replacing your keystrokes with the copyright symbolyou have two options: edit the replacement list, or turn off Auto-Replace altogether. Editing the replacement list is straightforward. Select Tools To turn off the Auto-Replace function, select Tools |
 New
New


