Section 28.3. Remote Desktop Access to Windows Programs
|
In this section of the chapter, we switch gears and look at Linux as a thin client for a Microsoft Windows terminal server. Under this scenario, a site's system administrator runs the applications desired by the users on a central Windows system (making sure there are enough licenses to support all the users), and the users access the application transparently through Linux systems. Performance is often better than when users run the same programs locally on Windows PCs! If you did not know Microsoft offered Terminal Services, the material in this section may come as a pleasant surprise. These services are offered through a feature called Remote Desktop Protocol or Remote Display Protocol (RDP), which can interact with an open source project called rdesktop . Thus, rdesktop provides the tools Linux needs to run Microsoft Windows software applications natively from NT 4.0, Windows 2000 Server, XP Pro, and Windows Server 2003. Few people think of a Microsoft Windows server as an application host. When Microsoft released its first viable Network Operating System (NOS ) , Windows NT Version 3.51 and later 4.0, they did not have such facilities. Windows NOS servers traditionally ran back-office applications such as email, various databases, and web servers. A third-party provider, Citrix , offered Terminal Services through its WinFrame product, a multiuser technology originally used in NT 3.51 that opened up the NT kernel for multiple sessions per system. Now Microsoft packages terminal server clients for Windows and Apple desktops. It has allowed Citrix to create terminal extensions and offer solutions to Unix and eventually Linux. But through the directions in this section, Linux can utilize rdesktop and Samba to directly access Windows terminal servers without the use of Citrix extensions. 28.3.1. rdesktop and TSCLientAs we stated, rdesktop lets a Linux system run Windows applications that reside on a remote Windows system. It also lets Linux participate in the remote Windows administration available with Terminal Services. That allows you the use of both operating systems simultaneously. Matthew Chapman, a graduate student from the University of New South Wales, Australia, wrote rdesktop as an open source client for Windows NT Terminal Server, Windows 2000, Windows XP Professional, and Microsoft Server 2003 Terminal Services. You don't need a license from Microsoft to use rdesktop itself (only to use the Microsoft applications). Think of rdesktop as you would a Internet browser, or an FTP, Telnet, or SSH client.
To interoperate with Microsoft's RDP, rdesktop uses industry-standard protocols: the Internet Engineering Task Force standards discussed in RFCs 905 and 2126. Those documents implement the Telecommunication Standardization Sector ITU-T.128 application sharing protocol. Matthew released rdesktop under the GNU Public License (GPL) as free, open source software. TSClient is the most popular and easy-to-use graphical interface to rdesktop. Most Linux distributions provide rdesktop and TSClient in their default configurations. Occasionally, you might have to specify the RDP components as options when installing Linux or download them from a repository. 28.3.1.1. Setting up Windows Terminal ServicesUnless you have configured a Windows server, you may find it difficult to visualize the kinds of tasks required to enable Linux to use Win32 applications from NT Version 4 or 5. Initially, you will need a Microsoft NOS and the ability to install Terminal Services. You will also need to configure a way for the terminal server to resolve your Linux workstations to a TCP/IP address. Figure 28-2 provides a look at how a Windows 2000 server sets up Terminal Services. Notice the large screen with the heading Windows 2000 Configure Your Server. On the left side of that window under the heading Application Server, you can see the subheading Terminal Services. Figure 28-2. Configuring Terminal Services in Windows 2000 and Windows Server 2003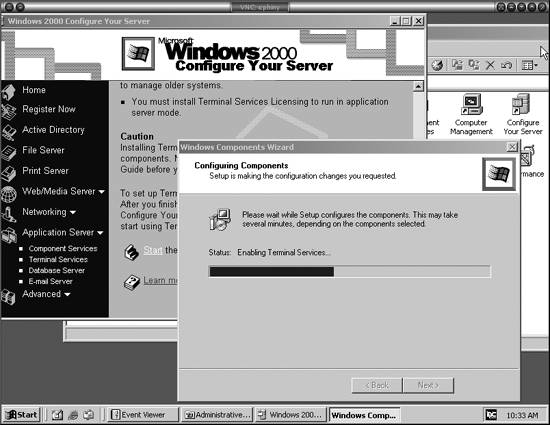 The small window in the foreground of Figure 28-2 shows the progress of installation while the operating system installs the terminal server components in the background. Prior to the release of Windows 2000 Server, you had to order a separate component to run applications from NT. Now, Terminal Services come as an integral part of the NOS. Figure 28-3 shows the same process for Windows Server 2003. The configuration wizard still displays a dialog screen, but you see a more verbose set of instructions on the wizard screen. Figure 28-3. The configuration wizard in Windows Server 2003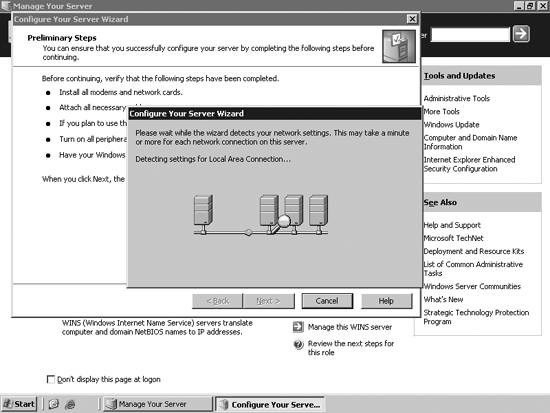 One of the major differences in the 2003 version of the NOS deals with license management. Microsoft requires activation of Client Access Licenses for its latest server. So, in addition to installing Terminal Services, users must install a license server and activate it over the Internet or by phone. If you have fewer than 25 users requiring Terminal Services, license services can reside on the same computer. If you have more than 100 users accessing the terminal server, you will want a second computer just to manage the Client Access Licenses. Figure 28-4 shows how to configure a Windows 2003 server in the role of a terminal server. Select the role and double-click it. You can see, in the highlighted section of this screen, a "Yes" under the column entitled "configured." Figure 28-4. Service Options in Windows Server 2003 To summarize what we just covered, remember the following:
28.3.1.2. Connecting to the terminal serverBefore you can run a Windows application on your Linux desktop from the terminal server, you need to install and set up rdesktop. The best way to run rdesktop involves using TSClient. TSClient is simply a graphical interface to rdesktop. You can execute the rdesktop commands from a console, but the TSClient GUI makes connecting easier for some people. It also allows you to save a configuration file for one or more terminal servers to which you might connect. Figure 28-5 shows TSClient running Microsoft Outlook on a Linux desktop. TSClient provides a Terminal Services configuration dialog box similar to what you see on Windows. Figure 28-5. Microsoft Outlook displayed by TSClient on a Linux desktop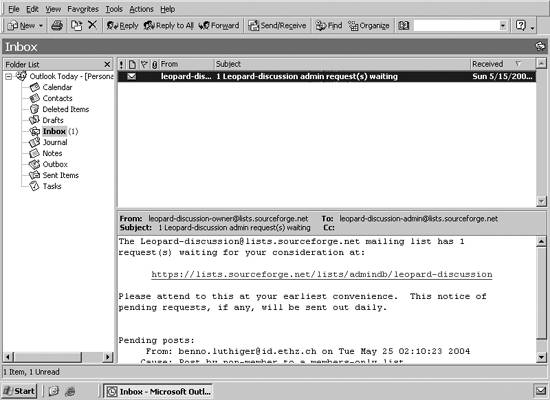 28.3.1.3. Making Windows applications multiuser awareThe most common applications used on terminal servers are those in the Microsoft Office suite. Other applications, including custom-written ones, require modifications to run in multiuser mode. The examples here give you an idea of how you might install Microsoft Office. When installing Office 2000 on a terminal server, you need to install the Office 2000 Resource Kit and specify a transform file, which ends with a .mst extension. Some people think of such a file as a mini-specification file. The file tells Terminal Services that the installation of the Office 2000 component is for multiuser mode. At the beginning of the Office installation procedure, you need to specify the path to the transform file in the Office 2000 Resource Kit. For example, the setup command might look like this: E:/Set.exe G:\Program Files\ORKTools\ToolBox\Tools\Terminal Server Tools\TERMSRVR.MST The default Microsoft SDK transform file comes with the Resource Kit. You can also make your own transform file. Some applications, such as Internet Explorer, run from the Windows menu and do not require modifications, unless you wish to change the security settings. But if you use Microsoft Office products including Microsoft Project, Visio, or media tools, most administrators will want to restrict access to those features depending on the needs of the users. Some users don't need templates for doing drafting, so loading the drafting templates is a waste of memory, disk space, and bandwidth. Eliminating features can improve performance. Office XP on a Terminal Services server gives you the option of using the Office XP Custom Installation Wizard to create a transform file to hold customized settings. You then install Office on the Terminal Services server by using that transform. All Office XP users who log on to the Terminal Services server receive the customized settings you defined in the transform. On Windows Server 2003, the only version of Office 2003 that supports Terminal Services is Office 2003 Enterprise Edition. It makes installation easier than Office 2000. Setup detects the use of Terminal Services automatically. By default, Microsoft makes some features unavailable. Office 2003 users who log on to the Terminal Services server receive the settings defined by Microsoft and the administrator who installs the Office suite. 28.3.1.4. Using Windows applications from the Linux desktopTo launch TSClient
from Fedora Core 3, simply select Launch Notice we use the Windows NetBIOS or host alias name of the server in the first line. Other parameters specify the RDP protocol and the Windows domain the system is in, which is known by the system administrator who set up the Windows server. Include your login name and your password on the Windows domain. If you want to save configuration options for a session so you don't have to retype them next time, you can create a protocol file from the fields you've typed in. Use the Save As button to preserve the information for later use. In this example, we saved a file called gateway.tsc. By clicking Open, a user can load that file and it will populate the Terminal Server client with the saved settings. Figure 28-6. Terminal Server client on a Linux desktop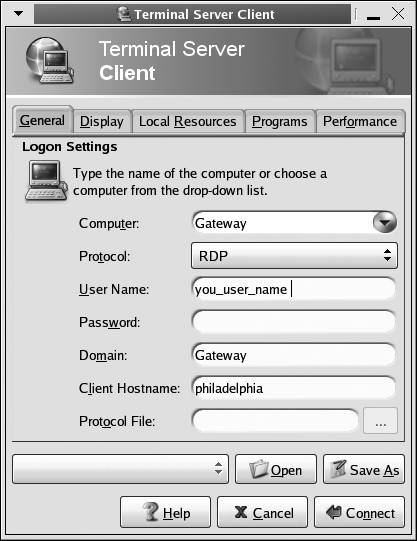 Notice in Figure 28-6 that five tabs exist toward the top of the screen. Each of these tabs has parameters you can use to configure the look and feel of your session as well as the application that opens when you connect to the server. In Figure 28-7, you can see the options available in the Display tab; among its useful options are altering the size of the display and the color depth. Lowering the color depth can reduce the bandwidth you take up when using Terminal Services. In this display, we used a 16-bit color depth. The remaining tabs provide additional options. For example, Local Resources allows you to stream sound to your terminal and specify key combinations as well as language options for your keyboard. You can also select a program to start immediately by specifying it in the next tab to the right, entitled Programs. This saves time logging Figure 28-7. Display tab window of Terminal Server client in to the server and selecting icons to launch a program if you use only one application, such as Microsoft Outlook. The Performance tab allows you to enable bitmap caching, motion events, and a window manager's key bindings and its decorations. You may want to hide the window manager's decorations so that you can immediately tell that you have opened a terminal session. Once you have pressed the Connect button on the bottom of the Terminal Server client screen, you will see a logon screen for the server. For instance, Figure 28-8 shows the log-on box for a Windows Server 2003 Enterprise Edition. The remote application screen also appears as a Linux application on the desktop. On the task bar at the bottom of Figure 28-8, you can see that the open application named Gateway Terminal Service Client appears as the second application from the Figure 28-8. Logging in to a Windows Terminal Server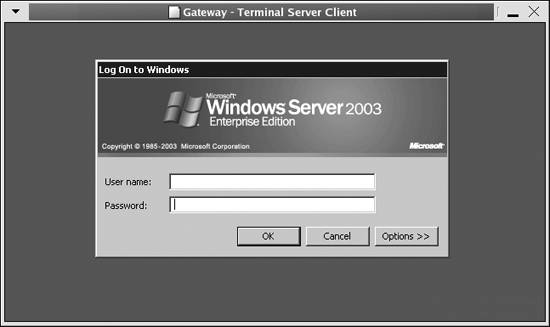 left. Once you enter your username and password, you can log on to the remote desktop and see an application window such as the one in Figure 28-9, which shows a live calendar view of Outlook 2000 SR-1 running on a Windows desktop. 28.3.2. Virtual Network ConnectionIn this section our emphasis switches to a widely used remote technology called Virtual Network Connection (VNC ). We discuss how VNC works and its value in heterogeneous networks. We also discuss installing it on different hosts and how to use it. More people use VNC than any other remote desktop tool; several open source VNC projects exist. Servers exist for Linux, Windows, Macintosh, and Unix operating systems. Clients exist for Linux, Windows, Macintosh, Unix, MS-DOS, Palm, and Java. Still, not all Linux users understand how valuable VNC can be. Perhaps VNC's most powerful feature is to let you control a number of different computers from one keyboard, mouse, and monitor. In a sense, VNC can function as a virtual KVM switch. Figure 28-9. Microsoft Office running on the Linux desktop using Terminal Server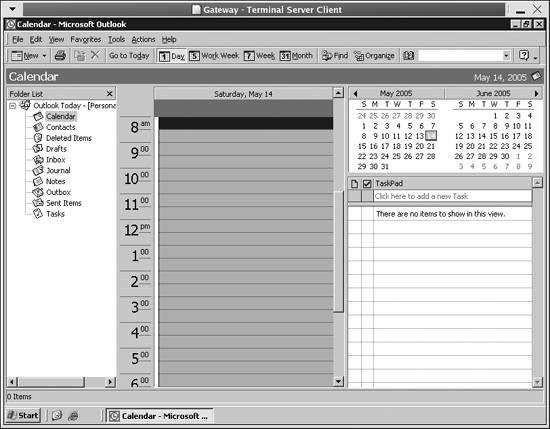
In Figure 28-10, you can see a remote session of VNC running on a Fedora Core 3 GNOME desktop. If you look closely, you can see the GNOME panels at the bottom of the screen. In this figure, we have opened a session of a popular VNC implementation called TightVNC. In the window, you will notice that we have accessed a Microsoft Windows XP desktop and opened the native Remote Desktop client application, which we could use to start a Terminal Services session. VNC displays the entire remote desktop, not just a single application. VNC requires a client and server to create a session. In the previous example, the server runs on the remote desktop and we used the vncviewer command to start the session. It put up the small dialog box shown in Figure 28-11. Figure 28-10. Opening a remote VNC session in GNOME on Fedora Core 3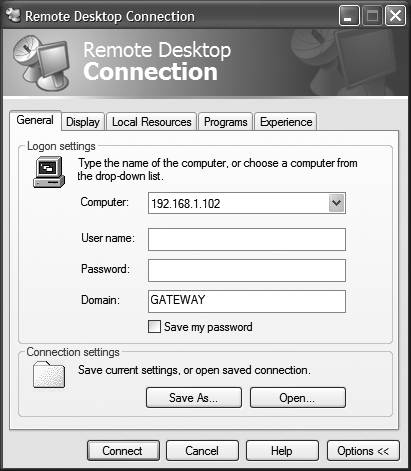 Figure 28-11. Logging on to a remote VNC desktop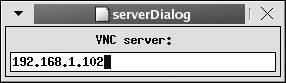 Figure 28-11 shows the simplicity of starting a remote session:
At that point, you should see a window containing the remote desktop, similar to the one in Figure 28-12. Figure 28-12 shows some typical activity on a remote Windows XP desktop as viewed from a Fedora Core 3 GNOME desktop. Two events are taking place on the Figure 28-12. Activity on a remote desktop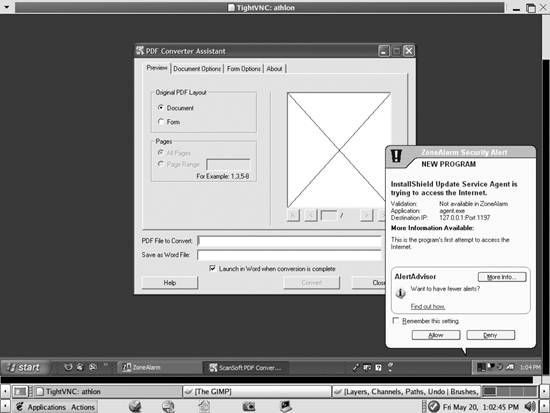 remote desktop: the Linux user has started a program to convert a PFD file to a Word file, and in response, a security product called ZoneAlarm is informing the user that the application is attempting to access the Internet to check for updates. VNC allows the user to take control of the remote computer. It is not a remote terminal session, like that provided by Windows Terminal Server, because you do not log in to a server. You do not require a Client Access License. Instead, anything you do on the VNC session will be under the auspices of the user who logged on to the remote desktop. Let's see how this works. VNC establishes remote access to a computer over a local area network or over the Internet using TCP/IP. VNC uses Remote Frame Buffer protocol (RFB). The RFB service grabs the screen image and sends it to the client in response to the client's requests. Once the server moves the screen image data, that data becomes compatible with any client ported to supported operating systems. The VNC client takes what the server sends and paints the image of the remote screen in a window on the client desktop. The client transmits mouse and keyboard data back to the server, giving a user control over a remote desktop. VNC transmits screen data from the server to the client. It compresses the screen data to conform to the bandwidth and CPU power on each end of the connection. Once the client establishes the initial frames and pixels in the viewer window, the server transmits only those areas of the screen that have changed. The frame itself remains the same. VNC creates stateless sessions. The user can disconnect from a session and then reconnect from a totally different machine to resume work where she left off. Some people use this feature to provide mobility. Either a server or a client may initiate a VNC connection. Usually, it is the client that connects to the server for remote access operations, but in a tech-support environment it is often useful to have the server connect to a waiting client. The tech support personnel can then lead the user through the resolution of his problem as if in person, even if the two are many miles apart. Further strengths of VNC include the following:
Current VNC endpoints (clients and servers) are largely based on TCP/IP, enabling them to be used on a very wide range of networks. It is entirely sensible and practical to implement VNC using some other kind of reliable, bidirectional protocol, but such systems are at present almost nonexistent. 28.3.2.1. Setting up VNCYou can obtain VNC from several sources. Most users prefer either RealVNC or TightVNC, which you can find at http://www.realvnc.com and http://www.tightvnc.com, respectively. Using either of these web sites, download and install the software on the platforms you want to use. To begin using VNC, you need to run a VNC server and then connect to it from the system running the VNC client through a viewer. Installing the Windows server, WinVNC, should create a RealVNC group in a Windows Start menu. Then, by running the VNC server as shown in Figure 28-13, you can start the service. With the service running, you can use vncviewer to initiate a session from a remote client. Figure 28-13. Launching WinVNC Server from the RealVNC group in the Start menu The first time you use a VNC server on a machine, the applications prompt you to set a password. In Windows, a small icon appears in the system tray; by right-clicking on this icon, you can control most aspects of the server. Connecting to the machine from a remote location also requires the password. The initial security uses a challenge/response protocol, which is reasonably secure. From that point on, you will need to find a third-party solution to provide a secure connection between a client and server.
28.3.2.2. Running a Linux VNC serverWith Linux applications, a VNC server appears like an X display. Applications continue running on the remote system whether or not you are connected to it. Start the VNC server on a Linux desktop with the command: $ vncserver You'll probably want to run it in the background because it doesn't exit until you finish your session. The first time you run the VNC server, the system will prompt you for a system password. This is the password people will use to connect to the machine with an active VNC server. All servers on the same Linux machine will use the same password by default. If you wish to change the password at a later time, you can do so by using the command: $ vncpasswd Once you issue the command, you will be prompted for the current password and the one you wish to use in the future. With a normal X system, the X display of a workstation uses its hostname and display, in a format such as hostname:0. On Linux, you can run many VNC servers . They will appear as hostname:1, hostname:2, and so forth, as if each were an additional display. vncserver chooses the first available display number and tells you what it is. In some situations, you have pre-existing sessions that you want people to use. You can cause applications to use a pre-existing VNC server rather than the normal X display by setting the DISPLAY environment variable to the VNC server you want, or by starting the application with the -display option. For example: $ xterm -display hostname:2 & You can kill a Unix VNC server by using, for example: $ vncserver -kill :2 |

 Internet


