|
The open source software revolution is not quite over yet, so as a result there still are a huge number of Windows desktop
and server systems in common use today. Even though many of us may think that the world will soon be using nothing but a Linux desktop, reality tells us something different: Windows desktops will be around for a long time. So the ability to exchange files
across Windows and Linux systems is rather important. The ability to share printers is equally important.
Samba is a very flexible and scalable application suite that allows a Linux user to read and write files located on Windows workstations, and vice versa. You might want to use it just to make files on your Linux system available to a single Windows client (such as when running Windows in a virtual machine environment on a Linux laptop). But you can use Samba to implement a reliable and high-performance file and print server for a network that has thousands of Windows clients. If you use Samba on a site-wide scale, you should probably spend serious time reading the extensive Samba documentation at http://www.samba.org/samba/docs, or a book such as Using Samba (O'Reilly), which is also part of the Samba distribution.
This section documents the key facets you need to know about file and print interoperability between Windows and Linux systems. First off, we supply an overview of how Windows networking operates, to help avoid some of the anguish and frustration that newcomers often feel during their first attempts to cross the great Windows and Unix divide. Next in line is an overview of the tools available in Linux-land that will help the Linux user to gain access to files and printers that live in Windows-land. The subject of providing Windows users access to files and printers that reside on a Linux system for is covered lastnot because it is less important, but because the scope of possibilities it offers is so much greater.
15.1.1. Protocols and Things Windows-Related
Linux users are generally aware that all they need for access to a remote Linux systems is its IP address. In essence, an IP address coupled with the Domain Name System (DNS) is the perfect vehicle for interoperating from any Linux system to a remote Linux system. We can therefore saywith perhaps a little poetic licensethat the Linux namespace
is the DNS. The namespace of the TCP/IP world places few restrictions on the maximum permissible length of a hostname or a name that may be placed in a DNS database. But human laziness usually limits the maximum number of characters one will tolerate in a hostname.
Life in Windows-land is not quite that easy, and there are good reasons for that too. The Windows networking world has a completely different namespace, one that originates from an attempt to solve a file sharing problem with no immediate plan to use TCP/IP
. TCP/IP was an afterthought. Windows did not at first have a TCP/IP protocol stack. Its native networking protocol was NetBEUI
, which stands for Network Basic Extended User Interface. For the technically minded, the name is a misnomer because the protocol actually consists of the Server Message Block (SMB) protocol via NetBIOS
encapsulated over Logical Link Control (LLC
) addressing. The resulting protocol is nonroutable and rather inefficient. The old protocol name, SMB, gave rise to the name Samba for the software project created by developer Andrew Tridgell when he decided to emulate the Windows file-sharing protocol.
Some time around 1996, the Server Message Block protocol was renamed the Common Internet File System (CIFS
)
protocol. The original CIFS protocol is basically SMB on steroids. The terms are used interchangeably in common use. The SMB/CIFS protocol supports particular features, such as:
File access File and record locking File caching, read-ahead, and write-behind File change notification Ability to negotiate the protocol version Extended file and directory attributes Distributed replicated virtual filesystems Independent name resolution Unicode file and directory names
The description of these features is beyond the scope of this book, but suffice it to say that when correctly configured, the protocols work well enough for large-scale business use.
NetBIOS is actually an application programming interface (API) that allows SMB/CIFS operations to be minimally encoded for transmission over a transport protocol of some type. NetBEUI, also known as the NetBIOS Frame (NBF
) protocol
, happens to use LLC addressing. It originated some time in the 1980s and was apparently first used by IBM as part of its PC-LAN product offering. The use of NetBIOS over TCP/IP was developed later and has been documented in various standards. NetBIOS can be encapsulated over many other protocols, the best known of which is IPX/SPXthe NetWare protocol.
NetBIOS (or, more correctly, SMB) has its own namespace. Unlike the native TCP/IP namespace, all NetBIOS names are precisely 16 characters in length. The - (dash) character may be used in the name, but it is ill-advised to use anything other than alphanumeric characters. Attempts to use a numeric character for the first digit will fail because this will cause systems that implement NetBIOS over TCP/IP to interpret the name as an IP address. The 16th character of a NetBIOS name is a name-type character, which is used by servers and clients to locate specific types of services, such as the network logon service.
The NetBIOS namespace also includes an entity known as a workgroup. Machines that have the same workgroup name are said to belong to the same workgroup. IBM LAN Server and Microsoft LAN Manager (as with Windows NT4) used the term domain to indicate that some form of magic authentication technology was being used, but at the lowest level a domain is identical with a workgroup name.
 | In network environments based on NetBIOS, it is extremely important to configure every machine to use the same networking protocols and to configure all the protocols identically. There can be no deviation from this; every attempt to do otherwise will result in networking failures. |
|
The NetBIOS over TCP/IP protocol (NBT or NetBT) uses two main protocols and ports for basic operation: TCP port 139
(the NetBIOS Session Service port) and UDP port 137
(the NetBIOS Name Server port). UDP port 137 is used for broadcast-based name resolution using a method known as mail-slot broadcasting. This broadcast activity can be significant on a high-traffic network.
The best way to minimize background UDP broadcast activity is to use a NetBIOS Name Server. Microsoft called this kind of server WINS, for Windows Internet Naming Service. WINS is to NetBT as DNS is to TCP/IP. Clients register their NetBIOS names with the WINS server on startup. If all machines are configured to query the WINS server, Windows networking usually proceeds without too many problems. WINS provides a practical and efficient technique to help resolve a NetBIOS name to its IP address.
With the release of Windows 2000, Microsoft introduced a technology called Active Directory (AD) that uses DNS for resolution of machine names to their TCP/IP addresses. In network environments that use only Windows 2000 (or later) clients and servers, Microsoft provides, together with AD, the ability to disable the use of NetBIOS. In its place, the new networking technology uses raw SMB over TCP/IP. This is known as NetBIOS-less
TCP/IP. In the absence of UDP-based broadcast name resolution and WINS, both of which are part of the NetBT protocol suite, NetBIOS-less TCP/IP wholly depends on DNS for name resolution and on Kerberos security coupled with AD services. AD is a more-or-less compliant implementation of the Lightweight Diretory Access Protocol (LDAP) standard, which has an excellent free software implementation called OpenLDAP (mentioned in Chapter 8) and which therefore allows Linux to emulate the most important services offered by AD.
 | The use of Samba
without NetBIOS support effectively means it must be an AD domain member server. Do not disable NetBIOS support unless you configure AD. |
|
Samba Version 2 is capable only of using NetBT
. Samba Version 3 is capable of seamless integration into a Windows AD NetBIOS-less network. When configured this way, it will use TCP port 445
, using the NetBIOS-less Windows networking protocol. Microsoft Windows networking will also use TCP port 135
, for DCE RPC
communications. A discussion of these protocols is beyond the scope of this book. The focus in this book is on use of Samba with NetBT.
Samba Version 3 was released in September 2003 after more than two years' development. It implemented more complete support for Windows 200x networking protocols, introduced support for Unicode, added support for multiple password back-ends (including LDAP), and can join a Windows 200x Active Directory domain using Kerberos security protocols. It remains under active development as the current stable release, with support intentions that will keep it current well into 2007. The Samba team hoped to issue Samba Version 4 beta release towards the end of 2005, after approximately three years' development. Samba Version 4 is a complete rewrite from the ground up. It has extensive support for Active Directory, with the intent of providing Active Directory domain control. It is anticipated that by mid-2006 Samba Version 4 will mature to the point that early adopters will begin to migrate to it.
Where possible, Samba should either be its own WINS
server or be used in conjunction with a Microsoft WINS server to facilitate NetBIOS name resolution. Remember that a price will be paid for not using WINS: increased UDP broadcast traffic and nonroutability of networking services.
We start this section with a simple scenario where you want to access files from a Windows server on your Linux system. This assumes that you have established a TCP/IP connection between your Linux and Windows computers, and that there is a directory on the Windows system that is being shared. Detailed instructions on how to configure networking and file sharing on Windows 95/98/Me and Windows NT/2000/XP can be found in Using Samba (O'Reilly).
To start with, both your Windows and your Linux systems should be correctly configured for TCP/IP interoperability. This means that:
Each system has a valid IP address. The systems share a correct netmask. The systems point to the same gateway (if one of your private networks has routers to multiple network segments). Each system has a valid /etc/hosts
and a valid DNS configuration if DNS is in use.
The Windows machine and workgroup names should consist only of alphanumeric characters. If you choose to configure a /etc/hosts file on the Windows clients, this file must be called hosts, without a file extension. On Windows 95/98/Me systems the hosts file should be placed in C:\Windows\System. On Windows NT/2000/XP systems it is located in C:\Winnt\System32\drivers\etc\hosts.
| The example hosts file on Windows NT/2000/XP systems has the file extension sam. Do not name the working file with this extension because it will not work. |
|
In the rest of this chapter, we use the term SMB name to mean the NetBIOS name of the SMB-enabled machine (also known as the machine name). The term workgroup means both the workgroup name and the domain name of an SMB-enabled machine. Please note that for all practical network operations, such as browsing
domains and workgroups, and browsing machines for shares, the workgroup name and domain name are interchangeable; hence our use of the term workgroup.
The Windows machine for our examples is a Windows XP Home machine called EMACHO. The workgroup is called MIDEARTH, with IP address 192.168.1.250. Our Linux system has the hostname loudbell, with IP address 192.168.1.4; our domain is goodoil.biz.
15.1.2. Linux System Preparation and Installing Samba
The services discussed in this chapter require kernel modules and facilities that may not be available on your Linux system as initially installed. Many versions of commercial Linux
systems (Novell SUSE Linux
and Red Hat Linux
) are shipped with the necessary capabilities. If your Linux system is homegrown or one of the roll-your-own distributions, you may need to rebuild the kernel. The steps outlined here should help your preparations. Of course, a recent release of Samba Version 3.0.x will also be required.
First we need to consider the Linux kernel to ensure it is equipped with the tools needed.
The Linux kernel must have support for smbfs
and cifsfs
. If your Linux system has an older kernel (a version earlier than 2.6.x) the cifsfs facility may not be available. There is a back-port of the cifsfs kernel drivers that you may be able to install. For more information regarding cifsfs visit the CIFS project web site, http://linux-cifs.samba.org/. In the event that you need to install this module into your kernel source code tree, be sure to follow the instructions on that site.
| The smbfs and cifsfs Linux kernel modules are not part of Samba. Each is a separate kernel driver project. Both projects depend on helper tools such as smbmount
, smbumount
, mount.smbfs
, and mount.cifs
, which are part of the Samba distribution tarball, and are required to enable its use. |
|
The Linux kernel source file for Version 2.6.x includes the cifsfs module. To find out if your running kernel includes it, install the kernel sources under the directory /usr/src/linux. Now follow these steps:
Configure the kernel source code to match the capabilities of the currently executing kernel:
    linux:~ # cd /usr/src/linux
    linux:~ # make cloneconfig
As the cloning
of the kernel configuration finishes, the kernel configuration file will be printed to the console. Do not be concerned, because the contents are also stored in the .config file. We examine this file in the next step. To determine the status of smbfs support in the kernel, enter:
    linux:~ # grep CONFIG_SMB_FS .config
    CONFIG_SMB_FS=m
The output tells us that smbfs support is enabled in the kernel and is available as a kernel loadable module. A value of y means it is built into the kernel, which is also acceptable, but a value of n means it is not supported. In the event that smbfs is not supported, use the kernel configuration utility outlined in "Kernel configuration: make config" in Chapter 18 to enable it. Now determine the status of cifsfs support in the kernel:
    linux:~ # grep CONFIG_CIFS .config
    CONFIG_CIFS=m
This response means that cifsfs support is available in the current kernel. If the value of this option is n, enable it using the kernel configuration utility. If you had to enable support for one of the preceding options, rebuild the kernel and install it.
After rebooting the system, the new kernel will be ready for the steps that follow in this chapter. The next challenge is to ensure that a recent version of Samba is available.
Binary packages of Samba are included in almost any Linux or Unix distribution. There are also some packages available at the Samba home page, http://samba.org.
Refer to the manual for your operating system for details on installing packages for your specific operating system. In the increasingly rare event that it is necessary to compile Samba, please refer to the Samba3-HOWTO document, available at http://www.samba.org/samba/docs/Samba3-HOWTO.pdf, for information that may ease the process of building and installing it appropriately.
| If you decide to build and install Samba manually, be sure to remove all Samba packages that have been supplied by the vendor, or that may already have been installed. Failure to do this may cause old binary files to be executed, causing havoc, confusion, and much frustration. |
|
Before building your own Samba binaries, make certain that the configure command is given the --with-smbmount option. The following commands complete the process of installation of the newly built Samba:
    linux:~ # make all libsmbclient wins everything
    linux:~ # make install
    linux:~ # make install-man
When the Samba build and installation process has completed, execute the following commands to ensure that the mount.cifs binary file is built and installed:
    linux:~ # export CFLAGS="-Wall -O -D_GNU_SOURCE -D_LARGEFILE64_SOURCE"
    linux:~ # gcc client/mount.cifs.c -o client/mount.cifs
    linux:~ # install -m755 -o root -g root client/mount.cifs /sbin/mount.cifs
The system is now ready for configuration, so let's get on with some serious exercises in sharing files with the other world.
15.1.3. Accessing Remote Windows Files and Printers
Soon we will connect to a file share on a Windows system. We assume that the Windows system has a static IP address, and that we are not using DNS. Name resolution is rather important in networking operations, particularly with Windows clients, so let's configure the /etc/hosts file so that it has the following entry:
192.168.1.250 emacho
There should, of course, also be an entry for the IP address of the Linux system we are on.
Now check that the /etc/hosts entries are working:
    linux:~ # ping emacho
    PING emacho (192.168.1.250) 56(84) bytes of data.
    64 bytes from emacho (192.168.1.250): icmp_seq=1 ttl=128 time=2.41 ms
    64 bytes from emacho (192.168.1.250): icmp_seq=2 ttl=128 time=2.16 ms
    64 bytes from emacho (192.168.1.250): icmp_seq=3 ttl=128 time=2.16 ms
    64 bytes from emacho (192.168.1.250): icmp_seq=4 ttl=128 time=2.02 ms
    64 bytes from emacho (192.168.1.250): icmp_seq=5 ttl=128 time=2.01 ms
    64 bytes from emacho (192.168.1.250): icmp_seq=6 ttl=128 time=3.90 ms

    --- emacho ping statistics ---
    6 packets transmitted, 6 received, 0% packet loss, time 5004ms
    rtt min/avg/max/mdev = 2.015/2.447/3.905/0.667 ms
OK, it works. Now we are really ready to begin file sharing.
15.1.3.1. Using the FTP-like smbclient to access Windows
It makes a lot of sense to first establish that our Linux system can communicate with the Windows system using Samba. The simplest way to do this is to use the Samba client tool, the smbclient command, to query the Windows machine so it will tell us what shares are available.
Let's perform an anonymous lookup of the Windows machine:
    linux:~ # smbclient -L emacho -U%
    Domain=[MIDEARTH] OS=[Windows 5.1] Server=[Windows 2000 LAN Manager]

            Sharename       Type      Comment
            ---------       ----      -------
    Error returning browse list: NT_STATUS_ACCESS_DENIED
    Domain=[MIDEARTH] OS=[Windows 5.1] Server=[Windows 2000 LAN Manager]

            Server               Comment
            ---------            -------

            Workgroup            Master
            ---------            -------
This is not very encouraging, is it? The lookup failed, as is evidenced by the reply Error returning browse list: NT_STATUS_ACCESS_DENIED. This is caused by a Windows machine configuration that excludes anonymous lookups
. So let's repeat this lookup with a valid user account that has been created on the Windows XP Home machine.
An account we can use on our example system is for the user lct with the password 2bblue4u. Here we go:
    linux:~ # smbclient -L emacho -Ulct%2bblue4u
    Domain=[EMACHO] OS=[Windows 5.1] Server=[Windows 2000 LAN Manager]

            Sharename       Type      Comment
            ---------       ----      -------
            IPC$            IPC       Remote IPC
            SharedDocs      Disk
            print$          Disk      Printer Drivers
            Kyocera         Printer   Kyocera Mita FS-C5016N KX
    Domain=[EMACHO] OS=[Windows 5.1] Server=[Windows 2000 LAN Manager]

            Server               Comment
            ---------            -------

            Workgroup            Master
            ---------            -------
Success! We now know that there is a share called SharedDocs on this machine. In the next step we will connect to that share to satisfy ourselves that we have a working Samba connection.
In this step we connect to the share itself, then obtain a files listing, and then download a file. This is an interesting example of the use of the smbclient utility:
    linux:~ # smbclient //emacho/SharedDocs -Ulct%2bblue4u
    Domain=[EMACHO] OS=[Windows 5.1] Server=[Windows 2000 LAN Manager]
    smb: \>
Success again! This is good. Now for a directory listing:
    smb:\ dir
      .                                  DR        0  Thu May 19 12:04:47 2005
      ..                                 DR        0  Thu May 19 12:04:47 2005
      AOL Downloads                       D        0  Tue Sep 30 18:55:16 2003
      CanoScanCSUv571a                    D        0  Thu May 19 12:06:01 2005
      desktop.ini                       AHS      129  Sun Jul  4 22:12:14 2004
      My Music                           DR        0  Sat Apr 16 22:42:48 2005
      My Pictures                        DR        0  Tue Sep 30 18:36:17 2003
      My Videos                          DR        0  Thu Aug  5 23:37:56 2004

                    38146 blocks of size 1048576. 31522 blocks available
    smb: \>
We can change directory into the CanoScanCSUv571a directory:
    smb: \> cd CanoScanCSUv571a
    smb: \CanoScanCSUv571a\>
But we want to see what files are in there:
    smb: \CanoScanCSUv571a\> dir
      .                                   D        0  Thu May 19 12:06:01 2005
      ..                                  D        0  Thu May 19 12:06:01 2005
      CanoScanCSUv571a.exe                A  3398144  Thu Mar 13 22:40:40 2003
      Deldrv1205.exe                      A    77824  Fri Apr 26 14:51:02 2002
      N122U.cat                           A    13644  Tue May 21 02:44:30 2002
      N122u.inf                           A     6151  Tue Apr 16 22:07:00 2002
      N122UNT.cat                         A    15311  Tue May 21 02:44:32 2002
      N122USG                             D        0  Thu May 19 12:10:40 2005
      USBSCAN.SYS                         A     8944  Fri Jun 12 13:01:02 1998

                    38146 blocks of size 1048576. 31522 blocks available

    smb: \CanoScanCSUv571a\>
Good. Everything so far is working. Let's download a file. Fetching and uploading files with smbclient works just like an FTP client:
    smb: \CanoScanCSUv571a\ >get Deldrv1205.exe
    getting file \CanoScanCSUv571a\Deldrv1205.exe of size 77824
             as Deldrv1205.exe (275.4 kb/s) (average 275.4 kb/s)
It all worked as it should. We are done with this demonstration. Let's quit back to a shell prompt:
    smb: \CanoScanCSUv571a\> quit
    linux:~ #
Let's summarize what has been learned so far. We have confirmed the following about our environment:
There is TCP/IP connectivity between the Linux and Windows systems. Anonymous browsing is disabled on the Windows XP Home system. Authenticated browsing using a local Windows account and password works.
smbclient was designed to be highly versatile. It is used as part of the smbprint
utility, where it pipes the print data stream through to a remote SMB/CIFS print queue in a manner analogous to the file transfer example witnessed earlier. For more information regarding the smbclient utility, refer to the manpage.
One you have basic SMB/CIFS interoperability, it should not be too difficult to mount the same share using smbfs. Let's move on and try that in the next section.
15.1.3.2. Using Linux-kernel-based smbfs
Before proceeding, let's look at what the smbfs filesystem driver does. This tool has some limitations that few people stop to recognize.
The smbfs filesystem driver behaves like the smbclient utility. It makes an authenticated connection to the target SMB/CIFS server using the credentials of a user, based on the account name and password provided. The filesystem driver then permits the SMB/CIFS connection to be attached to a Linux filesystem mount point. The Linux ownership of the mount point will reflect the user ID and group ID of the Linux user who mounts it, and the permissions will be determined by the UMASK
in effect at the time of mounting.
In effect, access to all files and directories will be subject to Linux filesystem permission controls, and on the SMB/CIFS server everything will take place as a single user. Multiple concurrent Linux users who access the file share through the mount point will be making multiple concurrent accesses as a single Windows user, and will do so using a single Windows process.
There is one other, rather significant design limitation when using the smbfs filesystem driver. It does not support Unicode
, and therefore creates problems when files contain characters other than the English alphabet. It should also be mentioned that this kernel module is somewhat defective and is no longer maintained. So why use it? That is easy to answer. Some Linux systems do not have support for cifsfs.
With these caveats stated and in the open, let's mount that SMB/CIFS filesystem:
    linux:~ # mount -t smbfs //emacho/shareddocs /mnt \
    -ousername=lct,password=2bblue4u,uid=jim,gid=users
    linux:~ #
That was easy! It is time to test whether it works.
    linux:~ # cd /
    linux:~ # ls -ald /mnt
    drwxr-xr-x    1 jim  users   4096 May 20 02:50 mnt
This demonstrates that the connection is mounted as the local Unix user jim. Let's copy some files to, and from, this system:
    linux:~ # cd /mnt
    linux:~ # ls -al
    total 25
    drwxr-xr-x   1 lct  users 4096 May 20 02:50 .
    drwxr-xr-x  23 root root   560 May 18 15:21 ..
    drwxr-xr-x   1 lct  users 4096 Sep 30  2003 AOL Downloads
    drwxr-xr-x   1 lct  users 4096 May 19 12:06 CanoScanCSUv571a
    dr-xr-xr-x   1 lct  users 4096 Apr 16 22:42 My Music
    dr-xr-xr-x   1 lct  users 4096 Sep 30  2003 My Pictures
    dr-xr-xr-x   1 lct  users 4096 Aug  5  2004 My Videos
    -rwxr-xr-x   1 lct  users  129 Jul  4  2004 desktop.ini

    linux:~ # cd CanoScanCSUv571a
    linux:~ # ls -al
    total 3451
    drwxr-xr-x  1 lct users    4096 May 19 12:06 ./
    drwxr-xr-x  1 lct users    4096 May 20 02:50 ../
    -rwxr-xr-x  1 lct users 3398144 Mar 13  2003 CanoScanCSUv571a.exe*
    -rwxr-xr-x  1 lct users   77824 Apr 26  2002 Deldrv1205.exe*
    -rwxr-xr-x  1 lct users   13644 May 21  2002 N122U.cat*
    -rwxr-xr-x  1 lct users   15311 May 21  2002 N122UNT.cat*
    drwxr-xr-x  1 lct users    4096 May 19 12:10 N122USG/
    -rwxr-xr-x  1 lct users    6151 Apr 16  2002 N122u.inf*
    -rwxr-xr-x  1 lct users    8944 Jun 12  1998 USBSCAN.SYS*

    linux:~ # cp USBSCAN.SYS /tmp
    linux:~ # cp /var/log/messages .
    linux:~ # ls -al messages
    -rwxr-xr-x  1 lct users 240117 May 20 02:58 messages
This has been a satisfying outcome, because everything works. We were able to copy a file from the SMB/CIFS share. A file was also copied to the share from the Linux filesystem. It is possible to create, change, and delete files on an SMB/CIFS mounted filesystem. Permissions that determine the limits of these operations reflect the operations permitted by the SMB/CIFS server for the effective user at its end. Linux filesystem permissions control user access to the mounted resource.
Now let's dismount the filesystem in preparation for the use of the command-line version of the smbfs toolset:
    linux:~ # cd /
    linux:~ # df /mnt
    Filesystem           1K-blocks      Used Available Use% Mounted on
    //emacho/shareddocs   39061504   6782976  32278528  18% /mnt
    linux:~ # umount /mnt
The Samba source tarball includes a set of tools that are meant to be run from the command line. The smbmount program is run by the mount command when used with the -t smbfs option, the way we used it previously. The smbmount program calls smbmnt, which performs the actual mounting operation. While the shared directory is mounted, the smbmount process continues to run, and if you issue a ps ax listing, you will see one smbmount process for each mounted share.
The smbmount program reads the Samba smb.conf configuration file, although it doesn't need to gather much information from it. In fact, it is possible to get by without a configuration file, or with one that is empty! The important thing is to make sure the configuration file exists in the correct location, or you will get error messages.
You will learn more about creating and validation of the configuration file later in this chapter. Here is a minimal smb.conf file:
    [global]
    workgroup = NAME
Simply replace NAME with the name of your workgroup, as it is configured on the Windows systems on your network.
The last thing to do is to mount the shared directory. Using smbmount can be quite easy. The command syntax is
smbmount UNC_resource_name mount_point options
where mount_point specifies a directory just as in the mount command. UNC_resource_name follows the Windows Universal Naming Convention (UNC) format, except that it replaces the backslashes with slashes. For example, if you want to mount a SMB share from the computer called maya that is exported (made available) under the name mydocs onto the directory /windocs, you could use the following command:
linux:~ # smbmount //maya/mydocs/ /windocs
If a username or password is needed to access the share, smbmount will prompt you for them.
Now let's consider a more complex example of an smbmount command:
    linux:~ # smbmount //maya/d /maya-d/ \
    -o credentials=/etc/samba/pw,uid=jay,gid=jay,fmask=600,dmask=700
In this example, we are using the -o option to specify options for mounting the share. Reading from left to right through the option string, we first specify a credentials file, which contains the username and password needed to access the share. This avoids having to enter them at an interactive prompt each time. The format of the credentials file is very simple:
    username=USERNAME
    password=PASSWORD
where you must replace USERNAME and PASSWORD with the username and password needed for authentication with the Windows
workgroup server or domain. The uid and gid options specify the owner and group to apply to the files in the share, just as we did when mounting an MS-DOS partition in the previous section. The difference is that here we are allowed to use either the username and group name or the numeric user ID and group ID. The fmask and dmask options allow permission masks to be logically ANDed with whatever permissions are allowed by the system serving the share. For further explanation of these options and how to use them, see the smbmount(8) manual page.
One problem with smbmount is that when the attempt to mount a shared directory fails, it does not really tell you what went wrong. This is where smbclient comes in handyas we saw earlier. See the manual page for smbclient(1) for further details.
Once you have succeeded in mounting a shared directory using smbmount, you may want to add an entry in your /etc/fstab file to have the share mounted automatically during system boot. It is a simple matter to reuse the arguments from the smbmount command shown earlier to create an /etc/fstab entry such as the following (all on one line):
    //maya/d  /maya-d  smbfs
    credentials=/etc/samba/pw,uid=jay,gid=jay,fmask=600,dmask=700 0 0
Well, that was a lot of information to digest. Let's continue onto the next section, where we will work with the cifsfs
kernel driver that is replacing smbfs.
15.1.3.3. Using Linux-kernel-based cifsfs
The cifsfs filesystem drive is a relatively recent replacement for the smbfs driver. Unlike its predecessor, cifsfs has support for Unicode characters in file and directory names. This new driver is fully maintained by an active development team.
If you have made sure that your kernel has support for the cifsfs module, as described previously in this chapter, try mounting a remote file share with a command like this:
    linux:~ # mount -t cifs -ouser=lct,password=2bblue4u,uid=lct,gid=users \
    //emacho/shareddocs /mnt
    linux:~ # ls -ald /mnt
    drwxrwxrwx  1 lct users 0 May 19 12:04 /mnt
If you compare the mount options with those used with the smbfs driver in the previous section, you'll see that the username parameter has changed to just user. The other parameters can be kept identical.
There is one apparent difference in a directory listing:
    linux:~ # ls -al /mnt/CanoScanCSUv571a/
    total 3684
    drwxrwxrwx  1 lct users       0 May 20 02:58 .
    drwxrwxrwx  1 lct users       0 May 19 12:04 ..
    -rwxrwSrwt  1 lct users 3398144 Mar 13  2003 CanoScanCSUv571a.exe
    -rwxrwSrwt  1 lct users   77824 Apr 26  2002 Deldrv1205.exe
    -rwxrwSrwt  1 lct users   13644 May 21  2002 N122U.cat
    -rwxrwSrwt  1 lct users   15311 May 21  2002 N122UNT.cat
    drwxrwxrwx  1 lct users       0 May 19 12:10 N122USG
    -rwxrwSrwt  1 lct users    6151 Apr 16  2002 N122u.inf
    -rwxrwSrwt  1 lct users    8944 Jun 12  1998 USBSCAN.SYS
    -rwxrwSrwt  1 lct users  240117 May 20 02:58 messages
Note that the directory node size is now reported as zero. Apart from this minor feature, the use of cifsfs to mount an SMB/CIFS resource cannot really be noticed, except when files that have multibyte (Unicode) characters in them are encountered.
The command used to mount the CIFS/SMB filesystem (mount -t cifs) actually causes the execution of the mount.cifs binary file. This file is built from the Samba sources, as we saw earlier in this chapter. There are no command-line tools, as there are with the smbfs kernel drivers and the smbmount group of tools provided by the Samba package.
Some network administrators insist that a password should never be passed to a Unix command on the command line because it poses a security risk. The good news is that mount.cifs permits an alternative to command-line options for obtaining the username and password credentials: it reads the environment variables USER, PASSWD, and PASSWD_FILE. In the variable USER, you can put the username of the person to be used when authenticating to the server. The variable can specify both the username and the password by using the format username%password. Alternatively, the variable PASSWD may contain the password. The variable PASSWD_FILE may, instead, contain the pathname of a file from which to read the password. mount.cifs reads a single line of input from the file and uses it as the password.
| If you ever put a cleartext password in a file, be sure to set highly restrictive permissions on that file. It is preferrable that only the processes that must have access to such a file be able to read it. |
|
The username and password can also be stored in a file. The name of this file can be used on the command line as part of the -o option as credentials=filename. Many of the options accepted by the mount -t cifs command are similar to those frequently used to mount an NFS filesystem. Refer to the mount.cifs manpage for specific details.
15.1.3.4. Using Linux desktop tools with libsmbclient
Office users who make heavy use of the Windows Explorer often feel lost when they first sit down at the Linux desktop. This is not surprising, because the look and feel is a little different. Tools are called by different names, but that does not mean that the capabilities are missing. In fact, thanks to the inclusion of the libsmbclient library in all distributions, the Linux desktop file managers (as well as web browsers) have been empowered to browse the Windows network.
Red Hat Linux and Novell SUSE Linux now both include a network browsing facility on the desktop. The environment makes it possible to browse the Windows network and NFS-mounted resources. The level of integration is excellent. Just click on the Windows network browsing icon, and libsmbclient will do all the hard work for you. Let's try this with both the KDE desktop and the GNOME desktop.
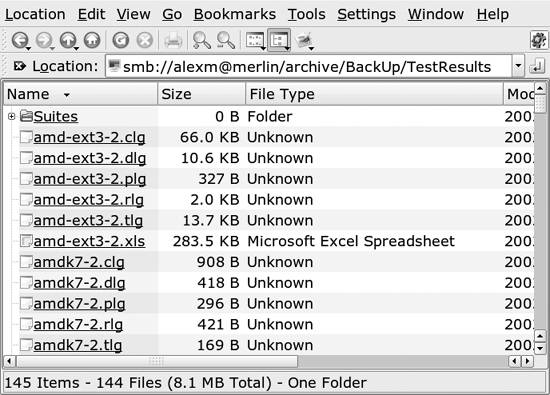
On Novell SUSE Linux Professional, the default KDE user desktop has an icon labeled Network Browsing. A single click opens the application called Konqueror, and very soon displays a separate icon for each networking technology type. The default icons are called FTP, SLP Services, SSH File Browsing, SSH Terminal, VNC Connection, Windows Network, and YOU Server, and there is an icon called Add a Network Folder. When the SMB Share icon is clicked, it reveals an icon for each workgroup and domain on the local network. To use our sample network as an illustration, clicking on the workgroup called MIDEARTH displays an icon for each server in that workgroup. An example of this screen is shown in Figure 15-1.
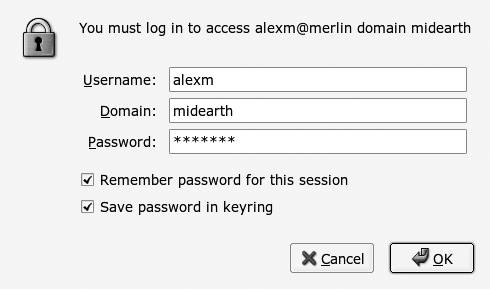
The default GNOME desktop has an icon called Network Browsing. A double-click opens the Network Browsing tool to reveal an icon called Windows Network. Click this to reveal an icon for each workgroup and domain that is visible on the network. An example is shown in Figure 15-2. Click on one of the SMB server icons to expose the shared resources that are available. Click on a shared folder to reveal the files within it. If access to any resource requires full user authentication, a login dialog will pop up. An example of the login dialog is shown in Figure 15-3.

KDE Konqueror neatly shows the URL in the Location bar. As you browse deeper in the Windows filesystem, the URL is updated to reveal the full effective URL that points to the current network location, for example, smb://alexm@MERLIN/archive/Music/Haydn/. The syntax for the URL is given in the libsmbclient manpage as:
smb://[[[domain:]user[:password@]]server[/share[/path[/file]]]][?options]
When libsmbclient is invoked by an application, it searches for a directory called .smb in the $HOME directory that is specified in the user's shell environment. It then searches for a file called smb.conf, which, if present, will fully override the system /etc/samba/smb.conf file. If instead libsmbclient finds a file called ~/.smb/smb. conf.append, it will read the system /etc/samba/smb.conf file and then append the contents of the ~/.smb/smb.conf.append file to it.
libsmbclient checks the user's shell environment for the USER parameter and uses its value when the user parameter is omitted from the URL.
The really nice feature of the libsmbclient library is that it authenticates access to the remote CIFS/SMB resource on a per-user basis. Each connection (SMB session) is independent, and access to folders and files is permitted just as if the user has logged onto a Windows
desktop to perform this access.
15.1.3.5. Printing to printers on Windows systems
In the earlier years of Samba the sole mechanism for printing
from a Unix/Linux system to a printer attached to a Windows machine involved the use of smbclient via a sample interface script called smbprint. This script is still available in the Samba tarball from the directory examples/printing, and remains in use even though it has been superseded by the smbspool utility.
When smbprint usage was at its prime, the two dominant printing systems in the Unix/Linux world were BSD lpr/lpd and AT&T SYSV printing. There was a new tool called LPRng that was trying to edge into the market. The LPRng package was a free open source printing solution that sought to replace the older BSD lpr/lpd technology, which was generally considered buggy and in need of replacement. There are still many Unix and Linux systems that use BSD lpr/lpd or LPRng. LPRng has a strong following in some areas. Systems that use LPRng tend to still use smbprint as the interface script that makes it possible to send a print job from the Unix/Linux spool to a remote Windows printer.
Commencing around 2000/2001, a new technology started to gain popularity. This package was called CUPS (the Common Unix Print System). The growth of adoption of CUPS has been dramatic. Meanwhile, the development team behind CUPS has gradually expanded its functionality as well as its utility. They created a printing API and have worked with many open source projects to gain a high degree of integration into each software project that requires a printing interface. The CUPS team worked together with the Samba team and contributed a direct interface methodology so that Samba can communicate with CUPS without requiring external interface scripts and utilities. Samba can pipe a print job directly to the CUPS spool management daemon cupsd.
In addition to the improved interface between Samba and CUPS, CUPS is a whole lot smarter than older print systems when sending print jobs to a network-attached Windows printer. Samba has gained a new printing utility (smbspool) that handles all printer interfacing between CUPS and a Windows print server.
Given that CUPS is now the dominant printing technology in Linux, it is best left to the configuration tools provided with either CUPS itself or with the Linux distribution to handle Linux-to-Windows printing. On the other hand, there will always be a situation that is not satisfied by this approach. When it is necessary to send a print job to a Windows printer, it is handy to have knowledge of a suitable tool. The tool of choice in this situation is smbspool.
In brief, here are the varieties of command syntax recognized by the smbspool utility:
    smb://server[:port]/printer

    smb://workgroup/server[:port]/printer

    smb://username:password@server[:port]/printer

    smb://username:password@workgroup/server[:port]/printer
One of these modes of use will meet all known needs. Each is followed by arguments:
This contains the job ID number, and is not presently used by smbspool. This contains the print user's name, and is not presently used by smbspool. This contains the job title string, and is passed as the remote file name when sending the print job. This contains the number of copies to be printed. If no filename is provided (argument 6), this argument is not used by smbspool. This contains the print options in a single string, and is currently not used by smbspool. This contains the name of the file to print. If the argument is not specified, the material to print is read from the standard input.
Each parameter should be in the order listed.
15.1.4. Sharing Linux Files and Printers with Windows Users
The previous section outlined the use of tools that make it possible for a Linux desktop user to access files
located on Windows workstations and servers using native Windows networking protocols. These tools can also be used in the other direction: to access files that are on a Unix/Linux server.
In this section we explore the use of Samba to provide files that are stored on Linux to Windows clients.
| The CIFS/SMB protocol is more complex than some other file-sharing protocols such as NFS. Samba has to be not only protocol-compatible with Microsoft Windows clients, but also compatible with the bugs that are present in each client. In this section, we show you a simple Samba setup, using as many of the default settings as we can. |
|
Setting up Samba involves the following steps:
Compiling and installing Samba, if it is not already present on your system. Writing the Samba configuration file smb.conf and validating it for correctness. Starting the two Samba daemons smbd and nmbd.
When correctly configured, a Samba server and the directories shared will appear in the browse lists of the Windows clients on the local networknormally accessed by clicking on the Network Neighborhood or My Network Places icon on the Windows desktop. The users on the Windows client systems will be able to read and write files according to your security settings just as they do on their local systems or a Windows server. The Samba server will appear to them as another Windows system on the network, and act almost identically.
15.1.4.1. Installing Samba
Correctly compiling Samba can be a challenge, even for an experienced developer, so it makes sense to use prebuilt binary packages where they are available. For most administrators the choice is among the following options:
Install from trusted RPM or .deb pacakges. Install from contributed RPM or .deb packages. Compile and install from the official source tarball. Hire someone else to compile and install from the source tarball.
Most Linux distributions include Samba, allowing you to install it simply by choosing an option when installing Linux. If Samba wasn't installed along with the operating system, it's usually a fairly simple matter to install the package later. Either way, the files in the Samba package will usually be installed as follows:
Daemons in /usr/sbin Command-line utilities in /usr/bin Configuration files in /etc/samba Logfiles in /var/log/samba Runtime control files in /var/lib/samba
There are some variations on this. For example, in older releases, you may find logfiles in /var/log, and the Samba configuration file in /etc.
If your distribution does not include Samba, you can download the source code, and compile and install it yourself. In this case, all of the files that are part of Samba are installed into subdirectories of /usr/local/samba.
Either way, you can take a quick look in the directories just mentioned to see whether Samba already exists on your system, and if so, how it was installed.
| If you are not the only system administrator of your Linux system, be careful. Another administrator might have used a source code release to upgrade an earlier version that was installed from a binary package, or vice versa. In this case, you will find files in both locations, and it may take you a while to determine which installation is active. |
|
If you need to install Samba, you can either use one of the packages created for your distribution, or install from source. Installing a binary release may be convenient, but Samba binary packages available from Linux distributors are usually significantly behind the most recent developments. Even if your Linux system already has Samba installed and running, you might want to upgrade to the latest stable source code release.
Obtaining fresh source files. You can obtain the Samba source files from the Samba web site http://www.samba.org/. To obtain a development version, you can download Samba from Subversion
or using rsync.
Samba is developed in an open environment. Developers use Subversion to check in (also known as commit) new source code. Samba's various Subversion branches can be accessed via anonymous Subversion using SVNweb or using the Subversion client.
To use SVNweb, access the URL http://svnweb.samba.org.
Subversion gives you much more control over what you can do with the repository and allows you to check out whole source trees and keep them up-to-date via normal Subversion commands. This is the preferred method of access by Samba developers.
In order to download the Samba sources with Subversion, you need a Subversion client. Your distribution might include one, or you can download the sources from http://subversion.tigris.org.
To gain access via anonymous Subversion, use the following steps.
Install a recent copy of Subversion. All you really need is a copy of the Subversion client binary. Run the command:
linux:~ # svn co svn://svnanon.samba.org/samba/trunk samba.
This will create a directory called samba containing the latest Samba source code (usually the branch that is going to be the next major release). At the time of writing, this corresponded to the 3.1 development tree. Other Subversion branches besides the trunk can be obtained by adding branches/BRANCH_NAME to the URL you check out. A list of branch names can be found on the Development page of the Samba
web site. A common request is to obtain the latest 3.0 release code, which can be done using the following command:
linux:~ # svn co svn://svnanon.samba.org/samba/branches/SAMBA_3_0_RELEASE samba_3
Whenever you want to merge in the latest code changes, use the following command from within the Samba directory:
linux:~ # svn update
Building Samba from source. To install from source, go to the Samba web site at http://www.samba.org and click on one of the links for a download site near you. This will take you to one of the mirror sites for FTP downloads. The most recent stable source release is contained in the file samba-latest.tar.gz. This file will give you detailed instructions on how to compile and install Samba. Briefly, you will use the following commands:
    linux:~ # tar xzvf samba-latest.tar.gz
    linux:~ # cd samba- VERSION
    linux:~ # su
    Password:
    linux:~ # ./configure
    linux:~ # make
    linux:~ # make install
Make sure to become superuser before running the configure script. Samba is a bit more demanding in this regard than most other open source packages you may have installed. After running the commands just shown, you will be able to find Samba files in the following locations:
Executables in /usr/local/samba/bin Configuration file in /usr/local/samba/lib Logfiles in /usr/local/samba/log smbpasswd file in /usr/local/samba/private Manual pages in /usr/local/samba/man
You will need to add the /usr/local/samba/bin directory to your PATH environment variable to be able to run the Samba utility commands without providing a full path. Also, you will need to add the following two lines to your /etc/man.config file to get the man command to find the Samba manpages:
    MANPATH /usr/local/samba/man
    MANPATH_MAP /usr/local/samba/bin /usr/local/samba/man
15.1.4.2. Configuring Samba
The next step is to create a Samba configuration file for your system. Many of the programs in the Samba distribution read the configuration file, and although some of them can get by with a file containing minimal information (even with an empty file), the daemons used for file sharing require that the configuration file be specified in full.
The name and location of the Samba configuration file depend on how Samba was compiled and installed. An easy way to find it is to use the testparm command, shown later in this section. Usually, the file is called smb.conf, and we'll use that name for it from now on.
The format of the smb.conf file is like that of the .ini files used by Windows 3.x: there are entries of the type:
key = value
When working with Samba, you will almost always see the keys referred to as parameters or options. They are combined in sections (also called stanzas) introduced by labels in square brackets. The stanza name goes by itself on a line, like this:
[stanza-name]
Each directory or printer you share is called
| 


