Foundation Topics
The Central Multicast Problem
Multicasting works very well, but there is one problem that haunts it. Although a PC subscribes to a channel, it still needs to discover the servers producing traffic on that channel. It should be easy to notice the traffic if the server is local, but not if the server is remote.
This chapter centers on this problem. Multicast traffic routes, but routes are built from users back toward servers. Your PC has to somehow know the address of the server.
There are many ways to publish server contact information. The simplest way is to send a link in e-mail. There is also an application called Session Directory (SD) that distributes exactly this kind of information. With SD, servers announce themselves using SDP (session description protocol) via a well-known multicast group (224.2.127.254). SD is used within Cisco IP/TV to distribute multicast servers and session descriptions.
This chapter explores ways that the PC may dynamically alert the router that it is looking for a multicast channel and ways that the router may search out servers producing traffic on that channel. Instead of discovering a server, a client may simply be told where the server is located.
Routing Multicast Traffic
IP multicast traffic must be routed, but with a different logic than that employed in unicast IP. Unicast IP packets are destined for a single interface (even if multiple paths exist), whereas multicast IP packets can have many destination interfaces, depending upon where the recipients are located.
Several multicast routing protocols are available, including Multicast OSPF (MOSPF), Distance Vector Multicast Routing Protocol (DVMRP), Center-Based Trees, Core-Based Trees, and Protocol Independent Multicast (PIM). Cisco routers do not support Center- or Core-Based Trees and support DVMRP only enough to redistribute routes. The only MOSPF command used in IOS is one to turn off an annoying error message that comes from receiving MOSPF. Therefore, this section focuses exclusively on PIM.
This section describes some of the facilities used to support multicast routing, such as RPF, multicast trees, and PIM operation. The following section builds on this by showing the commands required to implement these technologies.
Reverse Path Forwarding
Routers perform an RPF test on every multicast packet they receive. Reverse Path Forwarding (RPF) checks to make sure traffic always flows away from the root of the tree—from the source toward the recipients.
As a packet is received on a router interface, the source IP address is determined. An RPF check is used to verify that the packet arrived on the same interface that would be used if the router were to send traffic toward the source. If this is true, the packet is traveling out the branches of the tree, away from the source. If it is not true, the path is redundant or someone else has injected the packet on an unexpected interface, headed back down the branches of the tree toward the source.
To perform the RPF test, the PIM router looks up the source address in its unicast routing table. This is the reverse of normal packet forwarding, which looks up the destination address. If the next-hop interface used to reach the source address also matches the interface where the packet was received, the packet can be forwarded toward the multicast recipients. If not, the packet is discarded.
Multicast Trees
The routers in a network must determine a forwarding path to get multicast packets from the source to each of the recipients. Think of the network as a tree structure. At the root of the tree is the source, blindly sending IP packets to a multicast address. The source is not aware of lists of hosts or recipients that are members of a multicast group. Instead, it depends upon multicast routers and switches to handle the actual multicast packet delivery.
Each router along the way sits at a branch or fork in the tree. Routers learn which branches of the tree are home to multicast group recipients. Traffic is only forwarded on interfaces that have interested receivers.
This tree structure is somewhat similar to a spanning-tree topology because it has a root at one end and recipients at the other end. They differ, though, in that a spanning tree must connect the root to all end nodes, whereas the multicast tree does not necessarily have to do so. One way they are similar is that both are loop free—the multicast needs to be loop free so that none of the multicast traffic gets fed back into the tree.
Multicast routes are written as (S,G) for source and group. If 192.168.0.1 is transmitting on 227.182.150.159, the route would look like (192.168.0.1, 227.182.150.159). Multicast traffic is distributed by moving the traffic away from the source, along the RPF paths. The complete set of RPF paths can be thought of as a brachiating structure—a distribution tree—and this structure becomes the basis for multicast routing protocols.
Distribution Trees
The paths used in multicast routing are called distribution trees and there are two types: shared and source-rooted.
Shared trees define a common set of links over which all multicast traffic flows. Shared trees are interesting because they are pre-calculated and are efficient in terms of router resources. Shared trees can also be rooted at rendezvous points (RP). For each group, shared trees have one (*, G) route (all sources within the group route the same way).
Source-based trees take the shortest path from the source to the receiver, which is to say each source has a separate set of routes associated with it. Because there are many more paths to consider and hold in memory, source-based trees are more complicated but more efficient in terms of bandwidth.
Dense and Sparse Multicast Routing Protocols
Multicast routing protocols are also described as either sparse or dense. A dense multicast routing protocol assumes that all hosts on all links are interested in the traffic and so floods multicasts out all paths, only to have some paths ask not to receive the traffic. This could succinctly be described as "bush out, prune back." Sparse multicast routing protocols assume that no one wants the traffic until they ask for it.
Dense-mode protocols work better in LANs, where bandwidth is plentiful. Sparse-mode protocols work better in WANs, where conserving bandwidth is critical.
PIM
Protocol Independent Multicast (PIM) is a routing protocol that can be used for forwarding multicast traffic between IP subnets or network segments. PIM operates independently of any particular IP routing protocol. Therefore, PIM makes use of the IP unicast routing table and does not keep a separate multicast routing table. (The unicast-routing table is itself routing protocol–independent because one or more routing protocols can be used to populate a single table.)
PIM can operate in two modes, depending on the density of the recipients in a multicast group. Additionally, Cisco has developed a third, hybrid mode. The PIM modes are
PIM dense mode
PIM sparse mode
PIM sparse-dense mode
In addition, two versions of the PIM protocol can be used in a network: PIM version 1 and PIM version 2. By default, PIM version 2 is used on a router interface.
PIM Dense Mode
PIM routers can be configured for dense mode (also called PIM-DM) if it is safe to assume that a multicast group's recipients are located on every subnet. In other words, the multicast group is densely populated across the network.
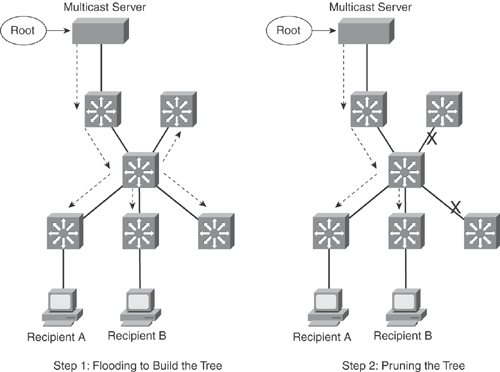
The multicast tree is built by first allowing a flood of traffic from the source to every dense-mode router in the network. The tree is grown from the root toward the leaves. For a brief time, unnecessary traffic is allowed. As each router receives traffic for the group, it must decide whether it already has active recipients wanting to receive the data. If so, the router can remain quiet and let the flow continue.
If no hosts have registered (via IGMP) for the multicast group with the router, the router sends a Prune message to the source. That branch of the tree is then pruned off so that the unnecessary traffic does not continue. The resulting tree is called a source tree or a source-distribution tree because it is unique from the source to the receivers.
Figure 19-1 shows the flood-then-prune operation of dense mode. The tree is built by a wave of join requests moving through all dense-mode multilayer switches. Then the switches that have no interested hosts request to be pruned from the tree.
Figure 19-1. PIM Dense Mode Constructs a Multicast Tree
PIM-DM routers become aware of their neighbors by exchanging hello messages. This neighbor information is first used to build the tree to all neighbors and then to prune branches.
If a multicast flow has begun and the tree has been built and then pruned, the tree exists only where active group members are located. After that, if a new host registers for the group, the branch of the network where it is located can be added or grafted back onto the tree.
PIM Sparse Mode
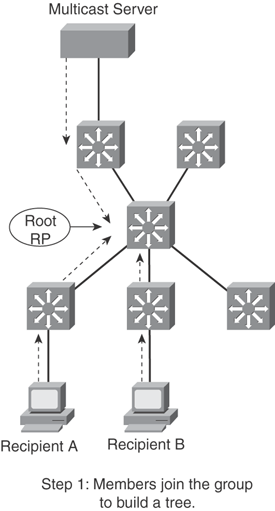
PIM sparse mode (also called PIM-SM) takes a different approach: The multicast tree is not extended to a router unless a host there has already joined the group. The multicast tree is built by beginning with the group members at the end leaf nodes and extending back toward a central root point. The tree is grown in reverse, from the leaves toward the root.
Sparse mode also works on the idea of a shared tree structure, where the root is not necessarily the multicast source. Instead, the root is a PIM-SM router that is centrally located in the network. This root router is called the rendezvous point (RP).
The tree from the RP to the group members is actually a subset of the tree that could be drawn from the source to the group members. Subsequently, if a multicast source anywhere in the network can register for group membership with the RP, the tree can be completed. Because of this, the sparse-mode tree is a shared tree.
As a recipient joins a multicast group via IGMP, the local router forwards the membership report toward the RP at the root of the tree. Each router along the way adds that branch to the shared tree. Pruning is performed only when a group member is removed from the group. This process is shown in Figure 19-2. Notice that it consists of only one step: Only routers with active group members join the tree. The routers that did not join the group are not pruned because they never became a part of the tree in the first place.
Figure 19-2. PIM Sparse Mode Constructs a Multicast Tree
Once PIM-SM routers start receiving traffic from a source (and learn the source IP address), they switch over to a shortest-path tree rooted at the multicast server.
Figure 19-3 illustrates the resulting tree structures for both PIM dense mode and PIM sparse mode, along with the multicast data flow. Notice that both PIM modes have constructed identical tree structures, yielding the same multicast traffic flow patterns.
Figure 19-3. Identical Results from PIM Dense and Sparse Modes

PIM Sparse-Dense Mode
PIM has the potential to support both dense and sparse modes because they can exist on different multicast groups in a network and even on the same router interface. Cisco offers the hybrid sparse-dense mode, allowing a PIM router to use sparse or dense mode on a per-group basis. If a group has an RP defined, sparse mode is used; otherwise, dense mode is used.
Sparse-dense mode is important because it solves the central multicast problem—discovering servers—in a simple and elegant way. Dense mode is used to flood RP discovery and announcement messages, which then allow the client to find the RP and use the RP to find the server.
PIM Version 1
For routers using the first version of PIM, RPs can be configured manually or by the more dynamic auto-RP process.
You can limit the range of multicast groups supported by the RP with the use of an access list. The override keyword causes this RP to be preferred over any that is automatically determined. Because the RP does not advertise itself, its address and function must be defined on every router in the PIM domain, including the RP itself. This makes future changes in the RP location difficult to carry out because every router must be reconfigured with the new RP address.
Cisco also provides a proprietary means of automatically informing PIM-SM routers of the appropriate RP for a group. This is known as Auto-RP. This is done by identifying a centrally located and well-connected router to function as the mapping agent. The mapping agent learns of all candidate RPs that are announced over the Cisco-RP-Announce multicast address 224.0.1.39 (by definition, all PIM-SM routers automatically must join 224.0.1.39).
The mapping agent sends RP-to-group mapping information to all PIM routers over the Cisco-RP-Discovery multicast address 224.0.1.40. The Time To Live (TTL) value is sent in these messages to limit the scope of the mapping. This limits how many router-hops away the information will reach and still be valid.
You then must explicitly define each candidate RP router. When a router knows it can be an RP, it begins sending announcements to the mapping agent.
The interface must be given because it corresponds to the advertised RP address and identifies where the mapping agent can be found. The scope of the announcement is limited by the number of router hops (TTL). The router can also advertise itself as a candidate RP for the multicast groups permitted in the group-list access list. By adding the interval keyword, the announcements will be sent at an interval of seconds.
PIM Version 2
The second version of PIM also includes a dynamic RP-to-group mapping advertisement mechanism. This is known as the bootstrap router method and is standards based.
PIMv2 is similar to the Cisco auto-RP method. First, a bootstrap router (BSR) is identified; this router learns about RP candidates for a group and advertises them to PIM routers. You need to configure only the BSR and candidate RPs; all other PIM routers learn of the appropriate RP from the BSR.
Enabling PIM Sparse-Dense Mode
This section describes the steps involved in setting up multicast networking and configuring PIM. Once completed, you can view and troubleshoot the operating conditions with several show commands, as described in this section.
Setting Up Multicast Networking
There are three steps to setting up IP multicast routing on a Cisco router:
Step 1. | Enable multicast routing. |
Step 2. | Turn on PIM in appropriate mode on selected interfaces. |
Step 3. | Set up rendezvous points (RPs). |
The following sections describe each step in greater detail.
Enabling Multicast Routing
Multicast routing is not supported on Cisco routers by default. Use the following command to enable multicast routing in global configuration mode:
Router(config)#ip multicast-routingTurning on PIM
Starting PIM on an interface automatically starts IGMP. PIM is enabled at the interface level, so the first step is to analyze your network and understand which router interfaces should support PIM. Once identified, activate PIM in interface-configuration mode, as shown in the following syntax. PIM runs in three modes: sparse, dense, and sparse-dense.
Router(config-if)#ip pim {dense-mode | sparse-dense-mode | sparse-mode}
To change the PIM version, you can use the following interface-configuration command:
Router(config-if)# ip pim version {1 | 2}
Configuring RPs
The final step is to configure RPs. To manually identify an RP, use the following global configuration command:
Router(config)# ip pim rp-address ip-address [access-list] [override]
Alternatively, RPs can be dynamically determined using Auto-RP. With Auto-RP, some routers need to volunteer to be RPs, while others need to advertise the RPs. Auto-RP identifies a centrally located and well-connected router to function as the mapping agent. The mapping agent learns of all candidate RPs that are announced over the Cisco-RP-Announce multicast address 224.0.1.39 (by definition, all PIM-SM routers automatically must join 224.0.1.39), compiles a list of which routers are RP for which groups, and advertises the list to client routers on 224.0.1.40. To define a router as a mapping agent, use the following global configuration command:
Router(config)# ip pim send-rp-discovery scope ttl
Again, the interface is used to determine an IP address to advertise from and is typically a loopback. TTL is still used to limit the scope of advertisement.
Configure a router as a candidate RP with the following global configuration command:
Router(config)# ip pim send-rp-announce type mod/num scopex ttl [group-list access-list] [interval seconds]
When configured, the router announces itself as a possible RP for the multicast range described by the access list. The announcement is sent using Auto-RP to 224.0.1.39. The interface is mapped to an IP address to specify how clients can reach the RP, so it is often a loopback. The TTL field is a security measure, which prevents propagation of RP offers into untrusted neighboring systems.
Alternatively, PIMv2 supports a bootstrap router (BSR). Define a BSR using the following global configuration command:
Router(config)# ip pim bsr-candidate type mod/num hash-mask-length [priority]
The interface specified determines the BSR address. RP selection for a group is based on a hashing function. The length of the hash mask controls the number of consecutive multicast groups that hash to the same RP.
Next, you must identify each of the candidate RP routers. Configure each RP with the following global configuration command:
Router(config)# ip pim rp-candidate type mod/num ttl [group-list access-list]
Finally, by default, the bootstrap messages permeate the entire PIM domain. You can limit the scope of the advertisements by defining PIMv2 border routers, which will not forward the bootstrap messages any farther. Use the following global configuration command:
Router(config)# ip pim borderVerifying Routes
Where show ip mroute shows the unicast table, the command to show a multicast routing table is
router#show ip mroute [group-address] [summary] [count][active kpbs]
The summary option displays each route on one line. The count option shows statistics. The active option filters the display to show only active sources. Example 19-1 shows this command used to display a particular route in the table.
Example 19-1. The show ip mroute Output
Router#show ip mroute 227.100.100.100
IP Multicast Routing Table
Flags: D - Dense, S - Sparse, C - Connected, L - Local, P - Pruned
       R - RP-bit set, F - Register flag, T - SPT-bit set, J - Join SPT
Timers: Uptime/Expires
Interface state: Interface, Next-Hop, State/Mode

(*, 227.100.100.100), 00:01:50/00:02:59, RP 172.16.3.1, flags: SPF
  Incoming interface: Tunnel35, RPF nbr 172.16.1.20, Mroute
  Outgoing interface list: Null

(170.100.1.1/32, 227.100.100.100), 00:01:50/00:01:09, flags: PFT
  Incoming interface: Ethernet0, RPF nbr 0.0.0.0, Registering
Outgoing interface list: Null |
Notice the routes that are not source-specific (meaning routes to an RP) are (*,G). Routes to the source are listed as (S,G). This example shows how an entry evolves from (*,G) to (S,G).
Verifying Neighbors
If there is an issue building a multicast routing table, a good place to start troubleshooting is to verify that PIM sees its neighbors.
Use the show ip pim interface command to look at settings on the interfaces, as shown in Example 19-2. This command shows the assigned (unicast) IP address; the interface name; the PIM version (1 or 2) and mode (dense, sparse, or sparse-dense); number of neighbors; frequency of queries; and the designed querier.
Example 19-2. The show ip pim interface Output
Stewart#show ip pim interface

Address           Interface     Version/Mode   Nbr   Query  DR
Count   Intvl
192.168.0.1 Ethernet0 v2/S 1 30 192.168.0.10 |
The show ip pim neighbor command shows a list of neighbors, with much of the same information shown in show ip pim interface. See Example 19-3.
Example 19-3. The show ip pim neighbor Command Output
Router#show ip pim neighbor
PIM Neighbor Table
Neighbor Address        Interface        Uptime    Expires   Ver   Mode
192.168.0.10 Ethernet0 00:01:37 00:01:05 v2 Sparse |
Verifying Rendezvous Points
Even when PIM routing is in place, RPs must be configured correctly to find traffic sources. The command show ip pim rp allows you to inspect the configured RPs and look at the mappings that have been applied. The full command is
Router(config)#show ip pim rp [group-name | group-address | mapping]
Using show ip pim rp, without further modifiers, displays RPs for active groups. If the command is modified with the group name, then only the RPs for the selected group are shown. The show ip pim rp mappings command maps multicast IP addresses to RPs, as shown in Example 19-4.
Example 19-4. The show ip pim rp and show ip pim rp mappings Output
Router#show ip pim rp Group: 227.1.1.1, RP: 192.168.5.1, uptime 00:00:20, expires never Router#show ip pim rp mapping PIM Group-to-RP Mappings ... Group(s): 224.0.0.0/4, Static RP: 192.168.5.1 |
Verifying Multicast Routing
Because multicast routes away from a source, it is important to understand the reverse-path. The show ip rpf command allows you to inspect reverse-path forwarding information for your traffic, as shown in Example 19-5.
Example 19-5. The show ip rpf Output
Router#show ip rpf 172.16.0.1
RPF information for ? (172.16.0.1)
  RPF interface: Serial0
  RPF neighbor: ? (172.16.5.2)
  RPF route/mask: 172.16.0.0/24
  RPF type: unicast (ospf 1)
  RPF recursion count: 0

Doing distance-preferred lookups across tables |


