SSL Improvements
The Secure Sockets Layer in IIS 5 was already quite a capable system but contained a few minor annoyances that could be difficult to get around. IIS 6 has made a number of minor and some more significant improvements. The main features are
Performance has been increased by as much as 50% on an implementation that was already one of the fastest in the business.
Selectable Crypto-service providers allow you to use third-party hardware-based accelerator cards for encrypting information over SSL. Because SSL is a significant CPU performance hog, this can improve the speed of SSL-heavy Web sites.
Remote Administration of certificates is now supported by enabling remote support in the cryptographic API (CAPI) certificate store. When managing many hundreds or thousands of sites, this eases administration considerably.
IIS 6 also incorporates two new wizards to help in configuring and managing the certificates: the Web Server Certificate Wizard and the Certificate Trust List Wizard.
Web Server Certificate Wizard
The Web Server Certificate Wizard is used to obtain, configure, and renew server certificates. The wizard is capable of creating a certificate request, replacing a server certificate (from an online or offline certificate service or from a file), reassign a certificate from one Web site to another, or simply view certificate information. It can also identify existing certificates and their expiry.
When creating a new certificate, you can select both the security level and the cryptographic service provider. To request a new server certificate using the Web Server Certificate Wizard, follow these steps:
In IIS Manager, expand the local computer, and then expand the Web Sites folder.
Right-click the Web site or file that you want, and then click Properties.
On the Directory Security or File Security tab, under Secure communications, click Server Certificate.
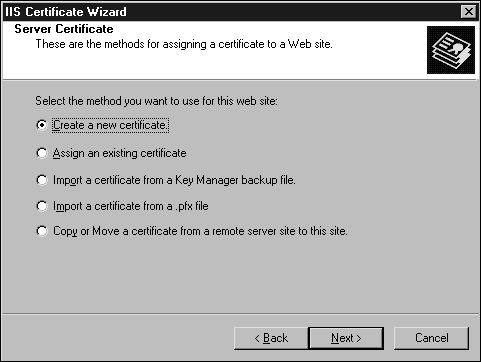
In the IIS Certificate Wizard (Figure 3.4), click Create a New Certificate.
Figure 3.4. Creating a new certificate with the IIS Certificate Wizard.
Choose whether you want to prepare the request for sending or whether you want to send it immediately. We'll follow the preparation process; the core certificate requirements are, of course, part of both systems. Click Next.
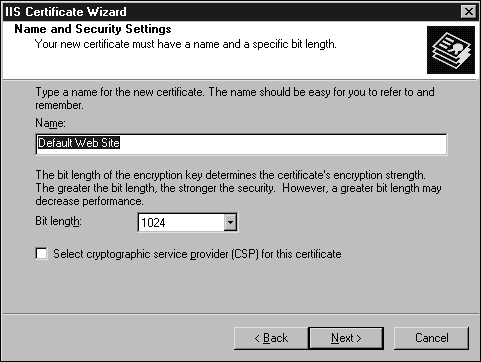
You will be asked some basic information about the certificate (Figure 3.5). Enter the name of the Web site (this is, its friendly, identifiable name, rather than its domain name) and the required bit length for the key (the longer, the more secure), and choose whether you want to select the cryptographic service provider. If you select this last option you will go through an interim screen before the next step, asking you to choose the service provider. Click Next.
Figure 3.5. Entering basic site information when creating a certificate request.
Fill in the organization information?that is, the legal organization name and the organizational unit (division or department). Click Next.
Enter the common name of your site. If it's a public site, enter the fully qualified domain name of the machine, or the domain it's in. If it's an intranet site, use the machine's basic name or NetBIOS name. Click Next.
Enter the country, state, and city in which you are located. Click Next.
Enter the filename where the certificate request can be stored. Click Next.
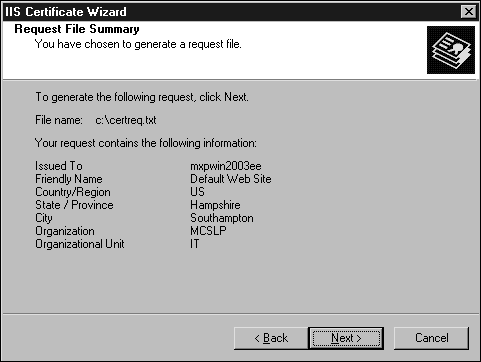
You will see a summary of all the options, similar to the one seen in Figure 3.6. Click Next to accept the settings and create the request.
Figure 3.6. Summary information for a new secure certificate.
Click Finish.
You will need to mail the certificate request to a suitable authority who will then send you the real certificate.
As with any wizard, the steps are relatively easy to follow, and it should be easy enough to follow the steps for all the different tasks supported by the wizard.
Certificate Trust List Wizard
The Certificate Trust List Wizard enables you to configure trust relationships between servers and certification authorities so that you can control which certification authority certificates from a client can be trusted on your site. You do this by creating a certificate trust list (CTL) that, in turn, is handled by the wizard.
Microsoft recommends the following guidelines when assigning IP addresses, Web sites, and SSL ports to your server certificates:
You cannot assign multiple server certificates per Web site.
You can assign a certificate to multiple Web sites.
You can assign multiple IP addresses per Web site.
You can assign multiple SSL ports per Web site.
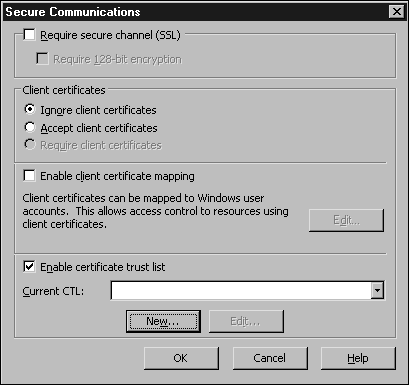
You can follow the steps in the Certificate Trust List Wizard to create and edit CTLs. You can get to the CTL Wizard by going to the Security tab for a Web site, directory, or file and clicking on the Edit button within the Secure Communications panel. Click on the check box in the properties window (see Figure 3.7). Choose an existing CTL or access the wizard to edit the currently selected CTL by clicking Edit. You can also create a new CTL through the wizard by clicking New.
Figure 3.7. Setting secure communication options.