Web-based Management
The idea of a Web interface is not new, having been available in Windows NT and Windows 2000 to a limited extent. As with other areas of IIS, Microsoft has completely rewritten and revamped the Web administration interface.
The main driving force behind this decision was the introduction of the Web Edition of Windows Server 2003. With the probability that a Web Edition server would be without a typical console, there is obviously the need to support alternative methods of managing the server and, in particular, the IIS component.
The reason for this is that the Web Edition is designed to be installed on the rackmount servers now common in data centers and Web farms. Having a display attached to all of these would obviously be difficult to manage. Although there are numerous ways around this, it should be obvious that including display, keyboard, and mouse hardware in each box is an expense in itself, and Keyboard Video Mouse (KVM) switches are not an efficient method of management when you are working with hundreds or even thousands of machines.
Windows Server 2003 addresses this in a number of ways, including extending the support for administration through the command line (which I'll cover later in this chapter in "Command Line Management"), the Remote Desktop Connection (which replaces the old Terminal Services for Administration component and is covered in "Remote Desktop?Terminal Services") and Out of Bandwidth Management (see the following sidebar).
OUT OF BANDWIDTH MANAGEMENT
The problem with many administration solutions, particularly in high-density rackmount installations, is that they rely on network bandwidth and usually a network connection. This isn't a complete solution though; what happens during installation and startup, or during a failure? All these situations cause a problem when networking services are not available and many rackmount devices are 'headless' servers without a console or display adaptor.
Microsoft provides a solution to this problem by supporting the so-called out of bandwidth (OOB) management tools. The Emergency Management Services component can redirect the BIOS and Windows command-line interface to a serial port (or a serial device on a USB adaptor) to allow you to manage and monitor a machine when a network connection isn't available.
Look for "remotely administered servers" and "emergency management services" in the online help for more information on OOB management.
Most of the other tools are generic administration tools first, which then provide IIS management facilities by their design. For example, by supporting desktop access with the Remote Desktop Connection (RDC) system, you can run IIS Manager as if you were running it locally, as well as providing direct access to the control panels and other admin tools.
The Web interface, however, was designed with the Web Edition specifically in mind and is primarily an IIS configuration tool first?with additional functionality for management of the underlying parts of the OS that help provide or support IIS.
For example, using the Web interface, we can configure Telnet, network interface settings, local users and groups, as well as shut down or restart the server and change the machine's identification?all in addition to setting many of the IIS parameters.
Setting Up Web Management
On Web Edition, the Web-based management system is installed by default. On other editions, you will need to install it by using Add/Remove Server Components applications, drilling down to the World Wide Web Publishing Service (through Application Server, Internet Information Services), and selecting the Remote Administration (HTML) component.
This installs the necessary components and configures a new administration Web site within IIS. The new Web site is configured to work on port 8099 and secure port 8098. However, you must use HTTPS on port 8098 when connecting to the site?if you try to connect without SSL, you will just get a warning page instructing you to try again on the SSL port.
CLIENT SUPPORT
Web Administration requires at least Internet Explorer 5 because it makes use of a combination of HTML standards and some ActiveX controls to support the site functionality. Although other browsers are theoretically supported, in my experience the effects can be less than ideal. Of course, you should have Internet Explorer 6 on your server anyway, and IE 6 is included in Windows XP.
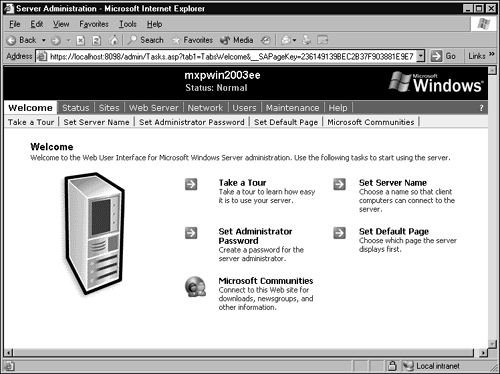
You will also need to supply the credentials to log into the site?obviously an administrative account and password. Once connected and logged in, you will be greeted with a window similar to the one shown in Figure 4.5.
Figure 4.5. The initial screen for the Web interface.
![]() SECURE THE ADMIN SITE
SECURE THE ADMIN SITE
I recommend configuring the administrative Web site so that only IP addresses used on your internal network can connect. This will help thwart hackers, who consider the administrative Web site a favorite target for attack.
The Web Interface
Unsurprisingly, there are a few differences between using the IIS Manager and other tools compared to using the Web interface. The majority of differences all relate to the nature of the Web interface itself. For example, we can't right-click on an object to get its properties, and most of the configuration is handled through a simple Web form rather than a familiar properties window.
It's also worth remembering that the Web interface is an alternative method of configuring the main components of your Web site and server?it's not meant as a replacement for IIS Manager or any of the other tools. If you need a finer level of control and configuration over your servers, you will need to use RDC, IIS Manager on a remote machine connected to the server, or a combination of the command-line tools and manual edits to the Metabase to configure your server.
Beyond these differences and limitations, the Web interface is pretty much what you would expect from an interface constrained by HTML, Web forms, and the largely one-way communication style of HTTP.
You can get a good idea of the basic interface structure by looking back at Figure 4.5. The server name is shown at the top of the window, and any important messages are given under this?initially, you will get one about the SSL certificate being used, which I cover in more detail in "The Status Page."
Beneath the message area, the main blue strip provides the toolbar for the main areas of the site and the white strip beneath that provides the sub-areas. These two button bars provide the main navigation area for the site.
The main portion of the window handles the specific configuration or wizard elements?or on the main heading areas, a summary and description of each of the sub-areas.
Because it's just another method of managing the sites and machine, I only cover the main points and areas of each page and, if necessary, sub-area; the rest should be pretty much self-explanatory.
The Welcome Page
The Welcome page is your first entry point for the administration site, and its prime purpose really is to provide a jump point and basic page for the toolbars. There are a few useful elements here though:
Take a Tour? A quick guide through the various areas of the administration site and the server environment as a whole. Although aimed at people using the administration site on the Web edition, it can be a useful intro to the main components of the site.
Set Administrator Password? Sets a password for the administrator.
Microsoft Communities? Links to the IIS homepage at Microsoft.
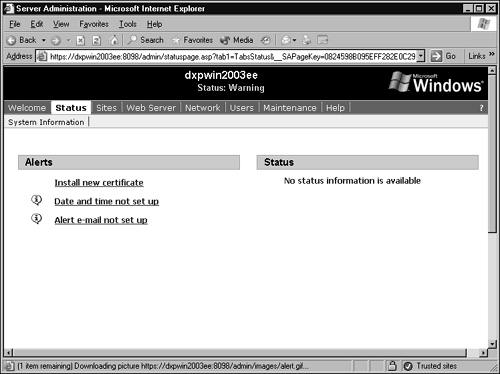
Set Server Name? Changes the name of the server and its domain affiliation. This is equivalent to using the Identity tab of the System control panel (see Figure 4.6).
Figure 4.6. Setting the Server Name through the Web Interface.
Set Default Page? Allows you to change the default page within the administration site. You can only choose between two?the Welcome page and the Status page, which we'll be looking at next. Unless you have a particular love of the Welcome page, you will probably find the Status page more useful because it will warn you of any significant problems with the server and any sites.
The Status Page
The Status page (see Figure 4.7) is probably the area you will visit the most once your sites are configured and running and everything is, on the whole, working normally.
Figure 4.7. Monitoring Status through the Web Interface.
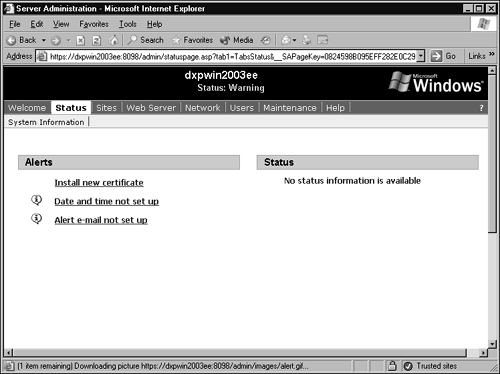
It provides a rundown of any major issues or problems with the server. You can get to the page in one of two ways?either directly using one of the toolbars or by clicking on the Status area underneath the server name. The status displayed there will be in one of four colors:
Green? Indicates that everything is running normally.
Gray? Indicates that there is information to pass on that is not important or critical to the operation of your server.
Yellow? Indicates some kind of warning. Either something is not working correctly, hasn't finished being configured, or something that is not yet a problem could be in the future.
Red? Indicates a critical failure or problem somewhere in your Web server or one of your sites.
In each case, if you go to the Status page when the status is in any of the last three states, you will have a list of messages, each a hyperlink, taking you to further information.
INITIAL ERRORS
Depending on what edition you've installed, you will have at least one message in the status error when you first go to the page. In editions other than the Web edition, it will only warn you about requiring a proper SSL certificate for the site. In Web Edition installations, you will have not only that message, but also others warning you to change the administrator password, hostname, and network configuration.
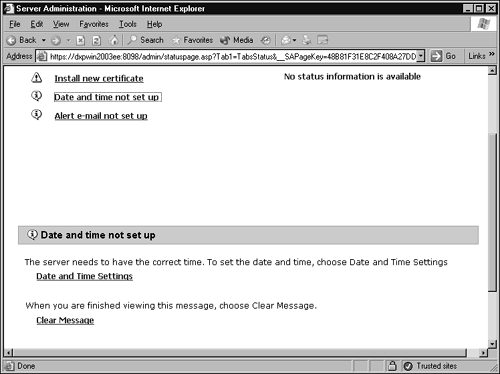
When you click on one of the messages, you will get the full details?shown in Figure 4.8?and you can also optionally clear the message. If you do so, it disappears permanently from the status page, so it's probably best to leave the message until you have actually addressed the issue.
Figure 4.8. Getting extended information on errors.
The Sites Page
You can start, stop, and configure the various sites on your machine from the Sites page (see Figure 4.9). As you can see from the figure, you can identify the site by its name, IP address, port number, or its host header. You can also search and find the site you are looking for using any of these criteria.
Figure 4.9. Site configuration in the Web interface.
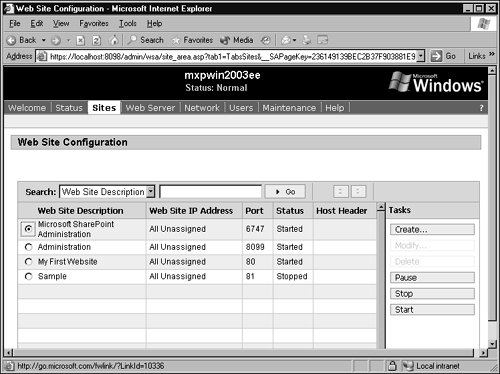
You can also modify, pause, start, or stop any of the sites you have configured. The SharePoint admin site (if it's installed) and the default Web site cannot be configured but can be paused, stopped, or started. For obvious reasons, you can't do anything to the administration site.
Also from this window, you can create a new site. The options available to you through this method are not as extensive as those through the wizard and properties pages in IIS manager, but they should be enough to get your site started.
The Web Server Page
The majority of the configuration elements of your server (rather than individual sites) are handled through the Web Server page. Here you can set the 'master' settings, such as the default location for Web sites, script settings, logging preferences, and FTP settings.
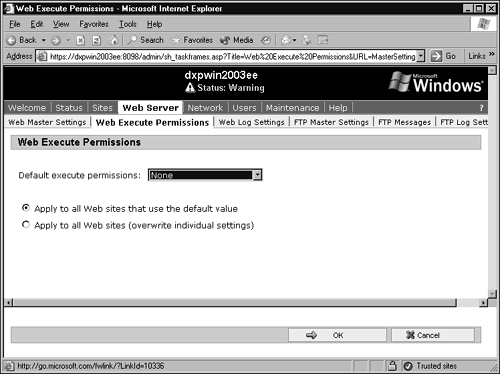
These master settings are used as defaults for new sites, and on some pages you get the opportunity to choose whether the changes are made to all sites that use the default settings (including all new sites) or whether they are applied to all sites, irrespective of their current settings. You can see an example of this in the Web Execute Permissions page shown in Figure 4.10.
Figure 4.10. Configuring Web Execute Permissions.
More specific information for the elements that can be configured through the sub-areas in this section includes
Web Master Settings? Sets the default Web site root directory, ASP timeout, FrontPage Extensions default setting, and the maximum number of connections.
Web Log Settings? Sets the log file format, location, and rotation period as default or all sites.
Web Execute Permissions? Sets the execute permissions for Web sites. One limitation of the Web interface is that script execute permissions can only be configured as either on or off for an entire site?it isn't possible to set them on individual directories. Enabling script access as switched on by default is almost certainly a bad idea.
FTP Master Settings? Sets the default settings, such as enabling content updates through the FTP service, and directory style, as well as general FTP settings, such as timeouts and connection limits.
FTP Messages? Sets the greeting, logout, and maximum connection messages sent to clients.
FTP Log Settings? Sets the log settings for FTP connections and transfers.
USING WEB ADMIN FOR GLOBAL SETTINGS
The Web admin interface can be useful even if you don't necessarily want Web admin facilities because you can set log and other settings right across all the Web sites without any manual configuration. This can make, for example, changing from W3C Extended Log Format to the IIS 6 binary log format across all your sites much easier.
The Network Page
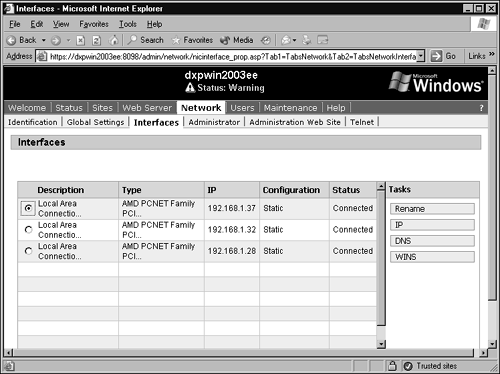
Network settings provide a combination of the facilities available through the Network control panel, the server identification, Administration Web site configuration, and the enabling of the Telnet service. The configuration page for individual interfaces is shown in Figure 4.11.
Figure 4.11. The Web interface network settings page.
The Network page has the following sub-areas
Identification? Sets the server name and domain membership. This is the true location of the configuration area also available from the Welcome page.
Interfaces? Sets up the parameters for individual network interfaces on the machine. From here, you can set the IP address (including static or DHCP allocation) and the DNS and WINS settings. If you have more than one interface and want to apply the same DNS settings to them all, use the Global Settings page.
Administration Web Site? Configures the port numbers on which the administration site is served and enables you to restrict the IP addresses that can access the site. Note that if you make a change here, although the changes will be submitted, you probably won't get a notification because the server will have changed its port number. You might also need to change the machine from which you are accessing the site. In either case, make sure that you have a record of the changes you've made, so you can access the site again.
Global Settings? Allows you to set global DNS settings across all network interfaces. You can also edit the TCP/IP hosts file and the NetBIOS LMHOSTS file through this area.
Administrator? Changes the Administrator password.
Telnet? Enables or disables access through the Telnet protocol for command-line administration.
LOCKOUT
It's possible, if you are not concentrating, to completely lock yourself out of the system when using some of the pages in this area. In particular, double-check any changes you plan to make to network interface settings, Administrator access, or restricting IP addresses able to connect to the admin site itself.
The Users Page
You can set up the local users and groups through this page. Domain users and groups should be configured on the domain controller or through a server with delegated control.
The Maintenance Page
The Maintenance page is essentially the catch-all page for any elements that didn't really fit into any of the other pages. Personally, I could think of a better place for some of these areas (notably, shouldn't the Logs and Alert E-Mail go under status, and Remote Desktop under Network?), but they are here nonetheless.
The main sections are
Date/Time? Sets the date and time.
Logs? Allows you to view, clear, and download the system logs (Application, Security and System, as through Event Viewer), as well as the Web Administration log. Web logs, curiously, are not directly available online; instead, use Web Server, Web Log Settings to set a log file directory.
Alert E-Mail? Configures the machine to email to any address the messages that apply under any of the three alert stati (critical, warning, and information). If you have a number of servers, this is obviously a more efficient method than continually visiting each admin site.
Shutdown? You can shut down or restart the server from this page. Shutdowns are dangerous unless you happen to be near enough to switch the machine on again. You can also schedule a shutdown or restart for some future time, which can be used to shut down a machine before some scheduled maintenance, for example?useful when many servers are involved and you want to minimize downtime.
Remote Desktop? Allows you to open a connection to the remote desktop connection (RDC) system, which I cover in more detail in "Remote Desktop?Terminal Services."
Language? Changes the language used on the administration site. You can only change this if the main OS has also been configured to work with multiple languages. If only one language is configured for the OS, only one language can be selected within the administration site.
REMOTE DESKTOP
One of the odd things here is that you can't configure whether to enable or disable the remote desktop connection system from within the Web interface?although you can open a connection to it when it's enabled. There doesn't seem to be a good reason for this, and there is no way of enabling it without Administrator access to the system.


