The Interfaces
We'll step quickly through the design process to focus on the scripting later. This section addresses which elements need to be placed where and with what properties. We'll start from the bottom frame and work our way up. Although this tutorial uses background artwork to help with the layout, these graphics are not required and will not be reviewed in this tutorial.
This application requires three interfaces:
Login interface
Student interface
Teacher interface
Each interface will exist on a different frame within a common Flash document. You will build the login screen on Frame 1, the student interface on Frame 10, and the teacher interface (controller) on Frame 20. Much of this application's interfaces will be similar to the ones discussed in Chapter 9, Exercise 9.2. We'll start by setting up the Timeline.
Exercise 18.1: Setting Up the Timeline
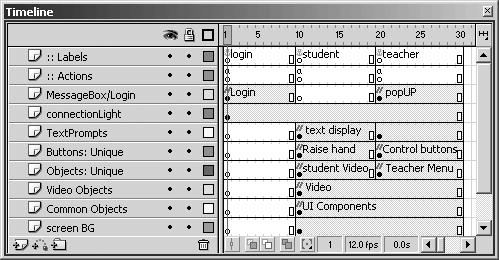
The Timeline is used to control the three different interfaces. The student and teacher interfaces share layout elements but have unique elements and ActionScript. The login interface is completely separate. Figure 18.2 shows how your Timeline should look when you are finished.
Figure 18.2. The completed Timeline.
-
Create nine new layers and name them from top to bottom:
Labels
Actions
Messagebox/Login
connectionLight
TextPrompts
Buttons: Unique
Objects: Unique
Video Objects
Common Objects
-
Click and drag Frame 30 on the Labels layer and drag down to the bottom to select all layers on Frame 30.
-
Add frames (F5) to create 30 frames on all layers.
-
Add keyframes (F7) at Frame 10 on all layers, except on the ConnectionLight layer.
-
Add keyframes (F7) at Frame 20 on all layers except connectionLight, Video Objects, and Common Object. The bottom two layers should span Frame 20 (see Figure 18.2).
-
Place three labels in the Labels layer at Frames 10, 20, and 30. Call them Login, Student, and Teacher, respectively.
Your Timeline is now ready for action.
Exercise 18.2: Constructing the Interfaces
This exercise will step you through the construction of three separate interfaces. Each interface will be built at separate frames on the Timeline you setup in the previous exercise.
Step 1: The Login Interface (Frame: 1)
The login screen (see Figure 18.3) is exactly the same as the login screen you built for Chapters 9 and 10, "STEP 10: Lobby Applications." It has a single text input box and a PushButton to call the login process.
Figure 18.3. The login screen.
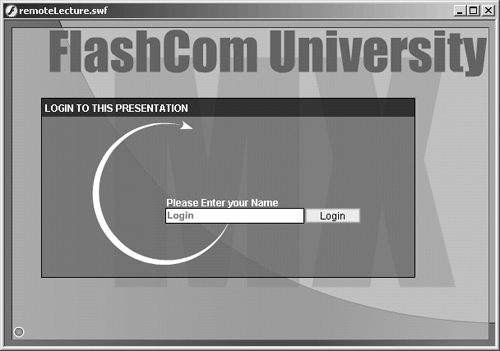
Place the following elements in the Login layer at Frame 1:
Text input field: Name: login_txt
PushButton from the Flash UI Components panel: Label: Login Click Handler: appLogin
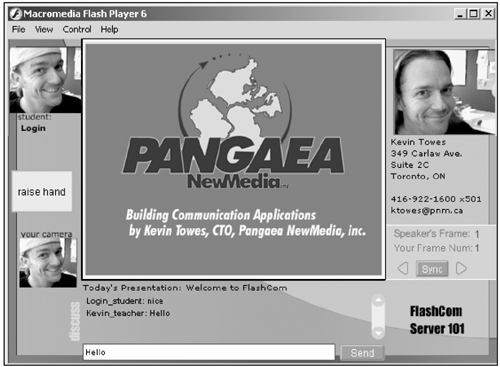
Step 2: The Student Interface (Frame: 10)
Building the student interface is as simple as assembling a series of Flash UI components and some dynamic text boxes. The teacher interface uses all the elements you place on this screen, as well, which is the major benefit to using the same Flash document for both interfaces. Use Figure 18.4 as your layout guide.
Figure 18.4. The student interface screen.

-
Place the Chat UI component on Frame 10 on the Common Objects layer.
-
On the same frame and layer, place PresentationSWF and set the following:
Instance Name: presentation_mc
Width: 508
Height: 296
X: 90
Y: 0
Note
The PresentationSWF object uses the file simple_preso.swf as the presentation movie. This SWF file, and its source FLA file, is a sample movie installed with the Flash Communication Server. You can find it within the application folder, sample_broadcast. It is also available on the book's web site at http://flashcom.PangaeaNewMedia.com/.
-
At Frame 10 on the Video Objects layer, place two Embedded Video objects. Give the first one the following settings:
Instance Name: student_video
Width: 90
Height: 80
X: 0
Y: 10
Give the second Embedded Video object the following settings:
Instance Name: speaker_video
Width: 120
Height: 100
X: 475
Y: 15
-
At Frame 10 on the Objects: Unique layer, which is the student-only layer, place a third Embedded Video object with these settings:
Instance Name: local_video
Width: 70
Height: 60
X: 15
Y: 240
-
On the same frame and layer, place a Message Box from UI Components Set 2 and use the following settings:
Instance Name: studentPopup
Width: 370
Height: 120
X: 90
Y: 150
Title: Video Request Denied
Message: instructor denied your request
Visible: false
-
Still on Frame 10, but on the Buttons: Unique layer, which is also a student-only layer, add a PushButton UI component with these settings:
Label: raise hand
Click Handler: askQuestion
-
Now it's time for the text boxes. On Frame 10's TextPrompts layer, which is student-only, add four dynamic text boxes all with Multiline set to true. Put the first box under the speaker video window and name it teacher_info. Put the second under the student video window and name it student_info. Put the third under the presentation controls and name it course_info. Put the fourth and final dynamic text box between the presentation screen and the Chat window and name it presentation_info.
That's it for the student interface. When everything is active, it should look like Figure 18.5.
Figure 18.5. The final interface as it will appear to the student.
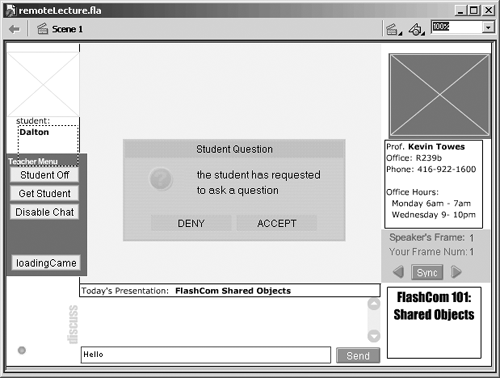
Step 3: The Teacher Interface (Frame: 20)
The teacher interface (see Figure 18.6) is your most complex interface, but really it's not that hard to create. Because we are building both interfaces within the same Flash movie, you can build on top of what you created for the student interface. For the teacher interface, you will reuse all the components you used in the student interface with no additional placement. You will, however, have to add some additional elements to the teacher screen.
Figure 18.6. The teacher interface.
-
On the Buttons: Unique layer, which is teacher-only, add four PushButton UI components. For the first one, use the following settings:
Instance Name: studentOff_pb
Label: Student Off
Click Handler: student_stop
For the second one, use:
Instance Name: studentOn_pb
Label: Get Student
Click Handler: student_start
For the third one, use:
Instance Name: chatControl_pb
Label: Disable Chat
Click Handler: disableChat
For the fourth one, use:
Instance Name: camControl_pb
Label: loadingCamera
Click Handler: no ClickHandler
-
In the TextPrompts layer, right-click (or Ctrl-click on the Mac) on Frame 10. Select Copy Frames from the menu. In the same layer, right-click on Frame 20 (teacher-only). Select Paste Frames to copy the placement and the properties of all Text objects.
-
For each Text object, select Input Text from the Properties window to make the boxes editable. Click the Show Frame and Background toggle in the Properties window to draw a white frame underneath the text. This is a great technique for reusing dynamic text boxes.
-
Back in Frame 10, add a Message Box from UI Components Set 2 to the MessageBox/Login layer. Use the settings:
Instance Name: myMessageBox
Width: 275
Height: 130
X: 140
Y: 120
Title: Student Question
Message: A student has requested a question
Buttons: [DENY,ACCEPT]
Close Handler: student_start
Visible: false
That's it for the teacher interface. Use Figure 18.6 to help you with the layout.


