Ripping and Burning Songs
Over the years, we have all purchased a lot of music CDs or, as some of us still call them, albums. Many of those albums, unfortunately, have only two or three songs we really liked, so playing the whole album wasn't what we wanted. As a result, we created collections of our favorite songs on tape and played the tapes, instead.
These days, with the help of our Linux systems, we can create our own collections from those albums we have purchased and create CD collections of those songs we want to hear. Furthermore, if you have lots of disk space and you spend a lot of time at your computer, nothing beats a collection of songs ready to play without having to change CDs all the time. Pulling songs from a CD and saving them to your system as digital images is what is commonly referred to as ripping.
Intermezzo: Digital Audio Formats
Before I get into the mechanics of ripping and burning songs, I'd like to spend a small amount of time discussing music formats. When you purchase a CD, the songs on that CD are in a format not generally used by your system. In fact, when we copy songs to disk from a CD, we always encode it into another, usually more compact format. The format we transfer to is identified by a three-letter extension on the file name. The most common formats are .wav, .mp3, and (more recently) .ogg.
The wav format is one originally created by Microsoft. It is extremely common but not the most efficient in terms of compression. The mp3 format (from the Motion Pictures Experts Group, aka MPEG) on the other hand, owes its popularity to the high compression ratio it uses?about 12:1. The newcomer on the block is the ogg (or Ogg Vorbis) format. Like mp3, it boasts a high compression rate, but unlike mp3, it is completely unencumbered by patents.
To give you an idea of the compression values, I ripped a 3-minute, 46-second song to wav format. It came in at 39866444 bytes, while the same song in ogg format required only 3438407 bytes. If you do the math, that is a ratio of 11.6:1. Pretty impressive reasons for not using wav format files.
Grip
Most distributions will come with Grip, a CD ripper designed for the GNOME desktop. As I've explained before, being GNOME-based doesn't stop this program from doing its job under KDE. Using a library called cdparanoia (which I will discuss later), Grip makes it possible to create MP3s or OGGs easily from your favorite CD. If the program is installed, you will likely find it in your multimedia menu. You can also call it by its program name (using the shell or the <Alt+F2> program launcher), grip.
Grip consists of a single window with multiple tabs. Each tab presents you with a window from which various functions are performed (i.e., Tracks, Rip, and Config). The main Tracks tab features a list of the current CD's audio tracks, including track number, title, and length in minutes and seconds. The CD's title and artist appear just above the track window.
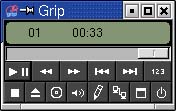
As you can probably tell by looking at Figure 17-10, Grip is also a CD player. Using the buttons at the bottom of the program window, you can play, pause, fast forward, or pause playback, just as you did with KsCD. The extra buttons let you open or close the CD-ROM drive, change the volume, edit tracks, perform track lookups, or switch to compact, player-only mode (Figure 17-11). If you move your mouse over the buttons and pause, tooltips will appear, informing you of the various button functions.
Figure 17-10. Grip ripping songs from a CD.
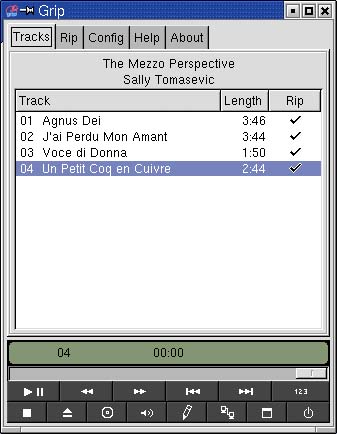
Figure 17-11. A more compact Grip.
To rip tracks to disk, either right-click on the track name or left-click under the Rip column heading at the track name's far right. In either case, a checkmark will appear, indicating that the track is ready for ripping. You can also quickly select all the tracks by clicking on the Rip column label. When you have selected the titles you wish to rip, click the Rip tab (Figure 17-12).
Figure 17-12. Ready to start extracting songs.
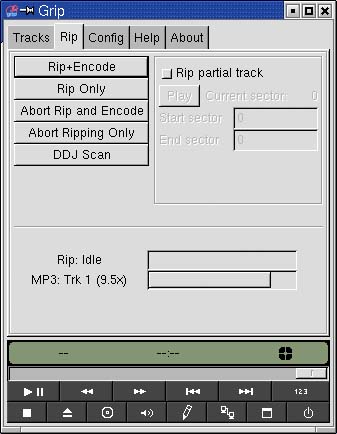
If you just go ahead and click Rip Only, the track will be saved in wav format (remember our discussion of compression). Click Rip+Encode, however, and Grip will encode and compress the disk file into ogg or mp3 format. The default encode is ogg format. To save as mp3, you will need an mp3 encoder, such as bladeenc or lame (check rpmfind.net for binary RPMs or check the resources section at the end of this chapter).
When the process starts, a progress indicator bar (about two-thirds of the way down) will detail the status of the rip. The resulting songs will be saved in your home directory under a folder called mp3, using the following format.
/home/username/mp3/artist_name/album_name/track_title.ogg
You can change this default by clicking the Config tab and selecting MP3, Encoder. There are a lot of possible settings here: dealing with the ripping process itself, MP3 encoders, online disc information servers, and file formats. The options are many, but the defaults are probably all you need if you are just writing songs to your disk. Grip comes with excellent help files for every part of this process. If you get stuck, just click the Help tab.
You'll notice I said to your disk at the end of the last paragraph? That's because Grip is strictly a ripping and encoding program. If you want to get those songs burned to CDs, you'll need a CD burning package. Luckily, this won't be a problem.


