5.5 Examples
Let's put what we know to use now and format a document with CSS. XHTML is a good place to start, so let's take the document in Example 3-4. To maximize the possibilities for formatting it, we should add some structure with div elements, and use span elements to increase the granularity of inlines. Example 5-1 is the improved result.
Example 5-1. An XHTML document with DIVs and SPANs
<html>
<head>
<title>CAT(1) System General Commands Manual</title>
<link rel="stylesheet" type="text/css" href="style1.css" />
</head>
<body>
<h1>CAT(1) System General Commands Manual</h1>
<div class="section">
<h2>NAME</h2>
<p>cat - concatenate and print files</p>
</div>
<div class="section">
<h2>SYNOPSIS</h2>
<p class="code">cat [-benstuv] [-] [<em>file</em>...]</p>
</div>
<div class="section">
<h2>DESCRIPTION</h2>
<p>
The <span class="command">cat</span> utility reads files sequentially,
writing them to the standard output. The file operands are processed
in command line order. A single dash represents the standard input.
</p>
<p>
The options are as follows:
</p>
<dl>
<dt><span class="option">-b</span></dt>
<dd>
Implies the <span class="option">-n</span> option but doesn't number blank lines.
</dd>
<dt><span class="option">-e</span></dt>
<dd>
Implies the <span class="option">-v</span> option, and displays a
dollar sign (<span class="symbol">$</span>) at the end of each line as
well.
</dd>
<dt><span class="option">-n</span></dt>
<dd>Number the output lines, starting at 1.</dd>
<dt><span class="option">-s</span></dt>
<dd>
Squeeze multiple adjacent empty lines, causing the output to be single
spaced.
</dd>
<dt><span class="option">-t</span></dt>
<dd>
Implies the <span class="option">-v</span> option, and displays tab
characters as <span class="symbol">^I</span> as well.
</dd>
<dt><span class="option">-u</span></dt>
<dd>
The <span class="option">-u</span> option guarantees that the output
is unbuffered.
</dd>
<dt><span class="option">-v</span></dt>
<dd>
Displays non-printing characters so they are visible. Control
characters print as <span class="symbol">^X</span> for control-X; the
delete character (octal 0177) prints as <span class="symbol">^?</span>
Non-ascii characters (with the high bit set) are printed as <span
class="symbol">M-</span> (for meta) followed by the character for the
low 7 bits.
</dd>
</dl>
<p>
The <i>cat</i> utility exits 0 on success, and >0 if an error occurs.
</p>
</div>
<div class="section">
<h2>BUGS</h2>
<p>
Because of the shell language mechanism used to perform output
redirection, the command <span class="command">cat file1 file2 >
file1</span> will cause the original data in file1 to be destroyed!
</p>
</div>
<div class="section">
<h2>SEE ALSO</h2>
<ul>
<li><a href="head.html">head(1)</a></li>
<li><a href="more.html">more(1)</a></li>
<li><a href="pr.html">pr(1)</a></li>
<li><a href="tail.html">tail(1)</a></li>
<li><a href="vis.html">vis(1)</a></li>
</ul>
<p>
Rob Pike, <span class="citation">UNIX Style, or cat -v Considered
Harmful</span>, USENIX Summer Conference Proceedings, 1983.
</p>
</div>
<div class="section">
<h3>HISTORY</h3>
<p>
A <i>cat</i> utility appeared in Version 6 AT&T UNIX.
</p>
<p>3rd Berkeley Distribution, May 2, 1995</p>
</div>
</body>
</html>
Example 5-2 is a CSS stylesheet for this document.
Example 5-2. A CSS stylesheet for an XHTML document
/* GLOBAL SETTINGS */

body {
  background-color: #aa6;
  font-family: serif;
}

/* BLOCKS */

.section {
  margin: 1em;
  padding: .5em;
  background-color: wheat;
}

h1, h2, h3 {
  font-family: sans-serif;
}

dt {
  background-color: tan;
}

.code {
  padding: 1em;
  border: thin solid gray;
  font-family: monospace;
  font-weight: bold;
}

/* INLINES */

.citation {
  color: purple;
  font-family: sans-serif;
  font-style: italic;
  font-weight: bold;
}

.command {
  font-family: monospace;
  font-weight: bold;
  color: red;
}

.option {
  font-family: monospace;
  font-weight: bold;
  color: blue;
}

.symbol {
  font-family: monospace;
  font-weight: bold;
  color: green;
}
I used the body element as the stage for setting global properties. All the viewable elements will inherit these properties and optionally override them. The remaining rules are divided into the block-type element group and rules for inline elements.
In the block group, the rule matching .section will apply to all the <div class="section"> elements, separating the page into nicely separated regions using background color and margin settings.
Heads are next, with the elements h1, h2, and h3 set to override the font family of the page with sans-serif. This is an example of how a rule can match a group of elements and apply the same set of styles to each.
An interesting experiment to try is to add a font-size property setting for one of these heads. You'll probably find that, no matter what you set it to, it will not change the size of the text in most HTML browsers. I am not sure why this is the case, but it is an example of how the user agent can choose to ignore the style settings from the server.
Skip down to the rule matching .code. This is a traditional paragraph whose style has been modified to look like a code listing. In our example, there is only one line of code, but what would happen if there were more? The whitespace would be crushed into single spaces, and the code would lose its structure. So perhaps a better definition would be based on the pre element.
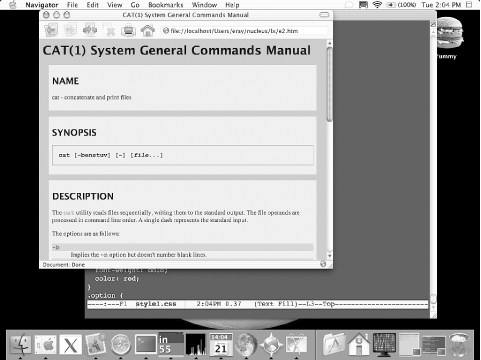
Figure 5-15 shows how the CSS-formatted page would look in a web browser.
Figure 5-15. Browser view of the XHTML document

This example is fairly simple due to the fact that every browser has a built-in stylesheet for HTML, so we are in fact only overriding a few default properties. We should now take a look at how a CSS stylesheet would look for another kind of XML document.
Let's return to Example 3-5, the DocBook version of a technical reference page. A stylesheet for this might look like Example 5-3. To associate this with the XML document, you first have to add this line, underneath the XML declaration:
<?xml-stylesheet rel="stylesheet" type="text/css" href="uri"?>
where uri is the location of the stylesheet.
Example 5-3. A CSS Stylesheet for a DocBook reference page
/* GLOBAL SETTINGS */

refentry {
  display: block;
  background: silver;
  font-family: serif;
  font-size: 12pt;
}

/* SECTIONS */

refnamediv, refsynopsisdiv, refsect1 {
  display: block;
  margin-top: 1em;
  margin-bottom: 1em;
  margin-left: 0.5em;
  margin-right: 0.5em;
  padding: 0.5em;
  background: #99a;
}

refnamediv {
  text-align: center;
  font-size: 13pt;
}

refsynopsisdiv:before {
  content: "Usage";
  font-family: sans-serif;
  font-weight: bold;
  font-size: 15pt;
}

/* BLOCKS */

listitem, member, para, refmeta, refpurpose, simplelist, synopsis,
term, title, variablelist {
  display: block;
}

listitem, member {
  margin-left: 2em;
  margin-right: 2em;
}

para { margin: 0.5em; }

refpurpose { font-style: italic; }

refsect1> title {
  margin-top: 0.5em;
  margin-bottom: 0.5em;
  font-family: sans-serif;
  font-weight: bold;
  font-size: 15pt;
}

simplelist { margin-left: 1em; }

synopsis {
  margin-top: 0.5em;
  margin-bottom: 0.5em;
  padding: 0.5em;
  font-family: monospace;
  background-color: #77f;
}

term { float: left; }

variablelist {
  margin-top: 0.5em;
  margin-bottom: 0.5em;
  margin-left: 1em;
  margin-right: 1em;
}

/* INLINES */

citetitle, command, keysym, literal, option, manvolnum,
replaceable { display: inline; }

command, keysym, literal, option {
  font-family: monospace;
  font-weight: bold;
}

citetitle { font-style: italic; }

command {
  background: gray;
  color: black;
}

keysym {
  background: purple;
  color: yellow;
}

literal { color: brown; }

manvolnum:before { content: "("; }
manvolnum:after {  content: ")"; }

option { color: blue; }

refmeta:before { content: " - "; }

replaceable { font-style: italic; }
Every element in this example has its display property set. Although the default behavior in browsers is to set the display to inline, I think it's a good idea to be explicit and set them all, lest you forget. If you want to see how a document looks when everything is an inline, try taking out the display property settings. Can you say, "obfuscated"?
Notice that in this example, I took advantage of CSS's property merging feature to make things a little more organized. All the inline elements have their display property set in one rule, and any other specific properties are added in other rules.
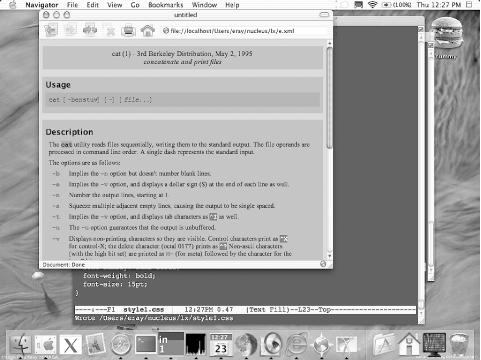
Skip down to the rule matching refsynopsisdiv:before. Here's an example of generated text. As you will see in Figure 5-16, it adds a previously nonexistent head just before the synopsis element telling you that this is a "Usage" synopsis. Other elements (such as manvolnum) also add text to make the document more readable and correct.
The rule matching the term element sets a property we haven't seen before. float lets the block exist on the same horizontal level as another block, relaxing the requirement of vertical alignment. By setting it to float:left, the list terms and definitions can sit side-by-side, making a more compact and readable list.
Figure 5-16. Browser view of the CSS-formatted DocBook document

CSS has a lot more to it than the few properties we've seen here. More and more, these features are being implemented in browsers allowing web designers more freedom to express themselves. Some things we haven't talked about are the interesting properties coming in CSS level 3. These include alternative media formats, such as speech synthesis and printed page. You will have much better control of your document in these forms as well as on screen.
As useful as CSS can be, it is still limited in many ways. We mentioned the problem of working with elements out of order. CSS can't jump ahead to grab an element at the end of the document for example. Its processing path is fixed. Lucky for us, there is another option. XSLT and XSL-FO bring to the table much more powerful formatting, allowing you incredible freedom to control the path of processing. Get ready, because they are the subjects of the next two chapters.


