14.3 Installing a PATA (Standard ATA) Hard Disk
To install a PATA hard disk, you physically install the drive in the PC, configure CMOS Setup to recognize the drive, and finally configure your operating system to use the proper transfer mode. Each of these steps is described in the following sections.
14.3.1 Physical Installation
The general procedures for installing any hard drive are similar, but the exact steps required vary according to the specific drive and case. Most cases contain drive bays, which form a part of the chassis structure designed to secure drives in place. Others use removable drive cage or drive tray arrangements, in which you first secure the drive to a removable carrier and then attach the carrier to the chassis. Whatever the arrangement, once you've removed the cover it will almost certainly be obvious how to physically secure the drive within the case. If it isn't, refer to the hardware documentation.
On a well-designed case, the screws that secure the drive will be readily accessible on both sides. Some cases are so badly designed that you may have to remove the drive bay assembly itself, or even the system board to access the screws on one side of the drive. Once you have removed the cover and decided where and how you will physically install the drive, take the following steps:
If you are also installing an enhanced PATA interface card, configure that card per the maker's instructions, attach the ATA cable(s) to it, and install the card in an available slot. If that card will replace one or both embedded system board ATA interfaces, restart the system and use CMOS Setup to disable the system board ATA interfaces before you install the card.
Ground yourself, open the antistatic bag that contains the drive, and place the drive flat on top of the antistatic bag. Recent systems automatically determine the proper drive parameters by querying the drive directly. However, if you are installing the drive in an older system, write down the drive parameters listed on the drive in case the BIOS fails to identify the drive.

Most manufacturers print the drive geometry and jumper settings on the drive itself, but some drives are not labeled. The manufacturer's web site is usually the best source for this information. All ATA drives larger than 8.4 GB use the same CHS settings: 16,383 cylinders, 16 heads, and 63 sectors/track. The system determines actual drive capacity by using the LBA sector count.
If necessary, visually examine any existing drives to determine how they are jumpered and to which ATA interface they connect. On recent systems, there's an easier way. BIOS Setup identifies ATA-3 (or later) compliant ATA/ATAPI devices by name, the channel to which they connect, and whether they are configured as Master or Slave. Depending on the existing configuration, you may choose simply to add the new drive to a free channel, or you may need to rejumper existing drives and/or move them to another interface. Use the following guidelines to set Master/Slave jumpers when connecting ATA/ATAPI devices:
Make the hard disk from which the PC boots the Master on the primary ATA channel.
To connect only one device to an ATA channel, configure it as Master (or Only), whether it is an ATA hard disk or an ATAPI CD-ROM or tape drive. Note that most ATAPI CD-ROM drives and many ATAPI tape drives are jumpered as Slave by default on the assumption that they will be connected to an ATA channel that already has a Master hard drive on it. On most systems, an ATAPI Slave works properly as the only device on an ATA channel, and some BIOSes do not support ATAPI Masters, but the Master-less Slave configuration is technically not permitted. If an ATAPI device is not recognized after you change operating systems, suspect this as the cause.
To connect two ATA drives to an ATA channel, jumper one drive as Master and the other as Slave. The controller on the drive jumpered as Master controls both devices on the cable, so it usually makes sense to jumper the newer and presumably faster device as Master.
To connect two ATAPI devices to an ATA channel, jumper one drive as Master and the other as Slave. It generally doesn't matter which is which, but given the choice, set the newer device as Master.
To connect an ATA hard drive and an ATAPI device to one ATA channel, jumper the ATA drive as Master and the ATAPI device as Slave. The reverse usually works, but is technically not permitted, and may cause problems if you later make changes to your system.
On an ATA cable with two device connectors, it doesn't matter which device you connect to which connector, so long as you make sure that Pin 1 on the interface and each device is connected toward the red stripe on the cable. If you are connecting only one device to a cable with dual connectors, good practice suggests that you connect that one device to the end connector and leave the middle connector unused.
Note that this advice about jumpering drives assumes that you are using standard drives and cables, which is still by far the most common method. If you are using CSEL-compatible drives and cables, see Section 13.1.5.2 for information about configuring CSEL drives.
After you have jumpered the new drives (and rejumpered existing ones, if necessary), but before you mount the drive in the bay, connect the ATA cable to the new drive, making sure that the red stripe on the cable connects to Pin 1 on both the drive and the adapter. It may or may not be easier to connect the power cable as well at this point.
Slide the new drive into a drive bay, but don't secure it with screws just yet. If you've set a jumper incorrectly, you may need to remove the drive to correct the problem. If you didn't connect the power cable earlier, do so now, making sure that it seats fully.
Leaving the cover off for now, give the system a quick visual check to make sure everything is connected properly. Connect the keyboard, mouse, and monitor if you'd previously disconnected them, then flip the power on to start the smoke test. You should hear the new drive spin up. If it's difficult to tell (which it often is with newer drives), you can put your fingertip against the drive and feel it spinning up. Watch the screen as the system starts, and invoke CMOS setup.
14.3.2 CMOS Setup
After you've physically installed a new PATA hard drive, the next step is to get the PC to recognize it by configuring CMOS Setup. New BIOSs automatically detect and query-attached ATA devices during boot. If your system has such a BIOS, it will display installed ATA devices by type, name, and model during the normal boot sequence as it detects them. If this occurs, it's generally safe to assume that the PC has automatically configured BIOS settings for optimum performance. If you have an older BIOS, you have to configure it manually to recognize the new drive. The exact steps required to do so vary according to the BIOS type and revision level, but the following general guidelines should suffice:
Display the BIOS Setup screen that lists installed devices. Any modern BIOS should list four devices?Primary Master/Slave and Secondary Master/Slave. If Setup has space for only two devices, you badly need a BIOS update. In fact, you need a new motherboard. With recent BIOSs, all ATA drives?including the one you just installed?should be listed by device name, size, and (perhaps) geometry, and ATAPI CD-ROM drives should be listed by name and type. If the drive you just installed is listed, the PC has configured that drive properly and you can use the operating system to partition and format the drive.
If the drive you just installed is not listed, try changing Drive Type for the channel where the new drive is installed from None or User to Auto, if that option is offered. The BIOS may or may not recognize the drive. If it doesn't do so immediately, try restarting the computer. If that doesn't work, but if the BIOS Setup main menu offers an option named IDE HDD Auto Detection (or something similar), invoke that option and then view BIOS Setup again to see if your new drive appears. If it does, you can use the operating system to partition and format the drive.
If the new drive still isn't listed, you'll have to configure it manually. To do so, examine the options available for Mode, enter the drive parameters recommended by the manufacturer for that mode, and choose one of the following modes:
- Normal
-
Configures the drive to operate in CHS addressing mode, which limits the drive to 504 MB.
- Large
-
Configures the drive to use ECHS translation mode. Select this mode, which may instead be labeled Large, ECHS, Translation, or something similar, only if the BIOS does not offer LBA mode, or if you are installing an older, non-LBA capable drive. Note that, because translation modes are not necessarily compatible between different BIOSs, you cannot safely move a hard drive configured to use translation mode on one machine to another machine, whose translation mode may be incompatible. If the two machines use compatible translation modes, everything may work properly. If not, the data will be scrambled beyond recovery when the second computer writes to the drive.

If you need to move a drive that uses ECHS translation mode to another system, the only safe way to do so is to back up any data you care about, remove the drive from the old system, install it in the new system, and then repartition and reformat the drive. Of course, any drive in a system old enough to be using ECHS mode is probably too old and slow to be useful anyway, and with new drives available at such low cost you're better off just installing a new drive.
- LBA
-
Configures the drive to use LBA mode, which allows you to use the full capacity of the drive. Select this option unless you are installing an older, non-LBA drive. LBA mode is standardized, and it should be safe to move a drive configured for LBA mode from one machine to another. We have done so many times, but your mileage may vary, so back up before you attempt this.
For BIOSs that require you to enter drive geometry manually, you should also examine the CMOS Setup screen that configures the embedded ATA interfaces, if available. Use this screen to configure the interface to use the fastest transfer mode common to the interface and the drive itself. For example, if you have just installed an Ultra-DMA/100 drive in a system with an older BIOS, you may find that the fastest mode supported by that interface is PIO-4 at 13.3 MB/s. If the embedded interface does not support modern high-speed transfer modes, consider replacing the interface. Enhanced ATA interfaces are relatively cheap, and allow you to take advantage of the faster throughput and greater safety of modern UDMA modes. If the drive is configured to use LBA, you can safely use the existing interface temporarily and replace it later with a faster interface. The drive will function properly as is with the upgraded interface, but will simply begin using the fastest transfer mode common to the drive and new controller.
Once the drive is installed, recognized by the system, and configured properly in CMOS Setup, turn off the system. Align the screw holes in the drive with those in the bay. If screws were supplied with the drive, use them. If not, you can use any standard drive screw, but first verify that it is not too long by using your fingers to tighten the screw into the bare drive, making sure that no resistance is felt before the screw is fully seated. Insert four screws to secure the drive, two on each side. Some drives and some bays also allow screws to be inserted from beneath. Once you have all four screws loosely secured, tighten each of them gently. Good practice (seldom seen nowadays) suggests using a lock washer or a small dab of fingernail polish to prevent the screws from vibrating loose.
With the drive secured, start the system again, and use the operating system to partition and format the drive.
14.3.3 Enabling PATA DMA Mode Transfers
Depending on what level UDMA your hard disk and interface support, enabling DMA transfers may or may not increase disk performance noticeably, but enabling DMA is always worthwhile because it greatly reduces the burden that PIO transfers place on the processor. If a computer has 75% CPU utilization using PIO transfers, that same computer using DMA transfers may provide the same or better disk performance at perhaps 1.5% CPU utilization. With multitasking operating systems, those extra free CPU ticks translate into faster system response.
To use DMA transfers, your drive, BIOS, and chipset must explicitly support DMA, and your operating system must have DMA drivers installed, loaded, and enabled. All versions of Windows 95, Windows 98, and Windows NT/2000/XP support DMA transfers, but DMA is disabled by default in some environments, as follows:
- Windows 95B, Windows 98, and Windows 2000/XP
-
A fresh install automatically installs DMA-capable drivers and tests the system for DMA support. Setup queries the chipset to determine if it supports DMA. If it does, Setup queries the drive itself to determine what DMA level, if any, it supports. If the drive is also DMA-capable, Setup does a series of reads and writes to determine if the system reliably supports DMA. If any of these tests fail, DMA is disabled. If all three succeed, DMA is enabled automatically at the fastest DMA mode common to the drive and interface. Upgrading an existing system to Windows 95B, Windows 98, or Windows 2000/XP automatically enables DMA only if the DMA was previously enabled.
Francisco García Maceda, our technical reviewer, notes the following:
"This paragraph is correct as far as the theory goes. However, I have installed Windows 98 and 98SE dozens of times with DMA-compatible hardware and usually?perhaps 80% of the time?I have had to enable DMA manually. Once manually enabled, it works without a problem for months on end. I always verify that DMA is in fact enabled after any OS installation. This has happened to me with chipsets from Intel, VIA, SiS, ALi, etc., and with processors from Intel, VIA, Cyrix, AMD, etc., so I haven't been able to associate it with any particular hardware configuration.
I'm also amazed that large companies such as Dell, Compaq, IBM, and HP used to ship their computers without DMA enabled, even though those systems had full hardware support for DMA. Go figure! So I would add to always check DMA status after any install (whether an upgrade or a bare-metal install) or when you receive your fully assembled computer. With Windows 2000 I haven't had this problem."
Although we haven't the slightest doubt that Mr. Maceda has experienced exactly what he describes, our experience with Windows 98/98SE configuring itself automatically to use DMA mode has been better than his, albeit not perfect. The few times we recall a fresh installation of Windows 98/98SE failing to configure DMA properly were on systems with VIA chipsets. We have never encountered the problem on systems with Intel chipsets. The root of the problem seems to be that Microsoft (with some justification) did not fully trust DMA until recently, and so took the conservative approach when deciding whether to enable it.
- Windows 95 and Windows 95A
-
These operating systems do not install DMA support automatically. If your ATA interface and drives are DMA-capable, you can install and enable DMA-capable drivers manually.
- Windows NT 4.0
-
Does not install DMA support automatically, but SP2 and higher include DMA-capable drivers that you can install and enable manually. For detailed instructions, see Microsoft Knowledge Base Article 158873.
Enabling DMA transfers is always an adventure because the only way to determine if your system works properly with DMA is to try it. Therefore, before you enable DMA, make sure you can recover if it doesn't work as expected. Always do a full backup and verify, including the registry, before you attempt to enable DMA.
For Windows 9X, have a known-good Startup diskette available before you try to enable DMA. If DMA does not work properly, you can recover by booting with the floppy, starting Windows in Safe Mode, disabling DMA, and restarting the system.
For Windows NT, the process is more perilous. If problems are immediately obvious when you restart the Windows NT system after enabling DMA, you can restart the system and choose the Last Known Good configuration to revert to the earlier, non-DMA drivers. Just don't log on before you do this, or the non-DMA Last Known Good configuration will be overwritten by the flawed DMA configuration.
When you restart the PC, immediately check the current DMA status. All versions of Windows 9X and Windows NT 4 or later automatically disable DMA transfers at boot and revert to PIO transfers if they detect an obvious DMA problem. A DMA checkbox that won't stay checked when you restart the system is a good indication that your computer does not support DMA properly. Unfortunately, this is not foolproof. DMA may appear to install successfully, but may have intermittent problems anyway. Any of the following symptoms may (or may not) indicate a DMA problem:
You cannot access the hard disk at all, or you notice corrupt or missing files.
The drive sometimes hangs briefly or seems to speed up and slow down during file access.
The keyboard or the foreground application sometimes stops responding for short periods, or the mouse becomes jerky or nonresponsive.
Windows locks up during the Plug-and-Play detection phase of Setup.
Windows will start only in Safe Mode.
Windows shutdown takes a lot longer than before you enabled DMA.
If any of these problems occur, it does not necessarily mean that you cannot use DMA with your computer. The following are likely causes of the problems:
- Cable
-
According to the ATA standard, cables can be no longer than 18 inches (0.45m), but we often see PATA cables of 24 inches and even 36 inches. These long cables simply will not work reliably, if at all, with high-speed DMA modes. Cables also vary greatly in quality. The ones you see for $1.99 in bins at the computer store are less likely to work reliably at high speeds than those that are supplied with a new DMA drive. When you're installing a DMA drive, always replace the old ATA cable with the cable that comes with the drive. If no cable came with the drive, buy a good-quality DMA cable separately. If you have problems with DMA, simply replacing the cable with a better cable may solve them.
- Drive
-
Any new drive should support DMA properly, but some early ATA-33 drives did not implement fast DMA modes correctly. If you reconfigure an older drive to use DMA, first check the manufacturer's web site for details on that model. Software patches for some models are available.
- BIOS
-
Some early BIOS implementations that nominally provide DMA support do not do so correctly. If a more recent BIOS revision is available for your computer, downloading it and installing it may resolve intermittent DMA problems. If your current BIOS does not support DMA, you may find that a revised version is available to add that capability.
14.3.3.1 Determining if a drive supports DMA
The easiest way to determine if a drive supports DMA or Ultra DMA transfers is to check the specifications in the manual or on the web site. You can also use debug to query the drive directly to determine what level of DMA, if any, it supports. To do so, boot the PC using a DOS floppy that contains the debug utility. (Running debug under Windows NT/2000/XP does not allow you to access the registers needed to perform this test.) At the DOS prompt, type debug and press Enter. If the drive to be tested is connected to the primary ATA interface, type the following commands at the debug hyphen prompt, ending each line by pressing Enter. Note that the first character in each of the first four lines is the lowercase letter "o" rather than zero, and that all "1" characters are the numeral one rather than the lowercase letter "l".
o 1f6 a0
o 1f2 45
o 1f1 03
o 1f7 ef
i 1f1
The first line (o 1f6 a0) specifies the drive to be tested. The a0 argument specifies the Master drive. To test the Slave drive, substitute b0 (o 1f6 b0). The second line (o 1f2 45) specifies the DMA mode to be tested. Valid arguments are 40 through 46, inclusive, for Ultra DMA Modes 0 through 6, respectively. For DMA (not Ultra DMA) Modes 1 and 2, use 21 or 22, respectively. Start with the fastest mode you believe the drive supports. If the test fails for this mode, retest using the next- slower mode until you find a mode that the drive does support. The 03 argument on the third line (o 1f1 03) programs disk timing. The ef argument on the fourth line (o 1f7 ef) is the Set Feature command for the drive. Pressing Enter after the final line (i 1f1) reads the error status and returns either the value 00, which indicates that the drive supports the DMA mode being tested, or the value 04, which indicates that the drive does not support the DMA level being tested. If debug returns something other than 00 or 04, you've mistyped something. To exit debug, type the letter q at the hyphen prompt and press Enter.
If the drive to be tested is connected to the secondary ATA interface, use the following debug commands, which substitute "7" for "f" in the address string:
o 176 a0
o 172 45
o 171 03
o 177 ef
i 171
All other comments concerning the commands for the primary ATA interface also pertain to the secondary ATA interface.
With Linux, the best way to determine the DMA modes a drive supports and the DMA mode it is currently using is to run hdparm -i /dev/hd*, replacing the asterisk with the correct letter for the hard drive you want to test. Figure 14-2 shows that the drive we tested supports udma0 through udma5. The asterisk indicates that the drive is currently using udma5.
Figure 14-2. Using hdparm to test DMA support and drive performance
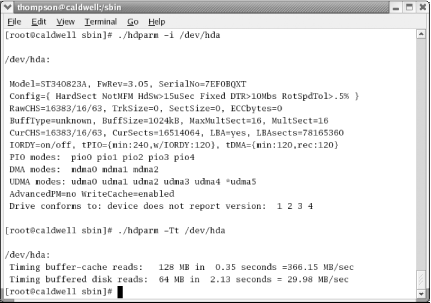
When you test DMA modes, you can also test drive performance. To do that, use the command hdparm -Tt /dev/hd*. In this example, the drive is doing buffered disk reads at nearly 30 MB/s, which is excellent performance for an ATA drive.
14.3.3.2 Enabling DMA mode transfers with Windows 9X
To determine if your system board and ATA interface support DMA, right-click the My Computer icon and choose Properties to display the System Properties dialog. Display the Device Manager and expand the Hard disk controllers item. You do not have DMA-capable hardware if you see only one or two entries that read Standard IDE/ESDI Hard Disk Controller. If the first entry is Intel 82371SB PCI Bus Master IDE Controller or similar, the system board and interface provide DMA support. The critical words are PCI Bus Master. The exact model number is less important.
Windows 98 and Windows 95B automatically load DMA-capable drivers if they detect DMA hardware. To install DMA support for the initial Windows 95 release, download and execute the file http://support.microsoft.com/download/support/mslfiles/remideup.exe and follow the prompts.
After you restart the system, enable DMA transfers by right-clicking My Computer and choosing Properties to display the System Properties dialog. Display the Device Manager page and expand the Disk drives item. Double-click the drive in question to display its Properties sheet and display the Settings page, shown in Figure 14-3.
Figure 14-3. In Windows 9X, marking the DMA checkbox on the Settings page of the disk Properties dialog to enable DMA transfers
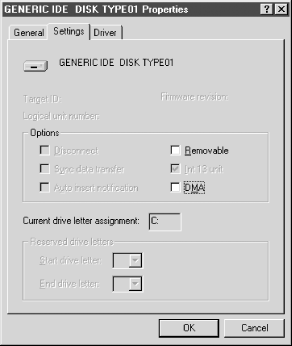
If a DMA-capable driver has been loaded, a DMA checkbox appears in the Options section. Mark that checkbox to enable DMA transfers for that drive. Exit the dialog, restart the system, and redisplay the dialog to verify that DMA remains enabled after the restart. If rebooting clears the checkbox, Windows has decided that some problem exists with DMA transfers, and has reverted to using PIO. If the checkbox remains marked, DMA transfers are enabled and should work, subject to the provisos listed earlier.
14.3.3.3 Enabling DMA mode transfers with Windows 2000 or Windows XP
To enable DMA under Windows 2000 or Windows XP, take the following steps:
Right-click the My Computer icon on the desktop and choose Properties to display System Properties.
Click the Hardware tab and then the Device Manager button to display the Device Manager.
Locate and expand the IDE ATA/ATAPI controllers item. On a standard system with both ATA controllers enabled, there should be three items listed, sorted alphabetically. One item describes the ATA controller itself (e.g., Intel(r) 82801BA Bus Master IDE Controller or VIA Bus Master PCI IDE Controller) and may be disregarded. The other two items should be Primary IDE Channel and Secondary IDE Channel.
Right-click the channel to which the device you want to enable DMA for is connected, choose Properties, and then click the Advanced Settings tab to display the dialog shown in Figure 14-4.
Figure 14-4. Windows XP showing this hard drive is using UDMA-5 (ATA-100) Transfer Mode
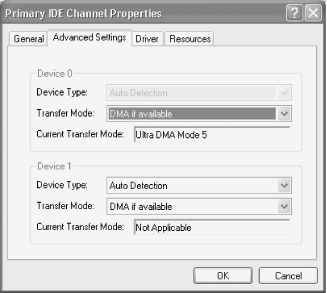
This dialog displays the Device Type and Current Transfer Mode for Device 0 (Master) and Device 1 (Slave) on the selected ATA channel. The Current Transfer Mode field shows the transfer mode currently in use, and may be changed as follows:
- DMA Mode x or Ultra DMA Mode x
-
Windows is using the indicated MDA or UDMA mode, which is the fastest mode supported by the interface, cable, and device. For example, if the hard drive supports UDMA/100 and the embedded motherboard interface supports UDMA/66, but you use a standard 40-wire ATA cable, Windows configures the interface to use UDMA/33. If you replace that cable with an 80-wire UDMA cable and restart the system, Windows reconfigures the interface to use UDMA/66. You cannot explicitly choose the UDMA mode to be used.
- PIO Mode or PIO Mode x
-
Windows is using the fastest PIO mode supported by the interface and device, typically PIO-4 (16.7 MB/s) unless the components are extremely old. If Transfer Mode is currently set to PIO Only, you may be able to enable DMA by setting Transfer Mode to DMA if available and restarting the system. If the Current Transfer Mode for the device still shows PIO Mode, that device cannot be used in DMA mode.
- Not Applicable
-
No device is installed.
14.3.3.4 Enabling DMA mode transfers with Linux
Ordinarily, a UDMA-aware Linux kernel automatically enables UDMA for any UDMA-capable drives and interfaces it finds. If a recent Linux kernel does not automatically enable UDMA, it's usually because the kernel doesn't understand how to use the UDMA features of the chipset or it thinks UDMA is not safe to use. However, a BIOS glitch or similar minor problem may fool the kernel into believing falsely that DMA is not supported or is unsafe to use. If that happens, it may be useful to enable DMA manually.
With any kernel 2.1.113 or later, you can enable DMA manually by using kernel boot parameters. To do so, add the command ide0=dma or ide1=dma to your startup script, where ide0 is the primary ATA interface and ide1 the secondary ATA interface. We have never used this method for a tertiary or higher ATA interface, and we suspect that it would not work reliably, if at all, for anything except the primary and secondary interfaces. As always, enabling DMA for an interface means that all devices attached to that interface must support DMA. Using this command for an interface to which a PIO mode device is attached results in unpredictable operation at best, and may cause data corruption or boot failures.
The problem with using kernel boot parameters to enable DMA is that they merely ask the kernel to use DMA rather than ordering it to do so. Even after adding a DMA kernel boot parameter to your startup script, you may find the drive is not using DMA. If that occurs, you can force DMA with the command hdparm -d1 /dev/hd*, replacing the asterisk with the appropriate letter. Note that a kernel boot parameter sets DMA for the interface, while hdparm sets DMA only for a specified device. Accordingly, if you have two devices attached to the interface, use hdparm twice, once for each device. For example, if you have two hard drives connected to the primary ATA interface, use hdparm -d1 /dev/hda and hdparm -d1 /dev/hdb to enable DMA for both drives. Although we have never needed to do so, you can disable DMA for a device using the command hdparm -d0 /dev/hd*
|


