22.4 Installing and Configuring Serial Port Hardware
Before you buy a serial port, verify that you don't already have what you need. Serial ports are cheap, ubiquitous, and easily disabled, so you may already have one or more of them installed that you don't know about. Before you purchase a serial port expansion card, take the following steps:
Use the operating system or a diagnostics program to determine the number and configuration of installed serial ports.
For Windows NT 4.0, choose Start
 Programs
Administrative Tools (Common)
Windows NT Diagnostics, click the Resources tab, and double-click the
Serial item.
Programs
Administrative Tools (Common)
Windows NT Diagnostics, click the Resources tab, and double-click the
Serial item.For Windows 2000/XP, right-click the My Computer icon and choose Properties. Click the Hardware tab and then the Device Manager button. Locate the Ports item in the Device Manager tree and double-click it to expand the listing to show individual ports. All installed COM ports (and LPT ports) are displayed. Double-click a port to display a tabbed dialog that provides information about that port, including details about General configuration, Port Settings, Driver details, and the Resources that port is using.
For Windows 9X, right-click the My Computer icon, click the Device Manager tab, expand the Ports (COM and LPT) item, highlight a port, click Properties, and finally click the Resources tab. Note the COM port number, IRQ, and I/O address assignments for each port present.
For Linux, open a terminal window. Display /proc/devices and look for tty* devices in the Character devices section (use the cat command to display the file; if the file is so large that it scrolls off the screen, you can use the more or less command to display one screen at a time). The first column lists the interrupt assigned to the device and the second column the device name. Ordinarily, the primary serial port uses IRQ 3 and the secondary serial port (if present) uses IRQ 4. Display /proc/ioports to view the base address and memory range assigned to each of the installed ports.
While you have this information displayed, record the details about each port (particularly which resources it is using), which you will need to avoid conflicts if you install another port. Also record unused IRQs that are available for use by another serial port. In addition to the minimal information supplied by Windows, diagnostic software may also report additional details. (Linux provides more details than you'll ever need to know about serial ports.)
Examine the rear of the PC case to locate an unused serial port connector. It may be a DB9M or a DB25M, and may reside on an expansion card bracket or on the chassis itself. If you find such a connector, it may or may not be connected to an unused serial port. If it is connected, that port may not be enabled. Conversely, active serial ports may not be represented by a back panel connector. For example, an internal modem uses a serial port, but does so internally, so no connector for that port appears on the back panel. Also, a port may be "orphaned"?installed and active, but not connected to a back panel connector. If that is the case, you can purchase a standard motherboard-to-back panel cable and connector at most computer stores for a couple of dollars.
Restart the computer, enter BIOS Setup, and locate the serial port settings section, if present. Determine if one or more serial ports are available on the motherboard but currently disabled. Such ports will not be reported by the BIOS, and so will not be recognized by Windows. The diagnostics program may or may not detect disabled ports. If BIOS Setup displays a disabled port, you can use Setup to enable and configure the port as described in the following section, assuming that the port uses a UART adequate for your intended purpose.
If you do need to buy a serial port card, get a dual-16650 card, which costs only $25 or so. Dual-16550 cards are still available, sometimes for less than $15, but having the 16650s is worth the small additional cost. Even if the system is old enough to have ISA slots, buy a PCI card rather than an ISA card. Serial ports are too slow to really need PCI, but you should avoid installing ISA cards in a PCI system whenever possible.
Once the port is physically installed and enabled, the next step is to configure the port hardware by assigning an IRQ and base address to the port. This is done differently according to the port being installed, as follows:
- Motherboard ports
-
Most motherboards include two serial ports, typically designated Serial 1/2 or A/B. You map these physical serial ports to logical COM ports by setting jumpers on older motherboards or by using BIOS Setup on newer ones. Many motherboards restrict you to assigning Serial A and B to one of the four standard COM port settings for IRQ and base address. Some motherboards allow you to define custom IRQ and base address settings for each serial port, which you can use to configure unique settings that allow three or more serial ports to coexist. Any motherboard allows you to disable the embedded serial ports, which you may need to do if the embedded ports use less-capable UARTs and you are installing a serial expansion card to replace them.
- Serial expansion cards
-
Simple serial expansion cards typically support two serial ports, although only one may be physically installed. If this is the case, empty sockets will exist to allow you to install an individual UART chip to add the second port. Each installed UART requires two UART support chips, designated 1488 and 1489. These chips may or may not be preinstalled for the empty UART socket. The chips necessary to add a second port are normally available from the same place you bought the card. Such simple cards are usually set by jumper to one of the four standard COM port settings. Newer cards, particularly those that use 16650 UARTs, may be set by jumper or by a setup utility bundled with the card. In the latter case, the utility may allow you to assign the serial port to any available IRQ and base address.
|
If you need only one or two serial ports, configure them with standard settings for COM1 and/or COM2. If you need more than two, configure the least-flexible serial ports as COM1 and COM2 and use the ports that allow custom IRQ and base address settings for COM3 and above. Assign the standard ports 0x3E8 to COM3 and 0x2E8 to COM4, but assign unused IRQs to those ports. For example, you might configure COM3 for 0x3E8 and IRQ 10 (rather than the default IRQ 4). Doing so allows you to use all COM ports simultaneously with no risk of IRQ conflicts.
22.4.1 Configuring COM Port Settings
Once you have installed and configured the serial port hardware, the next step is to configure the operating system to use it. Windows automatically recognizes proper IRQ and base address values for serial ports reported by the BIOS that use standard BIOS settings?COM1 and COM2 in this example. Depending on the BIOS, nonstandard COM port assignments are often detected, but the hardware settings may not be reported correctly. For example, when we installed COM3 on an older system using 0x3E8 and IRQ 10, Windows 95 detected COM3 on 0x3E8, but assumed that it used IRQ 4.
22.4.1.1 Configuring COM port settings in Windows 9X
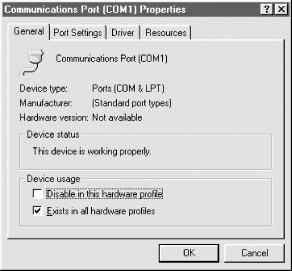
To configure COM port settings in Windows 9X, right-click the My Computer icon and choose Properties to display the Device Manager. If necessary, mark the View devices by type option button. Expand the Ports (COM and LPT) item, and double-click the port you are configuring to display the port Properties dialog, shown in Figure 22-5. The General page reports port status (in this case the port is working properly) and whether the port is available for use in the current profile.
Figure 22-5. The General page of Communications Port Properties displaying the operational status of the port
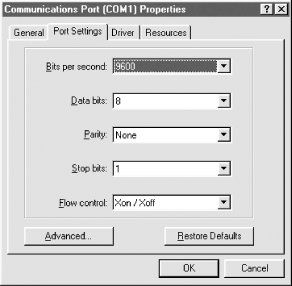
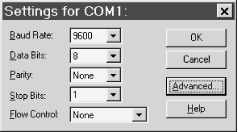
Click the Port Settings tab to display the Port Settings page, shown in Figure 22-6, and use the drop-down lists to configure port defaults for speed, framing, and flow control.
Figure 22-6. The Port Settings page, where you configure communication parameters for the port
|

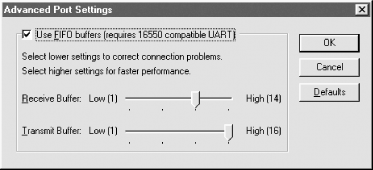
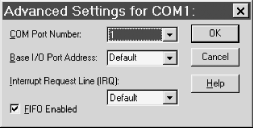
Windows automatically detects and enables 16550 FIFO buffering by default, but may use overly conservative settings. To optimize port performance, click the Advanced button in Port Properties to display the Advanced Port Settings dialog, shown in Figure 22-7. Move both slider bars to the far right for fastest performance, and leave them there unless you have problems with the port.
Figure 22-7. Advanced Port Settings, where you configure UART settings
|
To modify IRQ and/or I/O port settings, display the Resources page, shown in Figure 22-8. Clear the Use automatic settings checkbox, and select one of the Basic Configurations shown in Table 22-11. Highlight Input/Output Range or IRQ and click Change Setting. Select an available I/O port or IRQ, making sure that the Conflict information pane indicates that no conflicts exist. Save the changes and restart the system.
Figure 22-8. Windows 98SE displaying automatic settings for COM1
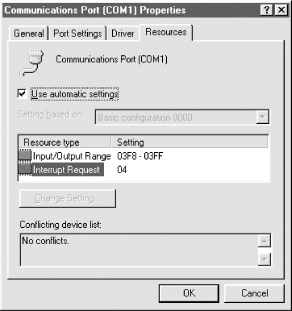
Table 22-11 lists Windows 98 (not Windows 98SE) Basic Configurations for COM ports. Basic Configurations 0, 2, 4, and 6 define standard uneditable values for COM1 through COM4, respectively. Basic Configurations 1, 3, 5, and 7 assign standard settings for I/O Port, but allow you to modify the IRQ. Choosing Basic Configuration 8 allows you to assign any IRQ and I/O port to a COM port.
|
Basic configuration |
Comm port |
Default IRQ |
IRQ editable? |
Default I/O port |
I/O port editable? |
|---|---|---|---|---|---|
|
0 |
1 |
4 |
No |
0x3F8 - 0x3FF |
No |
|
1 |
1 |
4 |
Yes |
0x3F8 - 0x3FF |
No |
|
2 |
2 |
3 |
No |
0x2F8 - 0x2FF |
No |
|
3 |
2 |
3 |
Yes |
0x2F8 - 0x2FF |
No |
|
4 |
3 |
4 |
No |
0x3E8 - 0x3EF |
No |
|
5 |
3 |
4 |
Yes |
0x3E8 - 0x3EF |
No |
|
6 |
4 |
3 |
No |
0x2E8 - 0x2EF |
No |
|
7 |
4 |
3 |
Yes |
0x2E8 - 0x2EF |
No |
|
8 |
Any |
Variable |
Yes |
Variable |
Yes |
Table 22-12 and Table 22-13 list Windows 98SE (not Windows 98) Basic Configurations for COM ports 1 and 2, respectively. In each case, Basic Configuration 0000 uses the most common settings for that port, and allows editing neither IRQ nor I/O Port. Basic Configurations 0001 through 0004 allow you to choose a standard I/O Port address range and assign any available IRQ to that COM port. The Windows 98SE method differs from that of Windows 98 and Windows 2000 (described in the following section) in that it forces you to choose a predefined I/O Port address range, and allows editing only the IRQ assigned to that port.
|
Basic configuration |
Default IRQ |
IRQ editable? |
Default I/O port |
I/O port editable? |
|---|---|---|---|---|
|
0000 |
4 |
No |
0x3F8 - 0x3FF |
No |
|
0001 |
4 |
Yes |
0x3F8 - 0x3FF |
No |
|
0002 |
4 |
Yes |
0x2F8 - 0x2FF |
No |
|
0003 |
4 |
Yes |
0x3E8 - 0x3EF |
No |
|
0004 |
4 |
Yes |
0x2E8 - 0x2EF |
No |
|
Basic configuration |
Default IRQ |
IRQ editable? |
Default I/O port |
I/O port editable? |
|---|---|---|---|---|
|
0000 |
3 |
No |
0x2F8 - 0x2FF |
No |
|
0001 |
3 |
Yes |
0x2F8 - 0x2FF |
No |
|
0002 |
3 |
Yes |
0x3F8 - 0x3FF |
No |
|
0003 |
3 |
Yes |
0x3E8 - 0x3EF |
No |
|
0004 |
3 |
Yes |
0x2E8 - 0x2EF |
No |
22.4.1.2 Configuring COM port settings in Windows NT 4
To configure port settings in Windows NT, run the Control Panel Ports applet. The Ports dialog lists the COM ports that NT recognizes. Double-click the port to be configured and use the drop-down lists in the Settings dialog, shown in Figure 22-9, to configure default port settings for speed, framing, and flow control.
Figure 22-9. The Windows NT 4 Settings dialog, where you configure communication parameters for the port
To view or change settings for I/O port and IRQ, click the Advanced button in the Settings dialog, and use the drop-down lists to specify parameters for the port (see Figure 22-10). You can enable or disable FIFO buffering by marking or clearing the checkbox, but Windows NT 4 makes no provision for tuning FIFO performance from the GUI. Although it's probably not worth the time to do, you can modify FIFO buffering settings using the Registry Editor. FIFO settings are contained in the key HKEY_LOCAL_MACHINE\SYSTEM\CurrentControlSet\Services\Serial. The relevant value entries are:
- RxFIFO
-
The RxFIFO value entry specifies the number of bytes that must accumulate in the receive FIFO buffer before a COM port interrupt is triggered. RxFIFO is a REG_DWORD value. The default value for this entry is the value set for the Serial service, which is eight bytes.
- TxFIFO
-
The TxFIFO value entry specifies the number of bytes that must accumulate in the send FIFO buffer before a COM port interrupt is triggered. TxFIFO is a REG_DWORD value. The default value for this entry is the value set for the Serial service, which is one byte.
Figure 22-10. The Windows NT 4 Advanced Settings dialog, where you configure base address and IRQ for a selected COM port
Note the following when you are configuring COM ports under NT:
NT may or may not recognize a newly installed port, depending on its settings. If the new port is not listed, click Add from the Ports dialog and use the drop-down lists to define port number, I/O port, and IRQ for the new port, as described earlier.
You can enter a custom value for I/O port address instead of using one of those listed.
NT does not prevent you from using settings that will cause port conflicts, so verify that the IRQ and I/O port address are available before configuring a port to use them.
22.4.1.3 Configuring COM port settings in Windows 2000/XP
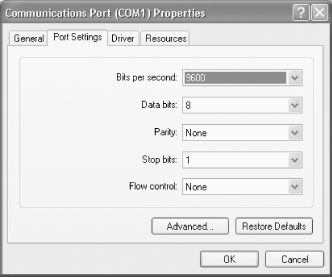
To configure port settings in Windows 2000/XP, right-click the My Computer icon and choose Properties to display the System Properties dialog. Display the Hardware page and click the Device Manager button. If necessary, mark the View devices by type option button. Expand the Ports (COM and LPT) item, and double-click the port you are configuring to display the port Properties dialog, shown in Figure 22-11. The General page reports port status and whether or not the port is available for use in the current profile. The Port Settings page, shown in Figure 22-11, allows you to change the default speed and framing parameters for the port.
Figure 22-11. The Windows 2000/XP Port Settings, where you change default speed and framing parameters for the selected port
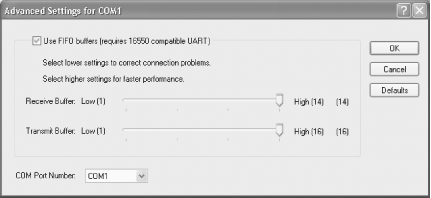
Windows 2000/XP automatically detects and enables 16550 FIFO buffering by default, but sets both Receive Buffer and Transmit Buffer to their fastest settings by default. On most systems, these settings work properly. If you encounter frequent retries or corrupted data on the serial port, try using these sliders on the Advanced Settings dialog, shown in Figure 22-12, to reduce the buffer settings in small increments.
Figure 22-12. The Receive Buffer and Transmit Buffer sliders, which you can adjust for optimum performance
To modify IRQ and/or I/O port settings, display the Resources page, shown in Figure 22-13. Clear the Use automatic settings checkbox, and select one of the Basic Configurations shown in Table 22-14 (for COM1) or Table 22-15 (for COM2). Highlight Input/Output Range or IRQ and click Change Setting. Select an available I/O port or IRQ, making sure that the Conflict information pane indicates that no conflicts exist. Save the changes and restart the system.
Figure 22-13. Windows XP Professional displaying automatic settings for COM1
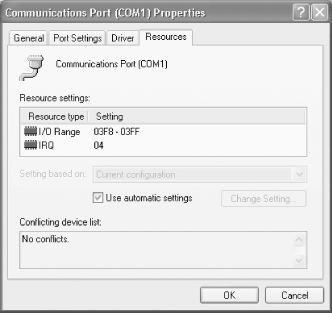
Table 22-14 and Table 22-15 list Windows 2000/XP Basic Configurations for COM ports 1 and 2, respectively. In each case, Basic Configurations 0000 through 0003 define standard settings for the COM ports, with 0000 corresponding to the most common settings. For either port, choosing Basic Configuration 0004 allows you to assign any available IRQ and I/O port to that COM port. The Windows 2000 method is similar to that of Windows 98SE, except that Windows 2000 allows editing both IRQ and I/O Port address range in Basic Configuration 0004, whereas Windows 98SE forces you to select from among the listed I/O Port address ranges, and allows editing only the IRQ assigned to the port.
|
Basic configuration |
Default IRQ |
Default I/O port |
Editable? |
|---|---|---|---|
|
0000 |
04 |
0x3F8 - 0x3FF |
No |
|
0001 |
04 |
0x3E8 - 0x3EF |
No |
|
0002 |
03 |
0x2F8 - 0x2FF |
No |
|
0003 |
03 |
0x2E8 - 0x2EF |
No |
|
0004 |
04 |
0x3F8 - 0x3FF |
Yes |
|
Basic configuration |
Default IRQ |
Default I/O port |
Editable? |
|---|---|---|---|
|
0000 |
03 |
0x2F8 - 0x2FF |
No |
|
0001 |
03 |
0x2E8 - 0x2EF |
No |
|
0002 |
04 |
0x3F8 - 0x3FF |
No |
|
0003 |
04 |
0x3E8 - 0x3EF |
No |
|
0004 |
03 |
0x2F8 - 0x2FF |
Yes |
On some i440BX-based systems?and perhaps systems with other chipsets as well, although we have not encountered it?Windows 2000/XP refuses to recognize serial ports and parallel ports. From reports we receive from readers, this is apparently not an uncommon problem. The symptom of this problem is that the Device Manager displays a yellow exclamation point for the port(s) in question. Double-clicking the port displays the Device status information shown in Figure 22-14.
Figure 22-14. Windows displaying Device status as disabled when it does not recognize a port
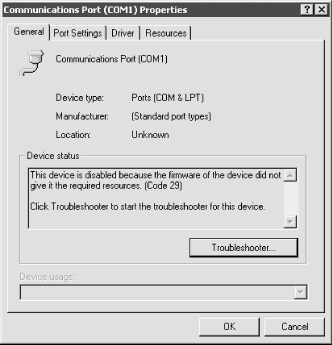
According to Microsoft, the message "This device is disabled because the firmware of the device did not give it the required resources. (Code 29)" indicates either that the port is disabled in the BIOS but is still being enumerated, or that the system BIOS needs to be updated. Each time we have encountered this problem, updating the system BIOS to the most recent version indeed fixed the problem.


