Classes
C# is a modern object-oriented language that encourages good object-oriented design practices. Many aspects of the C# language will be familiar to you if you’ve used C or C++. C# is different in some fundamental ways, however. For example, the C# language doesn’t permit functions to exist outside of class declarations, which is allowed in C++. The C# language also includes a much richer class library than C++, has a unified type system, and utilizes garbage collection to free the programmer from the low-level details of memory management.
As with all object-oriented languages, C# promotes reuse through classes. A class defines a type as well as the methods and properties that are used to interact with instances of the type. For example, a class that represents an animal might include methods that represent the animal’s activities (such as eating and sleeping) and properties that represent its characteristics (such as color or size).
To add a class to an existing project in Visual C#, right-click the project icon in Solution Explorer and choose Add and then Add Class from the shortcut menu. (Alternatively, you can select the project in Solution Explorer and choose Add Class from the Project menu.) The Add New Item dialog box will be displayed, as shown in Figure 2-1.
 Figure 2-1.
The Add New Item dialog box is used to add new classes or other types to a Visual C# project. To add a new class, click the Class icon, supply a name for the new class source file, and then click the Open button. Visual C# .NET will create the source file and open it for editing.
The following example demonstrates the syntax for declaring a class in C#:
public class Cat
{
    public Cat(string aName)
    {
        _name = aName;
    }
    public void Sleep()
    {
        _sleeping = true;
    }
    public void Wake()
    {
        _sleeping = false;
    }
    // Member variables
    protected bool   _sleeping;
    protected string _name;
}
The Cat class is defined using the class keyword. Declarations for member variables and methods that form the class are enclosed inside the outermost curly braces and make up the class declaration. Unlike C++, in C# the declaration and implementation of your class occur in the same file. This simplifies the programming model—you always know exactly which file contains the implementation of your class. By convention, each source file contains one class. You can implement multiple classes in a single source file, but there’s no reason to do so and it’s considered bad programming style.
There are other differences between a C# class and a C++ class, including the following:
-
In C#, every class member should have a specified accessibility level. Any member that doesn’t declare its accessibility defaults to private.
-
There are no #include directives. The C# compiler will globally analyze the project and automatically resolve dependencies.
-
No semicolon is required after the class declaration. The C# compiler is intelligent enough to determine where the class ends without the need for extra punctuation.
In our example, each member of a class is preceded by the public or protected keyword, which specifies whether the member is visible and available for use outside the class. Defining the accessibility of members and classes is discussed later in this chapter, in the section “Accessibility.”
Keep in mind that in the previous example, Cat is not an object, but a class. A class is a definition of a type, whereas an object is a particular instance of that type. To create an object from a class, use the new keyword, which allocates storage for an object and assigns the object reference to a variable, as in this statement:
Cat anastasia = new Cat();
This statement has two parts. The first part declares a variable of type Cat named anastasia. The second part creates a Cat object and stores a reference to the object in the variable named anastasia. The parentheses after Cat are required.
After creating an object, you can use member variables and methods that are exposed by the class, as shown here:
anastasia.Sleep();
Access to members is always made through the dot operator (.) (as shown in the preceding code). C++ sometimes requires the use of the -> or :: operator for member access. In C#, the -> and :: operators don’t exist—the dot operator is the only way to access the member of a type.
Objects are never created on the stack; they’re always created in an area of memory that automatically frees unused resources in a process known as garbage collection (discussed in detail in Chapter 3). When an object reference variable isn’t attached to an object, its default value is null and it can’t be used as a valid reference. C# won’t allow a variable to be used before it’s assigned a value, which eliminates many common error cases found in other programming languages. If you insist on attempting to use a null reference, as in the following code, the common language runtime will detect the null reference and generate a NullReferenceException:
Cat c = null;

// Not OK; generates a null reference exception.
c.Eat();
When using an object-oriented language, you’re encouraged to create classes that attempt to model the real world. Continuing with our animal classes example, one approach to organizing the many types of animals would be to completely describe each animal in a separate class. To represent five types of animals, you would create five classes, with each class fully describing the characteristics of each animal, as shown in Figure 2-2.
 Figure 2-2.
Figure 2-2 is a Unified Modeling Language (UML) diagram that shows five classes that model animals. UML is a common modeling tool used to describe relationships between classes. In this static class diagram, each box represents a class, and inside each is the class name and its members. As you can see, the five classes provide a simplified model of some basic animals. However, each class implements some of the same functions found in the other classes. Object-oriented design gives us a way to take advantage of the similarity between types: inheritance.
Inheritance enables you to look for similarities between classes and factor those similarities out into base classes that are shared by descendent classes. For example, all of our animal classes share the common characteristics Eat and Sleep. Even though some animals move on land and some swim, their common characteristics can be moved into a single class that each of the other classes can share, as shown in Figure 2-3.
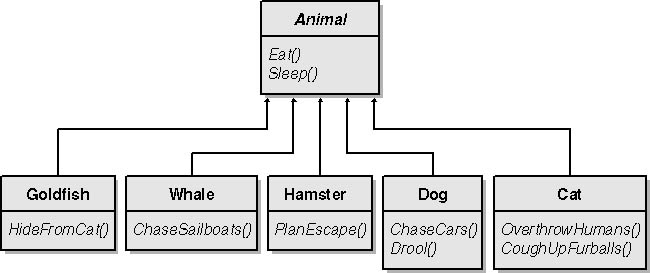 Figure 2-3.
In Figure 2-3, a new class is introduced. The Animal class contains methods that are common to all of our animals. We can further categorize these animals by dividing them into types, as shown in Figure 2-4.
 Figure 2-4.
In Figure 2-4, two new classes are introduced. The WaterAnimal and LandAnimal classes are specializations of the Animal class that include methods unique to those particular types of animals. As shown in Figure 2-4, the relationship between a base class and its subclasses is indicated with an arrow drawn from the subclass to the base class. Finally, each of the five original classes is a further specialization that implements only the methods unique to each particular animal.
Defining base classes in this way allows us to more easily introduce new animals into our set of classes. To add a Penguin class, for example, we would simply derive the new class from WaterAnimal and perhaps add a RentTuxedo method.
When you’re declaring a hierarchy of classes such as the animal classes, the base classes are often incomplete and shouldn’t be directly instantiated. Instead of directly creating an object from the Animal or WaterAnimal class, it’s more appropriate to create an instance of the Whale or Goldfish class.
In C#, base classes that aren’t to be directly instantiated are tagged with the abstract keyword, as follows:
abstract class Animal
{


}
}
Using the abstract keyword with your base classes allows the compiler to enforce proper use of your class hierarchy by preventing base classes from being directly instantiated.
If a method signature is defined in an abstract base class but not implemented in the class, it is marked as abstract, as shown here:
abstract class Horse
{
    abstract public void ChaseAfterBadGuys();
}
Abstract methods are discussed in more detail later in this chapter, in the section “Abstract Methods.”
C# also supports the opposite of the abstract class—a class that isn’t available as a base class. By declaring a class as sealed, you notify the compiler that the class must never be used as a base class, as follows:
sealed class Horse
{
}
Classes aren’t normally sealed because doing so prevents the class from being extended in the future. However, you might want to seal a class for exactly that reason—because you want only one specific class to be used, with a specific implementation, and with no subclasses permitted. This can be for reliability reasons or for commercial purposes. Another reason to seal a base class is for performance. When a sealed class is loaded, the runtime can perform optimizations for method calls to the sealed class because it knows that no virtual method calls will be required for subclasses.
C# also permits an individual method to be declared as sealed, preventing that method from being overridden in a subclass.
Like C++, C# allows you to access the current object through the this keyword. In addition, C# allows you to access the members of the immediate base class through the base keyword. The following example calls the PreDraw method of the CommandWindow class:
class MyCommandWindow: CommandWindow
{
    public void DrawShape()
    {
        base.PreDraw();
        Draw();
    }


}
The base keyword gives access to the immediate base class only. Returning to our animals example (as shown in Figure 2-4), you couldn’t use the base keyword within the Whale class to call a method from the Animal class, as shown here:
class Whale : WaterAnimal
{


    // Won't work; the following line calls a WaterAnimal
    // method rather than a method from Animal.
    base.Eat();


}
The base keyword also is available only from within the class—it can’t be called from outside the class, as shown here:
// Won't work; base is not allowed in this context.
BessieTheCow.base.GetPlansForWorldDomination();
Inheritance is a great tool for modeling real-world problems with classes, but you should take care to use inheritance only when appropriate. Inheritance is useful when modeling what are known as IS-A relationships, as in the following examples:
-
A Cow IS-A LandAnimal.
-
A Whale IS-A WaterAnimal.
-
An Airplane IS-A Vehicle.
All these cases are great prospects for inheritance. Watch out for cases in which inheritance is used to model ownership—known as HAS-A relationships—such as the ones shown here:
-
A BaseballTeam HAS-A HomeStadium.
-
A House HAS-A Foundation.
The HAS-A relationship indicates a need for a member variable instead of inheritance. These cases are not suitable for inheritance, and trying to use inheritance will likely lead to implementation difficulty.
All types in C# are ultimately derived from the object class. Of course, not all classes derive directly from object, but if you follow the inheritance hierarchy for any type, you’ll eventually come to object. In fact, deriving from object is such a fundamental aspect of programming in C# that the compiler will automatically generate the necessary code to inherit from object if you don’t specify any inheritance for your class. This means that the following two class definitions are identical:
class Cat
{


}

class Cat: object
{


}
Even the built-in types available to you as a C# programmer are derived from the object class. Because all types are based on a common base class, you can perform some useful operations on all types—unlike C++, where the built-in types missed out on some benefits of an object-oriented language. For example, in C# all types can be easily converted to string values by calling their ToString method, as shown here:
int n = 32;
string stringValue = n.ToString()
Or you can skip using the int type and just apply ToString to the value, as follows:
string stringValue = 32.ToString()
Other methods available through the object class include GetType, which returns a Type object that can be used to determine the type of an object at runtime. Still other methods deal with garbage collection, testing for equality, and cloning objects.
Most C# classes have one or more members. Members in C# classes expose functionality and maintain the state of an instance. Members fall into the following categories:
-
Fields Locations for storing data—similar to C++ member variables. Fields are described in more detail in the next section.
-
Constants Class members with values that don’t change. Constants are discussed later in this chapter, in the section “Constants.”
-
Methods Functions that perform tasks for an object or a class. Methods are described later in this chapter, in the section “Methods.”
-
Constructors Functions that are used to initialize an object when it’s first created. Constructors are described later in this chapter, in the section “Constructors.”
-
Destructors Functions that are used to clean up an object as it’s destroyed. Destructors are discussed later in this chapter, in the section “Destructors.”
-
Properties Functions that appear to be instance variables to clients, decoupling the client from the implementation details of the class, while providing the simplicity of direct public member access. Properties are discussed in Chapter 4.
-
Operators Functions that define how common expression operators will interact with objects. Operators are discussed in Chapter 4.
-
Events Used to provide notifications to clients, without the difficulties found in implementing callbacks. Events are discussed in Chapter 6.
-
Indexers Used to enable a class instance to appear to be an array to a client. Indexers are discussed in Chapter 7.
The following sections discuss the class members you’re likely to find in most C# programs. More specialized member types, such as operators and indexers, will be covered in upcoming chapters.
As mentioned, a field is a lot like a C++ member variable. A field is declared in a class by specifying its type, its name, and if necessary, its accessibility, as shown here:
public int _age;
The declaration of a field can optionally include an initial value, as follows. This value is useful when the type’s default value isn’t appropriate.
public int _answer = 42;
By default, each object has its own copy of every field. Fields modified in one object don’t affect fields of the same name in other objects. By marking a field with the static modifier, the field is shared among all instances of a class, as shown here:
static public int _objectCount;
Although a static field is shared and accessible by multiple objects, there’s no synchronization provided automatically. If multiple threads attempt to modify the field simultaneously, the results are undefined.
Because static fields are specific to a class rather than an object, they can’t be accessed through an object reference. Instead, they must be referenced through the class name, as shown here:
class Cat: Animal
{
    public static int mouseEncounters;
}

static void Main()
{
    Cat c = new Cat();
    // Not allowed; must use class name for static member.
    c.mouseEncounters = 0;
    // OK
    Cat.mouseEncounters = 0;
}
Fields can also be declared as readonly, as shown here:
public readonly int _age;
public static int _maxClasses;
Marking a field as readonly prevents any code from modifying the field after the object has been constructed. The compiler will flag any field assignment that occurs after construction as an error. A readonly field declaration can include an assignment, and it can optionally be marked as static. A readonly field can be assigned a value only when it’s first declared or within the constructor of its class. (More on constructors later in this chapter, in the section “Constructors.”)
A constant is similar to a field, but its value isn’t allowed to change from a value specified at compile time. The constant doesn’t take up space in the object; instead, it’s compiled into the executable where required. To declare a constant, use the const modifier, as follows:
public const int _maxSize = 9;
If you attempt to declare a constant member as static, the C# compiler will flag it as an error. A const member can be assigned a value only when it’s first declared. Members declared as const behave like static members because they aren’t associated with a particular object. There’s no need to define a const member as static—just define the member as const, and use it via the class name.
ClearRange(MyClass._maxSize);
Methods in C# classes contain the code executed on behalf of the class. All methods in C# exist as class members because C# doesn’t support stand-alone or global functions. Methods are always declared as part of the class declaration. Unlike C++, there’s no way to declare a C# method implementation separately from the class declaration.
Except for constructors and destructors (which we’ll look at later in this chapter, in the sections “Constructors” and “Destructors”), method declarations in C# consist of an accessibility level, a return type, a method name, and a list of zero or more formal parameters passed to the method, as shown here:
public int GetNextRecordId(string TableName)
{


}
If the accessibility level is omitted, the level is private by default.
Like fields, methods can be declared as static, and just as with fields, a static method must be called using the class name rather than using an object reference:
class Cat: Animal
{
    public static void ChaseMouse()
    {


    }
}
class CatApp
{
    static void Main()
    {
        Cat c = new Cat();
        // Not allowed; must use class name for static member.
        c.ChaseMouse();
        // OK
        Cat.ChaseMouse();
    }


}
C# doesn’t support default parameters. (A default parameter allows a default value to be defined as part of the method declaration and then inserted automatically when a client invokes a method with the parameter omitted.) This feature is disallowed due to component versioning. The default parameter is injected in the caller’s code—updating the default parameter would cause versioning issues for clients compiled against older versions of the class. Much of the benefit of default parameters can be obtained via method overloading or other design patterns.
By default, parameters are passed to a method by value, meaning that the method doesn’t have access to the actual parameter, but only a copy of the parameter’s value, as follows:
static void Main()
{
    int testValue = 12;
    Console.WriteLine("The test value is {0}", testValue);
    TrainInVain(testValue);
    Console.WriteLine("The test value is {0}", testValue);
}
public static void TrainInVain(int param)
{
    param = 42;
}
In this example, both calls to WriteLine display testValue as 12. The TrainInVain method changes the value of param, but this is only a copy of the actual parameter passed from the Main method. After TrainInVain returns to the caller, the original parameter is unchanged. When object references are passed by value, the value of the reference is passed to the method, allowing the method to have complete access to the object. However, the method can’t change the value of the object reference itself.
The ref keyword is used to pass a parameter by reference, enabling the parameter’s value to be updated by the called method, as shown here:
static void Main()
{
    int testValue = 12;
    Console.WriteLine("The test value is {0}", testValue);
    ChangeValue(ref testValue);
    Console.WriteLine("The test value is {0}", testValue);
}
public static void ChangeValue(ref int param)
{
    param = 42;
}
Here the first instance of WriteLine displays testValue as 12, but the second instance displays it as 42. The ref keyword modifies the type of the parameter and must be used by the caller as well as in the called method’s parameter list. If the caller omits the ref keyword, the compiler will flag it as an error.
The out keyword is similar to ref, except that you can’t pass a value in to a method in a parameter defined as out. Modifying a parameter with out indicates that the method will pass a value from the method back to the caller:
static void Main()
{
    int testValue;
    GetValue(out testValue);
    Console.WriteLine("The test value is {0}", testValue);
}
public static void GetValue(out int param)
{
    param = 42;
}
This output to WriteLine shows that testValue is 42. Unlike ref, the out modifier places a burden on the called method. The C# compiler will insist that a method called with an out parameter assign a value to the parameter; this is a quality assurance measure similar to the rule that variables must be assigned a value before use. Parameters marked as ref must be assigned a value by the caller.
The final modifier for parameters is used to pass a variable number of parameters to a method. The params keyword must be associated with a single-dimensional array, it must be the last entry in the parameter list, and there can be only one params modifier for each method declaration, as follows:
static void Main()
{
    PrintValues(42);
    PrintValues(1, 2, 3, 5, 7, 11, 13);
}
public static void PrintValues(params int[] aListToPrint)
{
    foreach(int val in aListToPrint)
    {
        Console.WriteLine(val);
    }
}
In this example, PrintValues is called with parameter lists of two different lengths, and the method simply walks the length of the array, printing the value for each array element. Arrays are discussed in detail in Chapter 3. The foreach expression is a simplified version of the C/C++ for expression and is discussed in Chapter 4.
C# permits method overloading, whereby multiple variations of a method are defined within a class. All versions of an overloaded method declaration have the same name, but differ in their parameter lists, as shown here:
public void Eat(CatFood food)
{


}

public void Eat(Bird theBird)
{


}

public void Eat(Bird theBird, int howMany)
{


}
When an overloaded method is called, the compiler must determine the best match for the method call. If no acceptable match is found, the compiler will flag the method call as an error.
Duck aDuck = GetDuck();

// Error; no overload of Eat accepts a duck.
theCat.Eat(aDuck);
The process of resolving exactly which overloaded method is invoked consists of the following two steps:
-
Methods are inspected to determine whether they’re potentially callable using the actual parameter list.
-
Methods are ranked according to the quality of the match for each parameter.
If one member function is ranked as the best acceptable match, that method is invoked. If there’s no acceptable method, the method call is rejected by the compiler as invalid. If more than one method is ranked equally acceptable, the method call is rejected by the compiler as ambiguous.
A constructor is a special type of method that’s called to initialize an object. Constructors always have the same names as their enclosing class and never have a return value. There are two types of constructors, as follows:
-
Instance constructors Used to initialize a specific object instance
-
Static constructors Also called class constructors; called before the first use of a class
An instance constructor is invoked as part of the creation of an object. The call to create an object with new causes the constructor to be invoked, as shown here:
class Orangutan: LandAnimal
{
    public Orangutan()
    {
        _bugCount = 100;
    }


}

static void Main()
{
    Orangutan tan;

    // Invokes constructor
    tan = new Orangutan();
}
Constructors can be overloaded just like other methods, and the process of overloading is the same as with ordinary methods—each constructor must have a different parameter list. When the object is created, parameters passed as part of the creation expression are used to determine which overloaded constructor should be called.
class Orangutan: LandAnimal
{
    public Orangutan()
    {
        _bugCount = 100;
    }

    public Orangutan(int StartingBugCount)
    {
        _bugCount = StartingBugCount;
    }

    public Orangutan(string Name)
    {
        _name = Name;
    }


}

static void Main()
{
    // Calls Orangutan()
    Orangutan tan1 = new Orangutan();

    // Calls Orangutan(int)
    Orangutan tan2 = new Orangutan(100);

    // Calls Orangutan(string)
    Orangutan tan3 = new Orangutan("Stan");
}
As part of the object construction process, the constructor in a subclass will invoke a constructor in the base class. This process can be implicit, with the call injected by the C# compiler, as shown here:
class LandAnimal
{


}

class Orangutan: LandAnimal
{
    public Orangutan()
    {
        _bugCount = 100;
    }


}
The C# compiler will inject a call to the LandAnimal base class before executing any code in the Orangutan constructor. The call can also be made explicitly using a constructor initializer.
public Orangutan(): base()
{
    _bugCount = 100;
}
An overloaded constructor doesn’t automatically search for a base class constructor that matches its parameter list; it will implicitly call the default base class constructor, which isn’t always the preferred execution path. A constructor initializer is normally used to invoke a non-default base class constructor, as shown in the following code. Using a constructor initializer is useful when a subclass and a base class share a set of overloaded constructors, especially because the constructor initializer has access to all the parameters passed to the constructor.
class Orangutan: LandAnimal
{
    // Initialize base class using the Name parameter.
    public Orangutan(string Name): base(Name)
    {
        _bugCount = 100;
    }


}
The constructor initializer doesn’t have access to the this pointer because the current object hasn’t yet been constructed. Attempting to access this or any members will be rejected by the compiler.
class Orangutan: LandAnimal
{
    // Doesn't work; _bugCount can't be referenced.
    public Orangutan(string Name): base(_bugCount)
    {
        _bugCount = 100;
    }
    protected long _bugCount;


}
Much of the code in a constructor is used to initialize member variables; this is true in many languages, including C#, C++, and Visual Basic. C# also provides the member initializer, a simple way for instance fields to be initialized before the body of the constructor is executed. Instance members are initialized in the order of declaration. To create a member initializer, simply provide an assignment expression with the member declaration, as follows:
class AnimalReport
{
    public string _name = "unknown";
    public static int _counter;


}
You can’t refer to other member fields or methods in an initializer expression. A member initializer reduces the amount of code you’re required to write and reduces the possibility of errors because all member initialization can take place in one location.
Static members can be initialized in the same way as instance members, but they’re always initialized before any of the instance members. Here’s the exact order of initialization:
-
Any static fields are initialized.
-
The static constructor is invoked.
-
Any instance fields are initialized.
-
An instance constructor is invoked.
Static constructors are similar to instance constructors, but they’re invoked automatically before an instance of the class is created, and they’re typically used to interact with static class members. Static constructors are implicitly public and have no access specifiers. A static constructor looks like a default instance constructor with an added static modifier, as shown here:
class Player
{
    static Player()
    {
        _counter = -1;
    }
    public Player(string Name)
    {
    }


}
The exact timing for the invocation of a static constructor might vary. In particular, there’s no way to ensure the ordering of static constructors in unrelated classes. Regardless of their exact order, you can be sure that static constructor invocation will occur as follows:
-
The static constructor will be invoked before the first instance of the class is created.
-
The static constructor will be invoked only once.
-
The static constructor will be invoked after the static members are initialized.
-
The static constructor will be invoked before any static members are referenced.
A destructor is an optional member function that contains the code necessary to destroy an instance of a class. In C#, destructors are declared using the familiar C++ syntax, with the destructor using the class name prefixed with a tilde (~), as shown here:
~Orangutan()
{
    StopGrooming();
}
Unlike in C++, a destructor in C# isn’t guaranteed to be called. The C# destructor isn’t called when a reference goes out of scope, as in C++; rather, it’s called later, when the object is reclaimed during garbage collection. Garbage collection is automatically handled for you, and there’s rarely a need for you to invoke it. Garbage collection is described in detail in Chapter 3, but for now, it’s important to understand that a C# destructor might be called long after the last reference has been removed, and might not be called at all. Classes that need to clean up scarce resources should release their resources by other methods. A common design pattern discussed in Chapter 3 is the implementation of a Close or Dispose method that explicitly releases resources.
Inheritance alters the way methods are declared and invoked. When a subclass derives from a base class, it might be useful for the subclass to implement or redefine methods that exist in the base class. In some cases, a subclass might want to hide a base class implementation of a method.
Abstract methods are useful when the base class can’t supply any meaningful implementation for a method. Unlike in C++, in C# an abstract method can’t have a method body. If the abstract method isn’t implemented by a subclass, the subclass can’t be instantiated directly.
To implement the abstract method, the client must clearly indicate its intention by using the override keyword, as shown in the following code. This helps avoid several error cases that might occur if base classes and subclasses are versioned or developed separately. (For an example error case, see the following section.) By forcing the subclass and base class to explicitly indicate their intentions, the chances for error are greatly reduced.
class Palomino: Horse
{
    override public void ChaseAfterBadGuys()
    {


    }
}
As mentioned, the abstract keyword allows a base class to require the implementation of a method in a derived class. A method declared as virtual in C# serves a similar purpose—allowing, but not requiring, that a subclass provide a new implementation. Here’s an example of declaring a virtual method:
class LandAnimal
{
    public virtual void Eat()
    {
        Chew();
        Swallow();
    }
}
After a method is declared as virtual in a base class, a subclass indicates its intent to override the base class version of the class by using the override keyword. The override keyword is used with virtual methods exactly as it is used with the abstract methods discussed earlier, as shown here:
class Cat: LandAnimal
{
    public override void Eat()
    {
        PlayWithFood();
        Chew();
        Swallow();
    }
}
When a virtual method is called, the most-derived version of the method is invoked. The most-derived method is determined by looking through the inheritance tree from the actual runtime class to the base classes. The first method discovered is invoked. This is usually, but not always, the desired result. Occasionally, it’s desirable to hide a base class method due to an issue widely known as the “fragile base class problem.” The following chain of events demonstrate this type of problem:
-
A base class, LandAnimal, is created and deployed.
-
A subclass, Orangutan, is created and deployed, along with other subclasses of the LandAnimal class.
-
This framework is wildly successful, so a second version is developed. In this second version, the developers responsible for LandAnimal introduce a new virtual method named Groom.
-
Unfortunately, the Orangutan class already has a method named Groom and will no longer compile because Groom isn’t declared with the override keyword.
In this example, a change to the base class has caused a maintenance problem in a subclass. The original version of Groom probably looks something like this:
class Orangutan: LandAnimal
{
    public void Groom(Orangutan other)
    {
        other.CleanFur();
        other.LookForBugs();
        other.EatBugs();
    }
}
You can solve this problem in C# by creating the Groom method in Orangutan using the new keyword. In C#, the new keyword is used to hide a virtual base class method. When a method is declared as new, the compiler is notified that this method doesn’t participate when looking for a virtual method, so if a virtual method is added to the base class, the existing code will continue to work correctly:
class Orangutan: LandAnimal
{
    new public void Groom(Orangutan other)
    {
        other.CleanFur();
        other.LookForBugs();
        other.EatBugs();
    }
}
Calls made to the Groom method through a base class reference will call the most-derived version of the Groom method that isn’t decorated with new. Calling Groom through an Orangutan reference will call the original Orangutan.Groom method.
Types and members in C# programs have a specific level of accessibility. Five levels of accessibility are available to class members, as described in Table 2-3.
|
Access Level |
Description |
|
public |
Completely open for access. |
|
protected |
Access granted to the enclosing class and subclasses. |
|
internal |
Access granted to classes in the enclosing assembly. (Assemblies are described later in this chapter, in the section “Adding References.”) |
|
protected internal |
Access granted to classes in the enclosing assembly and subclasses of the enclosing class. |
|
private |
Access granted to the enclosing class only. |
You must provide an accessibility level for each member, as in the example that follows, or the compiler will use the default level:
public class Employee
{
    // Name has public accessibility.
    public string Name;

    // EmployeeId has private accessibility.
    string EmployeeId;


}
Every type has some degree of access tuning available—if you declare nothing for that particular type, a default level of accessibility is defined for it. In some cases, the default accessibility changes depending on where the type is declared. Types that are defined at the highest level, the so-called top-level types, have public accessibility by default. Types that are defined inside of a class are given private accessibility by default, as shown here:
// Access level is public by default for top-level classes.
class MilkFactory
{
    public MilkFactory()
    {
        Console.WriteLine("Milk factory");
    }
}
class Cow
{
    // Access level is private by default for embedded classes.
    class MilkFactory
    {
        public MilkFactory()
        {
            Console.WriteLine("Cow milk factory");
        }
    }
}
The assumption is that a type defined inside a class is likely to be an implementation detail, and the most appropriate access level is likely to be private. This means that simply moving a class definition will affect its accessibility unless you take the reasonable step of prefixing all class declarations with your desired level of access.
Another option for a top-level type is to define it as internal, thus granting access only to code in the assembly that contains the class, as shown here:
// Accessible only from within the assembly
internal class Cow: ITemperamental
{


}
It just makes sense to define top-level types as either public or internal, as none of the other access levels apply. Types that are nested inside of other types often have other accessibility options.
Members of interfaces (discussed later in this chapter, in the section “Interfaces”) are always public. Because the purpose of an interface is to declare public methods, there’s no option to reduce the visibility of interface methods. Likewise, enumerated types (discussed later in this chapter, in the section “Enumerations”) provide a mechanism for naming scalar values. The members of an enumerated type are always public, and their accessibility can’t be reduced. However, an enum variable can be given any of the five accessibility levels in Table 2-3.
The default accessibility for structure members is private. This is contrary to the custom in C++, in which members are public by default. A structure member can have public, private, or internal accessibility. You can’t grant a member of a structure protected accessibility because you’re not able to inherit from a struct. The following example shows a structure with public and internal members:
struct Sailboat
{
    // Completely visible to all clients
    public int Length;

    // Visible only within the assembly
    internal int Beam;

    // Only visible within struct
    private string _secretName;
}
The default accessibility for class members is private. Class members can be given any of the five accessibility levels in Table 2-3. In object-oriented programming, it’s considered good practice to hide the implementation details of your class from clients, which can be achieved by using any of the accessibility options except public.
The accessibility options granted to a member of a class or structure aren’t absolute because they’re also dependent on the accessibility of the enclosing type. For example, if a field that refers to a class is declared as protected, the accessibility of its members is always protected or lower, even if the class has public members, as shown here:
    class Horse
    {
        public void ChaseAfterBadGuys()
        {


        }
    }
    class Cowboy
    {
        protected Horse _myHorse;
        public Cowboy()
        {
            _myHorse = new Horse();
        }
    }
    public class CowboyApp
    {
        static void Main(string[] args)
        {
            Cowboy cowboyBill = new Cowboy();

            // Won't compile; _myHorse is not accessible.
            cowboyBill._myHorse.ChaseAfterBadGuys();
        }
    }
In this example, methods for the Horse class aren’t accessible through the Cowboy class, even though the methods are given public accessibility. Because the _myHorse member variable has protected accessibility, none of the Horse members can have more open access.
The C# language doesn’t include the oft-misused friend keyword from C++. The protection levels in Table 2-3 expand on the protection levels offered in C++. C# enables you to specify that protected or private members of a class should be visible within an assembly, by declaring them as internal. This is a useful feature that allows a component developer to expose members internally within a component without granting access to users of the component.


