Lesson 4: Configuring and Troubleshooting the Desktop Environment
Lesson 4:?Configuring and Troubleshooting the Desktop Environment
Windows XP Professional provides great flexibility in configuring the desktop. You can configure your computer for multiple languages and multiple locations. This is especially important for international companies that deal with customers in more than one country or users who live in a country where more than one language is spoken. Windows XP Professional also provides accessibility options that allow you to make the operating system easier to use. All of the desktop settings available through the Control Panel are as easy to configure as those discussed in detail.
After this lesson, you will be able to
- Configure and troubleshoot multiple languages
- Configure and troubleshoot accessibility options
Estimated lesson time: 40 minutes
Configuring Multiple Languages and Multiple Locations
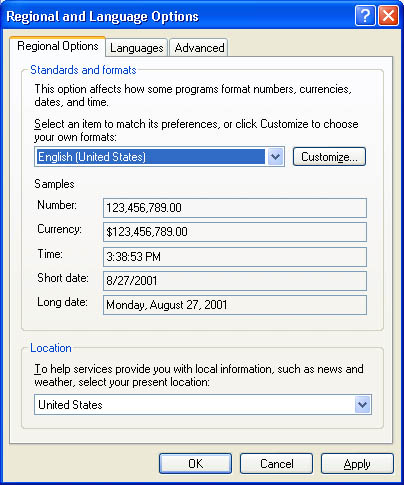
To configure multiple languages and multiple locations, in Control Panel, click Date, Time, Language, and Regional Options. To configure multiple languages, in the Date, Time, Language, And Regional Options window, you can click Add Other Languages or Regional And Language Options. Both selections open the Regional And Language Options dialog box (see Figure 10.19).
The Regional Options tab allows you to configure standards and formats for each language. For example, you can configure the format for displaying numbers, currency, the time, and dates. If you have configured multiple locations, you can also choose your preferred location. In contrast to Microsoft Windows 2000 Professional, Windows XP Professional adds support for the following locales: Galician, Gujarati, Kannada, Kyrgyz, Mongolian (Cyrillic), Punjabi, Divehi, Syriac, and Telugu.
To configure multiple languages in the Languages tab of the Regional And Languages Options dialog box, click Details. Windows XP Professional displays the Text Services And Input Languages dialog box. There are two check boxes available in the Text Services And Input Languages dialog box. The first is Install Files For Complex Script And Right-To-Left Languages. These files are required for Arabic, Armenian, Georgian, Hebrew, Indic, Thai, and Vietnamese languages. The second is Install Files For East Asian Languages. These files are required for Chinese, Japanese, and Korean languages. In the Text Services dialog box, click Add to access the Add Input Language dialog box (see Figure 10.20).


To configure additional languages, scroll through the list of languages and select the one you want to add. If you added at least one language to the one already installed on your computer, your computer is now supporting multiple languages.
If there are any problems with the way your multiple languages or locales are working, you might want to double-check your settings. You can also try uninstalling the multiple language support or multiple locale support. Make sure that everything is working correctly with only one language or locale, and then reconfigure and reinstall the multiple language or multiple locale support.

Practice:?Using Control Panel to Configure Multiple Languages
In this practice, you use the Regional And Language Options icon in Control Panel to configure multiple languages and multiple locations.
Run the MultiLanguages file in the Demos folder on the CD-ROM accompanying this book for a demonstration of configuring multiple languages.

To configure multiple languages
- Ensure that you are logged on as Fred or with a user account that is a member of the Administrators group.
- In Control Panel, click the Date, Time, Language, And Regional Options icon.
- Click Regional And Language Options.
Windows XP Professional displays the Regional And Language Options dialog box with the Regional Options tab active.
- Click the Languages tab.
- In the Text Services And Input Languages box, click Details.
Windows XP Professional displays the Text Services And Input Languages dialog box.
- In the Installed Services box, click Add.
Windows XP Professional displays the Add Input Language dialog box.
- Click the down-pointing arrow at the end of the Input Languages box to scroll through the listed languages, and select French (France).
The French Keyboard Layout/IME is selected automatically.
- Click OK to close the Add Input Language dialog box.
Windows XP Professional displays the Text Services And Input Languages dialog box. Notice that there are now two Installed Services.
- Click OK to close the Text Services And Input Languages dialog box.
- Click OK to close the Regional And Language Options dialog box.
- Close all open programs.
Configuring and Troubleshooting Accessibility Options
Windows XP Professional provides the ability to configure accessibility options through the Accessibility Options icon in Control Panel.
Configuring Keyboard Options
To configure keyboard options, in Control Panel, click Accessibility Options. In the Accessibility Options window, click Accessibility Options to display the Accessibility Options dialog box. The Keyboard tab of the Accessibility Options dialog box, shown in Figure 10.21, allows you to configure the keyboard options StickyKeys, FilterKeys, and ToggleKeys.

StickyKeys
Turning on StickyKeys allows you to press a multiple key combination, like Ctrl+Alt+Delete, one key at a time. This is useful for people who have difficulty pushing more than one key at a time. This is a check box selection, so it is either on or off. You can configure StickyKeys by clicking Settings to activate the Settings For StickyKeys dialog box (see Figure 10.22).

You can configure a shortcut key for StickyKeys. You can use the default shortcut key, pressing Shift five times, to turn on StickyKeys. This option is activated by default.
Two other options can also be configured for StickyKeys: Press Modifier Key Twice To Lock and Turn StickyKeys Off If Two Keys Are Pressed At Once. The modifier keys are Ctrl, Alt, Shift, and the Windows Logo key. If you select the modifier key option, pressing one of the modifier keys twice will cause that key to remain active until you press it again. This is useful for people who have difficulty pressing key combinations. If you choose to use the second option, StickyKeys is disabled if two keys are pressed simultaneously.
Two Notification settings can be configured for StickyKeys: Make Sounds When Modifier Key Is Pressed and Show StickyKeys Status On Screen. The first notification setting causes a sound to be made when any of the modifier keys-Ctrl, Alt, Shift, or the Windows Logo key-is pressed. The second notification setting causes a StickyKeys icon to be displayed in the taskbar when StickyKeys is turned on.
FilterKeys
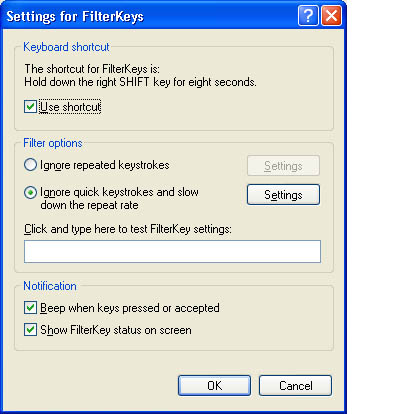
The Keyboard tab also allows you to configure FilterKeys. Turning on FilterKeys causes the keyboard to ignore brief or repeated keystrokes. This option also allows you to configure the keyboard repeat rate, which is the rate at which a key continuously held down repeats the keystroke. This is a check box selection, so it is either on or off. You can configure FilterKeys by clicking Settings to activate the Settings For FilterKeys dialog box (see Figure 10.23).

You can configure a shortcut key for FilterKeys. You can use the default shortcut key, holding down the Right Shift key for eight seconds, to turn on FilterKeys. This setting is activated by default.
Two other Filter options can also be configured for FilterKeys: Ignore Repeated Keystrokes and Ignore Quick Keystrokes And Slow Down The Repeat Rate. Ignore Repeated Keystrokes is inactive by default, and Ignore Quick Keystrokes And Slow Down The Repeat Rate is active by default. Only one of these two filter options can be active at a time. Configure each of them by clicking Settings.
Two Notification settings can be configured for FilterKeys: Beep When Keys Pressed Or Accepted and Show FilterKey Status On Screen. The first notification setting causes a beep when you press a key and another beep when the keystroke is accepted. The second notification option causes a FilterKeys icon to be displayed in the taskbar when FilterKeys is turned on. These settings are check boxes, so one of the settings, both of the settings (the default), or neither of the settings can be selected.
ToggleKeys
You can also configure ToggleKeys in the Keyboard tab. Turning on ToggleKeys causes the computer to make a high-pitched sound each time the Caps Lock, Num Lock, or Scroll Lock keys are switched on. Turning on ToggleKeys also causes the computer to make a low-pitched sound each time these three keys are turned off.
You can configure a shortcut key for ToggleKeys by clicking Settings. You can use the shortcut key, holding down Num Lock for five seconds, to turn on ToggleKeys. This setting is activated by default.
Configuring Sound Options
The Sound tab provides the Use Sound Sentry check box, which allows you to configure Windows XP Professional to generate visual warnings when your computer makes a sound. The Sound tab also provides the Use ShowSounds check box, which allows you to configure Windows XP Professional programs to display captions for the speech and sounds they make.
Configuring Display Options
The Display tab of the Accessibility Options dialog box provides a High Contrast check box, which allows you to configure Windows XP Professional to use color and fonts designed for easy reading. You can click Settings to turn off or on the use of a shortcut, Left Alt+Left Shift+Print Screen, which is enabled by default. Clicking Settings also allows you to select the high-contrast appearance scheme that you want to use. The Display tab also provides cursor options that allow you to set the blink rate and the width of the cursor.
Configuring Mouse Options
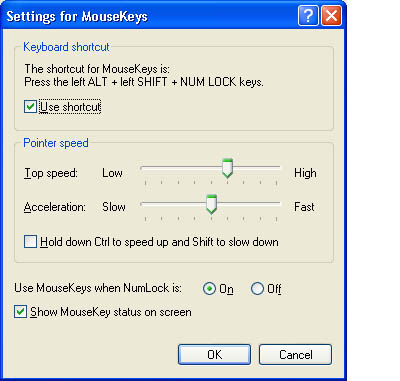
The Mouse tab provides the Use MouseKeys check box, which allows you to configure Windows XP Professional to control the pointer with the numeric keypad on your keyboard. You can click Settings to configure MouseKeys in the Settings For MouseKeys dialog box (see Figure 10.24).

MouseKeys uses a shortcut, Left Alt+Left Shift+Num Lock, which is enabled by default. You can also configure the pointer speed and acceleration speed. There is even a check box, Hold Down Ctrl To Speed Up And Shift To Slow Down, that allows you to temporarily speed up or slow down the mouse pointer speed when you are using MouseKeys. To speed up the mouse pointer movement, hold down Ctrl while you press the numeric keypad directional keys. To slow down the mouse pointer movement, hold down Shift while you press the numeric keypad directional keys.
Configuring General Tab Options
The General tab (see Figure 10.25) allows you to configure Automatic Reset. This feature turns off all the accessibility features, except the SerialKeys devices, after the computer has been idle for a specified amount of time.

The General tab includes the Notification feature, which allows you to configure Windows XP Professional to give a warning message when a feature is activated and to make a sound when turning a feature on or off.
The General tab also allows you to activate the SerialKeys Devices feature, which configures Windows XP Professional to support an alternative input device (also called an augmentative communication device) to your computer's serial port.
The Administrative Options feature provides two check boxes, Apply All Settings To Logon Desktop and Apply All Settings To Defaults For New Users, that allow you to configure Windows XP Professional to apply all configured accessibility options to this user at logon and to apply all configured accessibility options to all new users.

Lesson Review
The following questions will help you determine whether you have learned enough to move on to the next lesson. If you have difficulty answering these questions, review the material in this lesson before beginning the next lesson. The answers are in Appendix A, "Questions and Answers."
- How can you configure Windows XP Professional to use multiple languages?
- Turning on ________________________ allows you to press a multiple key combination, like Ctrl+Alt+Delete, one key at a time. (Choose all answers that are correct.)
- FilterKeys
- StickyKeys
- ToggleKeys
- MultiKeys
- Turning on ________________________ causes the keyboard to ignore brief or repeated keystrokes. This option also allows you to configure the keyboard repeat rate, which is the rate at which a key continuously held down repeats the keystroke.
- When using MouseKeys, to speed up the mouse pointer movement, hold down the ________ key while you press the numeric keypad directional keys. To slow down the mouse pointer movement, hold down the ________ key while you press the numeric keypad directional keys.
- The ______________ tab in the Accessibility Options dialog box includes the Notification feature, which allows you to configure Windows XP Professional to give a warning message when a feature is activated and to make a sound when turning a feature on or off.
Lesson Summary
- In Control Panel, click Date, Time, Language, And Regional Options to configure Windows XP Professional for multiple languages and multiple locales.
- StickyKeys allows you to press a multiple key combination, like Ctrl+Alt+Delete, one key at a time.
- FilterKeys causes the keyboard to ignore brief or repeated keystrokes.
- ToggleKeys causes the computer to make a high-pitched sound each time the Caps Lock, Num Lock, or Scroll Lock keys are switched on.
- SoundSentry causes Windows XP Professional to generate visual warnings when your computer makes a sound.
- ShowSounds causes Windows XP Professional programs to display captions for the speech and sounds they make.
- The Display tab of the Accessibility Options dialog box provides a High Contrast check box that allows you to configure Windows XP Professional to use color and fonts designed for easy reading.
- MouseKeys allows you to configure Windows XP Professional to control the pointer with the numeric keypad on your keyboard.


