Lesson 3: Installing Windows XP Professional over the Network
Lesson 3:?Installing Windows XP Professional over the Network
You can install Windows XP Professional over the network. This lesson discusses the similarities and differences between installing from a CD-ROM and installing over the network. The major difference is the location of the source files needed for installation. This lesson also lists the requirements for an over-the-network installation.
After this lesson, you will be able to
- Complete a network installation of Windows XP Professional
Estimated lesson time: 30 minutes
Preparing for a Network Installation
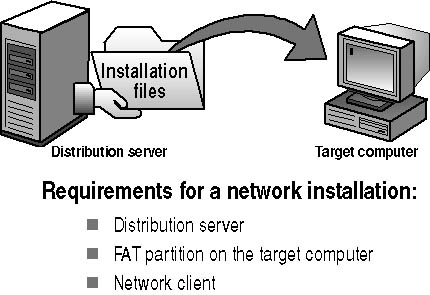
In a network installation, the Windows XP Professional installation files are located in a shared location on a network file server, which is called a distribution server. From the computer on which you want to install Windows XP Professional (the target computer), you connect to the distribution server and then run the Setup program.
Figure 2.6 shows the requirements for a network installation.
Installing Windows XP Professional requires you to do the following:
- Locate a distribution server. The distribution server contains the installation files from the I386 folder on the Windows XP Professional CD-ROM. These files reside in a common network location in a shared folder that allows computers on the network to access the installation files. Contact a network administrator to obtain the path to the installation files on the distribution server.After you have created or located a distribution server, you can use the over-the-network installation method to concurrently install Windows XP Professional on multiple computers.
- Create a FAT partition on the target computer. The target computer requires a formatted partition to which to copy the installation files. Create a partition containing at least 1.5 GB of disk space or more and format it with the FAT file system.
- Install a network client. A network client is software that allows the target computer to connect to the distribution server. On a computer without an operating system, you must boot from a client disk that includes a network client that enables the target computer to connect to the distribution server.
Installing over the Network
The Setup program copies the installation files to the target computer and creates the Setup boot disks. After Setup copies the installation files, you start the installation on the target computer by booting from the Setup boot disks. From this point, you install Windows XP Professional as you would from a CD-ROM.
Figure 2.7 shows the process for installing Windows XP Professional over the network.

Installing Windows XP Professional over the network involves the following steps:
- Boot the network client.
On the target computer, boot from a floppy disk that includes a network client or start another operating system that can be used to connect to the distribution server.
- Connect to the distribution server.
After you start the network client on the target computer, connect to the shared folder on the distribution server that contains the Windows XP Professional installation files.
- Run WINNT.EXE or WINNT32.EXE to start the Setup program.
WINNT.EXE and WINNT32.EXE reside in the shared folder on the distribution server.
- Use WINNT.EXE for an installation using MS-DOS or Windows 3.0 or later versions on the source system.
- Use WINNT32.EXE for an installation using Microsoft Windows 95, Windows 98, Microsoft Windows Me, Windows NT 4, or Windows 2000 Professional.
Running WINNT.EXE or WINNT32.EXE from the shared folder does the following:
- Creates the $Win_nt$.~ls temporary folder on the target computer
- Copies the Windows XP Professional installation files from the shared folder on the distribution server to the $Win_nt$.~ls folder on the target computer
- Install Windows XP Professional.
Setup restarts the local computer and begins installing Windows XP Professional.
Modifying the Setup Process Using WINNT.EXE
You can modify an over-the-network installation by changing how WINNT.EXE runs Setup. Table 2.3 lists the switches you can use with WINNT.EXE and describes their functions.
Table 2.3 WINNT.EXE Switches
Modifying the Setup Process Using WINNT32.EXE
You can modify an over-the-network installation by changing how WINNT32.EXE runs Setup. Table 2.4 lists the switches you can use with WINNT32.EXE and describes their functions.
Table 2.4 WINNT32.EXE Switches

Lesson Review
The following questions will help you determine whether you have learned enough to move on to the next lesson. If you have difficulty answering these questions, review the material in this lesson before beginning the next lesson. The answers are in Appendix A, "Questions and Answers."
- On which of the following operating systems running on the client computer do you use WINNT32.EXE to install Windows XP Professional? (Choose all that apply.)
- Windows 3.0 or later
- Windows 95
- Windows 98
- Windows NT 4
- On which of the following operating systems running on the client computer do you use WINNT.EXE to install Windows XP Professional? (Choose all that apply.)
- Windows 3.0 or later
- Windows 95
- Windows Me
- Windows NT 4
- What Windows XP Professional command allows you to verify that your computer is compatible with Windows XP Professional before you begin installing it?
- You use the ____________________________ switch with WINNT32.EXE to prevent Setup from restarting the computer after completing the file-copy phase.
- You use the ____________________________ switch with WINNT32.EXE to tell Setup to copy all installation source files to your local hard disk.
Lesson Summary
- When you install Windows XP Professional, the main difference between an over-the-network installation and an installation from CD-ROM is the location of the source files.
- After you connect to the shared folder containing the source files and start WINNT.EXE or WINNT32.EXE, the installation proceeds as an installation from CD-ROM.
- Several switches for WINNT.EXE and WINNT32.EXE allow you to modify the installation process.
- The /checkupgradeonly switch specifies that WINNT32.EXE should check your computer only for upgrade compatibility with Windows XP Professional.


