Lesson 2: Setting Up Network Printers
Lesson 2:?Setting Up Network Printers
Setting up and sharing a network printer makes it possible for multiple users to utilize it. You can set up a local printer that is connected directly to the print server, or you can set up a network interface printer that is connected to the print server over the network. In larger organizations, most printers are network interface printers.
After this lesson, you will be able to
- Identify the requirements for setting up a network printer and network printing resources
- Add and share a new local or network interface printer
- Describe how to add a new printer port
- Set up client computers
Estimated lesson time: 30 minutes
Adding and Sharing a Local Printer
The steps for adding a local printer or a network interface printer are similar. You would use the following steps to add a local printer:
- Log on as Administrator or with a user account that is a member of the Administrators group on the print server.
- Click Start, click Control Panel, and then click Printers And Other Hardware.
- Under Pick A Task, click Add A Printer to launch the Add Printer Wizard.
The Add Printer Wizard starts with the Welcome To The Add Printer Wizard page displayed.
If you have a Plug and Play printer that connects through a USB port, an IEEE 1394 interface, or any other port that allows you to attach or remove devices without having to shut down and restart your computer, you do not need to use the Add Printer Wizard. Plug the printer's cable into your computer or point the printer toward your computer's infrared port and turn on the printer. Windows automatically installs the printer for you. - Click Next.
The Add Printer Wizard displays the Local Or Network Printer page (see Figure 6.2).
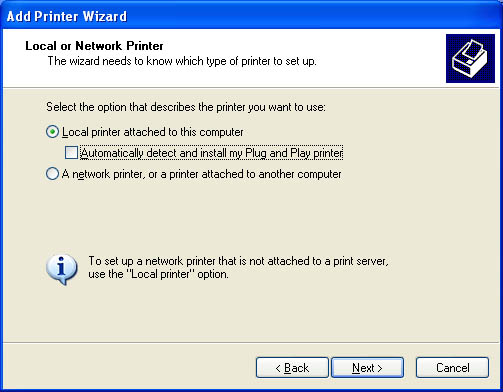 Figure 6.2??Local Or Network Printer page of the Add Printer Wizard
The Add Printer Wizard guides you through the steps to add a printer that is connected to the print server. The number of local printers that you can connect to a print server through physical ports depends on your hardware configuration.
Table 6.2 describes the Add Printer Wizard pages and options for adding a local printer.
Table 6.2??Add Printer Wizard Pages and Options for a Local Printer
Adding and Sharing a Network Interface Printer
In larger companies, most printers are network interface printers. These printers offer several advantages. First, you do not need to locate printers with the print server. In addition, network connections transfer data more quickly than printer cable connections.
To add a network interface printer, select Local Printer Attached To This Computer on the Local Or Network Printer page of the Add Printer Wizard. The main difference between adding a local printer and adding a network interface printer is that for a typical network interface printer, you provide additional port and network protocol information.
The default network protocol for Windows XP Professional is Transmission Control Protocol/Internet Protocol (TCP/IP), which many network interface printers use. For TCP/IP, you provide additional port information in the Add Standard TCP/IP Printer Port Wizard.
Figure 6.3 shows the Select A Printer Port page of the Add Printer Wizard, and Table 6.3 describes the options on this page that pertain to adding a network interface printer.
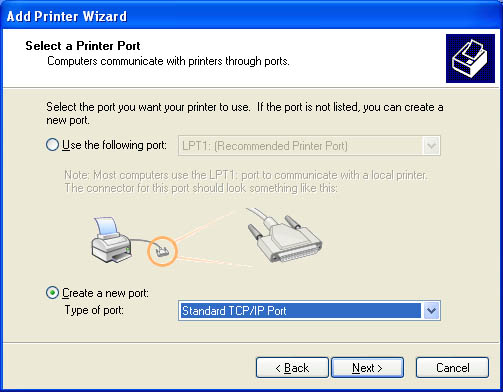
Table 6.3??Options on the Select A Printer Port Page That Affect Adding a Network Interface Print Device
| Option | Description |
|---|---|
Create A New Port |
This selection starts the process of creating a new port for the print server to which the network interface print device is connected. In this case, the new port points to the network connection of the print device. |
Type Of Port |
This selection determines the network protocol to use for the connection. If you select Standard TCP/IP it starts the Add Standard TCP/IP Printer Port Wizard. |
Figure 6.4 shows the Add Port page of the Add Standard TCP/IP Printer Port Wizard, and Table 6.4 describes the options on this page.
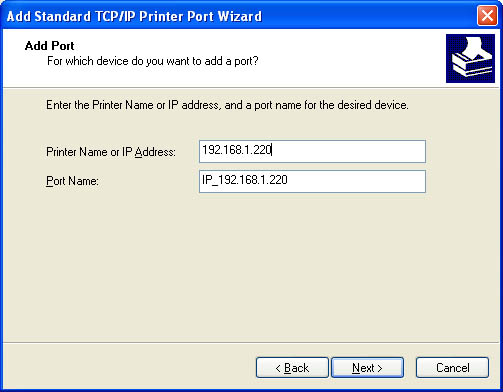
Table 6.4??Options on the Add Port Page That Affect Adding a Network Interface Printer
| Option | Description |
|---|---|
Printer Name Or IP Address |
The network location of the printer. You must enter either the IP address or a Domain Name System (DNS) name of the network interface printer. If you provide an IP address, Windows XP Professional automatically supplies a suggested port name for the print device in the form IP_Ipaddress. If Windows XP Professional cannot connect to and identify the network interface printer, you must supply additional information about the type of printer. To enable automatic identification, make sure that the printer is powered on and connected to the network. |
Port Name |
The name that Windows XP Professional assigns to the port that you created and defined. You can enter a different name. After you create the port, Windows XP Professional displays it on the Select A Printer Port page of the Add Printer Wizard. |
Adding an LPR Port
The line printer remote (LPR) port is designed for computers that need to communicate with UNIX or VAX host computers in accordance with Request for Comments (RFC) 1179. For computers that need to submit print jobs to host computers, the standard TCP/IP port should be used in most cases. A network-connected printer must have a card that supports the line printer daemon (LPD) for TCP/IP printing to work properly.
If you want to add an LPR port, you must first install the optional networking component, Print Services for UNIX.
To install Print Services for UNIX complete the following steps:
- Click Start, click Control Panel, and click Network And Internet Connections.
- Click Network Connections.
- On the Advanced menu, click Optional Networking Components.
- In the Components list, click Other Network File And Print Services, and then click Details.
Windows XP Professional displays the Other Network File And Print Services dialog box.
- Select Print Services For UNIX, and then click OK.
- Click Next to close the Other Network File And Print Services dialog box.
- When the installation completes, close the Network Connections dialog box.
To add an LPR port complete the following steps:
- Click Start, click Control Panel, and click Printers And Other Hardware.
- Click Printers And Faxes.
- Click Add A Printer.
Windows XP Professional starts the Add Printer Wizard.
- Click Next.
The Add Printer Wizard displays the Local Or Network Printer page.
- Ensure that Local Printer is selected and Automatically Detect And Install My Plug And Play Printer is cleared.
- Click Next.
The Select A Printer Port page appears.
- Click Create A New Port, and on the Type Of Port drop-down list, select LPR Port.If LPR Port is not available, make sure the optional networking component, Print Services for UNIX is installed. Click Cancel to exit the Add Printer Wizard.
- Click Next.
- In the Name Or Address Of Server Providing LPD text box, type the DNS name or Internet Protocol (IP) address of the host of the printer you are adding.The host can be the direct-connect TCP/IP printing device or the UNIX computer to which the printer is connected. The DNS name can be the name specified for the host in the HOSTS file. LPD is a service on the print server that receives documents (print jobs) from the LPR utilities running on client systems.
- Follow the directions on the screen to complete the installation of the TCP/IP printer.
You add and share a printer by using the Add Printer Wizard in the Printers folder.
Setting Up Client Computers
After you add and share a printer, you need to set up client computers so that users can print. Although the tasks to set up client computers vary depending on which operating systems are running on the client computers, all client computers require installation of a printer driver. The following points summarize the installation of printer drivers according to the computer's operating system:
- Windows XP Professional automatically downloads the printer drivers for client computers running Windows 2000, Windows NT versions 4 and earlier, Windows 95, or Windows 98.
- Client computers running other Microsoft operating systems require installation of printer drivers.
- Client computers running non-Microsoft operating systems require installation of both printer drivers and the print service on the print server.
Client Computers Running Windows 2000, Windows NT, Windows Me, Windows 95, or Windows 98
Users of client computers running Windows XP Professional, Windows XP Home Edition, Windows 2000, Windows NT, Windows Me, Windows 98, and Windows 95 only need to connect to the shared printer. The client computer automatically downloads the appropriate printer driver, as long as there is a copy of it on the print server.
If your client computer is running Windows XP Professional and you want to connect to the shared printer, start the Add Printer Wizard on the client computer. On the Local Or Network Printer page (see Figure 6.2), select A Network Printer, Or A Printer Attached To Another Computer, and then click Next. The Specify A Printer page appears, as shown in Figure 6.5.
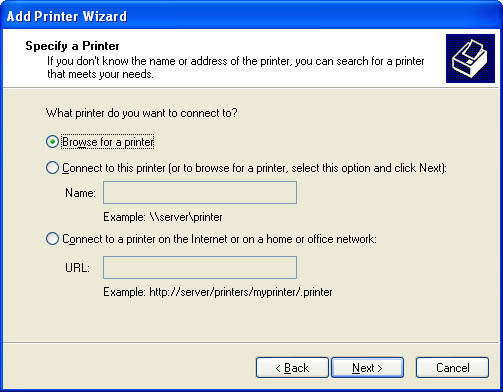
If you are not sure what the name of the shared printer is, you can browse for it by selecting the Browse For A Printer option, and then clicking Next. After you have located the shared printer and selected it, click Next. You are then asked if it should be the default printer. If you want it to be the default printer, click Yes; otherwise select No and then click Next. The Completing The Add Printer Wizard page appears. Check over the information and then click Finish. You have successfully made a connection from your client computer to the shared printer.
Client Computers Running Other Microsoft Operating Systems
To enable client computers running other Microsoft operating systems (such as Windows 3.1 or MS-DOS) to print to a shared Windows XP Professional-based printer, you must manually install a printer driver on the client computer. You can get the appropriate printer driver for a Windows-based client computer from the installation disks for that client computer or from the printer manufacturer.
Client Computers Running Non-Microsoft Operating Systems
To enable users of client computers running non-Microsoft operating systems to print, the print server must have additional services installed on it. Table 6.5 lists services that are required for Macintosh and UNIX client computers or computers running a NetWare client.
Table 6.5??Services Required for Client Computers Running Non-Microsoft Operating Systems

Practice:?Installing a Network Printer
In this practice, you use the Add Printer Wizard to install and share a local printer. Sharing the printer makes it available to other users on the network. You also take the printer offline and then print a document, which loads the document into the print queue.
Before you can share a printer or a folder on a computer running Windows XP Professional in a workgroup environment, you must run the Network Setup Wizard.
Run the NetworkSetupWizard and NetworkPrinter files in the Demos folder on the CD-ROM accompanying this book for a demonstration of using the Network Setup Wizard and the Add Printer Wizard.

Exercise 1: Running the Network Setup Wizard
In this exercise you set up the network for your Windows XP Professional workgroup by running the Network Setup Wizard.
To run the Network Setup Wizard
- Log on as Fred or with a user account that is a member of the Administrators group.
- Click Start, and then click Control Panel.
- In Control Panel, click Network And Internet Connections.
- Click Network Connections.
- Under Network Tasks, click Set Up A Home Or Small Office Network.
Windows XP Professional displays the Welcome To The Network Setup Wizard page.
- Click Next to continue.
Network Setup Wizard displays the Before You Continue page with the following steps that you should complete before running the wizard:
- Install the network cards, modems, and cables.
- Turn on all computers, printers, and external modems.
- Connect to the Internet.
- Ensure that you have completed the appropriate steps, and then click Next.
The Network Setup Wizard displays the Select A Connection Method page with the following options:
- This Computer Connects Directly To The Internet
- This Computer Connects To The Internet Through Another Computer On My Network Or Through A Residential Gateway
- Other
- Select the appropriate option and then click Next.
The Network Setup Wizard displays the Give This Computer A Description And Name page.
- Enter a description. Ensure the computer name is already filled in and then click Next.
The Network Setup Wizard displays the Name Your Network page.
- Enter an appropriate name, and then click Next.
The Network Setup Wizard displays the Ready To Apply Network Settings page.
- Review the settings and then click Next to have the Network Setup Wizard set up your network.
Setting up your network takes a few minutes and should not be interrupted.
The Network Setup Wizard displays the You're Almost Done page with the following four options:
- Create A Network Setup Disk
- Use The Network Setup Disk I Already Have
- Use My Windows XP CD
- Just Finish The Wizard; I Don't Need To Run The Wizard On Other Computers
- Ensure the default option, Create A Network Setup Disk, is selected and then click Next.If you do not have a floppy disk, select Use My Windows XP CD, click Next, and follow the directions on the screen to complete the wizard. Go to Exercise 2.
If you have more than one drive that can be used, The Network Setup Wizard displays the Select A Disk Drive page listing the drives you can use. This list of drives includes floppy drives and Zip drives.
- Select the appropriate disk drive and then click Next.
The Network Setup Wizard displays the Insert The Disk You Want To Use page.
- Insert the disk you want to use to create a Network Setup Disk into the appropriate disk drive.
- Click Format Disk.
The Network Setup Wizard displays a Format dialog box, allowing you to configure how the format will be performed.
- Ensure the appropriate options are selected and then click Start.
The Format dialog box displays a warning message box indicating that formatting the disk will erase all information currently on the disk.
- Click OK to continue.
The Format dialog box formats the disk. This could take a few minutes.
When the formatting is complete, the Format dialog box displays a Format Complete message box.
- Click OK to close the Format Complete message box.
- Click Close to close the Format dialog box.
- In the Insert The Disk You Want To Use page, click Next to continue.
The Network Setup Wizard displays a Copying message box.
When the Network Setup Disk is completed, The Network Setup Wizard displays the To Run The Wizard With The Network Setup Disk page. This page tells you that you need to insert the Network Setup Disk in each computer on your network and run NETSETUP, located on the Network Setup Disk, on each computer in your network.
- Click Next to continue.
- Review the information on the page and then click Finish.
Windows XP Professional displays a System Settings Change message box indicating that you must restart your computer for the changes to take effect.
- Remove your Network Setup Disk and then click Yes to restart your computer.
Exercise 2: Adding and Sharing a Printer
In this exercise, you use the Add Printer Wizard to add a local printer to your computer and share it.
To add a local printer
- Log on as Administrator or with a user account that is a member of the Administrators group on the print server.
- Click Start, click Control Panel, and then click Printers And Other Hardware.
- Click Add A Printer to launch the Add Printer Wizard.
Windows XP Professional starts the Add Printer Wizard.
- Click Next in the Welcome To The Add Printer Wizard page to continue.
The Add Printer Wizard displays the Local Or Network Printer page.
The Add Printer Wizard prompts you for the location of the printer. Because you are adding a printer on the computer at which you are sitting, this printer is referred to as a local printer.
- Click Local Printer.
- Ensure that the Automatically Detect And Install My Plug And Play Printer check box is cleared, and then click Next.
The Add Printer Wizard then displays the Select A Printer Port page. Which port types are available depends on the installed network protocols. For this exercise, assume that the print device that you are adding is directly attached to your computer using the LPT1 port.
If the print device is connected to a port that is not listed, click Create A New Port, and then enter the port type. - Scroll through the Use The Following Port drop-down list box and review the selection of ports.You can select File to print to a file instead of a printer.
- Verify that Use The Following Port is selected, and that LPT1 (Recommended Printer Port) is selected.
- Click Next.
The Add Printer Wizard prompts you for the printer manufacturer and model. You will add an HP Color LaserJet 4550 PS printer.
The list of printers is sorted in alphabetical order. If you cannot find a printer name, make sure that you are looking in the correct location. - Under Manufacturer, select HP. Then, under Printers, select HP Color LaserJet 4550 PS.The selected driver is digitally signed to ensure reliability and to protect your system. Driver signing is covered in Chapter 11, "Implementing, Managing, and Troubleshooting Hardware Devices and Drivers."
- Click Next.
The Add Printer Wizard displays the Name Your Printer page. In the Printer Name list box, Windows XP Professional automatically defaults to the printer name HP Color LaserJet 4550 PS. For this exercise, do not change this name.
- If other printers are already installed, the wizard also asks whether you want to make this the default printer. If the Add Printer Wizard displays the Do You Want To Use This Printer As The Default Printer message, click Yes.
- To accept the default printer name, click Next.
The Printer Sharing page appears, prompting you for printer sharing information.
To share a printer
- In the Add Printer Wizard, on the Printer Sharing page, select Share Name.
You can assign a shared printer name, even though you already supplied a printer name. The shared printer name is used to identify a printer on the network and must conform to a naming convention. This shared name is different from the printer name that you entered previously. The printer name is a description that appears with the printer's icon in the Printers And Faxes folder and in Active Directory.
- In the Share Name box, type Printer1 and then click Next.
The Add Printer Wizard displays the Location And Comment page.
If your computer running Windows XP Professional is part of a domain, Windows 2000 displays the values that you enter for Location and Comment when a user searches Active Directory for a printer. Entering this information is optional, but it can help users locate the printer more easily. - In the Location text box type second floor west and in the Comment text box type mail room - room 2624.
- Click Next.
The Add Printer Wizard displays the Print Test Page page.
You can print a test page to confirm that your printer is set up properly. In this exercise you do not need to have a printer, so you will not print a test page. When you are actually setting up a printer, you should print a test page to confirm that it is working properly.
- Under Do You Want To Print A Test Page, ensure that No is selected and click Next.
The Add Printer Wizard displays the Completing The Add Printer Wizard page and provides a summary of your installation choices.
As you review the summary, you might notice an error in the information you entered. To modify these settings, click Back. - Confirm the summary of your installation choices, and then click Finish.
If necessary, Windows XP Professional displays the Files Needed dialog box, prompting you for the location of the Windows XP Professional distribution files.
- If necessary, insert the Windows XP Professional CD-ROM and wait for about 10 seconds.
- If Windows displays the Windows XP CD-ROM window, close it.
- If prompted to insert the Windows XP Professional CD-ROM, click OK to close the Insert Disk dialog box.
If necessary, Windows XP Professional copies the printer files.
- In the Printers And Other Hardware window, click Printers And Faxes.
Windows XP Professional created an icon for the shared HP Color LaserJet 4550 PS printer. Notice that Windows XP Professional displays an open hand on the printer icon, indicating that the printer is shared. The check mark just above the printer indicates that printer as the default printer.
Exercise 3: Taking a Printer Offline and Printing a Test Document
In this exercise, you take the printer that you created offline. Taking a printer offline causes documents that you send to this printer to be held on the computer while the print device is not available. This eliminates error messages about unavailable printers in later exercises. Windows XP Professional displays such error messages when it attempts to send documents to a printer that is not connected to the computer.
To take a printer offline
- In Control Panel, click Printers And Other Hardware.
- In the Printers And Other Hardware window, click Printers And Faxes.
- Right-click the HP Color LaserJet 4550 PS icon.
- On the menu that appears, click Use Printer Offline.
Windows XP Professional dims the icon and changes the status of the printer from Ready to Offline to reflect that the printer is not available.
To print a test document
- In the Printers And Faxes folder, double-click the HP Color LaserJet 4550 PS icon.
The list of documents to be sent to the print device is empty.
- Click Start, point to All Programs, point to Accessories, and then click Notepad.
- In Notepad, type any text that you want.
- Arrange Notepad and the HP Color LaserJet 4550 PS window so that you can see the contents of each.
- In Notepad, on the File menu, click Print.
Windows XP Professional displays the Print dialog box, allowing you to select the printer and print options.
Many programs running under Windows XP Professional use the same Print dialog box.The Print dialog box displays the location and comment information that you entered when you created the printer, and the Status for the printer shows that it is currently offline. You can also use this dialog box to search Active Directory for a printer.
Notice that HP Color LaserJet 4550 PS is selected as the printer.
- Click Print.
Notepad briefly displays a message on your computer stating that the document is printing. On a fast computer, you might not be able to see this message.
- Close Notepad and click No when prompted to save changes to your document.
In the HP Color LaserJet 4550 PS window, you will see the document waiting to be sent to the print device. Windows XP Professional holds the document because you took the printer offline. Otherwise, Windows XP Professional would have sent the document to the print device.
- Close the HP Color LaserJet 4550 PS window.
- Close all open windows.
Exercise 4: Adding an LPR Port
In this exercise, you install Print Services for UNIX and create an LPR port.
To install Print Services for UNIX
- In Control Panel, click Network And Internet Connections.
- Click Network Connections.
- On the Advanced menu, click Optional Networking Components.
- In the Components list, click Other Network File And Print Services, and then click Details.
The Other Network File And Print Services dialog box appears.
- Select Print Services for UNIX, and then click OK.
The Other Network And File Services dialog box appears.
- Click Next and when the installation completes, close the Network Connections and Network And Internet Connections windows.
To add an LPR port
- In Control Panel, click Printers And Other Hardware, and then click Printers And Faxes.
- Double-click Add Printer.
The Add Printer Wizard starts.
- Click Next.
The Add Printer Wizard displays the Local Or Network Printer page.
- Ensure that Local Printer is selected.
- Ensure that the Automatically Detect And Install My Plug And Play Printer check box is not selected, and then click Next.
The Select A Printer Port page appears.
- Click Create A Printer Port.
- On the Type Of Port drop-down menu, select LPR port and click Next.
- In the Name Or Address Of Server Providing LPD text box, type the DNS name or IP address of the host of the printer you are adding.The host can be the direct-connect TCP/IP printing device or the UNIX computer to which the printer is connected. The DNS name can be the name specified for the host in the HOSTS file. LPD is a service on the print server that receives documents (print jobs) from the LPR utilities running on client systems.
- Follow the directions on the screen to complete the installation of the TCP/IP printer.
You add and share a printer by using the Add Printer Wizard in the Printers folder.

Lesson Review
Here are some questions to help you determine whether you have learned enough to move on to the next lesson. If you have difficulty answering these questions, review the material in this lesson before beginning the next lesson. The answers for these questions are in Appendix A, "Questions and Answers."
- Which of the following tasks are done with the Add Printer Wizard? (Choose all answers that are correct.)
- Taking a local printer offline
- Printing multiple copies of a document
- Adding an LPR port
- Making a printer that is connected to your computer available to other network users
- What is the default printer in Windows XP Professional?
- After you get home from the store, you unpack your new computer and printer. You install Windows XP Professional, and you want to install your printer. You want to set up the printer as your default printer. During the installation you are not prompted to use the printer as your default printer for all Windows-based applications. You know you have seen this option at work when you install local printers. Why aren't you seeing it on your home computer?
- Which of the following statements about adding and using an LPR port are correct? (Choose all answers that are correct.)
- The LPR port is designed for computers that need to communicate with Macintosh computers in accordance with RFC 1179.
- A network-connected printer must have a card that supports the LPD for TCP/IP printing to work properly.
- When you are trying to add an LPR port, if the LPR Port option is not available, install the optional networking component, Print Services for UNIX.
- LPD is a service on the client computer that sends documents (print jobs) out the LPR port.
- After you add and share a printer on a computer running Windows XP Professional, the tasks to set up client computers vary depending on which operating systems are running on the client computers. Which of the following operating systems running on client computers would require additional software or services to be installed before users on these computers can connect to the shared printer? (Choose all answers that are correct.)
- Windows 98
- NetWare
- Windows 2000 Professional
- UNIX
Lesson Summary
- To set up and share a printer for a local print device or for a network interface print device, use the Add Printer Wizard.
- Sharing a local printer makes it possible for multiple users on the network to utilize it.
- Users of client computers running Windows XP Professional, Windows 2000, Windows Me, Windows NT, Windows 98, or Windows 95 only need to connect to the shared printer to be able to print.
- To enable users of client computers running non-Microsoft operating systems to print, the print server must have additional services installed.


