Lesson 3: Creating, Modifying, and Deleting User Accounts
Lesson 3:?Creating, Modifying, and Deleting User Accounts
Windows XP Professional provides two ways to create, modify, and delete user accounts: the User Accounts tool in the Control Panel and the Computer Management snap-in.
After this lesson, you will be able to
- Modify existing user accounts
- Create local user accounts
- Delete user accounts
Estimated lesson time: 50 minutes
User Accounts Tool
The User Accounts tool in the Control Panel (shown in Figure 3.5) is one of the tools you use to create, modify, and delete local user accounts.
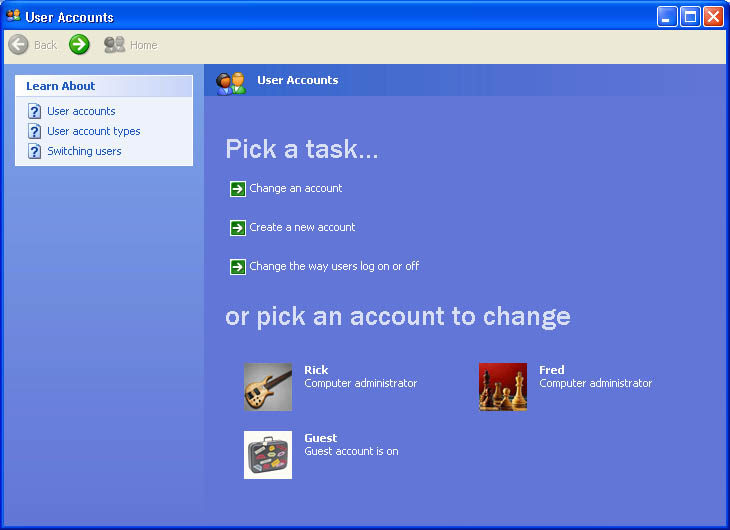
If you are logged on with an account that is a member of the Administrators group, the Pick A Task portion of the User Accounts tool allows you to perform the following tasks:
- Change an account (which includes deleting the account)
- Create a new user account
- Change the way users log on or log off
Changing an Account
If you are an administrator, the Change An Account task allows you to make changes to any user account on the computer. If you are logged on with a limited user account, you do not see the same Pick A Task screen as an administrator; you see only a Pick A Task screen that contains some of the following options that an administrator can perform:
- Change My/The Name.??Changes the user account name of an account on the computer. You only see this option if you are logged on as an administrator because only an administrator can perform this task.
- Create A Password.??Creates a password for your account. You only see this option if your user account does not have a password. Only an administrator can create passwords for other user accounts.
- Change My/The Password.??Changes the password for your account. You only see this option if your user account already has a password assigned to it; you see this option instead of the Create A Password option. Only an administrator can change passwords for other user accounts.
- Remove My/The Password.??Removes the password for your account or any other account on the computer. You only see this option if your user account already has a password assigned to it. Only an administrator can remove passwords for other user accounts.
- Change My/The Picture.??Changes the picture that appears on the Welcome screen. Only an administrator can change the pictures for other user accounts.
- Change My/The Account Type.??Changes the account type for a specified account. Only an administrator can change the account type for a user account.
- Set Up My Account To Use A .NET Passport.??Starts the Add A .NET Passport To Your Windows XP Professional Account Wizard. A passport allows you to have online conversations with family and friends, create your own personal Web pages, and sign in instantly to all .NET-enabled sites and services. You can set up only your own account to use a .NET passport.
- Delete The Account.??Deletes a specified user account. You only see this option if you are logged on as an administrator because only an administrator can perform this task.
To change your account while logged on with a limited user account, complete the following steps:
- Click Start, click Control Panel, and then click User Accounts.
The Pick A Task window appears.
- Click the appropriate option for the modification that you want to make and then follow the prompts on the screen.
To change an account while logged on as an administrator, complete the following steps:
- Click Start, click Control Panel, and then click User Accounts.
- In the User Accounts window, click Change An Account.
The Pick An Account To Change window appears.
- Click the account you want to change.
The What Do You Want To Change About account_name Account window appears.
- Click the appropriate option for the modification that you want to make and then follow the prompts on the screen.
Creating a New User Account
Only administrators can create new user accounts. This option is only available on the Pick A Task screen if you are logged on with a user account that is a member of the Administrators group.
To create a new user account, complete the following steps:
- Click Start, click Control Panel, and then click User Accounts.
- In the User Accounts window, click Create A New Account.
The Name The New Account window appears.
- In the Type A Name For The New Account box, type a user logon name (up to 20 characters), and then click Next.The user's logon name appears in the Welcome screen and on the Start menu. For information about valid characters for creating user accounts, see Table 3.1.
The Pick An Account Type window appears. Windows XP Professional provides two account types: Computer Administrator and Limited. Table 3.2 lists the capabilities of each account type.
- Select the appropriate account type, and then click Create Account.
Table 3.2??User Account Types and Capabilities
Changing the Way Users Log On or Log Off
Only administrators can change the way users log on or log off the computer. This option is only available on the Pick A Task screen if you are logged on with a user account that is a member of the Administrators group.
These two options control how all users log on and log off the computer:
- Use The Welcome Screen.??This check box, enabled by default, allows you to click your user account on the Welcome screen to log on to the computer. If you clear this check box, you must type your user name and password at a logon prompt to log on.
- Use Fast User Switching.??This check box, enabled by default, allows you to quickly switch to another user account without first logging off and closing all programs. When you are finished, you can switch to the first user account.
To change the way users log on or log off, complete the following steps:
- Click Start, click Control Panel, and then click User Accounts.
- In the User Accounts window, click Change The Way Users Log On Or Off. The Select Logon And Logoff Options window appears.
- Select or clear the appropriate check boxes.
Picking an Account to Change
The Pick An Account To Change portion of the User Accounts tool is only available if you are logged on with a user account that is a member of the Administrators group. It allows you to select a user account to modify. The account modifications you can make depend on the account type and how it is configured. The account characteristics that you can change are the same as those discussed earlier in this lesson in the section entitled, "Changing an Account."
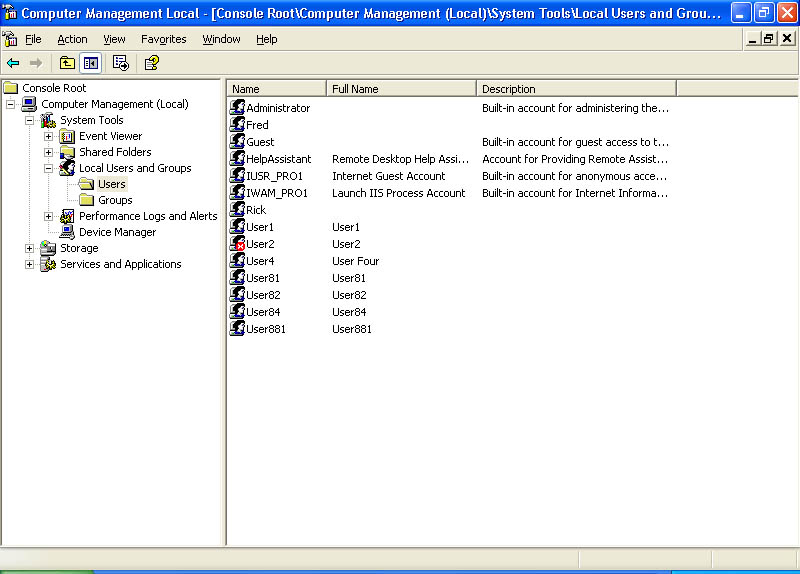
The Computer Management Snap-In
One of the tools for managing Microsoft Windows XP Professional is the Microsoft Management Console (MMC). The MMC provides a standardized method for creating, saving, and opening administrative tools. The MMC doesn't provide management functions itself, but it hosts management applications called snap-ins that you use to perform one or more administrative tasks.
The MMC allows you to do the following:
- Administer tasks and troubleshoot problems locally.??You can perform most of your administrative tasks and troubleshoot many problems using only the MMC.
- Administer tasks and troubleshoot problems remotely.??You can use most snap-ins for remote administration and troubleshooting. Windows XP Professional prompts you with a dialog box when you can use a snap-in remotely.
- Centralize administration.??You can use consoles to perform most of your administrative tasks from one computer. Each console can contain one or more snap-ins, including third-party snap-ins, so you can create one console that contains all the tools you need to perform your administrative tasks.
When you add snap-ins to an empty console, you create a customized console. One of the snap-ins that you can add is the Computer Management snap-in, shown in Figure 3.6. The Computer Management snap-in is another Windows XP Professional tool for creating, deleting, modifying, and disabling local user accounts and changing passwords.
Creating a Customized MMC Console
To create a customized MMC console containing Computer Management, complete the following steps:
- Click Start, and then click Run.
- In the Open text box, type mmc and then click OK.
MMC starts and displays an empty console.
- Maximize the Console1 window.
- Maximize the Console Root window.
- On the File menu, click Add/Remove Snap-In.
MMC displays the Add/Remove Snap-In dialog box.
- In the Standalone tab, click Add.
MMC displays the Add Standalone Snap-In dialog box shown in Figure 3.7.
 Figure 3.7??The Add Standalone Snap-In dialog box
 - In the Available Standalone Snap-Ins list, select Computer Management, and then click Add.
MMC displays the Computer Management dialog box (shown in Figure 3.8), which allows you to specify which computer you want to administer. The Local Computer: (The Computer This Console Is Running On) option is selected by default.
 Figure 3.8??The Computer Management dialog boxYou can add Computer Management for the local computer on which you are working or, if your local computer is part of a network, you can add Computer Management and point to a remote computer. To add Computer Management for a remote computer, in the Computer Management Snap-In dialog box, select Another Computer and then click Browse. In the Select Computer dialog box, in the Enter The Object Name To Select text box, type the name of the remote computer that you want to administer with Computer Management and then click OK. There is also a check box that allows you to change the selected computer when you launch the MMC console from the command line.
 - In the Computer Management dialog box, click Finish.
- In the Add Standalone Snap-In dialog box (see Figure 3.7), click Close.
- In the Add/Remove dialog box, click OK to place the Computer Management snap-in in an MMC console.
Creating a Local User Account Using the Computer Management Snap-In
To create local user accounts using the Computer Management snap-in complete the following steps:
- Expand the MMC console containing the Computer Management snap-in.
- In the console pane of the Computer Management window, click the Computer Management plus sign (+) icon to expand the tree. Computer Management contains three folders: System Tools, Storage, and Services And Applications.
- In the console pane, double-click System Tools, and then click Local Users And Groups.
- In the details pane, right-click Users, and then click New User.
- Fill in the appropriate text boxes in the New User dialog box (Figure 3.9), click Create, and then click Close.
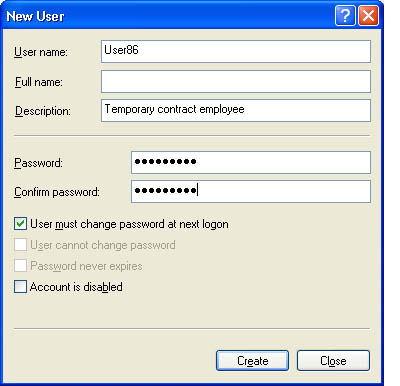
Table 3.3 describes the local user account options shown in Figure 3.9.
Table 3.3??Local User Account Options

Practice:?Creating, Modifying, and Deleting Local User Accounts
In this practice, you create a new local user account and assign it a password using the User Accounts tool. You then create a custom MMC console that contains the Computer Management snap-in and then use the snap-in to create two more new user accounts. Then you test one of the newly created local user accounts. You complete the practice by using the User Accounts tool to delete a local user account.
After completing this practice, you will be able to
- Use the User Accounts program to create a new local user account
- Create a customized MMC console containing the Computer Management snap-in
- Use the Computer Management snap-in to create a new local user account
Run the LocalUserAccounts file in the Demos folder on the CD-ROM accompanying this book for a demonstration of creating, modifying, and deleting local user accounts.

Exercise 1: Creating a New Local User Account Using the User Accounts Tool
In this exercise, you use the User Accounts tool to create a new user account.
To create a local user account
- Log on as Fred or with a user account that is a member of the Administrators group.
- Click Start, click Control Panel, and then click User Accounts.
- In the User Accounts window, under Pick A Task, click Create A New Account.
Windows XP Professional displays the Name The New Account window.
- In the Type A Name For The New User text box, type User1, and then click Next.
Windows XP Professional displays the Pick An Account Type dialog box.
- Click Limited.If your account is a limited account type, you can change or remove your password, change the picture displayed with your account, and change your theme and other desktop settings. You can also view files you created and files in the shared documents folder.
- Click Create Account.
Windows XP Professional displays the User Accounts window; User1 appears in the list of accounts.
- Create an account for User2 using steps 3 through 6.
Leave the User Accounts window open for the next exercise.
Exercise 2: Assigning a Password to a Local User Account Using the User Accounts Tool
In this exercise, you use the User Accounts tool to assign a password to a local user account.
To assign a password to a local user account using the User Accounts tool
- In the User Accounts window, click User1.
- Click Create A Password.
- Type password in both the Type A New Password text box and the Type The New Password Again To Confirm text box.
- Type the most commonly used password in the Type A Word Or Phrase To Use As A Password Hint text box.
- Click Create Password.
The What Do You Want To Change About User1's Account window appears. Notice that the list of changes you can make now includes two new options: Change The Password and Remove The Password. The Create A Password option is gone.
- Click the Home icon to return to the User Accounts window.
- Assign User2 the password User2.
- Close the User Accounts window and Control Panel.
Exercise 3: Creating a Customized MMC Console That Contains the Computer Management Snap-In
In this exercise, you create a customized MMC console that contains the Computer Management snap-in.
To create a custom MMC containing Computer Management
- Click Start and then click Run.
- In the Open text box, type mmc and then click OK.
MMC starts and displays an empty console.
- Maximize the Console1 window by clicking Maximize.
- Maximize the Console Root window by clicking Maximize.
- On the File menu, click Add/Remove Snap-In.
MMC displays the Add/Remove Snap-In dialog box.
- Click Add.
MMC displays the Add Standalone Snap-In dialog box.
- In the Available Standalone Snap-Ins list, click Computer Management and then click Add.
MMC displays the Computer Management dialog box, which allows you to specify the computer that you want to administer. The Local Computer option is selected by default.
- In the Computer Management dialog box, click Finish.
The MMC creates the console that contains the Computer Management snap-in for managing the local computer.
- In the Add Standalone Snap-In dialog box, click Close.
- In the Add/Remove Snap-In dialog box, click OK to place the Computer Management snap-in in your customized MMC console.
Computer Management (Local) now appears in the console tree.
- On the File menu, click Save As.
MMC displays the Save As dialog box.
- In the File Name text box, type Computer Management Local, and then click Save.
The title bar is now Computer Management Local. You have just created a customized MMC console containing the Computer Management snap-in and have named it Computer Management Local.
Exercise 4: Creating a New Local User Account Using the Computer Management Snap-In
In this exercise, you use the Computer Management snap-in to create two new local user accounts.
To create a local user account using the Computer Management snap-in
- In the Computer Management window, in the console pane, click the plus sign in front of Computer Management (Local) to expand it.
Computer Management contains three folders: System Tools, Storage, and Services And Applications.
- In the console pane, double-click System Tools, and then click Local Users And Groups.
- In the details pane, right-click Users, and then select New User.
The New User dialog box appears.
- In the User Name text box, type User3.
- In the Full Name text box, type User Three.
Do not assign a password to the user account.
- Confirm that the User Must Change Password At Next Logon check box is selected.
- Click Create to create the new user, and then click Close.
- Click Start, click Control Panel, and then click User Accounts.
The User Accounts window appears.
What type of account is User3?
Notice that User3 is a password-protected account. The password for User3 is a blank password.
- Close the User Accounts window and then close Control Panel.
- In the Computer Management details pane, right-click Users, and then click New User.
- In the User Name text box, type User4.
- In the Full Name text box, type User Four.
- In the Password and Confirm Password text boxes, type User4.
How does the password appear on the screen? Why?
In high-security environments, assign initial passwords to user accounts and then require users to change their passwords the next time they log on. This accomplishes two goals: it prevents a user account from existing without a password and ensures that only the user knows the password. The password assigned in this exercise was for ease of use in the exercise. The passwords you assign should be difficult to guess and should include both uppercase and lowercase letters, numerals, and valid nonalphanumeric characters. - Confirm that the User Must Change Password At Next Logon check box is selected and then click Create.
- Close the New User dialog box.
- In the Computer Management console, on the File menu, click Exit to close the Computer Management custom MMC console.
The Microsoft Management Console dialog box appears, in which you indicate whether you want to save Console settings to Computer Management.
If you click Yes, the next time you open the Computer Management console, it appears as it does now. If you click No, Windows XP Professional does not save the settings. - Click Yes to save the Console settings.
Exercise 5: Testing a New Local User Account
In this exercise, you test one of the new local user accounts to verify that it works as expected.
To test a local user account
- Click Start and then click Log Off.
Windows XP Professional displays a Log Off Windows dialog box telling you to click Switch User if you want to leave programs running and switch to another user. Your other options are to click Log Off or Cancel.
- In the Log Off Windows dialog box, click Log Off.
- On the Welcome screen, click User3.
What happens?
- Click OK. The Change Password dialog box appears.
- Leave the Old Password text box blank, and in the New Password and Confirm New Password text boxes, type User3, and then click OK.
Windows XP Professional displays a Change Password dialog box indicating that the password has been changed.
- Click OK to close the Change Password dialog box.
The user account, User3, that you created using the Computer Management snap-in allowed you to log on. Because you left the default check box, User Must Change Password At Next Logon, selected when you created the account, you were prompted to change passwords when you logged on as User3. You confirmed that the User3 user account was created with a blank password when you left the Old Password box blank and successfully changed the password to User3.
- Log off the computer.
Exercise 6: Deleting a Local User Account
In this exercise, you use the User Accounts tool to delete the User3 local user account.
To delete a local user account
- Log on as Fred or with a user account that is a member of the Administrators group.
- In the Control Panel, click User Accounts.
- Click User3.
Windows XP Professional displays the What Do You Want To Change About User Three's Account window.
- Click Delete The Account.
Windows XP Professional displays the Do You Want To Keep User Three's Files window.
Windows XP Professional can automatically save the contents of User Three's desktop and My Documents folder to a new folder called User Three on your desktop. However, it cannot save User Three's e-mail messages, Internet Favorites, and other settings. - Click Delete Files.
Windows XP Professional displays the Are You Sure You Want To Delete User Three's Account window.
- Click Delete Account.
Windows XP Professional displays the User Accounts window. Notice that the User3 account is no longer listed under Or Pick An Account To Change.
- Close the User Accounts tool and then close the Control Panel.
- Log off the computer.

Lesson Review
The following questions will help you determine whether you have learned enough to move on to the next lesson. If you have difficulty answering these questions, review the material in this lesson before beginning the next lesson. The answers are in Appendix A, "Questions and Answers."
- Which of the following statements about the Windows XP Professional User Accounts tool are correct? (Choose all that apply.)
- The User Accounts tool allows you to remotely create, modify, and delete user accounts on all computers in the network running Windows XP Professional.
- The User Accounts tool allows you to view and modify all accounts on the computer.
- The tasks you can perform with the User Accounts tool depend on the type of account you use to log on to the local computer.
- The User Accounts tool allows users to delete, create, or remove their individual passwords.
- Which of the following tasks can both account types perform? (Choose all that apply.)
- Change your picture
- Change your account type
- Create, change, or remove your password
- Change your account name
- Which of the following statements about logging on or logging off a computer running Windows XP Professional are true? (Choose all that apply.)
- When you use the Welcome screen to log on the local computer, you can quickly switch to another user account without logging off and closing all programs that you are running.
- The User Accounts tool allows you to disable a local user account to prevent users from using the disabled account to log on.
- When you use the Welcome screen to log on the local computer, you can only log on using one of the accounts displayed on the Welcome screen.
- The User Accounts tool allows you to replace the Welcome screen with a logon prompt that requires users to type their individual user names and passwords.
- When you use the Computer Management snap-in to create a new user account, which check box do you select to prevent a new employee from using the new account until the employee starts working for the company?
Lesson Summary
- The User Accounts tool allows administrators to create a new user account, change an existing account, and change the way a user logs on or logs off.
- The two check boxes that control the way users log on and log off the computer, Use The Welcome Screen and Use Fast User Switching, are for all users. You cannot set them for individual local user accounts.
- The Computer Management snap-in allows you to create, modify, and delete user accounts for the local computer on which you are working. If your computer is part of a network, you can use the Computer Management snap-in on a remote computer.
- The Computer Management snap-in provides all the functionality of the User Accounts tool and additional functionality, including the ability to view all accounts in the local security database and to disable accounts.
- Always require new users to change their passwords the first time they log on to force them to use passwords that only they know.
- If you select the Use The Welcome Screen and the Use Fast User Switching check boxes, when you log off the computer, a dialog box appears allowing you to leave programs running and switch to another user without logging off and closing all programs.


