Lesson 4: Using Offline Folders and Files
Lesson 4:?Using Offline Folders and Files
When the network is unavailable or when you are on the road and your laptop is undocked, offline folders and files allow you to continue working on files that are stored on shared folders on the network. These network files are cached on your local disk so that they are available even if the network is not. When the network becomes available or when you dock your laptop, your connection to the network is reestablished. Offline files synchronize the cached files and folders on your local disk with those stored on the network.
After this lesson, you will be able to
- Configure and use offline folders and files
Estimated lesson time: 30 minutes
Configuring Your Computer to Use Offline Folders and Files
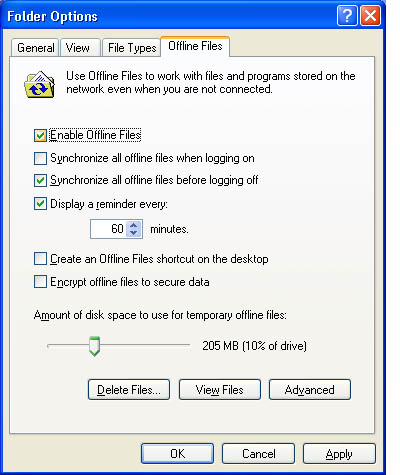
Before you can use offline folders and files, you must configure your computer to use them. You configure offline folders and files by using the Folder Options selection located on the Tools menu of My Computer. In the Offline Files tab of Folder Options, you must select the Enable Offline Files and the Synchronize All Offline Files Before Logging Off check boxes (see Figure 15.5).

In the Offline Files tab, you can click Delete Files to delete the locally cached copy of a network file. Click View Files to view the files stored in the Offline Files folder; these are the locally cached files that you have stored on your system. Click Advanced to configure how your computer responds when a network connection is lost. For example, when a network connection is lost, you can configure your computer to notify you and allow you to begin working offline.

Practice:?Configuring Offline Folders
In this practice you configure your computer running Windows XP Professional just as you would if it were a laptop computer running Windows XP Professional so that you can use offline folders and files. This allows you to work offline.

Run the OfflineFolders file in the Demos folder on the CD-ROM accompanying this book for a demonstration of configuring a computer so you can use offline files.
To configure Offline Folders and Files
- Log on as Fred or with a user account that is a member of the Administrators group.
- Click Start, right-click My Computer, and then click Open.
- On the Tools menu, click Folder Options.
Windows XP Professional displays the Folder Options dialog box.
- Click the Offline Files tab.If Fast User Switching is enabled, Offline Files cannot be enabled. Click Cancel to close the Folder Options dialog box. Open User Accounts in Control Panel, and select Change The Way Users Log On Or Off. Clear the Use Fast User Switching check box and click Apply Options. Close User Accounts. In My Computer, on the Tools menu, click Folder Options and then click the Offline Files tab. Go to step 5.
- Select the Enable Offline Files check box.
- Ensure that the Synchronize All Offline Files Before Logging Off check box is selected, and then click OK.
Your computer is now configured so that you can use offline folders and files.
- Close the My Computer window.
Configuring Your Computer to Share Offline Folders and Files
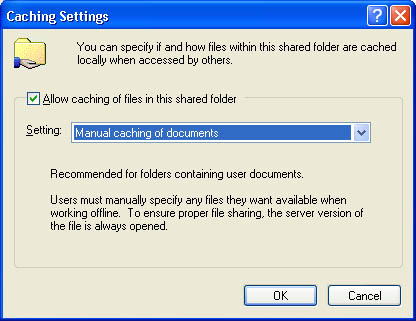
Before other users on the network can use offline folders and files on your computer, you must configure the resource to allow caching for offline use. You configure offline folders and files through Windows Explorer or My Computer. Figure 15.6 shows the Allow Caching Of Files In This Shared Folder check box in Windows Explorer.

Windows XP Professional provides the following three settings for caching:
- Manual Caching Of Documents.??The default setting. Users must manually specify any files that they want available when they are working offline. To ensure proper file sharing, the server version of the file is always open.
- Automatic Caching Of Documents.??Every file a user opens is automatically downloaded and cached on the user's hard drive so that it will be available offline. If an earlier version of a file is already loaded on the user's hard drive, it is automatically replaced with the newer version. To ensure proper file sharing, the server version of the file is always opened.
- Automatic Caching Of Programs and Documents.??Opened files are automatically downloaded and cached on the user's hard drive so that it will be available offline. If an earlier version of a file is already loaded on the user's hard drive, it is automatically replaced with the newer version. File sharing is not ensured.

Practice:?Configuring Offline Folders for Sharing
In this practice, you configure a network share on a computer running Windows XP Professional so that users can access the files in the share and use them offline.
To enable a network share to provide files to be used offline
- Ensure that you are still logged on as Administrator, and start Windows Explorer.
- Create a folder C:\Offline.
- Right-click Offline and then click Sharing And Security.
Windows Explorer displays the Offline Properties dialog box with the Sharing tab active.
- Click Share This Folder, and then click Caching.
Windows Explorer displays the Caching Settings dialog box.
- Click the down arrow at the end of the Setting dialog box.
- Ensure Manual Caching Of Documents is selected and then click OK.
- Click OK to close the Offline Properties dialog box.
Leave Windows Explorer open.
Synchronizing Files
File synchronization is straightforward if the copy of the file on the network does not change while you are editing a cached version of the file. Your edits are incorporated into the copy on the network. However, it is possible that another user could edit the network version of the file while you are working offline. If both your cached offline copy of the file and the network copy of the file are edited, you must decide what to do. You are given a choice of retaining your edited version and not updating the network copy with your edits, of overwriting your cached version with the version on the network, or of keeping a copy of both versions of the file. In the last case, you must rename your version of the file, and both copies will exist on your hard disk and on the network.
Configuring the Synchronization Manager
To configure the synchronization manager, open Windows Explorer, click the Tools menu, and then click Synchronize. Notice that you can manually synchronize your offline files with those on the network by clicking Synchronize. You can also configure the Synchronization Manager by clicking Setup.
In configuring the Synchronization Manager, you have three sets of options for configuring synchronization. The first set of options is accessed through the Logon/Logoff tab (see Figure 15.7). You can configure synchronization to occur when you log on, when you log off, or both. You can also specify that you want to be prompted before synchronization occurs. You can specify the items to be synchronized at log on or log off, or both, and you can specify the network connection.

The second set of options in configuring the Synchronization Manager is accessed through the On Idle tab. The items configurable are similar to those configurable through the Logon/Logoff tab. The following items are configurable through the On Idle tab:
- When I Am Using This Network Connection.??This option allows you to specify the network connection and which items to synchronize.
- Synchronize The Selected Items While My Computer Is Idle.??This option allows you to specify which items you want to synchronize.
- Synchronize The Selected Items While My Computer Is Idle.??This option allows you to turn off or on synchronization during idle time.
Click Advanced on the On Idle tab to configure the following options: Automatically Synchronize The Specified Items After My Computer Has Been Idle For X Minutes; While My Computer Remains Idle, Repeat Synchronization Every X Minutes; and Prevent Synchronization When My Computer Is Running On Battery Power.
The third set of options for scheduling synchronization is accessed through the Scheduled tab. You can click Add to start the Scheduled Synchronization Wizard. The first page of the Scheduled Synchronization Wizard allows you to specify the connection, the items to synchronize and whether you want the computer to automatically connect if you are not connected when the scheduled time for synchronization arrives. The second page of the wizard is the Select The Time And Day You Want The Synchronization To Start page. It allows you to configure the starting time and date for the synchronization. You can also configure the frequency of the synchronization, which can be set for every day, every weekday, or at a specified interval measured in days. On the third page of the wizard you assign a name to this scheduled synchronization and, on the final page, you review your settings.

Practice:?Configuring Synchronization Manager
In this practice you configure the Synchronization Manager.

Run the SynchronizationManager file in the Demos folder on the CD-ROM accompanying this book for a demonstration of configuring Synchronization Manager.
To configure Synchronization Manager
- Ensure that you are still logged on as Administrator.
Windows Explorer should be open from the last practice.
- Click Tools and then click Synchronize.
Windows XP Professional displays the Items To Synchronize dialog box, which allows you to specify which folders you want to synchronize.
- If nothing is selected, click My Current Home Page, and then click Setup.
Windows XP Professional displays the Synchronization Settings dialog box with the Logon/Logoff tab selected.
- Review the options on the Logon/Logoff tab, and then review the options on the On-Idle tab and the Scheduled tab.
- On the Logon/Logoff tab, select My Current Home Page.
- Ensure that both the When I Log On To My Computer and When I Log Off My Computer check boxes are checked.
- Select the Ask Me Before Synchronizing The Items check box, and then click OK.
- Click Close to close the Items To Synchronize dialog box, and then close Windows Explorer.

Lesson Review
The following questions will help you determine whether you have learned enough to move on to the next lesson. If you have difficulty answering these questions, review the material in this lesson before beginning the next lesson. The answers are in Appendix A, "Questions and Answers."
- How do you configure your computer to use offline folders and files?
- What tools does Windows XP Professional provide for you to configure your computer to provide offline files? What must you do to allow others to access files on your computer?
- What does Synchronization Manager do?
Lesson Summary
- Offline files are network files that are cached on your local disk so that they are available even if the network is not.
- Before you can use offline files, you must use the Folders Options selection on the Tools menu of My Computer or Windows Explorer to configure your computer to use offline files.
- You must use the User Accounts tool to disable Fast User Switching before you can enable Offline Files.
- You use Synchronization Manager to configure synchronization of the offline files you are using and the copies on the server.
- Synchronization Manager allows you to configure synchronization to occur when you log on, when you log off, or both, and you can specify that you want to be asked before synchronization occurs.


