Lesson 2: Implementing an Audit Policy
Lesson 2:?Implementing an Audit Policy
Auditing is a powerful tool for tracking events that occur on computers in your organization. To implement auditing, you need to consider auditing requirements and set the audit policy. After you set an audit policy on a computer, you can implement auditing on files, folders, and printers.
After this lesson, you will be able to
- Set up auditing on files and folders
- Set up auditing on printers
Estimated lesson time: 40 minutes
Configuring Auditing
For computers running Windows XP Professional, you set up an audit policy for each individual computer.
Auditing Requirements
The requirements to set up and administer auditing are as follows:
- You must have the Manage Auditing And Security Log user right for the computer on which you want to configure an audit policy or review an audit log. By default, Windows XP Professional grants these rights to the Administrators group.
- The files and folders to be audited must be on NT file system (NTFS) volumes.
Setting up Auditing
Setting up auditing is a two-part process:
- Set the audit policy.??The audit policy enables auditing of objects but doesn't activate auditing of specific objects.
- Enable auditing of specific resources.??You designate the specific events to audit for files, folders, printers, and Active Directory objects. Windows XP Professional then tracks and logs the specified events.
Setting an Audit Policy
The first step in implementing an audit policy is selecting the types of events for Windows XP Professional to audit. For each event that you can audit, the configuration settings indicate whether to track successful or failed attempts. You set audit policies for a local computer in the Group Policy snap-in, which can be accessed by using the Microsoft Management Console (MMC) console and adding the Group Policy snap-in.
Table 12.1 describes the types of events that Windows XP Professional can audit.
Table 12.1?? Types of Events Audited by Windows XP Professional
To set an audit policy on a computer that is running Windows XP Professional, access the Group Policy snap-in, as follows:
- Log on with an account that is a member of the Administrators group.
- Click Start and click Run. In the Open text box, type mmc and then click OK.
- In the Console 1 window, on the File menu, click Add/Remove Snap-In.
- In the Add/Remove Snap-In dialog box, click Add.
- In the Add Standalone Snap-In dialog box, select Group Policy and then click Add.
- In the Select Group Policy Object dialog box, ensure that the Group Policy Object text box contains Local Computer, and then click Finish.
- In the Add Standalone Snap-In dialog box, click Close.
In the Add/Remove Snap-In dialog box, notice that it contains Local Computer Policy, even though you added Group Policy. Group Policy for the local computer is referred to as Local Computer Policy.
- In the Add/Remove Snap-In dialog box, click OK.
- In the console tree of the Local Computer Policy snap-in, double-click Local Computer Policy.
- Double-click Computer Configuration, and then double-click Windows Settings.
- Double-click Security Settings, and then double-click Local Policies.
- Click Audit Policy.
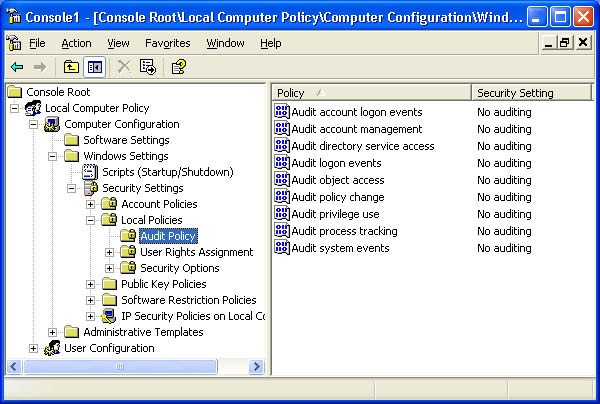
The console displays the current audit policy settings in the details pane of the Local Computer Policy window, as shown in Figure 12.1.
 Figure 12.1??Events that Windows XP Professional can audit
 - Select the type of event to audit, and then, on the Action menu, click Properties.
For example, if you select Audit Logon Events and on the Action menu you click Properties, the Audit Account Logon Events Properties dialog box appears, as shown in Figure 12.2.
 Figure 12.2??The Audit Account Logon Events Properties dialog box
 - Select the Success check box, the Failure check box, or both.
A check mark in the Success check box indicates that auditing is in effect for successful attempts. A check mark in the Failure check box indicates that auditing is in effect for failed attempts.
- Click OK.
- Restart your computer.
Once you have set the audit policy, remember that the changes that you make to your computer's audit policy don't take effect immediately unless you restart your computer.
Auditing Access to Files and Folders
If security breaches are an issue for your organization, you can set up auditing for files and folders on NTFS partitions. To audit user access to files and folders, you must first set your audit policy to audit object access, which includes files and folders.
When you set your audit policy to audit object access, you enable auditing for specific files and folders and specify which types of access, by which users or groups, to audit.
You can enable auditing for specific files and folders as follows:
- Click Start, right-click My Computer, and then click Explore.
- Right-click the file or folder for which you want to enable auditing and click Properties.
- In the Security tab of the Properties dialog box for a file or folder, click Advanced.
If you do not have a Security tab on the Properties dialog box for your files and folders there are two things you should check:
Are your files and folders located on a partition formatted as NTFS?
If your computer is not a member of a domain, have you turned off Simple File Sharing? To stop using Simple File Sharing, click Start, right-click My Computer, and then click Explore. On the Tools menu, click Folder Options. Click the View tab, clear Use Simple File Sharing (Recommended), and click OK.
- In the Auditing tab of the Advanced Security Settings For folder_name dialog box, click Add, select the users for whom you want to audit file and folder access, and then click OK.
- In the Audit Entry For folder_name dialog box, select the Successful check box, the Failed check box, or both for the events that you want to audit.
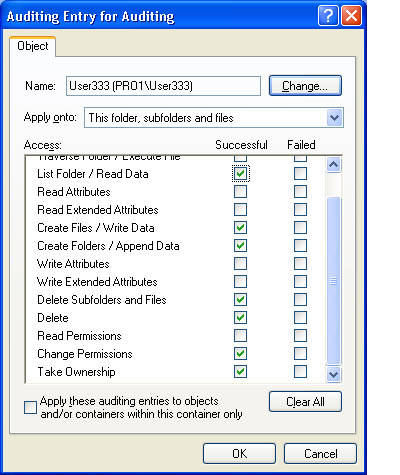
For a list of the events that can be audited for folders, see Figure 12.3.
Table 12.2 describes the user activity that triggers these events so you can determine when you should audit these events.
 Figure 12.3??Events that can be audited for folders
Table 12.2??User Events and What Triggers Them
Event User activity that triggers the event Traverse Folder/Execute File
Running a program or gaining access to a folder to change directories
List Folder/Read Data
Displaying the contents of a file or a folder
Read Attributes Read Extended Attributes
Displaying the attributes of a file or folder
Create Files/Write Data files
Changing the contents of a file or creating new in a folder
Create Folders/Append Data
Creating folders in a folder
Write Attributes Write Extended Attributes
Changing attributes of a file or folder
Delete Subfolders And Files
Deleting a file or subfolder in a folder
Delete
Deleting a file or folder
Read Permissions
Viewing permissions for the file owner for a file or folder
Change Permissions
Changing permissions for a file or folder
Take Ownership
Taking ownership of a file or folder
- Click OK to return to the Advanced Security Settings For folder_name dialog box.
By default, any auditing changes that you make to a parent folder also apply to all child folders and all files in the parent and child folders.
- To prevent changes that are made to a parent folder from applying to the currently selected file or folder, clear the Inherit From Parent The Auditing Entries That Apply To Child Objects check box.
- Click OK.
Auditing Access to Printers
Audit access to printers to track access to sensitive printers. To audit access to printers, set your audit policy to audit object access, which includes printers. Enable auditing for specific printers and specify which types of access to audit and which users will have access. After you select the printer, you use the same steps that you use to set up auditing on files and folders, as follows:
- Click Start, click Control Panel, and then click Printers And Other Hardware.
- Click Printers And Faxes, right-click the printer you want to audit, and then click Properties.
- In the Properties dialog box for the printer, click the Security tab, and then click Advanced.
The Advanced Security Settings dialog box appears.
- In the Auditing tab, click Add, select the appropriate users or groups for whom you want to audit printer access, and then click OK.
- In the Apply Onto box in the Auditing Entry dialog box, select where the auditing setting applies.
The options in the Apply Onto box for a printer are This Printer Only, Documents, and This Printer And Documents.
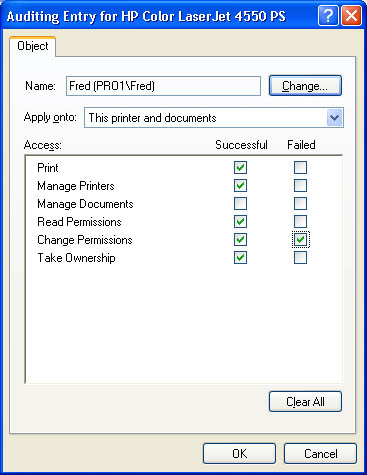
- Under Access, select the Successful check box, the Failed check box, or both for the events that you want to audit (see Figure 12.4).
- Click OK in the appropriate dialog boxes to exit.

Table 12.3 describes audit events for printers and explains which user action triggers the event.
Table 12.3??Printer Events and What Triggers Them

Lesson Review
The following questions will help you determine whether you have learned enough to move on to the next lesson. If you have difficulty answering these questions, review the material in this lesson before beginning the next lesson. The answers are in Appendix A, "Questions and Answers."
- What are the requirements to set up and administer auditing?
- What are the two steps in setting up auditing?
- How do you set audit policies for a local computer?
- What are some reasons for auditing system events?
- By default, any auditing changes that you make to a parent folder ________________ (are inherited/are not inherited) by all child folders and all files in the parent and child folders.
Lesson Summary
- The first step in implementing an audit policy is selecting the types of events for Windows XP Professional to audit.
- You can select the events to audit for files and folders on NTFS volumes, and you can select the events you want to audit for printers.
- When you have set your audit policy to audit object access, you can enable auditing for specific files, folders, and printers and specify which types of access, by which users or groups, to audit.
- For each event that you can audit, the configuration settings indicate whether to track successful attempts, failed attempts, or both.
- You must have the Manage Auditing And Security Log user right for the computer on which you want to configure an audit policy or review an audit log. By default, Windows XP Professional grants these rights to the Administrators group.
- You use the Group Policy snap-in to set audit policies, and then you restart your computer if you want to immediately enable auditing.


