Lesson 4: Using Disk Defragmenter, Check Disk, and Disk Cleanup
Lesson 4:?Using Disk Defragmenter, Check Disk, and Disk Cleanup
Windows XP Professional saves files and folders in the first available space on a hard disk and not necessarily in an area of contiguous space. The parts of the files and folders are scattered over the hard disk rather than being in a contiguous area. This scattering of files and folders across a hard disk is known as fragmentation. When your hard disk contains numerous fragmented files and folders, your computer takes longer to access them because it requires several additional reads to collect the various pieces. Creating new files and folders also takes longer because the available free space on the hard disk is scattered. Your computer must save a new file or folder in various locations on the hard disk.
Temporary files, Internet cache files, and unnecessary programs also take up space on your computer's hard drive. Sometimes there are file system errors and sometimes sectors on your hard disk go bad, which can cause you to lose data you have stored on your hard disk. This lesson introduces three Windows XP Professional tools-Disk Defragmenter, Check Disk, and Disk Cleanup-that help you organize your hard disks, recover readable information from damaged areas on your hard disk, and clean up any temporary files and unnecessary programs taking up space on your hard drive.
After this lesson, you will be able to
- Describe fragmentation and defragmentation
- Use Disk Defragmenter to organize your hard disks
- Use Check Disk to search for and repair file system errors and recover readable information from bad sectors
- Use Disk Cleanup to clean up your hard disks
Estimated lesson time: 60 minutes
Defragmenting Disks
The process of finding and consolidating fragmented files and folders is called defragmenting. Disk Defragmenter locates fragmented files and folders and defragments them by moving the pieces of each file or folder to one location so that each occupies a single, contiguous space on the hard disk. Consequently, your system can access and save files and folders more efficiently. By consolidating files and folders, Disk Defragmenter also consolidates free space, making it less likely that new files will be fragmented. Disk Defragmenter can defragment FAT, FAT32, and NTFS volumes.
You access Disk Defragmenter by selecting Start, pointing to All Programs, pointing to Accessories, pointing to System Tools, and then clicking Disk Defragmenter. The Disk Defragmenter dialog box is split into three areas, as shown in Figure 14.8.
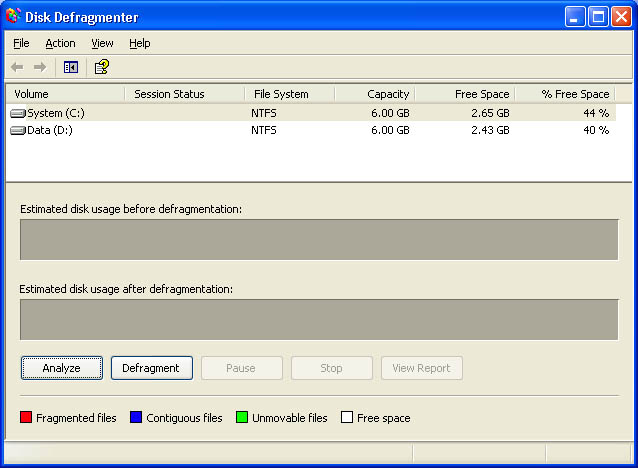
The upper portion of the dialog box lists the volumes that you can analyze and defragment. The middle portion provides a graphic representation of how fragmented the selected volume is. The lower portion provides a dynamic representation of the volume that continuously updates during defragmentation. The display colors indicate the condition of the volume as follows:
- Red indicates fragmented files.
- Blue indicates contiguous (nonfragmented) files.
- Green indicates system files, which Disk Defragmenter cannot move.
- White indicates free space on the volume.
By comparing the Analysis Display band to the Defragmentation Display band during and after defragmentation, you can easily see the improvement in the volume.
You can also open Disk Defragmenter by selecting a drive you want to defragment in Windows Explorer or My Computer. On the File menu, click Properties, click the Tools tab, and click Defragment Now. Then select one of the options described in Table 14.6.
Table 14.6??Disk Defragmenter Options
Figure 14.9 shows the Disk Defragmenter dialog box after you have analyzed the C drive. Windows XP Professional displays another Disk Defragmenter dialog box indicating that you need to defragment the volume. You can view a report showing more details about the fragmentation on your volume, close the dialog box and run the defragmenter at a later time, or defragment the volume now.
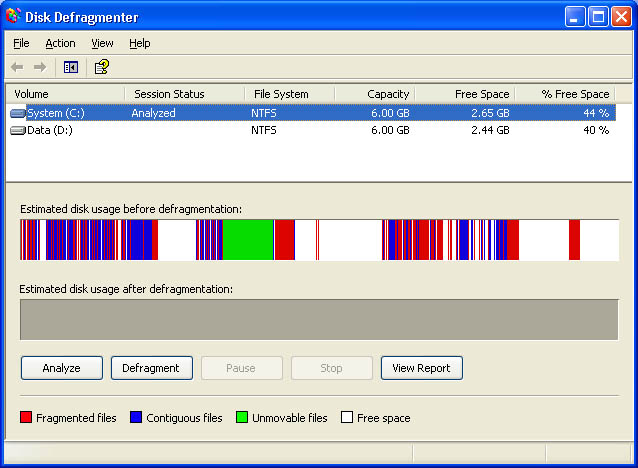
If there is not enough fragmentation to require you to defragment the volume, Windows XP Professional displays a Disk Defragmenter dialog box indicating that there is no need to defragment the volume at this time.
Using Disk Defragmenter Effectively
The following list provides some guidelines for using Disk Defragmenter:
- Run Disk Defragmenter when the computer will receive the least usage. During defragmentation, data is moved around on the hard disk and that process is microprocessor-intensive. The defragmentation process will adversely affect access time to other disk-based resources.
- Educate users to defragment their local hard disks at least once a month to prevent accumulation of fragmented files.
- Analyze the target volume before you install large applications and defragment the volume if necessary. Installations complete more quickly when the target media has adequate contiguous free space. Additionally, accessing the application after installation is faster.
- When you delete a large number of files or folders, your hard disk might become excessively fragmented, so be sure that you analyze it afterward. Generally, you should defragment hard disks on busy file servers more often than those on single-user client computers.
Using Check Disk
Check Disk attempts to repair file system errors, locate bad sectors, and recover readable information from those bad sectors. All files must be closed for this program to run. To access Check Disk, select the drive you want to check in Windows Explorer or My Computer. Click the File menu, click Properties, click the Tools tab, and click Check Now. Select one of the options on the Check Disk dialog box shown in Figure 14.10. The options are explained in Table 14.7.

Table 14.7??Check Disk Options
| Check box | Description |
|---|---|
Automatically Fix File System Errors |
Select this check box to have Windows XP Professional attempt to repair file system errors found during disk checking. All files must be closed for this program to run. If the drive is currently in use, a message asks you if you would like to reschedule the disk checking for the next time you restart your computer. Your drive is not available to run other tasks while the disk is being checked. |
Scan For And Attempt Recovery Of Bad Sectors |
Select this check box to have Windows XP Professional attempt to repair file system errors found during disk checking, locate bad sectors, and recover any readable information located in those bad sectors. All files must be closed for this program to run. If the drive is currently in use, a message asks you if you would like to reschedule the disk checking for the next time you restart your computer. Your drive is not available to run other tasks while the disk is being checked. If you select this check box, you do not need to select Automatically Fix File System Errors because Windows XP Professional attempts to fix any errors on the disk. |
You can also use the command-line version of Check Disk. The command-line syntax for Chkdsk is as follows:
Chkdsk [volume[[path]filename]]] [/f] [/v] [/r] [/x] [/i] [/c] [/l[:size]]
The switches used by Chkdsk are explained in Table 14.8.
Table 14.8??Chkdsk Switches
| Switch | Description |
|---|---|
Filename |
Specifies the file or set of files to check for fragmentation. You can use the wildcards * and ?. This switch is only valid on volumes formatted with FAT12, FAT16, and FAT32 file systems. |
Path |
Specifies the location of a file or set of files within the folder structure of the volume. This switch is only valid on volumes formatted with FAT12, FAT16, and FAT32 file systems. |
Size |
Changes the log file size. You must use the /l switch with this switch. This switch is only valid on volumes formatted with NTFS. |
Volume |
Specifies the drive letter (followed by a colon), mount point, or volume name. This switch is only valid on volumes formatted with FAT12, FAT16, and FAT32 file systems. |
/c |
Skips the checking of cycles within the folder structure. This switch is only valid on volumes formatted with NTFS. |
/f |
Fixes errors on the volume. If Chkdsk cannot lock the volume, you are prompted to have Chkdsk check it the next time the computer starts. |
/i |
Performs a less vigorous check of index entries. This switch is only valid on volumes formatted with NTFS. |
/l |
Displays the current size of the log file. This switch is only valid on volumes formatted with NTFS. |
/r |
Locates bad sectors and recovers readable information. If Chkdsk cannot lock the volume, you are prompted to have Chkdsk check it the next time the computer starts. |
/v |
On volumes formatted with FAT12, FAT16, or FAT32, displays the full path and name of every file on the volume. On volumes formatted with NTFS, displays any cleanup messages. |
/s |
Forces the volume to dismount first, if necessary. |
/? |
Displays this list of switches. |
Used without parameters, Chkdsk displays the status of the disk in the current volume.
Using Disk Cleanup
You can use Disk Cleanup to free up disk space by deleting temporary files and uninstalling programs. Disk Cleanup lists the temporary files, Internet cache files, and unnecessary programs that you can safely delete. To access Disk Cleanup, select the drive you want to check in Windows Explorer or My Computer. On the File menu, click Properties, and in the General tab, click Disk Cleanup. The Disk Cleanup dialog box is shown in Figure 14.11 and its options are explained in Table 14.9.
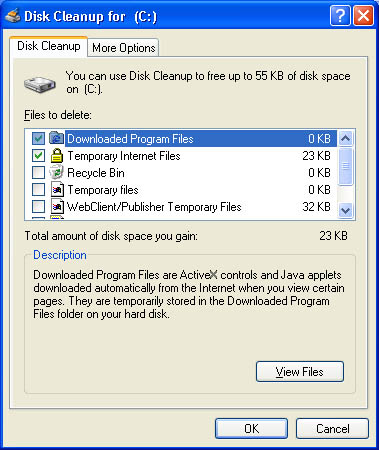
Table 14.9??Disk Cleanup Deletion Options
| Check box | Description |
|---|---|
Downloaded Program Files |
Select this check box to have Windows XP Professional delete theActiveX controls and Java applets that have been downloaded automatically from the Internet when users viewed certain pages. These files are temporarily stored in the Downloaded Program Files folder on the computer's hard disk. |
Temporary Internet Files |
Select this check box to have Windows XP Professional delete the files in the Temporary Internet Files folder on the computer's hard drive. These files are Web pages stored on the hard disk for quick viewing. Users' personalized settings for Web pages are not deleted. |
Recycle Bin |
Select this check box to have Windows XP Professional delete thefiles in the Recycle bin. When you delete a file from your computer, it is not permanently removed from the computer until the Recycle Bin is emptied (by deleting the files contained in the Recycle Bin). |
Temporary Files |
Select this check box to have Windows XP Professional delete any Temporary files on this volume. Programs sometimes store temporary information in a Temp folder. Before a program closes, it usually deletes this information. You can safely delete temporary files that have not been modified in more than a week. |
WebClient/Publisher Temporary Files |
Select this check box to have Windows XP Professional delete any temporary WebClient/Publisher files. The WebClient/Publisher service maintains a cache of accessed files on this disk. These files are kept locally for performance reasons only and can be deleted safely. |
Compress Old Files |
Select this check box to compress files that have not been accessed in a while. No files are deleted and all files are still accessible. Because files compress at different rates, the value displayed for the amount of space you will recover is an approximation. |
Catalog Files For any The Content Indexer |
Select this check box to have Windows XP Professional delete old catalog files left over from previous indexing operations. The Indexing Service speeds up and enriches file searches by maintaining an index of the files on this disk. |
There are additional ways to free up space on your hard disk using Disk Cleanup. Click the More Options tab in the Disk Cleanup dialog box (see Figure 14.12). The available options are explained in Table 14.10.
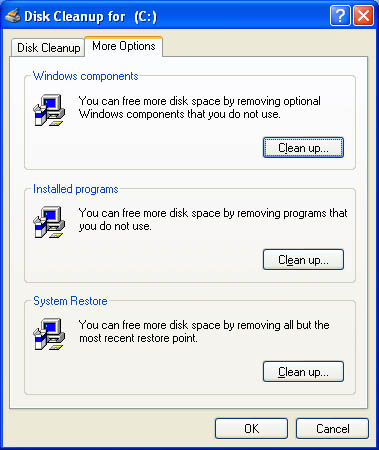
Table 14.10??Disk Cleanup More Options Tab Options

Practice:?Managing NTFS Compression
In this practice you use the Disk Defragmenter to determine if your hard disk is fragmented. If it is, you will defragment your hard disk. You then use Check Disk to examine your hard disk for file system errors, fix them, locate any bad sectors, and recover any readable information from those bad sectors. Finally, you use Disk Cleanup to free up disk space by deleting temporary files and uninstalling programs.

Exercise 1: Defragmenting a Hard Drive
In Exercise 1, you use the Disk Defragmenter to determine if your hard disk is fragmented. If it is, you will defragment your hard disk.
To defragment a hard drive
- Log on as Fred or an account that is a member of the Administrators group.
- Click Start, and then point to More Programs.
- Point to Accessories, point to System Tools, and then click Disk Defragmenter.
Windows XP Professional displays the Disk Defragmenter dialog box.
- If there are multiple volumes on your computer, select C and then click Analyze.
- If Windows XP Professional displays a dialog box indicating that there is no need to defragment your volume at this time, click Close and then read through steps 6 through 12.
- If Windows XP Professional displays a Disk Defragmenter dialog box indicating that you need to defragment your volume now (see Figure 14.13), click View Report.
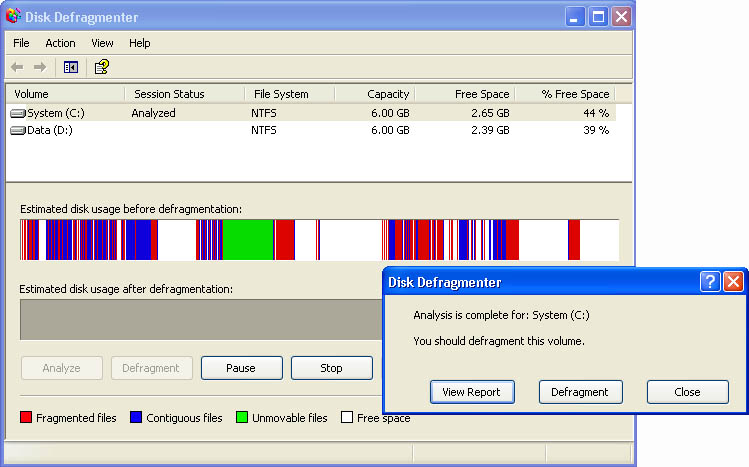 Figure 14.13??The Disk Defragmenter dialog box
 - In the Analysis Report dialog box, shown in Figure 14.14, scroll through the Volume Information box.
 Figure 14.14??The Analysis Report dialog box
 - Scroll through the Most Fragmented Files box, and then click Save As.
Windows XP Professional displays the Save Defragmentation Report dialog box. Notice that the default title for the report is VolumeC and the default location for the report is in the My Documents folder.
- Click Save to save the report as VolumeC in the My Documents folder.
You are returned to the Analysis Report dialog box.
- Click Defragment.
Disk Defragmenter defragments the volume. This could take a long time to complete, depending on the size of the volume and the amount of fragmentation.
- Compare the Analysis Display with the Defragmentation Display (see Figure 14.15).
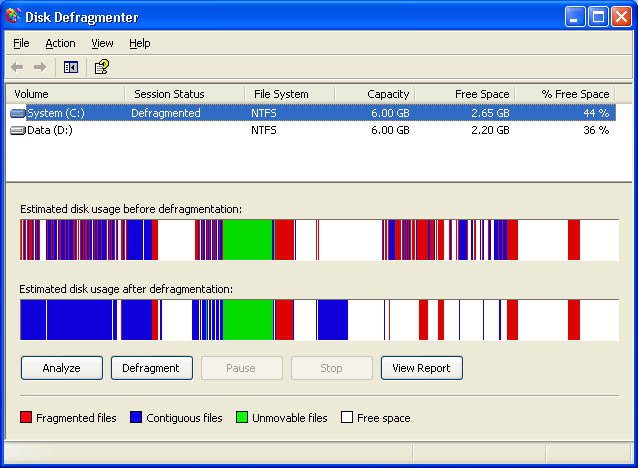 Figure 14.15??The Disk Defragmenter dialog box
 - Close Disk Defragmenter.
Leave the Local Disk (C:) Properties dialog box open for the next exercise.
Exercise 2: Running Check Disk
In Exercise 2, you run Check Disk to examine your hard disk for file system errors. If any errors are found, you fix them. You also locate any bad sectors and recover any readable information from those bad sectors.
To use Check Disk on a hard drive
- In the Local Disk (C:) Properties dialog box, click the Tools tab.
- In the Tools tab, click Check Now.
Windows XP Professional displays the Check Disk Local Disk (C:) dialog box.
- Select Scan For And Attempt Recovery Of Bad Sectors.
- Click Start.
It might take a few minutes to complete all five phases.
- When prompted that the Disk Check is complete, click OK.
Leave the Local Disk (C:) Properties dialog box open for the next exercise.
Exercise 3: Running Disk Cleanup
In Exercise 3, you run Disk Cleanup to free up disk space. Disk Cleanup allows you to delete temporary files and uninstall programs.
To use Disk Cleanup on a hard drive
- In the General tab of the Local Disk (C:) Properties dialog box, click Disk Cleanup.
A Disk Cleanup dialog box appears, indicating that it is calculating how much space you will be able to free on the C drive.
- In the Files To Delete list box in the Disk Cleanup For (C:) dialog box, review the files that Disk Cleanup is recommending you delete.If you started with a clean hard disk and installed Windows XP Professional in Chapter 2, there might be few, if any, files that Disk Cleanup found to delete. If you wanted to delete any files that Disk Cleanup recommended you delete, make sure that the files you want to delete are selected (a check mark is in the check box in front of the files) and then click OK.
- Click the More Options tab.
When would you use the options available in the More Options tab?
- Click Cancel.
- Close Disk Cleanup and all open windows.

Lesson Review
The following questions will help you determine whether you have learned enough to move on to the next chapter. If you have difficulty answering these questions, review the material in this lesson before beginning the next chapter. The answers are in Appendix A, "Questions and Answers."
- What is fragmentation and what problems does it cause?
- The process of finding and consolidating fragmented files and folders is called _______________. The Windows XP Professional system tool that locates fragmented files and folders and arranges them in contiguous space is _____________________.
- Windows XP Professional provides a tool to locate fragmented files and folders and arrange them in contiguous space on volumes formatted with which file systems?
- Which of the following functions does Check Disk perform? (Choose all answers that are correct.)
- Locate fragmented files and folders and arrange contiguously
- Locate and attempt to repair file system errors
- Locate bad sectors and recover readable information from those bad sectors
- Delete temporary files and offline files
- Why do you need to empty the Recycle Bin?
Lesson Summary
- Windows XP Professional saves files and folders in the first available space on a hard disk and not necessarily in an area of contiguous space, which can lead to file and folder fragmentation.
- Windows XP Professional takes longer to access existing files and folders and to create new files and folders when the hard disk is fragmented.
- Disk Defragmenter, a Windows XP Professional system tool, locates fragmented files and folders and defragments them, enabling your system to access and save files and folders more efficiently.
- Disk Defragmenter not only consolidates files and folders, it also consolidates free space, making it less likely that new files will be fragmented.
- Disk Defragmenter can defragment FAT, FAT32, and NTFS volumes.
- Check Disk attempts to repair file system errors, locate bad sectors, and recover readable information from those bad sectors.
- Disk Cleanup frees up disk space by locating temporary files, Internet cache files, and unnecessary programs that you can safely delete, and it also deletes temporary files and uninstalling programs.


