16.3 Installing and Configuring a Display
Physically installing a CRT monitor or FPD requires only connecting its video cable to the video adapter and plugging the monitor into the wall receptacle. The steps required to adjust the CRT monitor or FPD for best image quality vary according to the specific monitor you use. See the monitor manual for specific instructions.
|
The steps required to configure the video adapter to use the monitor optimally vary by operating system, as described in the following sections.
16.3.1 Configuring a Display Under Linux
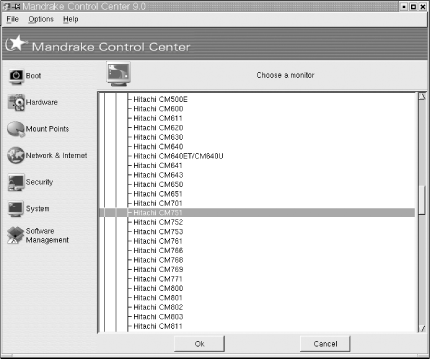
The setup utility in recent Linux distributions probes the video adapter and display to determine their capabilities and automatically configures optimum video settings. Setup prompts you to confirm the hardware it detects and to choose display settings such as resolution and color depth. To change the display type, log on as root and run Xconfigurator or whatever equivalent GUI utility your distribution provides. For example, the Mandrake Control Center, shown in Figure 16-4, allows you to select among hundreds of standard displays.
Figure 16-4. Using Mandrake Control Center to reconfigure display type

If your display is not listed, you can define a custom display type. Before you do that, check the manual to determine the combinations of resolution and refresh frequency that the monitor can support. For a digital FPD, also take color depth into account. Choose the optimum combination for your needs, define the display properly, and then configure the video adapter to use the settings you chose (see Chapter 15).
|
16.3.2 Configuring a Display Under Windows 9X/2000/XP
Windows
9X/2000/XP detects Plug-and-Play monitors and automatically
configures the correct settings for them, both when that monitor was
present during Setup and, at the next restart, when you install a new
Plug-and-Play monitor. For non-Plug-and-Play monitors, Windows uses
the Standard Monitor, which displays only standard VGA resolution.
Monitor type is configured from Display Properties 


Windows enables Automatically detect Plug & Play monitors by default. With some display adapters, enabling this setting causes the monitor to flicker during detection each time the system starts. This is harmless, but some people find it disconcerting. If that's the case, once your monitor is installed properly you can safely clear this checkbox.
Windows also enables Reset display on suspend/resume by default. This setting causes Windows to send a reset to the monitor each time you resume from Suspend mode. This causes annoying flickering with most video adapters, but disabling it can cause problems with some monitors, including inability to resume because the monitor never "wakes up" from Suspend mode. If you decide to disable this function and this problem occurs, the only option is to restart the computer and re-enable this setting. Note that even with this setting enabled, some configurations fail to resume from Suspend mode. If that occurs, the only solution we know of is to disable power management for video functions.
If Windows does not detect the monitor model (or detects the wrong model), use the Update Device Driver Wizard to select the proper monitor model from among those supported by Windows or to install a driver provided by the monitor manufacturer.
|


