Namespaces
As outlined in Chapter 1, all types, even the main application class, are defined inside namespaces. Types that appear to be declared outside of a namespace are placed into the default global namespace. The namespaces used in C# are similar to namespaces used in other languages, such as C++. At the .NET Framework level, the name of a type includes the namespace. For example, consider the following class:
namespace RailRoad
{
    public class Train
    {


    }
}
}
}
C# types are declared using namespaces as shown in this example, but the .NET Framework sees the name of the type declared above as RailRoad.Train. In C#, you can refer to the type as Train or Railroad.Train. The latter name works, but it can be somewhat unwieldy.
As you saw in Chapter 1, a new namespace is created with the namespace keyword, as shown here:
namespace MSPress.CSharpCoreRef.Animals
{


}
}
Members of a namespace can be defined in multiple files—it isn’t necessary for the entire namespace to be located in a single source file. When the compiler encounters multiple source files that use the same namespace, they’re simply added together.
As a style issue, the namespace should reflect a hierarchy, with your company name or other unique identifier at the namespace root. Creating a namespace with your company name as its root node helps to ensure that your namespaces don’t accidentally clash with namespaces from other developers. Most of the source code for this book is placed in the MSPress.CSharpCoreRef namespace.
Unlike C++ namespaces, an entire C# namespace can be defined on a single line, as follows:
YourCompanyName.ComponentArea.ClassCluster
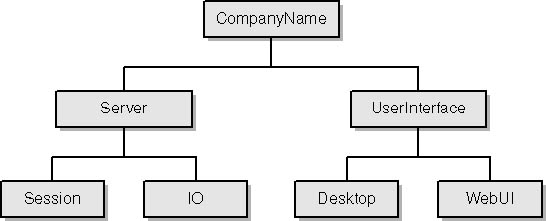
It isn’t necessary for all of your classes to exist within a single namespace. In large projects, it’s a good idea to create hierarchies of namespaces. For example, when creating reusable components for an application, you might organize your namespaces as shown in Figure 2-5:
 Figure 2-5.
By default, a Visual C# class created using any of the wizards will include a reference to the System namespace. When using data types from other namespaces in the .NET Framework, you have two options. The first option is to use the full name of the type including the namespace, as shown here:
System.Xml.XmlTextReader tr;
The second option is to add the namespace to your current namespaces with the using keyword:
using System.Xml;
Now when you declare an instance of the type, you can simply use the type name:
XmlTextReader tr;
If two types have the same names within their respective namespaces, you’ll need to manually solve the ambiguity for the compiler. For instance, consider an example program that uses two classes named Id, each in a separate namespace, as shown here:
namespace BankTypes
{
    public class Id
    {
        string _identifier;
        public Id(string Identifier)
        {
            _identifier = Identifier;
        }
        string GetId()
        {
            return _identifier;
        }
    }
}
namespace ClubTypes
{
    public class Id
    {
        string _identifier;
        public Id(string Identifier)
        {
            _identifier = Identifier;
        }
        string GetId()
        {
            return _identifier;
        }
    }
}
The ClubTypes and BankTypes namespaces each contain classes named Id. You’re free to use both namespaces in any of your source files, but if you attempt to create an Id object, you’ll get a compilation error due to the ambiguity. The compiler will return an error because the name Id could refer to either of the two classes—either ClubTypes.Id or BankTypes.Id.
If you have IntelliSense enabled, Visual Studio .NET will warn you of this problem as you’re editing your source file. Given namespaces and types as declared in the previous example, if you insert the following line into your code, IntelliSense will warn that the Id type name is ambiguous and must be further qualified:
Id myId = new Id("CSharpCoreRef");
If one of the Id types is to be used, it must be fully qualified:
ClubTypes.Id myClubId = new ClubTypes.Id("CSharpCoreRef");
In the .NET Framework, available types are packaged into assemblies. Assemblies are the unit of versioning and deployment for .NET applications and components. In its most basic form, an assembly is a single EXE or DLL module that contains a type.
Before you can make use of a type, you must add a reference to the assembly that contains the type. If you’re building a project from the command line, use the /reference or the shorter /r switch to add a reference to the proper assembly, as shown here:
csc /reference:system.xml.dll; animals.cs
To add a reference to an assembly in Visual Studio .NET, right-click the References icon in Solution Explorer and choose Add References from the shortcut menu. The Add Reference dialog box will be displayed, as shown in Figure 2-6.
 Figure 2-6.
The .NET tab contains all assemblies that are available for use in the global assembly cache. The Select button is used to select specific assemblies to be referenced by the project. To select an assembly that isn’t in the global assembly cache, you can use the Browse button to navigate to a private assembly.
The compiler will add the reference to the external assembly to a portion of your assembly known as the manifest, which includes a list of all external dependencies for the DLL. The .NET Framework uses the dependency list in the manifest to load the types used by your code. You can determine the assembly for a particular .NET Framework type using the MSDN documentation. The documentation of each type includes information about both its namespace and its assembly.


