Implementing NAT: A Step-by-Step Example
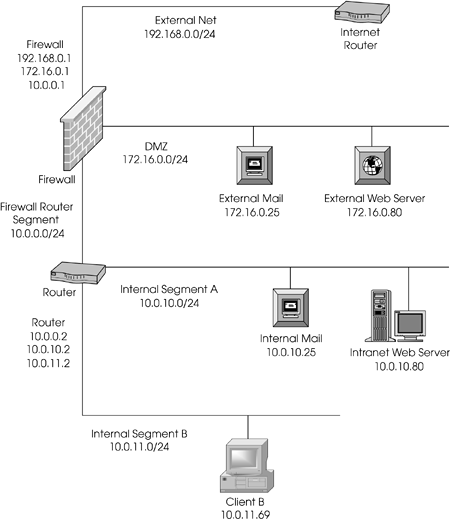
The following sample configuration involves NAT. I show what you need to do step-by-step to configure FireWall-1 to support this configuration (see Figure 10.3).
Figure 10.3. Sample network for step-by-step example
The security policy is defined as follows.
Allow the external mail server and the Web server to be reached from anywhere via SMTP and HTTP, respectively.
Allow the external mail server to send e-mail to anywhere on the Internet and to the internal mail server.
Allow a second Web instance of a Web server (running on port 81) to be accessible via a separate IP address on port 80.
Allow clients on segment A and segment B to browse the Internet via HTTP or HTTPS hiding behind a single IP address.
Allow an intranet Web server to be accessible on the Internet via HTTP. The Web server will provide its own authentication, so no authentication is necessary by FireWall-1.
Except for the former requirements, deny all other traffic.
The preceding policy is specially crafted for demonstration purposes only. Generally speaking, it is not wise to permit traffic from the Internet all the way into the internal network without some sort of encryption. Let's take the following steps to set this up.
Determine which IP addresses will be used for translation.
Set up the necessary proxy ARPs.
Set up the necessary static host routes.
Create the necessary network objects.
Make the necessary modifications to anti-spoofing.
Create the necessary rulebase rules to permit the desired traffic.
Create the NAT rules.
Install the security policy, and verify that everything works as planned.
The subsections below describe these steps further.
Determining Which IP Addresses to Use
The legal addresses include everything in 192.168.0.0/24 except for the firewall (.1) and the router (.2). You can choose any other IP address in the range. The hosts for this setup will use the following static mappings:
External mail server: 192.168.0.10
Web server: 192.168.0.11
Web server (instance on port 81): 192.168.0.12
Intranet Web server: 192.168.0.13
For the browsing that segment A and segment B hosts will need, use the firewall's external IP address of 192.168.0.2.
Setting Up Proxy ARPs
Before you begin, you need to determine which MAC address you are going to use to ARP for the translated IP addresses. You know that all of the translated addresses are on the same subnet as the external interface of the firewall. You simply need to determine what the MAC (or physical) address of the external interface is and use that address. To do this, use one of the following commands:
On UNIX and Nokia platform: ifconfig -a
On Windows NT/2000: ipconfig /all
On a UNIX platform, you will see something like this[4]:
[4] On a Solaris platform, it is likely that you will see the same MAC address on all Ethernet interfaces. The default behavior is to use a hostid-based MAC address and not the hardware MAC. So long as two or more interfaces are not on the same physical network, this should not be a problem. You can change the MAC address on a per-interface basis with the ifconfig command.
lo0: flags=849 <UP,LOOPBACK,RUNNING,MULTICAST> mtu 8232
               inet 127.0.0.1 netmask ff000000
le0: flags=863 <UP,BROADCAST,NOTRAILERS,RUNNING,MULTICAST> mtu 1500
       inet 192.168.0.1 netmask ffffff00 broadcast 192.168.0.255
               ether 0:11:22:33:44:55
le1: flags=863 <UP,BROADCAST,NOTRAILERS,RUNNING,MULTICAST> mtu 1500
       inet 10.0.0.1 netmask ffffff00 broadcast 10.0.0.255
               ether 0:c0:78:2:0:d6
le2: flags=863 <UP,BROADCAST,NOTRAILERS,RUNNING,MULTICAST> mtu 1500
       inet 172.16.0.1 netmask ffffff00 broadcast 172.16.0.255
               ether 0:c0:78:20:0:6d
On a Nokia platform, the output is slightly different:
loop0c0:  flags=57<UP,PHYS_AVAIL,LINK_AVAIL,LOOPBACK,MULTICAST>
       inet6 mtu 63000 ::1 ?> ::1
       inet mtu 63000 127.0.0.1 ?> 127.0.0.1
       phys loop0
eth-s1p1c0:  lname eth-s1p1c0 flags=e7<UP,PHYS_AVAIL,LINK_AVAIL,
BROADCAST,MULTICAST>
      inet mtu 1500 192.168.0.1/24 broadcast 192.168.0.255
      phys eth-s1p1 flags=133<UP,LINK,BROADCAST, MULTICAST,PRESENT>
      ether 0:11:22:33:44:55 speed 100M full duplex
eth-s2p1c0:  lname eth-s2p1c0 flags=e7<UP,PHYS_AVAIL,LINK_AVAIL,
BROADCAST,MULTICAST>
       inet mtu 1500 10.0.0.1/24 broadcast 10.0.0.255
       phys eth-s2p1 flags=133<UP,LINK,BROADCAST,MULTICAST,PRESENT>
       ether 0:c0:78:2:0:d6 speed 100M full duplex
eth-s3p1c0:  lname eth-s3p1c0 flags=e7<UP,PHYS_AVAIL,LINK_AVAIL,
BROADCAST,MULTICAST>
       inet mtu 1500 172.16.0.1/24 broadcast 172.16.0.255
       phys eth-s3p1 flags=133<UP,LINK,BROADCAST,MULTICAST,PRESENT>
       ether 0:c0:78:20:0:6d speed 100M full duplex
On a Windows NT/2000 platform, you will see this:
Ethernet adapter 3C5x91:

     Description . . . . . . . . : 3Com 3C5x9 Ethernet Adapter
     Physical Address. . . . . . : 00-11-22-33-44-55
     DHCP Enabled. . . . . . . . : No
     IP Address. . . . . . . . . : 192.168.0.1
     Subnet Mask . . . . . . . . : 255.255.255.0
     Default Gateway . . . . . . : 192.168.0.254

Ethernet adapter 3C5x92:

     Description . . . . . . . . : 3Com 3C5x9 Ethernet Adapter
     Physical Address. . . . . . : 00-C0-78-20-00-6D
     DHCP Enabled. . . . . . . . : No
     IP Address. . . . . . . . . : 10.0.0.1
     Subnet Mask . . . . . . . . : 255.255.255.0
     Default Gateway . . . . . . :

Ethernet adapter 3C5x93:

     Description . . . . . . . . : 3Com 3C5x9 Ethernet Adapter
     Physical Address. . . . . . : 00-0C-87-02-00-D6
     DHCP Enabled. . . . . . . . : No
     IP Address. . . . . . . . . : 172.16.0.1
     Subnet Mask . . . . . . . . : 255.255.255.0
     Default Gateway . . . . . . :
Use the ether or physical address of the system's external interface. In this case, you will use 00:11:22:33:44:55. Now that you know what the MAC address is, you can set up the ARPs. On UNIX systems, this is done as follows:
# arp -s 192.168.0.10 00:11:22:33:44:55 pub
# arp -s 192.168.0.11 00:11:22:33:44:55 pub
# arp -s 192.168.0.12 00:11:22:33:44:55 pub
# arp -s 192.168.0.13 00:11:22:33:44:55 pub
In order for these ARPs to be available on reboot, you need to add them to a file that executes on startup. Do not add them to the /etc/rc3.d/S95firewall1 script, which gets overwritten during an upgrade. Create a new startup script like /etc/rc3.d/S94nat.
Windows NT does not have a proxy ARP facility, so Check Point has included it as part of the software. Create the file %FWDIR%\state\local.arp, and enter the following information:
192.168.0.10    00-11-22-33-44-55
192.168.0.11    00-11-22-33-44-55
192.168.0.12    00-11-22-33-44-55
192.168.0.13    00-11-22-33-44-55
These ARPs will not become active until a policy reload is performed. In some cases, it may be necessary to stop and start FireWall-1.
In Windows 2000, proxy ARP is broken, particularly if you use the Routing and RAS service. Microsoft has a hotfix for this proxy ARP issue. Refer to article ID Q282312 in Microsoft's Knowledge Base. After you have that hotfix, you need a special utility from Check Point called fwparp, which is available from Check Point's Knowledge Base, article sk699. This program needs to be run after each reboot, so it is not terribly convenient. For Windows 2000 deployments, it is recommended that you do proxy ARPs on a different device or configure static routes for each of those addresses on the upstream router.
On the Nokia platform, add these ARPs via the Voyager interface as Proxy-Only type. In a VRRP configuration, configure both firewalls and use the VRRP MAC address instead of the network card's MAC. You may also configure the NAT IPs as VRRP backup IPs, thus eliminating the need for proxy ARPs.
NOTE!
In IPSO, there is an option to allow connections to VRRP IP addresses. Make sure this option is disabled if you plan to configure the NAT IPs as VRRP IPs. |
Setting Up Static Host Routes
The only translations for which you need to set up static host routes are those that involve a destination static translation (i.e., where the destination IP address needs to be translated). In our example, you need to set up static host routes for all of them because they will all be connected by their translated IP address.
You need to determine where the real hosts for the virtual IPs are in relation to the firewall. This is so you can determine the next hop for the static host routes you will set up. Using Figure 10.3, you know the following information.
The external mail and external Web servers are on the same subnet as the firewall. In this case, you simply use the real host's IP address as the next hop.
The intranet Web server is not on the same subnet as the firewall. In this case, you want to use the next hop IP address, which is the router that is connected to segment A?the segment on which the intranet Web server is connected. This is 10.0.0.2.
On UNIX platforms (not IPSO), you would add the static routes like this:
# route add 192.168.0.10 172.16.0.25 1
# route add 192.168.0.11 172.16.0.80 1
# route add 192.168.0.12 172.16.0.80 1
# route add 192.168.0.13 10.0.0.2 1
Like the previous ARPs, these lines need to go into a startup file so that they are available after a reboot.
On Windows NT platforms, the static routes you add are similar to UNIX:
> route add 192.168.0.10 172.16.0.25 ?p
> route add 192.168.0.11 172.16.0.80 -p
> route add 192.168.0.12 172.16.0.80 -p
> route add 192.168.0.13 10.0.0.2 -p
Note that on Windows NT/2000, if you use the -p flag, the routes are persistent; that is, they are stored in the Registry and will stay there until they are deleted, even after a reboot.
On the Nokia platform, you can use Voyager to add these routes. Additionally, in IPSO 3.6 and later, you can use the following commands from clish:
NokiaIP380:10> set static-route 192.168.0.10/32 nexthop gateway
                   address 172.16.0.25 priority 1 on
NokiaIP380:11> set static-route 192.168.0.11/32 nexthop gateway
                   address 172.16.0.80 priority 1 on
NokiaIP380:12> set static-route 192.168.0.12/32 nexthop gateway
                   address 172.16.0.80 priority 1 on
NokiaIP380:13> set static-route 192.168.0.13/32 nexthop gateway
                   address 10.0.0.2 priority 1 on
In IPSO 3.5 and earlier, there is no supported manner in which to add routes via the command line.
Creating Network Objects
You must create network objects for both translated and untranslated objects; see Table 10.2.
Name | Object Type | IP/Mask/Group Objects | Description |
|---|---|---|---|
net-dmz | Network | 172.16.0.0/255.255.255.0 | Your DMZ |
smtp-dmz | Node, host | 172.16.0.25 | Mail server in the DMZ |
smtp-dmz-ext | Node, host | 192.168.0.10 | Translated version of smtp-dmz |
web-server | Node, host | 172.16.0.80 | Web server in the DMZ |
web-server-ext | Node, host | 192.168.0.11 | Translated version of web-server (for port 80) |
web-server-ext2 | Node, host | 192.168.0.12 | Translated version of web-server (for port 81) |
net-router-segment | Network | 10.0.0.0/255.255.255.0 | Segment shared by firewall segment and internal router |
net-segment-a | Network | 10.0.10.0/255.255.255.0 | Segment A |
web-intranet | Node, host | 10.0.10.80 | Intranet Web server |
web-intranet-ext | Node, host | 192.168.0.13 | Translated version of web-intranet |
smtp-internal | Node, host | 10.0.10.25 | Internal SMTP server |
net-segment-b | Node, host | 10.0.11.0/255.255.255.0 | Segment B |
valid-dmz | Group | net-dmz | Represents your DMZ interface's valid addresses for anti-spoofing |
valid-internal | Group | net-segment-a + net-segment-b + net-router-segment | Represents your internal interface's valid addresses for anti-spoofing |
firewall | Check Point gateway | 192.168.0.1 | Your firewall |
Modifying the Anti-Spoofing Settings
When configuring your firewall object, set your topology according to the settings shown in Table 10.3. These settings are configured in the Topology frame in the firewall object. Also, make sure that each interface has Spoof Tracking set to Log to catch any errors in the anti-spoofing configuration.
Interface | Valid Address Setting |
|---|---|
DMZ | Interface defined by IP and netmask |
Internal | Specific: valid-internal |
External | External |
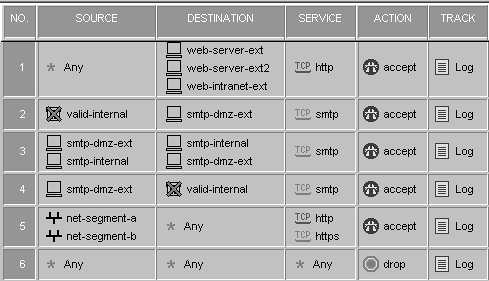
Creating Security Policy Rules
The rules shown in Figure 10.4 are based on the security policy defined earlier.
Figure 10.4. Sample security policy rulebase
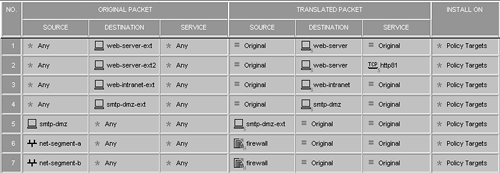
Creating Address Translation Rules
Once the security policy is defined, NAT rules must be defined, as shown in Figure 10.5. Before you begin, make sure you define a service for port 81. It will be a service of type TCP. In Figure 10.5, it is referred to as http81, so you can do the port translation that the security policy requires. Note that at the lower right of some of the icons used in the figure, the "S" refers to static rules, and the "H" refers to hide rules.
Figure 10.5. Sample NAT policy rulebase
Installing and Testing the Security Policy
Initiate a connection to exercise each rule and ensure that each one is functioning as you expect. Test access from inside and outside the network.


