Making Your First Rulebase
Now that the various components have been discussed, I will talk about making a rulebase. As mentioned earlier, the rulebase is what determines who can do what, where, and when. In order to make a rulebase, you need to create and configure the various components that make up the rulebase. Follow this order of business.
Get a map of the network(s) the firewall is designed to protect. It does not need to be a totally detailed map, but it needs to cover the major points of interest: physical and logical network segments being protected, any special hosts (externally accessible hosts or any hosts that require special access or restrictions), and all routers one hop away from the firewall.
Create network objects for each network segment and special hosts. Do not create the firewall at this step.
Create groups that make up all the networks on each leg of the firewall. This is for anti-spoofing, as well as for creating a much more readable rulebase later.
Create the Check Point gateway object(s) and configure anti-spoofing.
Adjust rulebase properties as appropriate.
Install the security policy.
You might think you should create the Check Point gateway object first. However, the reason you create it last is so you can define anti-spoofing at the same time you create the Check Point gateway object.
Knowing Your Network
Knowing what you are protecting is half the battle. If you do not have a network map, the process of generating one should give you an idea of how the various parts of your network talk to one another. You need to find out what network segments (physical and logical) are present, how they talk to one another, what routers are present, and so on. Although there are programs that claim to be able to automatically map a network for you, the best approach is to sit down and just figure it out. In some situations, this is fairly easy because there are only a couple of network segments. However, in large networks, figuring out the entire network may be too large a task for a single person to do. In this case, delegate responsibility to people who are in the best position to know how their part of the network is configured.
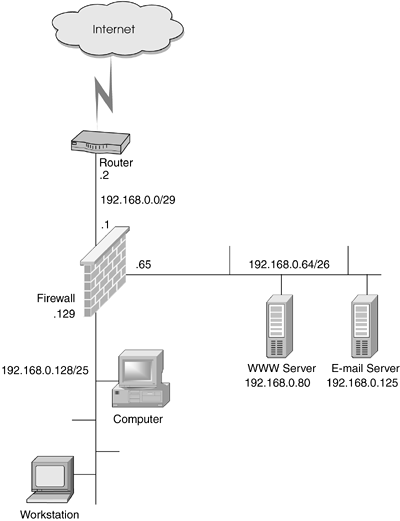
Regardless of how you collect all the information, generate a network map of some kind. Although it is not required, having a visual representation of your network is extremely helpful when crafting policy. To guide you through the rest of the steps, let's use the network pictured in Figure 4.32. This network has two segments: an internal segment with PCs and workstations, and a DMZ with e-mail and WWW servers.
Figure 4.32. Sample network map
NOTE!
In the sample network diagrams throughout this book, I use RFC1918 address space to "protect the innocent." I am treating the 192.168.0.0/16 address space as if it were routable on the Internet, though it normally is not. |
Defining Objects
Seven network objects need to be created:
A network object for 192.168.0.128/25, called net-192.168.0.128-25
A network object for 192.168.0.64/26, called net-192.168.0.64-26
A group object called net-internal, which contains net-192.168.0.128-25
A group object called net-dmz, which contains net-192.168.0.64-26
A workstation object for the WWW server, called www-server
A workstation object for the e-mail server, called email-server
A Check Point object for the firewall/management console itself, called firewall
You will note that I stated that a group should be created for both the internal and DMZ networks even though they contain only one object each. I did this for two reasons: It makes a more readable rulebase, and it allows easier expansion later.
Unless you are allowing access to or from hosts outside of the DMZ or the internal segment, it is not necessary to define anything in addition to these objects. Figures 4.33 through 4.36 show how the net-192.168.0.64-26, net-dmz, email-server, and firewall objects are defined.
Figure 4.33. Network Properties for net-192.168.0.64-26
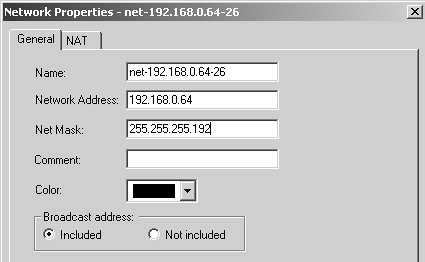
Figure 4.34. Group Properties for net-dmz
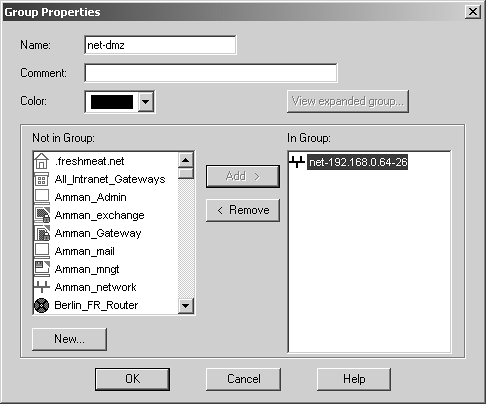
Figure 4.35. Host Node, General Properties frame for email-server

Figure 4.36. Check Point Gateway, General Properties frame for firewall
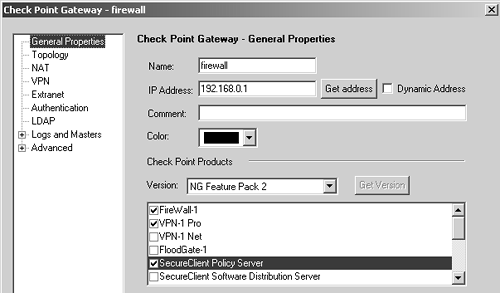
The last object is the most important to discuss, especially with regard to how it is created. The other objects are fairly self-explanatory.
The name of the Check Point gateway object should match the hostname of the box. The name should not be a reserved word or a defined service name, and it should not contain any illegal characters. (See the Frequently Asked Questions section later in this chapter for more details.) The IP address listed should be the external, routable IP address of the firewall. The name of the object should be resolvable to this IP address via the local hosts file. The licensed IP address of the firewall should also be the same as the IP address.
Defining the Rules
In Chapter 2, I discussed defining a site-wide security policy. If you have a policy document, generating the rules for your security policy in FireWall-1 should be relatively straightforward. If you do not have such a document, it might be a good idea to generate one now. One way to create this document is to sit down with some department heads in a conference room, draw the network on the whiteboard, and define some rules. When I used to install FireWall-1 at customer sites, part of my installation process was exactly that: sketch the network on a whiteboard and make a list of requirements of who needs to do what, where, and when. The result of this process should be a list of simple-to-understand statements that can easily be turned into rules in FireWall-1.
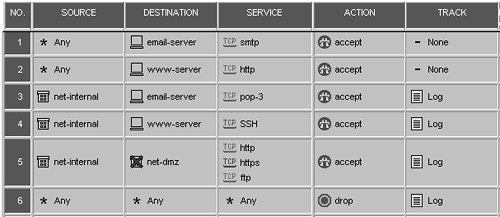
Using the sample network shown in Figure 4.32 and some arbitrary business rules, the following set of statements can be generated. The business rules will obviously be different for each network.
Everyone can access the e-mail server via SMTP. Access to this service will not be logged on the firewall.
Everyone can access the WWW server via HTTP. Access to this service will not be logged on the firewall.
Hosts on the internal network (192.168.0.128/25) can access the SMTP server via POP3. Access to this service will be logged.
Hosts on the internal network can access the HTTP server via SSH. Access to this service will be logged.
Hosts on the internal network can access the Internet via HTTP, HTTPS, and FTP. Access to these services will be logged.
Except for the preceding rules, all other traffic should be dropped. All dropped packets will be logged.
These business rules translate to the rules in the rulebase pictured in Figure 4.37.
Figure 4.37. Sample rulebase for the network shown in Figure 4.32
Tweaking the Global Properties
The following list contains some guidelines for setting the various properties as well as rules to use in place of these settings. All of the following properties are in the FireWall-1 portion of the Global Properties screen except for one.
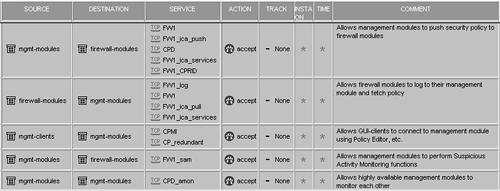
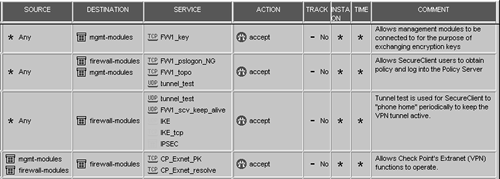
Accept VPN-1 & FireWall-1 control connections and Accept CPRID connections: Even though Check Point has tightened these properties over the years to make them safer, some people still feel these properties are dangerous. These two properties enable over 30 different rules, so I understand people's concerns. Enabling these properties and selecting Implied Rules from the View menu shows a complete list of these rules. I have combined many of these rules into groups of implied rules, shown in Figures 4.38 through 4.40. Accept CPRID connection only enables the FW1_CPRID service as shown in Figure 4.38. Note that I did not list implied rules for products not covered in this book.
Figure 4.38. General replacement rules for Accept control connections and Accept CPRID connections properties
Figure 4.39. VPN replacement rules for Accept control connections property
Figure 4.40. Authentication replacement rules for Accept control connections property
Accept outgoing packets originating from gateway: This property is generally safe to leave enabled. The one reason you might not leave this property enabled is for logging purposes. In this case, you can create a rule permitting all traffic from the firewall with the Track field set to Log. Figure 4.41 shows an example. If you think that not enabling this property or adding this rule will keep a hacker from using your firewall to break into other systems, consider this: If a hacker has that kind of access to your firewall, chances are he can probably disable the firewall.
Figure 4.41. Rule to allow connections from the firewall
Accept RIP: Figure 4.42 shows an example of a replacement rule you could use for this property if you wanted to disable the property and still use RIP. This property allows RIP packets that originate from anywhere, which I view as dangerous. RIP2-ROUTERS.MCAST.NET is a host object with IP address 224.0.0.9 and is needed only if RIPv2 is being used.
Figure 4.42. Rule to allow RIP on internal networks
Accept Domain Name over UDP (Queries): This property allows UDP-type DNS packets to and from anywhere. Should you wish to disable this property, which is very dangerous to leave enabled, see Figure 4.43 for an example replacement rule for this property. If you leave this property enabled, I highly recommend that you enable stateful DNS queries, explained in FAQ 4.7 later in this chapter.
Figure 4.43. Rule to allow DNS queries from clients to DNS servers
Accept Domain Name over TCP (Zone Transfer): This property allows TCP-type DNS packets to and from anywhere. Should you wish to disable this property, which is very dangerous to leave enabled, see Figure 4.44 for an example replacement rule for this property. Note that unless your primary and secondary DNS servers are separated by your firewall, neither the property nor the rule is necessary. If you leave this property enabled, I highly recommend that you enable stateful DNS queries, explained in FAQ 4.7 later in this chapter.
Figure 4.44. Rule to allow DNS servers to perform zone transfers
Accept ICMP requests: This property allows ICMP requests from any location. This includes echo requests, timestamp requests, information requests, and mask requests. This property is considered dangerous and should be disabled. If you wish to allow outbound ping or traceroute, consider using a rule similar to Figure 4.45. Note that replies to these ICMP packets are controlled by a different property.
Figure 4.45. Rule to allow outbound ping and traceroute to the Internet
Accept Stateful ICMP Replies: This property is actually in the Stateful Inspection frame of the Global Properties screen, which will be explained in more detail in Chapter 6. The property is mentioned here because it is necessary to have this property enabled for ICMP to work correctly. By default, it should be.
Accept dynamic address modules' DHCP traffic: This property permits DHCP packets that originate from a firewall marked as having a dynamic address and any replies to it. Unless you have a firewall that uses DHCP in any way, this property can be disabled.
Log Implied Rules: If you have any implied rules enabled and want their activity logged, check this box.
Rules That Should Be in Every Rulebase
Some specific rules should be included in your rulebase regardless of what your security policy states. These rules are common in many installations, and there are good reasons for them.
The first rule that should be part of your rulebase is the last rule in your rulebase: the Cleanup rule, shown in Figure 4.30 earlier in this chapter. Even if this rule is not specified, it is always implied. However, you should add a rule explicitly with logging so you know about all unauthorized traffic.
Another good rule is a rule that denies all traffic to the firewalls, what many people refer to as the Stealth rule (see Figure 4.46).
Figure 4.46. Stealth rule
![]()
It may seem strange to explicitly drop traffic to your firewall if your last rule is "deny all" anyway. However, this separates that traffic so you can more easily see what traffic is being directed at your firewall. You can also perform a different tracking option, such as an alert. Normally, the Stealth rule goes at or near the top of your rulebase. However, it should appear after any rule that permits traffic directly to the firewall. Figure 4.47 shows an example of such a rule. This rule allows VRRP to the firewall, which is relevant to Nokia platforms.
Figure 4.47. Rule to permit VRRP to function on Nokia platforms

This rule permits VRRP and IGMP packets from the hosts in the Firewalls group to the firewalls and the special address vrrp.mcast.net. This rule will be enforced on all gateways, and packets that match this rule will not be logged. It is a common rule found on a pair of Nokia firewalls running VRRP.
I typically like to add to rulebases a rule that rejects ident packets, as shown in Figure 4.48. Ident is used by some services to identify the remote end of the connection, although it is relatively easy to spoof. Internet Relay Chat (IRC) and SMTP are the most common services that use ident. Most SMTP servers can live without ident information, whereas most IRC servers are configured to deny a connection if ident doesn't return information. If you simply drop incoming ident packets, these services will appear to hang until the attempted ident connection times out. By rejecting the packets instead of dropping them, you can avoid this delay.
Figure 4.48. Rule to reject ident traffic

Installing the Policy
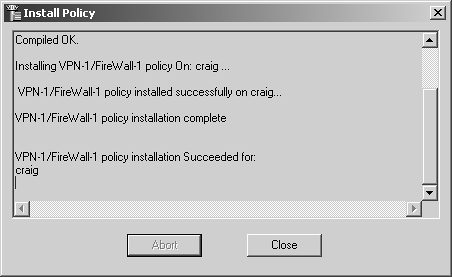
Once you have created a good policy, you need to install it. You do this by selecting Install from the Policy menu or by clicking this button in the GUI: ![]() . A series of dialog boxes are then displayed, informing you about various aspects of your security policy that might need correction. In addition, you will see a screen where you can select which gateways to install the policy on and some conditions for installing that policy (i.e., it must install successfully on all selected gateways or members of a cluster). If the installation is done correctly, you should see something similar to the screen shown in Figure 4.49.
. A series of dialog boxes are then displayed, informing you about various aspects of your security policy that might need correction. In addition, you will see a screen where you can select which gateways to install the policy on and some conditions for installing that policy (i.e., it must install successfully on all selected gateways or members of a cluster). If the installation is done correctly, you should see something similar to the screen shown in Figure 4.49.
Figure 4.49. Policy installation status screen
If an error or problem is encountered, you might receive one of the following error messages. Note that this list does not contain every possible problem you might encounter, but it does contain the most common errors.
No machines eligible for Policy Installation! If you forgot to define an internal gateway with FireWall-1 installed, you will see this message. Make sure at least one object is defined in this manner before attempting to install a policy.
Rule x hides/conflicts with Rule y for Services z: This message means that Rule x is constructed in such a way that Rule y would never apply. Consider the example shown in Figure 4.50. The first rule would deny the internal network access via SSH before the second rule could allow it. Therefore, the second rule could never allow SSH from the internal network.
Figure 4.50. Rule with conflicts
Authentication for command load failed: This error message displays when your management module and firewall module are on separate platforms, and you have not established an authenticated control connection between them. See Chapter 7 for more details.
External interface not set by this loading: This error occurs on node-limited licenses when you have not defined your external interface in the topology of your Check Point gateway object. Go back to the gateway object, view the topology definition, and make sure at least one interface is defined as "external."
Connection timed out or refused: A "connection timed out" message occurs if the remote firewall module is disconnected from the network or has a policy loaded on it that prevents the management module from communicating with it. To resolve problems with the policy, log into the firewall module and run the command fw unloadlocal. This will unload the current policy on your firewall module. A "connection refused" message may occur for a similar reason but also occurs when the fwd process is no longer active. On a UNIX/IPSO platform, type fw kill fwd; fwd. On a Windows NT platform, restart the FireWall-1 service in the Windows NT/2000 Services Manager.
