Section 7.4. Themes, Templates, and Macros
Themes and templates in Radio are the two features that control the presentation of your blog. Each page you see is composed of many templates. A template is just an HTML file with some non-HTML tags to indicate Radio-specific elements such as entries and dates. Where these elements exist, Radio, when posting your blog entry, inserts the content represented by those elements. A theme is a collection of templates that has a consistent look and feel.
The non-HTML tags are called macros. A macro corresponds to functionality within Radio, generally written in UserTalk, that is inserted into your blog when your page is published. Macros add additional functionality such as enabling comments on your blog, adding a list of recent blog posts and more. While changing your theme involves only a few mouse clicks, editing templates to add macros is much harder.
As with other blogging systems, adding macros requires that you understand HTML, because the macros are inserted directly into HTML "chunks" stored in Radio.
7.4.1 Using Existing Themes
Use these steps to change your overall theme.
Click the Themes link on the Radio command bar at the top of the screen.
Select a theme to use by clicking on the radio button to its left.
Confirm that you really do want to replace your existing theme. This is important because changing your theme eliminates all customizations to your current theme. Be careful that you don't lose something important!
To save your existing theme changes, go into each template in the Prefs section of Radio and copy each of the templates to a text file. After changing to a new theme, you can make these changes to the new theme.
Click Submit.
Click Home to return to the home page. If your new theme doesn't appear, refresh your browser and it will be displayed.
Check your blog to make sure you like the appearance you chose. If you don't like it, repeat this process to choose a different theme.
Radio comes with many variations on the Adult Contemporary theme, plus several exotic themes such as Soundwave, Space, Transmitter, and Woodlands. Many people have made Radio themes available for download, and a simple Google search for "UserLand Radio themes" will find them. For example: http://radio.weblogs.com/0001246/gthemes/.
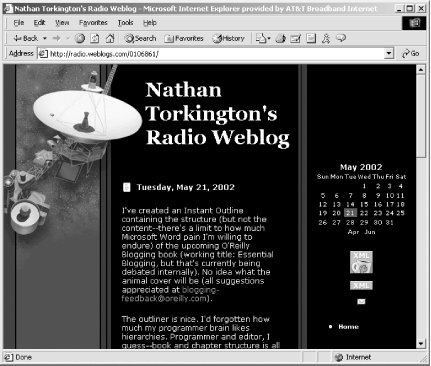
Figure 7-5 shows a blog with the Woodland theme, while Figure 7-6 shows the same blog with the Space theme.
Figure 7-5. The Woodland theme
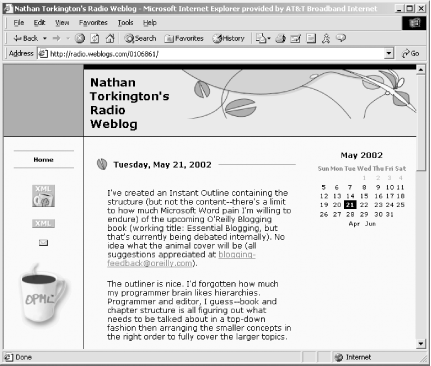
Figure 7-6. The Space theme
For additional themes for Radio or to see examples of the themes, see:
- http://themes.userland.com
- http://themes.userland.com/newsItems/viewDepartment$new%20radio%20theme
7.4.2 Customizing Templates with Macros
Radio macros are always used between the <% and %> delimiters, which tell Radio to replace the name of the macro with its action when the blog is published. The standard Radio macros, those published and documented on the UserLand web site, are listed below. Your copy of Radio will have additional macros added to it automatically when Radio.root is updated.
The Prefs menu has a list of templates: Main template (the basic structure of almost every page in your blog); Main template (the basic structure of your public Radio UserLand home page); Day template (view of one day's entries); Item template (the format of a single item); and Desktop Website template, which contributes the home page when you are authoring your blog in Radio. Click on a template to edit it. Let's edit your Home page template to add a reminder of how to sign your checks. Once you've selected the template to edit, you'll see a page like Figure 7-7.
Figure 7-7. Editing the main template
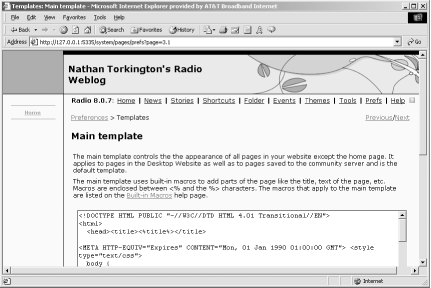
The HTML template is in the textbox. Scroll down approximately halfway until you find the macro <%navigatorLinks%> in HTML like this:
<%navigatorLinks%>

<hr size="1">

</td>
Change it to:
<%navigatorLinks%>

<hr size="1">

<br>Don't forget to date your checks <%year%>!

</td>
Click the Submit button and your Main template change will be saved. On the resulting page, you can see the effect of your change (see Figure 7-8).
Figure 7-8. Main template with change
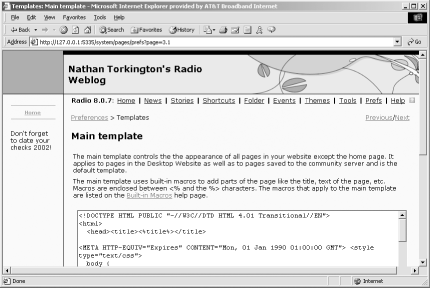
When Radio constructs a page from the Main template, it now finds the macro <%year%>, which is replaced with the current year.
7.4.3 Useful Macros
Macros for use in the Main, Home Page, and Desktop Website templates include:
- <%title%>
-
Title of the page (e.g., "Stories").
- <%siteName%>
-
Name of your blog (e.g., "Sherlock Holmes' Casebook").
- <%description%>
-
Description of your blog (e.g., "Elementary, Dear Watson").
- <%bodytext%>
-
Body of the page. The Main template is used to generate every page you see from Radio, from Create New Entry to Prefs. The content specific to the Create New Entry and Prefs pages is represented by the <%bodytext%> macro.
- <%year%>
-
Current year (e.g., 2002).
- <%authorName%>
-
Your name (e.g., "Dr Watson").
- <%authorMailAddress%>
-
Your email address (e.g., watson@example.com).
- <%navigatorLinks%>
-
Contents of your #navigatorLinks file (see Chapter 3).
- <%radioBadge%>
-
Image that links to the Radio UserLand home page.
- <%rssLink%>
-
Orange XML button that links to the RSS version of your blog.
- <%now%>
-
Time you published the page, used for Last Update message (e.g., 5/21/2002; 10:06:40 P.M.)
Macros for use in the Day template include:
- <%archiveLink%>
-
Image that links to the archive page for that day.
- <%longDate%>
-
Long version of the date for that day (e.g., "Tuesday, May 21, 2002").
- <%items%>
-
Posts for that day.
Macros for use in the Item template include:
- <%itemText%>
-
Text of a blog post.
- <%itemTitle%>
-
Title of a blog post, if specified.
- <%when%>
-
Time the post was made (e.g., 4:31:19 P.M.).
- <%permalink%>
-
Image that links to the post on the archive page (a small # sign by default).
- <%editButton%>
-
The button that appears next to blog posts in the Desktop Website.
- <%enclosure%>
-
Link to a post's enclosure ? applies only to items that have enclosures. An enclosure is a binary attachment to an RSS item, such as an MP3 file.
- <%itemNum%>
-
The unique ID for this blog post.
- <%paddedItemNum%>
-
The unique ID for this blog post, padded with zeros to make it eight digits long.
- <%source%>
-
A link to the site that was the source for the item ? applies only to items posted from the News page.
- <%commentLink%>
-
A link to open a pop-up page where visitors can post comments about your blog posts.
7.4.4 Saving Your Customizations
When you change your theme (remember a theme is a collection of individual templates), any changes you've made to your existing templates are lost. For example, if you customize the Woodlands theme and then decide to experiment with the Space theme, your changes to the Woodlands theme are lost. Radio warns you about this, but most users are so used to clicking right through warning dialogs that it's very easy to lose your work.
To save a customized theme, go to the Themes page. A link in the first paragraph of the Themes page lets you create your own theme. Others will be able to download your customized theme if you choose to publish it. To share a theme you create, please see the Create Theme page accessed from the main Themes page (click on the Themes link in the Radio command bar).
7.4.5 Enabling Comments
UserLand offers a comments service to all Radio users, which works even if you publish your blog to your own web server instead of running your blog from UserLand. Comments are disabled by default. To enable comments, add the <%commentLink%> macro to your Item template.
Click on the Prefs link in the Radio command bar.
In the Weblog grouping, click on the Comments option.
Click on the comments checkbox and then click Submit.
Now you need to modify your template to allow comments to be added. Click on Prefs again and then click on Templates.
Under Templates, click on the Item template.
Paste the text <%commentLink%> into the edit after the <%editButton%>. This places the link to the comment tool on the left hand side of the screen below your post.
Click Submit to save your change.
Reload your blog.
To disable the comments, go to the Prefs page and simply remove the <%commentLink%> macro.
The standard Radio comment tool has limitations, such as relatively slow performance, no ability to delete comments, and no notification to authors of comments. There are other services offering Radio-compatible comment engines, such as http://rateyourmusic.com/yaccs/.
7.4.6 Listing Recent Posts
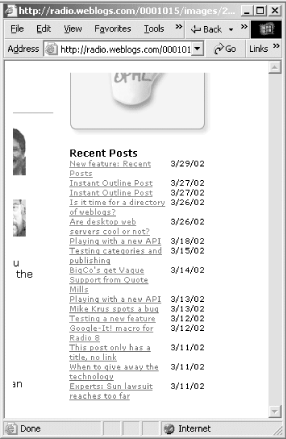
People who read your blog will vary from everyday readers to occasional browsers. If you blog frequently, you may find that those occasional readers are penalized by the sequential, newest to earliest, nature of blogs. To make this easier for readers, you can add the Recent Posts macro to your blog. The Recent Posts macro lists the titles of recently added posts. You must have titles enabled (see Chapter 4) to use the Recent Posts macro. Figure 7-9 shows the Recent Posts macro in action.
Figure 7-9. Recent Posts macro
Like many Radio macros, the Recent Posts macro (actually called radio.macros.recentTitledBlogPosts) can be called with parameters. In the case of this macro, the parameters specify how many posts to display, whether to truncate titles, and so on. The five parameters, all of which are optional, are listed with their default values in Table 7-1.
|
Parameter |
Default Value |
Meaning |
|---|---|---|
maxPosts |
25 |
Maximum number of posts to display |
maxTitleLength |
(infinite) |
Maximum length of title (titles will be truncated to this length) |
flIncludeWhen |
true |
List the dates of the posts as well as their titles |
Catname |
"" |
Category of posts (empty string means all) |
cellSpacing |
0 |
Cell spacing for the table |
So to display a Recent Posts list, but truncate the titles at 50 characters, you'd use:
<%radio.macros.recentTitledBlogPosts (maxTitleLength:50)%>
To raise the number of posts to 50:
<%radio.macros.recentTitledBlogPosts (maxPosts:50)%>
To add 5 pixels between each line in the post lists and between the title and the data (i.e., set the cellspacing attribute of the HTML table that displays the posts):
<%radio.macros.recentTitledBlogPosts (cellSpacing:5)%>
To give 10 posts a title length of 50 characters, with no dates and 5 pixels of cell spacing:
<%radio.macros.recentTitledBlogPosts (maxPosts:50, maxTitleLength:50,

 flIncludeWhen:false, cellSpacing:5)%>
To add this macro to your template underneath your calendar:
Update your Radio.root file as described earlier in Chapter 3.
Click on the Prefs link in the Radio command bar.
In the Templates group of links, click on the Home Page template.
Find the call to <%drawcalendar ( )%>.
Add the Recent Posts macro after the call to drawcalendar. Exactly where to put it in the HTML depends on the template you're using. For example, in the Default template, the calendar is part of a table with your navigation links and various Radio and XML icons. In this case, it's best to put the Recent Posts list outside that table. In the Woodlands theme, the icons and links are elsewhere, so you can simply put the Recent Posts macro call immediately after the drawcalendar call.
<%radio.macros.recentTitledBlogPosts (maxTitleLength:50)%>
Click on Submit to save your template.
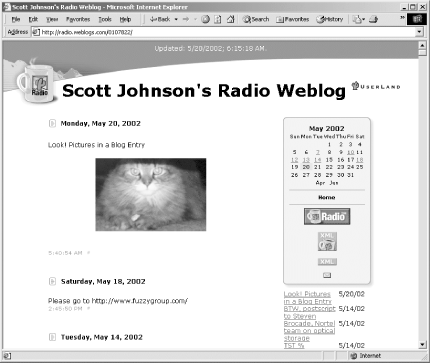
Reload your blog's home page and you should see the Recent Post list. Figure 7-10 shows the Recent Posts list added to the Default theme.
Figure 7-10. Calendar and recent posts
If you find that the macro's output doesn't appear on your blog, one of two things is probably wrong. An error message from Radio probably indicates a syntax error ? check that you haven't mistyped the % characters or mistyped the macro or its arguments. If you just don't see a change, your changed post probably hasn't been upstreamed yet ? wait a few seconds and try again. If it still doesn't work, check your network connectivity and look at the Events log in Radio.
7.4.7 Additional Macros
There are many different macros for Radio templates: some from UserLand, some from individual developers, and some from third parties. Different types of macros include the very popular GoogleBox, picture galleries, image uploaders, and more. Locate these macros via these directories:
- http://radio.userland.com/directory/6742
- http://ruminations.weblogger.com/directory/143
7.4.8 Creating and Downloading Themes
Although adding macros to an existing Radio template is relatively easy if you are comfortable with HTML, it is actually quite difficult to create an entire theme. A third-party product for Radio, themeTool, lets you create your own themes using standard web development tools such as DreamWeaver or FrontPage. More information is available from:
- http://radiotools.evectors.it
- http://radio.userland.com/stories/storyReader$7024


