The Management GUIs
The Management GUIs allow you to create and edit your security policy as well as view policy logs and system status. Several distinct applications make up the Management GUIs. In NG FP3, Check Point decided to rename all of the Management GUI client programs using the Smart moniker. To reduce confusion and to give a sense of familiarity for readers who are familiar with earlier versions of FireWall-1, I refer to these programs by both names in the list below and throughout the book. In NG AI, Check Point collectively refers to the Management GUIs as SmartConsole.
SmartDashboard/Policy Editor: Allows you to view and modify your security policy. This application is covered in this chapter.
SmartTracker/Log Viewer: Allows you to view your firewall logs. This application is covered in Chapter 5.
SmartView Status/Status Manager: Allows you to view basic system status and display alerts from your firewalls. This application is also covered in Chapter 5.
SecureClient Packaging Tool: Allows you to create custom Secure Client installation bundles. This application is covered in Chapter 12.
SmartUpdate/SecureUpdate: Allows you to manage Check Point software installed on remote modules. This application is covered in Chapter 7.
SmartView Monitor/Traffic Monitoring: Allows you to get real-time data on the amount and kinds of traffic going through the firewall. Since this application relates to FloodGate-1, this application is not covered in this book.
Reporting Tool: Allows you to run reports on logged firewall activity.
User Monitor: Allows you to monitor which users are currently using Secure Client and data about those clients.
Large Scale Manager: Allows you to view the status and install policy on a large number of gateways. This application is discussed in Chapter 7, but it is not explicitly covered.
The SMART Clients, as Check Point has referred to them since FireWall-1 NG FP3, view data stored on the management console via a TCP connection on port 18190. They do not store any information locally except for preferences for the application itself. The most common (and recommended) platform on which to run the GUIs is Windows (95, 98, NT, or 2000). A Motif version exists for Solaris. It uses the same code as the Windows platform and is nearly identical in appearance, but it runs on an emulation layer that, at least in the past, has been slow and known to be buggy and leak memory. To add insult to injury, Check Point charges extra for the use of this GUI, reportedly because Check Point has to pay a licensing fee to the company that provides the emulation layer.
Introducing SmartDashboard (a.k.a. Policy Editor)
Before discussing how to control access to the administrative interfaces, I want to briefly talk about the most often used administrative interface: SmartDashboard (a.k.a. the Policy Editor). The introduction of the NG version of FireWall-1 brought forth massive changes in all the Management GUI applications, but the most striking changes are in what Check Point now calls SmartDashboard. Figure 4.1 shows a sample of how it looks after you initially authenticate.
Figure 4.1. SmartDashboard
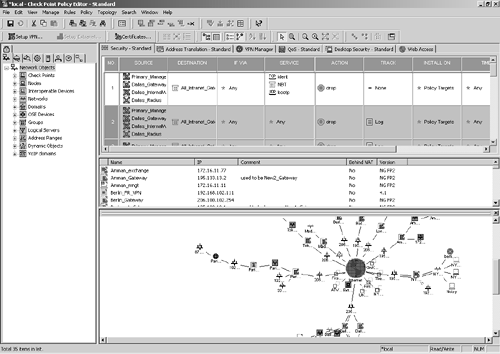
The familiar toolbar and menus are along the top. On the left, you see what is referred to as the objects tree. From here, you can see all the different types of objects, each in its own tab. Within these tabs, you can view the objects in a hierarchical fashion as well as create and edit the objects by right-clicking on the object or category and selecting the appropriate menu options. You can also drag and drop objects from this area into the rulebase, which is the top window in the main portion of the screen with headings such as Source, Destination, Service, Action, and so on.
Just below the rulebase, there is an area called the objects list. As you change to different categories in the objects tree, the objects list changes to give you a summary listing of all the objects of that category. Like the objects tree, you can right-click to create or edit an object as well as drag and drop objects into the rulebase.
Below the objects list is the Visual Policy Editor (VPE). From here, you can see the various objects you have created and how they interrelate with one another. You can move objects around in this view and connect them to other objects, creating a network map similar to what you would see in Visio or similar applications.
When you create gateways and define the interfaces they have, pseudo-objects get created for each network. VPE allows you to "actualize" these pseudo-objects into real objects by right-clicking on the object and selecting Actualize. This is one of my favorite features of VPE. Another nice thing is that VPE can be undocked from the main Policy Editor screen to give the other parts of the Policy Editor more room.
The downside to VPE is that it costs extra?it is not included with a basic FireWall-1 license.
Configuring Management Users via fwm or cpconfig
It is important to note that the users mentioned in this section can authenticate only to the Management GUIs. They do not in any way correspond to specific user accounts on the operating system or to users who authenticate for other services through the firewall. The latter type of users is discussed in Chapter 8.
In order to configure users for the Management GUIs, you can do one of the following things.
Add users via cpconfig.
Run fwm -a on the command line.
Add administrative users via the Policy Editor.
NOTE!
The user database in the Policy Editor is different from the database maintained by cpconfig or fwm. If a user exists in both databases, the user in the fwm database takes precedence. |
The permissions you can enter depend on which version of FireWall-1 you are using. You can assign permissions to not only FireWall-1/VPN-1 functions but also to other applications in the Check Point Suite. If you add a user via cpconfig on Windows NT, a screen that looks like Figure 4.2 appears (see the next subsection).
Figure 4.2. Managing users and administrators
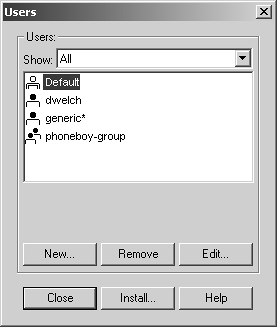
If you add a user via the command line, you will be prompted for the same permissions. Note that while I am using fwm commands in the following example, you would see essentially the same behavior if you ran cpconfig and selected the appropriate option to add users.
# fwm -a
Administrator name: dwelch
Password: abc123
Verify Password: abc123
Permissions for all Management Clients (Read/[W]rite All,
[R]ead Only All, [C]ustomized) w
Administrator dwelch was added successfully and has
Read/Write permission to all management clients
The preceding example creates a user who can do anything. The user being created in the following example can perform limited functions.
# fwm -a
Administrator name: jerald
Password: def456
Verify Password: def456
Permissions for all Management Clients (Read/[W]rite All,
[R]ead Only All, [C]ustomized) c
      Permissions for SecureUpdate (Read/[W]rite,
      [R]ead Only, [N]one) r
      Permissions for Check Point Users Database (Read/[W]rite,
      [R]ead Only) w
      Permissions for LDAP Users Database (Read/[W]rite,
      [R]ead Only, [N]one) w
      Permissions for Security Policy (Read/[W]rite,
      [R]ead Only, [N]one) w
      Permissions for QoS Policy (Read/[W]rite, [R]ead Only, [N]one) n
      Permissions for Monitoring (Read/[W]rite, [R]ead Only, [N]one) n
Administrator jerald was added successfully and has
Read Only permissions for SecureUpdate
Read/Write permissions for Check Point Users Database
Read/Write permissions for LDAP Users Database
Read/Write permissions for Security Policy
A password must be no more than eight characters in length. If you want to change the password of an existing user, run fwm -a again or use cpconfig to make the change. Table 4.1 lists some of the other command-line options for the fwm command.
Flag | Description |
|---|---|
-a foo | Adds or updates the username foo |
-s abc123 | Sets the user's password to abc123 (requires -a) |
-r foo | Removes the user foo |
-p | Prints a list of administrative (GUI) users |
-g rulebase.W | Imports the file rulebase.W into the rulebases.fws file, which contains all the rulebases on your management console |
Configuring Management Users via Policy Editor
In the NG version of FireWall-1, Check Point added the ability to manage management users via the Policy Editor application. You do this by either pulling down the Users and Administrator option from the Manage menu or clicking on the following icon in the objects tree: ![]() . If you did the latter, find the Administrators subtree, right-click with your mouse, and pull down New Administrator. If you did the former, you will see a screen like Figure 4.2. From here, push the New button and select Administrators. Either set of steps will get you to Figure 4.3.
. If you did the latter, find the Administrators subtree, right-click with your mouse, and pull down New Administrator. If you did the former, you will see a screen like Figure 4.2. From here, push the New button and select Administrators. Either set of steps will get you to Figure 4.3.
Figure 4.3. Administrator Properties, General tab

The login name is the name by which the user identifies him- or herself when logging into an administrative GUI. A permissions profile determines what permissions this administrative user has. Since no permissions profiles exist, we must create a new one. Click on the New button in the Administrator Properties window. Figures 4.4 and 4.5 show the Permissions Profile Properties, General tab and Permissions tab, respectively; these are fairly self-explanatory.
Figure 4.4. Permissions Profile Properties, General tab
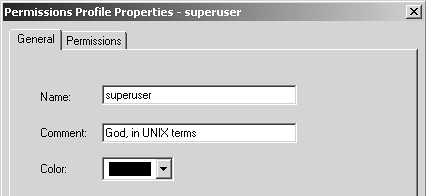
Figure 4.5. Permissions Profile Properties, Permissions tab

NOTE!
Administrative users cannot have the same name as normal users. They also cannot function as normal users (e.g., in user authentication). |
WARNING!
Be sure you get your permissions profile correct the first time. Once you create it, you will have no way to edit or remove it! |
After creating your permissions profile, set the Personal options for the administrative user, as shown in Figure 4.6.
Figure 4.6. Administrator Properties, Personal tab
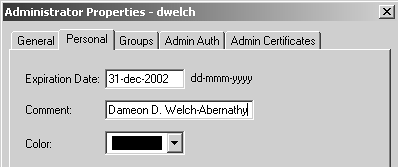
The important thing to set here is the expiration date for the user. Optionally, you can specify a comment or color. I prefer to put the real name associated with the user as a comment, but you can do anything you like.
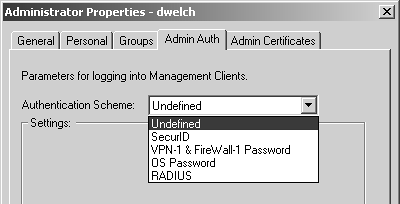
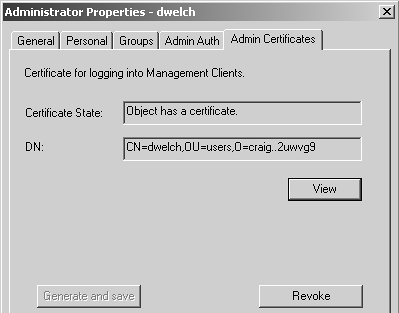
The next things to configure are the groups this user is in, how this user authenticates, and the user's certificate. These are shown in Figures 4.7 through 4.9. The authentication types shown in Figure 4.8 are explained in Chapter 8.
Figure 4.7. Administrator Properties, Groups tab
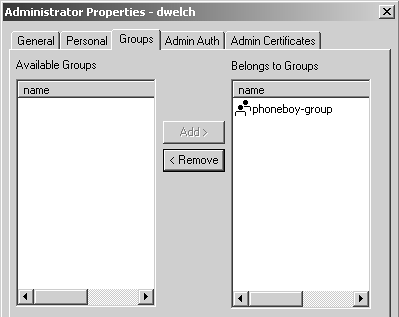
Figure 4.9. Administrator Properties, Admin Certificates tab

Figure 4.8. Administrator Properties, Admin Auth tab
When an administrative user has a certificate defined, the screen will look similar to Figure 4.10. The user presents that certificate during the initial authentication process with the GUI. If both an authentication scheme and a certificate are defined, either one can be used to authenticate to the Management GUIs.
Figure 4.10. Administrator Properties, Admin Certificates tab with certificate defined
Configuring Which Hosts Can Use Management GUIs
Once you know how to create a specific user for the Management GUIs, you need to tell your management console which IP addresses are allowed to use them. The IPs that are allowed to connect are configured in the file $FWDIR/conf/gui-clients. The file contains a simple list: one IP address or DNS hostname per line. You can specify a range of IP addresses using a * wildcard (e.g., 192.168.0.*).
The localhost (i.e., the management console) is always allowed to connect regardless of the contents of this file, although a proper username and password must still be entered.
NOTE!
Where the management console and firewall module are on the same system, if you use the "Accept VPN-1 & FireWall-1 control connections" property (discussed later in this chapter) to permit access via the SMART Clients, you will need to reinstall your security policy before any changes to $FWDIR/conf/gui-clients will take effect. |
NOTE!
When you use * as a wildcard in $FWDIR/conf/gui-clients, the "Accept VPN-1 & FireWall-1 control connections" property will not allow access to the management station. An explicit rule must be created, similar to what Figure 4.38 shows later in this chapter. |
Being able to manage your security policy from any machine on your internal network may be desirable. Listing all possible IPs your clients may come from may not be. A highly recommended way to get around the limitation is to install an SSH server on the management console and use port forwarding on the SSH client. Port forwarding works by forwarding data from a local port to the remote host or port. On your SSH client, you would configure the port forwarding as follows:
Local port 18190
Remote hostname is management-console
Report port is 18190
In your GUI, you would connect to localhost (127.0.0.1) instead of the management console's hostname or IP. Your SSH client will forward the communication over the SSH connection (which is, of course, encrypted) to the management console. The SSH daemon on the management console will then send the connection to port 18190 on the localhost. The management console will see the connection coming from localhost, which is always allowed.
Now you can effectively manage your FireWall-1 security policy from anywhere. While FireWall-1 now provides both strong encryption and authentication to the Management GUIs, this was not always the case. SSH also provides another encryption layer and strong authentication (using an RSA or DSA key). An alternative to SSH for people using Windows NT/2000 for a management console is ZeBeDee, which is similar to SSH in that it provides many of the same functions, but the client and the server run under both Windows and UNIX platforms.
Files Modified by SmartConsole
SmartConsole directly reads from and writes to the following files on the management console. If any of these files require manual editing, make sure that no one is connected via the GUI. You can do this by killing the fwm process via the command fw kill fwm.
$FWDIR/conf/objects_5_0.C: Your network objects and services
$FWDIR/conf/rulebases_5_0.fws: Your FireWall-1/VPN-1 rulebases
$FWDIR/conf/slprulebases_5_0.fws: Your Desktop Security policies for SecureClient (see Chapter 12)
$FWDIR/conf/fgrulebases_5_0.fws: Your FloodGate-1 policies
$FWDIR/conf/fwauth.NDB*: Your user database and encryption keys[1]
[1] On UNIX/IPSO platforms, fwauth.NDB is simply one file. On Windows NT, fwauth.NDB contains a number that points to a file named fwauth.NDBx.
The Management GUI also reads from, but does not directly write to:
$FWDIR/log/fw.log: Security policy log
$FWDIR/log/fw.alog: Accounting log
$FWDIR/log/fw.vlog: Active log
$FWDIR/log/fw.*ptr: Log pointer files
SmartDashboard/Policy Editor Restrictions
Only one user can be logged in to the Security Policy Editor in read-write mode at any given time. This prevents multiple managers from overwriting each other's changes. This also means that a user with only Users-Edit privileges can prevent an administrator with read-write from logging in using read-write mode. When this occurs, you will get the error message shown in Figure 4.11.
Figure 4.11. Logging into Management GUI when another administrator is connected

GUI Demonstration Mode
If you have to demonstrate FireWall-1 and do not have easy access to a management console, you can use a demonstration mode built into the Security Policy Editor and the Log Viewer. If you are using a pre-FP2 version of FireWall-1 NG, you can log in with any username and password to hostname *local.
This demonstration mode allows you to work with the files installed in the same directory as your GUI. They are demo versions of objects_5_0.C, rulebases_5_0.fws and other files. Although not all parts of the GUI will be available in demonstration mode, it is perfect for demonstrating the GUI to others without having to use it on a live system.[2] It is also possible to edit objects via the GUI or replace the included demo files with your own. The files you need to modify include but may not be limited to the following.
[2] Many of the screenshots generated for this book were done in demonstration mode.
rules.fws: Contains all defined rulebases. It is exactly the same format as $FWDIR/conf/rulebases.fws on the management console.
objects.fws: Contains all users and services. It is exactly the same format as $FWDIR/conf/objects.C on the management console.
users.fws: Contains users and groups for the demo rulebases. Note that this file is of a different format than $FWDIR/conf/fwauth.NDB. To get a feel for the format, create some users in *local mode and view the file.
lv_recs.fws: Contains demonstration log entries.


