Highly Availabile Management Modules
While Check Point has allowed highly available firewalls since the version 3.0 days, only with FireWall-1 NG has Check Point supported a way to create a highly available management station, though it does come at the cost of an additional management license. The management module machines should not also be configured as firewall machines, that is, as a distributed management setup at the same software version as the primary, including any hotfixes.
When you install FireWall-1 on the secondary management module, it should use the same operating system as your primary management module. You should also choose the module type as Secondary Management. In this kind of installation, the only major question you are asked is to provide an OTP. As for a firewall module, this is how the primary management module will authenticate itself to this secondary module.
On the primary management station, use the Policy Editor/SmartDashboard application to create a new object of type Check Point host. The object will look similar to Figure 7.4. The key thing to select in this screen is Secondary Management Station.
Figure 7.4. Secondary management object
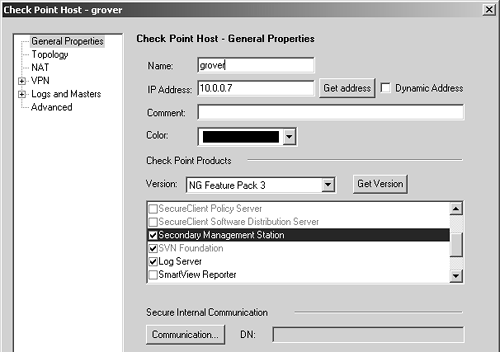
Next, you should establish SIC with the secondary management station. Click on the Communication button and type in the OTP you defined on the secondary management station. Click Initialize. SIC should now be established.
From the Manage menu, select Management High Availability. A window similar to Figure 7.5 appears.
Figure 7.5. Preparing to manually sync the management modules
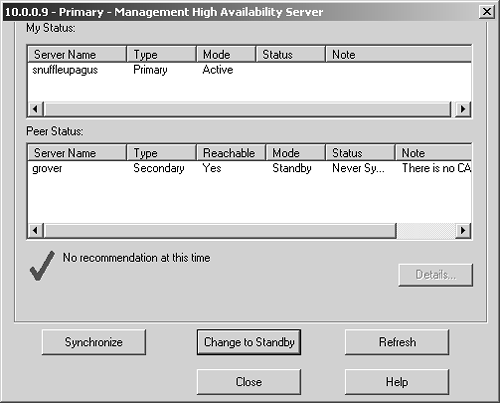
You can see that the management stations shown in Figure 7.5 have never been synced. Click on the Synchronize button. A window will pop up, giving you two options.
Synchronize Configuration Files Only: This synchronizes only the database and configuration files.
Synchronize Fetch, Install, and Configuration Files: In addition to the database and configuration files, this option synchronizes files that will allow the managed firewall modules to fetch their security policies from the secondary management station. This happens only if the modules are configured to use the secondary management station as one of its masters.
For the purposes of discussion, choose the second option. Click OK. After several minutes, depending on the speed of the link between the management stations, you will see the peer status changed to Synchronized.
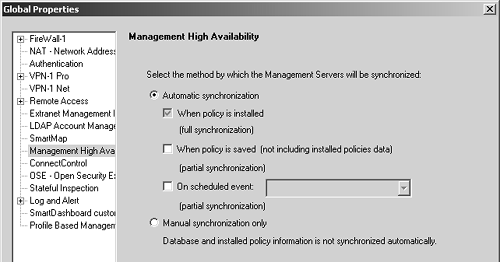
By default, the management stations will synchronize anytime a policy is loaded to a firewall module. In the Global Properties section under the Management High Availability frame, pictured in Figure 7.6, you can choose additional options. The options here include three that relate to automatic synchronization and one for manual.
When policy is installed: This option is always checked when automatic synchronization is specified. This synchronizes all management module data when the policy is installed to a module.
When policy is saved: This option causes all database and configuration files to be synchronized when the Save button is clicked in SmartDashboard/Policy Editor. This does not include data on policies currently installed on modules. As such, this is a partial synchronization.
On scheduled event: This option allows you to specify a time object that indicates when a partial synchronization will occur.
Manual synchronization only: With this option selected, no data will be automatically synchronized between the management stations. All synchronization must be done manually as described previously.
Figure 7.6. Global Properties, Management High Availability frame
WARNING!
Neither synchronization mode will synchronize manual changes to any .def files. Make sure that any changes made on one management module are also made on the other. |
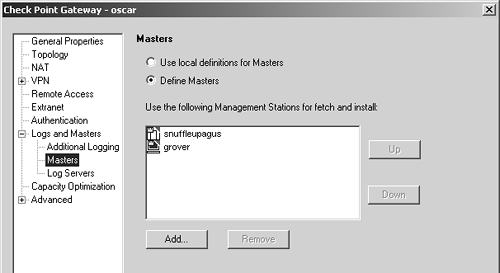
To ensure that either management module can push a policy to the firewall module, the gateway object must be configured for both management stations. This is done in the gateway object in the Masters subsection of the Logs and Masters frame, as shown in Figure 7.7.
Figure 7.7. Gateway object, Logs and Masters, Masters subsection
Similarly, if you want to be able to view logs on either management module, the gateway object needs to be configured accordingly. This is done in the Log Servers subsection of the Logs and Masters frame, as shown in Figure 7.8.
Figure 7.8. Gateway object, Logs and Masters, Log Servers subsection
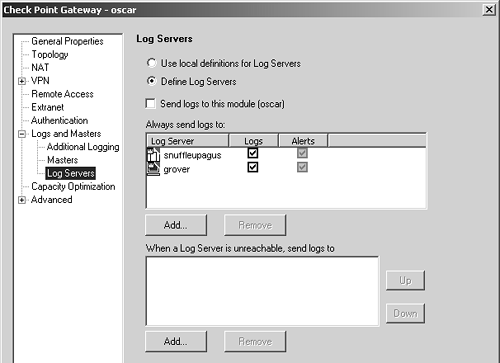
Once these changes are made, the policy will need to be reinstalled on the firewall module.
Failing Over to the Secondary Management
You can manually switch the primary management station into Standby mode by going to the Manage menu in SmartDashboard/Policy Editor and selecting Management High Availability. In the dialog that appears, click the Change to Standby button. Then you can log into the secondary management station with SmartDashboard/Policy Editor and everything will work as if you are on the primary management station.
Of course, you rarely switch over your management station because you plan to. Usually, your primary management station goes down due to a hardware failure, a power failure, or some other unforeseen event. In this case, you can log into the secondary management module using SmartDashboard/Policy Editor and change to Active mode. Figure 7.9 shows the dialog that comes up after logging into the secondary management station with SmartDashboard/Policy Editor while the primary management station is down.
Figure 7.9. Connecting to the secondary management station when the primary one is down
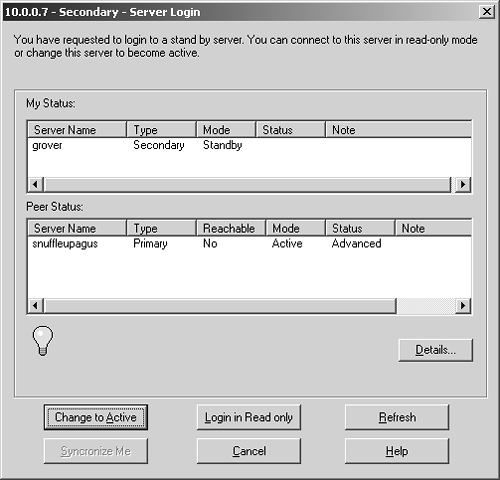
As you can see in Figure 7.9, the primary management station, snuffleupagus, is down. When you click on the Change to Active button, the secondary management module will attempt to become active. This process may take a few minutes because the secondary management module will attempt to notify the primary management module, which will fail because it is offline.
Once the primary module comes back online, it too will believe it is in master state. This is not good. If changes were made on the secondary management module, you will need to first log into the primary management station with SmartDashboard/Policy Editor and switch it to Standby mode, then log into the secondary management station, synchronize with the primary, and change the secondary to Standby mode. That will get all the changes to the primary and make it the currently active management station.
I found that in order to change the management stations to Standby mode, I needed to kill the fwm process, and manually restart it; otherwise I would get an error message, "A Read/Write Management client is connected." You can kill the fwm process and restart it with the following two commands:
# fw kill fwm
# fwm
WARNING!
If you made changes on the secondary management station and then initiate a synchronize action from the primary management station, all changes on your secondary module will be overwritten! |


