Clientless VPN
Clientless VPN is becoming increasingly popular. The idea is to use a Web browser to provide access to an intranet, which many people already have installed on their computers for surfing the Internet. Unfortunately, this means you can access only Web-enabled applications. For some organizations, this is enough.
FireWall-1 has actually had the basic functionality for Clientless VPN since FireWall-1 4.1, though the feature was never called that and it was never enabled via the GUI. In NG FP3, Check Point added a GUI option for Clientless VPN under the VPN Advanced frame of the gateway object. In NG FP2 and before, you can enable the functionality as follows.
Add the following entry to $FWDIR/conf/fwauthd.conf on your firewall module:
443 fwssd in.ahttpsd wait 443 ec
Stop the firewall with the command cpstop.
Modify the prompt_for_destination property to be true instead of false. You can do this by using dbedit or the GUIdbedit tool, or by manually editing objects_5_0.C. (See FAQ 4.2 for details.) The dbedit commands for this are:
dbedit> modify properties firewall_properties
               prompt_for_destination true
dbedit> update properties firewall_properties
Restart the firewall with the command cpstart.
Reinstall the security policy.
There are two ways to access Clientless VPN:
Access sites directly via HTTPS as if they were available on the Internet (e.g., https://wacko.animaniacs.com).
Access sites via the firewall using HTTPS (e.g., https://firewall.animaniacs.com/wacko). This is best described as the reverse proxy method.
In either case, you need to create a rule similar to the one shown in Figure 8.50. You must also open up the service definition for HTTPS, go to the Advanced section, and change the protocol type to HTTP.
Figure 8.50. Sample rule for Clientless VPN
![]()
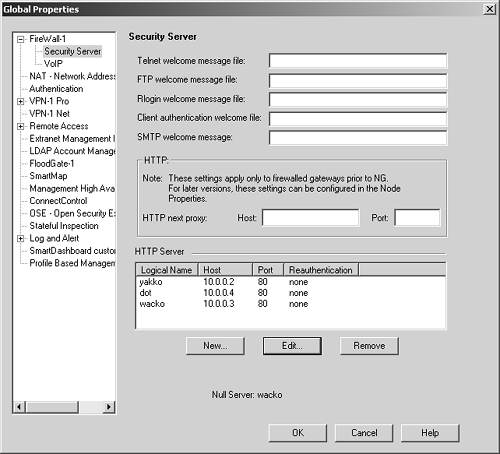
If you decide to go the reverse proxy route, which you would want to do if not all the Web servers you want to access have a public IP associated with them, you will need to go to the Security Server frame under Global Properties. Figure 8.51 shows this screen, which includes a section called HTTP Server. Each server needs to be added to this screen.
Figure 8.51. Global Properties, Security Server frame

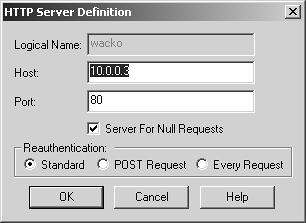
Let's assume the firewall has the FQDN hellonurse.animaniacs.com and that three servers need to made accessible: yakko, dot, and wacko. Each one is defined as an HTTP server. The properties for each of these HTTP servers are similar to what is shown in Figure 8.52. The fields on the HTTP Server Definition screen are described below.
Logical Name: Enter the name you want to give the logical server. The server will be accessible as http://firewall-name/logical-name. In the case of Clientless VPN, it's actually https://firewall-name/logical-name.
Host: Indicate the hostname or IP address of the host that FireWall-1 will connect to when this logical server is accessed.
Port: Indicate the port of the host to access using the host in the previous field.
Server For Null Requests: You can define only one logical server in this manner. Simply accessing http://firewall-name can access the server that is the null server.
Reauthentication: You can ask for authentication according to the normal rules. You can also ask for authentication on every request or ask for authentication only on a POST command.
Figure 8.52. HTTP Server Definition

After all three servers are defined, this information appears in the HTTP Server section of the Security Server frame as shown in Figure 8.51. The servers will be accessible via the URLs listed in Table 8.2. The rule shown in Figure 8.50 enables access to these servers.
Site | URL through Firewall |
|---|---|
yakko | https://hellonurse.animaniacs.com/yakko |
wacko | https://hellonurse.animaniacs.com/wacko |
dot | https://hellonurse.animaniacs.com/dot |
NOTE!
The "none" value in Figure 8.51 corresponds to Standard Reauthentication. |
Known Issues with Clientless VPN
Two issues that come up with Clientless VPNs?issues related to the use of Outlook Web Access and the use of the Netscape/Mozilla browser with certificate-based authentication?can be corrected with some minor changes. Perform the following steps to resolve these problems.
Enter the following commands in dbedit or use the GUIdbedit tool. See FAQ 4.2 for details.
dbedit> modify properties firewall_properties
        http_allow_content_disposition true
dbedit> modify properties firewall_properties
        enable_propfind_method true
dbedit> modify properties firewall_properties
               cert_req_ext_key_usage 1
dbedit> update properties firewall_properties
http_allow_content_disposition enables the use of the Content-Disposition header in FireWall-1, which is usually dropped by default. enable_propfind_method enables extended methods (i.e., other than GET, HEAD, and so on) used by Outlook Web Access, which are not accepted by default. cert_req_ext_key_usage allows FireWall-1 to accept the kinds of certificate requests used by the Netscape/Mozilla browser.
Modify $FWDIR/conf/InternalCA.C on the management station. Add the following property:
:ike_cert_extended_key_usage (1)
Perform a cprestart on the management and firewall modules.
Generate a new VPN certificate for the gateway.
Edit the gateway object in the VPN Advanced frame and specify the newly generated certificate as the certificate to use.
Reinstall the security policy on your modules.


