Integrating External Authentication Servers
The following subsections describe how to integrate the various supported authentication servers with FireWall-1.
Integrating SecurID
SecurID supports native ACE mode (a proprietary mechanism) and authentication via the RADIUS protocol. The following instructions apply to setting up native ACE mode.
WARNING!
Although FireWall-1 4.1 supported native ACE mode, versions of FireWall-1 NG prior to FP3 did not include full support for native ACE mode on all platforms. Check Point came out with a hotfix to FP2 on Solaris, Windows, and Linux that fixed several issues with SecurID authentication. Native ACE mode was not supported on IPSO at all until FP3. If using NG FP0, FP1, or FP2, it is recommended that you use RADIUS mode to provide SecurID authentication. |
To configure FireWall-1 for SecurID authentication, you simply need to copy the sdconf.rec file from the ACE/Server to /var/ace/sdconf.rec on UNIX or IPSO or to %SystemRoot%\System32\sdconf.rec on Windows NT. Generating a proper sdconf.rec file on the ACE/Server is the tricky part of this process.
Your firewall will be defined as an ACE/Client within the ACE/Server. Be sure that the client hostname and IP address of the firewall defined in the ACE/Server agree with the firewall's own definitions. This means that the client hostname specified should be the same as the UNIX, Windows NT, or IPSO command hostname and that the IP address that this name resolves to is the same on both systems. The other IP addresses associated with the firewall should be listed as Secondary Nodes, which must be listed in order for the ACE/Server to accept authentication requests from the firewall. For IPSO systems, do not include the VRRP IP addresses. In addition, if using version 5.0 or later of the ACE/Server, you will need to define legacy-mode authentication that supports a defined primary server and a backup server.
SecurID is a predefined group of services. SecurID uses UDP port 5500 and TCP port 5510.
Integrating RADIUS
FireWall-1 works with RADIUS version 1 and version 2 servers. The following subsections provide an example of how to configure a UNIX-based RADIUS server to support FireWall-1.
Adding a Firewall to RADIUS Server's Clients File
The clients file (in /etc/raddb on UNIX stations) contains entries of the following format:
radius-client shared-secret
The radius-client in this case is your firewall. Note that this name should reflect the hostname your firewall resolves as on your RADIUS server. You may need to do some debugging to determine the correct hostname.
The shared-secret is a password that both the RADIUS client (your firewall) and the RADIUS server will use for encryption when communicating with each other. In FireWall-1 3.x, shared secrets beginning with a number or the letter f have problems.
Adding Users in RADIUS Server's Users File
You may not need to add users in the users file if you already have existing RADIUS users in your database file (typically in /etc/raddb on UNIX). If you are setting up new users, your user entries should look something like this:
phoneboy     Password = "abc123", Expiration = "Dec 31 2005"
             User-Service-Type = Login-User
Note that you can put other entries in the users file that are not used by FireWall-1. The only entries that FireWall-1 cares about are the entries listed above. Note that if you install a RADIUS server on a UNIX or Windows machine and you want to use the existing users configured in the operating system for authentication, make sure you have an entry in the users file that looks similar to this:
DEFAULT Auth-Type = System, User-Service-Type = Login-User
Creating a RADIUS Service (Optional)
You can use RADIUS on a nonstandard port. You will need to create a new RADIUS service as appropriate. The default port for RADIUS is UDP 1645.
Creating a RADIUS Server Object
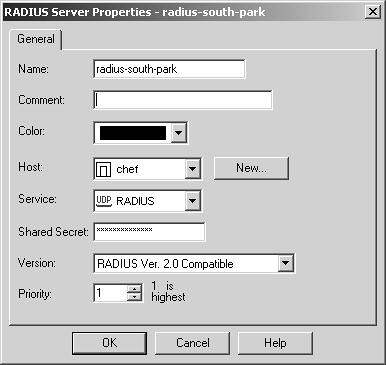
You need to create a workstation object for your RADIUS server in your Security Policy Editor. You then need to create a new server object of type RADIUS. The dialog in Figure 8.39 shows the General tab for RADIUS Server Properties. The fields on this screen are described as follows.
Name: Enter the name you want to give the object. It should be unique.
Comment: Enter any information you would like in this field.
Color: Select whichever color is appropriate.
Host: Indicate the workstation object on which the RADIUS server runs.
Service: Indicate the port on which RADIUS runs. By default, this is port 1645 (i.e., the default RADIUS port).
Shared Secret: Indicate the shared secret. This should match the shared secret configured on the RADIUS server.
Version: Choose the appropriate version of the RADIUS server.
Priority: If you have multiple RADIUS servers, you can prioritize the order in which they are queried. The default is 1, which is the highest priority, meaning it will be queried first. Check Point recommends having only one server defined with each priority.
Figure 8.39. RADIUS Server Properties, General tab
Once you have completed these fields, you should be able to create users of type RADIUS.
Integrating TACACS/TACACS+
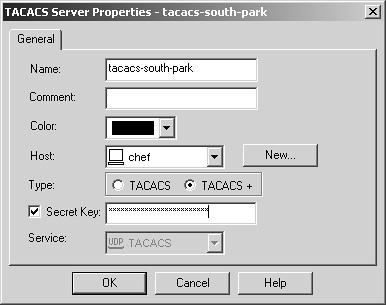
The TACACS configuration is very similar to RADIUS, although it is much simpler. You must configure a server object of type TACACS after defining the workstation object on which your TACACS server runs (see Figure 8.40). The fields on this screen are described as follows.
Name: Enter the name you want to give the object. It should be unique.
Comment: Enter any information you would like in this field.
Color: Select whichever color is appropriate.
Host: Indicate the workstation object on which the TACACS server runs.
Type: Choose TACACS or TACACS+ as necessary.
Secret Key: If the checkbox is activated and TACACS+ is being used, enter the secret key. This should be the same as the NAS Key defined on your TACACS+ server.
Service: Indicate the port on which TACACS is used. (This option is active only when TACACS is being used.)
Figure 8.40. TACACS Server Properties, General tab
Once you have completed these fields, you should be able to create users of type TACACS.
NOTE!
TACACS uses UDP port 49, and TACACS+ uses TCP port 49. |
Integrating LDAP
In order to integrate FireWall-1 into an LDAP server, you need to have certain items.
The suffix of the directory. Your LDAP administrator should be able to tell you the suffix of the directory. For the following examples, I will use "o=acmelabs, c=us".
An account on the LDAP server that has at least read access to the parts of the directory FireWall-1 will use.
If you want to use SmartDashboard/Policy Editor to edit users on the LDAP server, you need an account with read-write access on the LDAP server.
Once you have this information, you will want to configure the LDAP server with the schema for FireWall-1. Note that although you could simply disable schema checking, this makes your directory far less manageable. Schema checking ensures that the data you import into the directory server follows a particular format. Check Point includes a schema file in $FWDIR/lib/ldap/schema.ldif. However, it is coded in an LDAP Data Interchange Format (LDIF) file and thus can only be imported into directory servers that support modifying schemas via an LDIF file. A separate schema file is provided for Microsoft Active Directory in Windows 2000 at $FWDIR/lib/ldap/schema_microsoft_ad.ldif. Current versions of Netscape Directory Server (and possibly others) support this using the following command:
$ ldapmodify -D "cn=root" -w password -f schema.ldif
When using this command, replace cn=root with your rootdn name, and replace password with your actual password. The output of this command should continually print "modifying entry cn=schema" over and over without any errors.
Other LDAP servers, such as OpenLDAP versions 1 and 2, do not support schema modifications in this manner. As a result, you have to modify your schema so that it includes the FireWall-1 schema. Instructions on how to do this are provided in Appendix C for OpenLDAP version 1 and Appendix D for OpenLDAP version 2.[3]
[3] All of the LDAP examples in this book were done against an OpenLDAP server.
WARNING!
OpenLDAP is not considered an OPSEC-compliant LDAP server. This means if you call Check Point with a problem regarding communication with an OpenLDAP server, Check Point will likely refuse to support you. This being said, OpenLDAP appears to work well for many users, and Check Point even includes instructions for integrating OpenLDAP with FireWall-1 on the support site. |
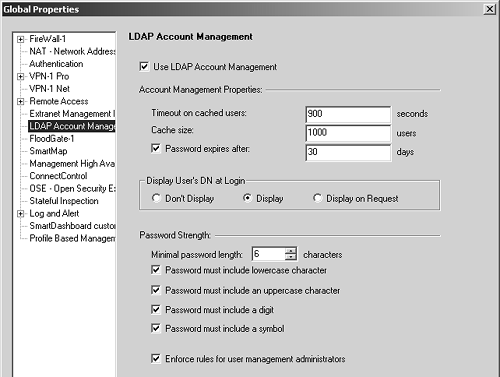
Once all of the previous requirements are met, you can begin to configure FireWall-1 to use LDAP. The first change you need to make is in the LDAP Account Management frame of the Global Properties section (see Figure 8.41). In this frame you can set the following options.
Use LDAP Account Management: Select this checkbox if you want to allow FireWall-1 to use LDAP. All other options on this screen will be dimmed if this is unchecked.
Timeout on cached users: This value indicates the amount of time FireWall-1 will cache an entry it has read from the LDAP server before it attempts to reread the entry from the LDAP server.
Cache size: This value indicates the number of users FireWall-1 will attempt to keep cached in memory.
Password expires after: If this option is checked, LDAP users will be forced to change their passwords after the specified number of days.
Display User's DN at Login: If you choose Display in this section, you will be able to see your full Distinguished Name as defined in the LDAP server (e.g., "cn=pinky, o=acmelabs, c=us"). This allows you to verify that you are authenticating against the correct record in the LDAP database; thus it's a useful diagnostics tool.
Password Strength: This section presents various options for enforcing strong passwords. These options apply only when a user changes his or her password.
Enforce rules for user management administrators: If this property is selected, the Password Strength rules will be enforced when the administrator creates or modifies a VPN-1 & FireWall-1 Password.
Figure 8.41. Global Properties, LDAP Account Management tab
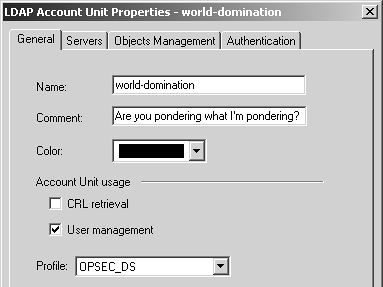
Once you have configured these properties, you can then define an LDAP account unit, which is created as a server object. The screens used to create an LDAP account unit start with Figure 8.42. The General tab includes the following items.
Name: Enter the name you want to give to the LDAP account unit. It should be unique.
Comment: Enter any information you would like in this field.
Color: Select the appropriate color.
Account Unit Usage: You can use the Certificate Revocation Lists (CRLs are used in a Public Key Infrastructure) stored in the LDAP server. If you are using only the CRL retrieval function, you do not need to fill in the login DN or password because CRLs can be obtained through an anonymous bind with the LDAP server. The User management option allows you to use accounts stored in the LDAP server for authentication.
Profile: This field specifies the kind of LDAP server you are authenticating against. The options are Microsoft_AD (Microsoft Active Directory), Netscape_DS (Netscape/iPlanet Directory Server), Novell_DS (Novell Directory Server), and OPSEC_DS (all other directory servers). For OpenLDAP, use OPSEC_DS.
Figure 8.42. LDAP Account Unit Properties, General tab
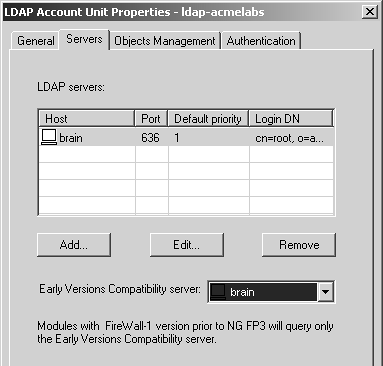
The Servers tab (see Figure 8.43) allows you to define the LDAP servers that make up this account unit. You may include any number of LDAP servers you have defined by clicking on the Add button. The assumption is that all LDAP servers in this account unit will have the same data (i.e., they are replicas of each other). For modules running versions of FireWall-1 prior to FP3, only one of the LDAP servers in this account unit will actually be used. You can select which one in this screen.
Figure 8.43. LDAP Account Unit Properties, Servers tab
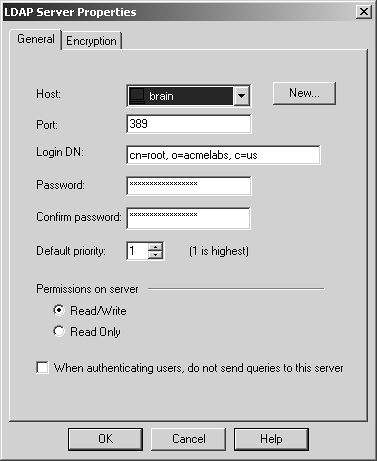
If you add an account unit, you will see a screen similar to Figure 8.44. You can select the following options on this tab.
Host: In this field, select the host object on which the LDAP server runs.
Port: This field indicates the port on which the LDAP server expects unencrypted communication. The default is port 389.
Login DN: This field shows the distinguished name that will be used by FireWall-1 to log into the LDAP server.
Password: Enter in this field the password that will be used by FireWall-1 to log into the LDAP server. A second password field is presented so you can validate the password you typed.
Default priority: This value reflects the priority relative to all other LDAP servers that serve this account unit. The highest priority value is 1.
Permissions on server: These options indicate the permissions that the DN used by FireWall-1 to log into the LDAP server will have. The DN need not have read/write permission unless you wish to use SmartDashboard/Policy Editor to manage users on the LDAP server.
When authenticating users, do not send queries to this server: This options tells FireWall-1 not to use this particular LDAP server to authenticate users. This is useful when an LDAP server goes temporarily offline.
Figure 8.44. LDAP Server Properties, General tab
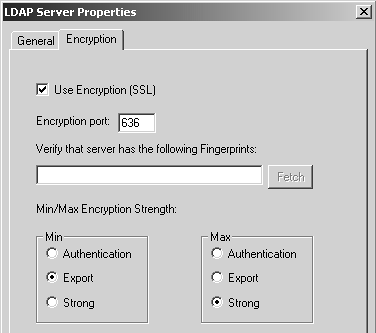
If you wish to communicate with the LDAP server using SSL, go to the Encryption tab (see Figure 8.45). Here you can set the following properties.
Use Encryption (SSL): If you need to use SSL to access your LDAP server, select this checkbox.
Encryption port: Indicate the port used to make the encrypted connection to the LDAP server. The default is port 636.
Verify that server has the following Fingerprints: Because FireWall-1 does not use a certificate authority to verify keys, you should obtain the server key fingerprints via some non-network method and enter them in this box. If you do not, FireWall-1 will fill in this information the first time an SSL connection is made to the LDAP server. On subsequent attempts to connect, FireWall-1 compares what it receives with what is in this box and displays an error message if there is a discrepancy.
Min/Max Encryption Strength: Set the minimum and maximum levels of encryption you want to allow for the SSL connection to the LDAP server. Export refers to 40-bit encryption. Strong refers to 128-bit encryption. Authentication means effectively no encryption.
Figure 8.45. LDAP Server Properties, Encryption tab
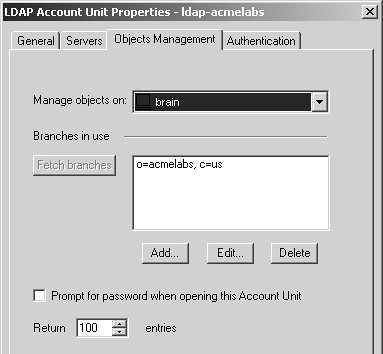
After adding all the LDAP servers that support the account unit, you need to tell FireWall-1 what branches in the LDAP database to use. This is done via the Objects Management tab in the LDAP Account Unit Properties frame, shown in Figure 8.46. You can set the following options in this tab.
Manage objects on: If you are using multiple LDAP servers for this account unit and will be managing users via SmartDashboard/Policy Editor, this field should point to the LDAP server that is the master, that is, not the replica servers.
Branches in use: Specify in which branches of the LDAP server to look for users.
Prompt for password when opening this Account Unit: If you do not feel comfortable storing the password for your administrative login to the LDAP server, check this box. This means a password will be required anytime you want to use SmartDashboard/Policy Editor to edit objects on the LDAP server.
Return X entries: If an LDAP query could potentially return lots of entries, this option will limit how many entries will be returned.
Figure 8.46. LDAP Account Unit Properties, Objects Management tab
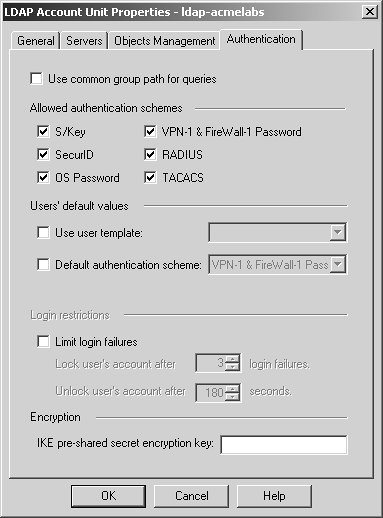
The Authentication tab is shown in Figure 8.47. This tab contains several properties.
Use common group path for queries: If an account unit is made up of several branches, selecting this option optimizes the query to the LDAP server so that only the common elements of those branches are queried.
Allowed authentication schemes: This section defines the authentication schemes this account unit will allow. It is very similar to the specifications listed in the Gateway Properties screen for your firewall object(s).
Use user template: If an LDAP server being used does not contain information specific to FireWall-1, the missing information is filled in from the specified user template when this option is checked. Be careful to ensure that the template does not contain user-specific information (e.g., IKE with pre-shared secrets should be different for each user). If your template contains VPN-1 & FireWall-1 Password as an authentication scheme, this will be mapped to the normal LDAP password for that user.
Default authentication scheme: This is similar to the previous option except that only authentication-specific information is defined. If you select RADIUS or TACACS, you will be prompted for the RADIUS or TACACS server to use. As with the previous option, VPN-1 & FireWall-1 Password maps to the normal LDAP password. S/Key is not allowed as an option because more information is needed to establish an S/Key chain.
Limit login failures: If this box is checked, a user who fails to authenticate properly the specified number of times will have his or her account temporarily locked for the specified amount of time.
IKE pre-shared secret encryption key: When IKE pre-shared secrets are defined in the LDAP server, they are stored encrypted. The value in this field is the encryption key used to store those secrets in the LDAP server.
Figure 8.47. LDAP Account Unit Properties, Authentication tab
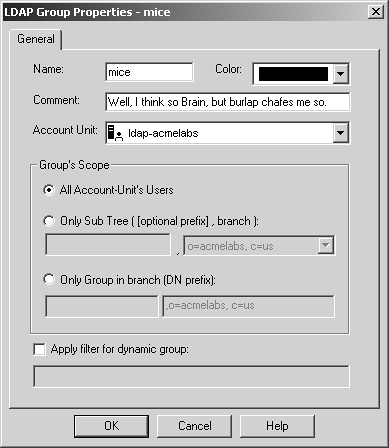
Once you have defined the LDAP account unit, you then need to create an LDAP group via the Manage Users interface (from the Manage menu, select Users) or from the objects tree view. Figure 8.48 shows the General tab for the Group Properties screen, which includes the following properties.
Name: Enter the name you want to give this external group.
Color: Choose the appropriate color for this group.
Comment: Enter any information you would like in this field.
Account Unit: Choose the LDAP account unit you defined earlier.
Group's Scope: You can further narrow the account unit specified by designating either a certain subtree or an existing LDAP group using a DN prefix.
Apply filter for dynamic group: You may specify additional LDAP criteria to filter against in this box. For example, you can check to see if certain fields contain certain values (e.g., "objectClass=myObject or mail=*.us.acmelabs.com").
Figure 8.48. LDAP Group Properties, General tab
Once you have completed these fields, you can create a rule in terms of this new external group (see Figure 8.49).
Figure 8.49. Sample authentication rule with LDAP group
![]()


